User Guide
Page 4
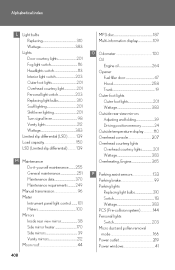
... Tires ...275 Tire inflation pressure...285 Wheels...289 Air conditioning filter...291 Electronic key battery ...293 Checking and replacing fuses...295 Headlight aim...309 Light bulbs...310 • Bottle holders/door pockets ...209 3-5. Essential information...318 If your vehicle needs to be towed ...318 If you think something is wrong ...325...
... Tires ...275 Tire inflation pressure...285 Wheels...289 Air conditioning filter...291 Electronic key battery ...293 Checking and replacing fuses...295 Headlight aim...309 Light bulbs...310 • Bottle holders/door pockets ...209 3-5. Essential information...318 If your vehicle needs to be towed ...318 If you think something is wrong ...325...

User Guide
Page 114
2-1. n If the indicators flash faster than usual Check that a light bulb in IG-ON mode. Move and hold the lever partway to signal a lane change The left hand signal will flash until you release the lever. Driving procedures Turn signal lever Left turn Right turn signal lights has not burned out. 98 n Turn signals can be operated when The engine switch is in the front or rear turn Move and hold the lever partway to signal a lane change The right hand signal will flash until you release the lever.
2-1. n If the indicators flash faster than usual Check that a light bulb in IG-ON mode. Move and hold the lever partway to signal a lane change The left hand signal will flash until you release the lever. Driving procedures Turn signal lever Left turn Right turn signal lights has not burned out. 98 n Turn signals can be operated when The engine switch is in the front or rear turn Move and hold the lever partway to signal a lane change The right hand signal will flash until you release the lever.
User Guide
Page 321
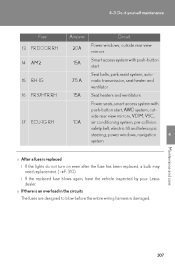
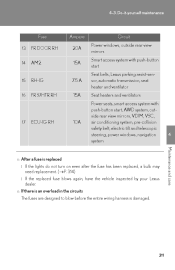
... 17 ECU-IG RH 10A 4 Maintenance and care n After a fuse is damaged. 307 4-3. l If the replaced fuse blows again, have the vehicle inspected by your Lexus n If there is an overload in the circuits The fuses are designed to blow before the entire wiring harness is replaced l If the lights do...
... 17 ECU-IG RH 10A 4 Maintenance and care n After a fuse is damaged. 307 4-3. l If the replaced fuse blows again, have the vehicle inspected by your Lexus n If there is an overload in the circuits The fuses are designed to blow before the entire wiring harness is replaced l If the lights do...

User Guide
Page 324
Check the wattage of the light bulb being replaced. (→P. 383) n Remove the engine compartment cover. →P. 263 n Front bulb locations Parking light Headlight high beam n Rear bulb locations Back-up light Rear turn signal light 310 Do-it-yourself maintenance Light bulbs You may replace the following bulbs yourself. For more information about replacing other light bulbs, contact your Lexus dealer. n Prepare a replacement light bulb. 4-3.
Check the wattage of the light bulb being replaced. (→P. 383) n Remove the engine compartment cover. →P. 263 n Front bulb locations Parking light Headlight high beam n Rear bulb locations Back-up light Rear turn signal light 310 Do-it-yourself maintenance Light bulbs You may replace the following bulbs yourself. For more information about replacing other light bulbs, contact your Lexus dealer. n Prepare a replacement light bulb. 4-3.

User Guide
Page 325
Do-it-yourself maintenance Replacing light bulbs n Headlight high beams STEP 1 Release the lock and remove the cover. STEP 2 Turn the bulb base counterclockwise. 4 Maintenance and care STEP 3 Unplug the connector while depressing the lock release. 311 4-3.
Do-it-yourself maintenance Replacing light bulbs n Headlight high beams STEP 1 Release the lock and remove the cover. STEP 2 Turn the bulb base counterclockwise. 4 Maintenance and care STEP 3 Unplug the connector while depressing the lock release. 311 4-3.

User Guide
Page 326
Do-it-yourself maintenance n Parking lights STEP 1 Release the lock and remove the cover. STEP 2 Turn the bulb base counterclockwise. n Back-up light STEP 1 Open the trunk door and remove the trunk panel cover clips. 312 STEP 3 Remove the light bulb. 4-3.
Do-it-yourself maintenance n Parking lights STEP 1 Release the lock and remove the cover. STEP 2 Turn the bulb base counterclockwise. n Back-up light STEP 1 Open the trunk door and remove the trunk panel cover clips. 312 STEP 3 Remove the light bulb. 4-3.

User Guide
Page 327
STEP 3 Remove the light bulb. 4 n Rear turn bulb bases counterclockwise. STEP 2 Turn the bulb base counterclockwise. 313 4-3. Do-it-yourself maintenance STEP 2 Partly remove the trunk panel cover and turn signal lights Maintenance and care STEP 1 Open the trunk door and remove the cover.
STEP 3 Remove the light bulb. 4 n Rear turn bulb bases counterclockwise. STEP 2 Turn the bulb base counterclockwise. 313 4-3. Do-it-yourself maintenance STEP 2 Partly remove the trunk panel cover and turn signal lights Maintenance and care STEP 1 Open the trunk door and remove the cover.

User Guide
Page 328
Do-it . n Bulbs other than the above If any of the bulbs listed below has burnt out, have your Lexus dealer replace it -yourself maintenance STEP 3 Remove the light bulb. 4-3. l Headlight low beams (halogen bulbs) l Headlight high and low beams (discharge bulbs) l Front fog lights l Front turn signal lights l Front side marker lights l Stop/tail lights l Tail lights l Rear side marker lights l High mounted stoplight l License plate lights 314
Do-it . n Bulbs other than the above If any of the bulbs listed below has burnt out, have your Lexus dealer replace it -yourself maintenance STEP 3 Remove the light bulb. 4-3. l Headlight low beams (halogen bulbs) l Headlight high and low beams (discharge bulbs) l Front fog lights l Front turn signal lights l Front side marker lights l Stop/tail lights l Tail lights l Rear side marker lights l High mounted stoplight l License plate lights 314

User Guide
Page 329
...bulbs, make sure to the light bulbs. l Water has built up on , or may go out temporarily. Maintenance and care 315 n Discharge headlights 4 If voltage to the discharge bulbs is restored. The discharge bulbs... will come on when normal power is insufficient, the bulbs may not come on the inside the headlight. l... Do-it-yourself maintenance n When replacing the front left headlight and parking light bulbs Remove the securing bolt and move the washer fluid filler opening to allow easy ...
...bulbs, make sure to the light bulbs. l Water has built up on , or may go out temporarily. Maintenance and care 315 n Discharge headlights 4 If voltage to the discharge bulbs is restored. The discharge bulbs... will come on when normal power is insufficient, the bulbs may not come on the inside the headlight. l... Do-it-yourself maintenance n When replacing the front left headlight and parking light bulbs Remove the securing bolt and move the washer fluid filler opening to allow easy ...

User Guide
Page 330
... attempt to repair or disassemble light bulbs, connectors, electric circuits or component parts. Hold the bulb by electric shock. If the bulb is momentarily generated and may damage ...not touch the glass portion of the light bulb with bare hands. n To prevent damage or fire Make sure bulbs are turned on the lens. The bulbs become very hot and may result in ...-yourself maintenance CAUTION n Replacing light bulbs l Turn off the headlights. l Do not attempt to replace the bulb immediately after turn- ing off the headlights. l Fully install light bulbs and any parts used to do so...
... attempt to repair or disassemble light bulbs, connectors, electric circuits or component parts. Hold the bulb by electric shock. If the bulb is momentarily generated and may damage ...not touch the glass portion of the light bulb with bare hands. n To prevent damage or fire Make sure bulbs are turned on the lens. The bulbs become very hot and may result in ...-yourself maintenance CAUTION n Replacing light bulbs l Turn off the headlights. l Do not attempt to replace the bulb immediately after turn- ing off the headlights. l Fully install light bulbs and any parts used to do so...

User Guide
Page 395
...65 5 55 5 21 16 5 8 10 3.0 3.8 3.0 3.8 A B C D E F G E E E E E G E G E 6 Interior ⎯ ⎯ Vehicle specifications Specifications Light bulbs Light Bulbs Headlights (low beam) Discharge bulbs Halogen bulbs Front turn signal lights Headlights (high beam) Exterior Parking lights Front fog lights Trunk light Rear turn signal lights Back-up lights... Overhead courtesy lights Front Rear Door courtesy lights A: B: C: D: E: F: G: D4S discharge bulbs H11 halogen bulbs Wedge base bulbs (amber) HB3 halogen bulbs Wedge base bulbs (clear) HB4 halogen bulbs Double end bulbs 383 Bulb No. 6-1.
...65 5 55 5 21 16 5 8 10 3.0 3.8 3.0 3.8 A B C D E F G E E E E E G E G E 6 Interior ⎯ ⎯ Vehicle specifications Specifications Light bulbs Light Bulbs Headlights (low beam) Discharge bulbs Halogen bulbs Front turn signal lights Headlights (high beam) Exterior Parking lights Front fog lights Trunk light Rear turn signal lights Back-up lights... Overhead courtesy lights Front Rear Door courtesy lights A: B: C: D: E: F: G: D4S discharge bulbs H11 halogen bulbs Wedge base bulbs (amber) HB3 halogen bulbs Wedge base bulbs (clear) HB4 halogen bulbs Double end bulbs 383 Bulb No. 6-1.
User Guide
Page 417
......100 Glove box ...205 Glove box light...206 H Head restraints Adjusting ...29 Headlight aim ...309 Headlight cleaner ...120 Headlights Discharge headlights precautions ...316 Replacing light bulbs ...310 Switch...113 Wattage ...383 I/M test...254 Illuminated entry system ...202 Indicator lights...106 Initialization Items to initialize ...399 Inside rear view mirror ...38 Interior...
......100 Glove box ...205 Glove box light...206 H Head restraints Adjusting ...29 Headlight aim ...309 Headlight cleaner ...120 Headlights Discharge headlights precautions ...316 Replacing light bulbs ...310 Switch...113 Wattage ...383 I/M test...254 Illuminated entry system ...202 Indicator lights...106 Initialization Items to initialize ...399 Inside rear view mirror ...38 Interior...
User Guide
Page 418
...116 Headlights switch ...113 Interior light switch...203 Outer foot lights...201 Overhead courtesy light...201 Personal light switch ...203 Replacing light bulbs...310 Scuff lighting...201 Shift lever lighting ...201 Turn signal lever...98 Vanity lights ...212 Wattage...383 Limited slip differential (LSD)......heater...170 Side mirrors...39 Vanity mirrors...212 Moon roof...44 408 Parking assist sensors...133 Parking brake...99 Parking lights Replacing light bulbs...310 Switch...113 Wattage ...383 PCS (Pre-collision system) ...144 Personal lights Switch...203 Micro dust and pollen removal mode ...
...116 Headlights switch ...113 Interior light switch...203 Outer foot lights...201 Overhead courtesy light...201 Personal light switch ...203 Replacing light bulbs...310 Scuff lighting...201 Shift lever lighting ...201 Turn signal lever...98 Vanity lights ...212 Wattage...383 Limited slip differential (LSD)......heater...170 Side mirrors...39 Vanity mirrors...212 Moon roof...44 408 Parking assist sensors...133 Parking brake...99 Parking lights Replacing light bulbs...310 Switch...113 Wattage ...383 PCS (Pre-collision system) ...144 Personal lights Switch...203 Micro dust and pollen removal mode ...

User Guide
Page 419
... system (PCS)...144 R Radar cruise control ...124 Radiator...270 Radio ...174 RDS (Radio date system)...175 Rear sunshade...225 Rear turn signal lights Replacing light bulbs ...310 Wattage ...383 Rear view mirror Compass...238 Rear window defogger...170 Replacing Electronic key battery ...293 Fuses...295 Light...
... system (PCS)...144 R Radar cruise control ...124 Radiator...270 Radio ...174 RDS (Radio date system)...175 Rear sunshade...225 Rear turn signal lights Replacing light bulbs ...310 Wattage ...383 Rear view mirror Compass...238 Rear window defogger...170 Replacing Electronic key battery ...293 Fuses...295 Light...
User Guide
Page 421
Alphabetical index Trunk Extending a space ...227 Opener...19 Trunk light Trunk light ...20 Wattage ...383 Turn signal lights Replacing light bulbs ...310 Switch...98 Wattage ...383 V Vanity lights Vanity lights...212 Wattage ...383 Vanity mirrors ...212 VDIM (Vehicle dynamics integrated management)...139......335, 339, 339 Engine oil level ...339 Engine oil maintenance ...339 Engine oil pressure ...334 Hill-start assist control ...338 Hood...339 Lexus parking assist sensor...335, 339 Moon roof ...339 Open door...339 Parking brake ...339 Pre-collision system...335, 339 Smart access system with ...
Alphabetical index Trunk Extending a space ...227 Opener...19 Trunk light Trunk light ...20 Wattage ...383 Turn signal lights Replacing light bulbs ...310 Switch...98 Wattage ...383 V Vanity lights Vanity lights...212 Wattage ...383 Vanity mirrors ...212 VDIM (Vehicle dynamics integrated management)...139......335, 339, 339 Engine oil level ...339 Engine oil maintenance ...339 Engine oil pressure ...334 Hill-start assist control ...338 Hood...339 Lexus parking assist sensor...335, 339 Moon roof ...339 Open door...339 Parking brake ...339 Pre-collision system...335, 339 Smart access system with ...

Owners Manual
Page 4
......289 Wheels...293 Air conditioning filter...295 Electronic key battery ...297 Checking and replacing fuses...299 Headlight aim...313 Light bulbs...314 • Bottle holders/door pockets ...213 3-5. Maintenance and care...248 Cleaning and protecting the vehicle exterior...248 Cleaning ...and protecting the vehicle interior ...250 5-1. Other interior features...215 Sun visors...215 Vanity mirror...216 Clock...217 Satellite switches ...218 Ashtrays ...221 Cigarette lighter ...222...
......289 Wheels...293 Air conditioning filter...295 Electronic key battery ...297 Checking and replacing fuses...299 Headlight aim...313 Light bulbs...314 • Bottle holders/door pockets ...213 3-5. Maintenance and care...248 Cleaning and protecting the vehicle exterior...248 Cleaning ...and protecting the vehicle interior ...250 5-1. Other interior features...215 Sun visors...215 Vanity mirror...216 Clock...217 Satellite switches ...218 Ashtrays ...221 Cigarette lighter ...222...

Owners Manual
Page 119
Move and hold the lever partway to signal a lane change The right hand signal will flash until you release the lever. 2 When driving n Turn signals can be operated when The engine switch is in the front or rear turn Move and hold the lever partway to signal a lane change The left hand signal will flash until you release the lever. Driving procedures Turn signal lever Left turn Right turn signal lights has not burned out. 103 n If the indicators flash faster than usual Check that a light bulb in IG-ON mode. 2-1.
Move and hold the lever partway to signal a lane change The right hand signal will flash until you release the lever. 2 When driving n Turn signals can be operated when The engine switch is in the front or rear turn Move and hold the lever partway to signal a lane change The left hand signal will flash until you release the lever. Driving procedures Turn signal lever Left turn Right turn signal lights has not burned out. 103 n If the indicators flash faster than usual Check that a light bulb in IG-ON mode. 2-1.
Owners Manual
Page 327
..., have the vehicle inspected by your Lexus n If there is an overload in the circuits The fuses are designed to blow before the entire wiring harness is replaced l If the lights do not turn on even after the fuse has been replaced, a bulb may need replacement. (→P. 314)... dealer. Do-it-yourself maintenance Fuse 13 Ampere 20A 15A Circuit Power windows, outside rear view mirrors Smart access system with push-button start Seat belts, Lexus parking assist-sensor, automatic transmission, seat heater and...
..., have the vehicle inspected by your Lexus n If there is an overload in the circuits The fuses are designed to blow before the entire wiring harness is replaced l If the lights do not turn on even after the fuse has been replaced, a bulb may need replacement. (→P. 314)... dealer. Do-it-yourself maintenance Fuse 13 Ampere 20A 15A Circuit Power windows, outside rear view mirrors Smart access system with push-button start Seat belts, Lexus parking assist-sensor, automatic transmission, seat heater and...

Owners Manual
Page 330
n Prepare a replacement light bulb. Check the wattage of the light bulb being replaced. (→P. 388) n Remove the engine compartment cover. →P. 267 n Front bulb locations Parking light Headlight high beam n Rear bulb locations Back-up light Rear turn signal light 314 4-3. For more information about replacing other light bulbs, contact your Lexus dealer. Do-it-yourself maintenance Light bulbs You may replace the following bulbs yourself.
n Prepare a replacement light bulb. Check the wattage of the light bulb being replaced. (→P. 388) n Remove the engine compartment cover. →P. 267 n Front bulb locations Parking light Headlight high beam n Rear bulb locations Back-up light Rear turn signal light 314 4-3. For more information about replacing other light bulbs, contact your Lexus dealer. Do-it-yourself maintenance Light bulbs You may replace the following bulbs yourself.

Owners Manual
Page 331
STEP 2 Turn the bulb base counterclockwise. 4 Maintenance and care STEP 3 Unplug the connector while depressing the lock release. 315 4-3. Do-it-yourself maintenance Replacing light bulbs n Headlight high beams STEP 1 Release the lock and remove the cover.
STEP 2 Turn the bulb base counterclockwise. 4 Maintenance and care STEP 3 Unplug the connector while depressing the lock release. 315 4-3. Do-it-yourself maintenance Replacing light bulbs n Headlight high beams STEP 1 Release the lock and remove the cover.