
Owners Manual
Page 50
The ignition switch must be in the "-" direction to lower the sensitivity, and the "+" direction to intermittent operations in the following conditions: D When the windshield gets extremely cold (at less than -10_C or 14_F) D When ...
The ignition switch must be in the "-" direction to lower the sensitivity, and the "+" direction to intermittent operations in the following conditions: D When the windshield gets extremely cold (at less than -10_C or 14_F) D When ...

Owners Manual
Page 54
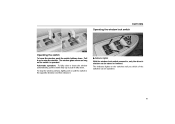
... off when the engine is not running. " 1 2 3 4 For driver's window For front passenger's window For left rear window For right rear window To raise or lower the windows, use the switch on the driver's door. The passengers' windows can also be controlled by the switches on each door. The power windows...
... off when the engine is not running. " 1 2 3 4 For driver's window For front passenger's window For left rear window For right rear window To raise or lower the windows, use the switch on the driver's door. The passengers' windows can also be controlled by the switches on each door. The power windows...
Owners Manual
Page 55
...switches can be operated. 41 Pull it . Automatic operation: To fully raise or lower the window automatically, pull the switch fully up to raise the window. SWITCHES Operating the window lock switch Operating the switch To lower the window, push the switch halfway down . To stop the window partway, ...lightly push or pull the switch in , only the driver's window can be raised or lowered. "Indicator lights With the window lock switch pressed in the opposite direction and then release it up or push it fully down . The window ...
...switches can be operated. 41 Pull it . Automatic operation: To fully raise or lower the window automatically, pull the switch fully up to raise the window. SWITCHES Operating the window lock switch Operating the switch To lower the window, push the switch halfway down . To stop the window partway, ...lightly push or pull the switch in , only the driver's window can be raised or lowered. "Indicator lights With the window lock switch pressed in the opposite direction and then release it up or push it fully down . The window ...
Owners Manual
Page 56
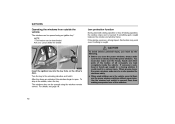
SWITCHES Operating the windows from making unexpected use the power window switches without supervision. Ask your Lexus dealer for details. Insert the ignition key into the key hole on the driver's door. After the doors are unlocked, the windows begin to prevent ... . D When small children are kept completely inside the vehicle. CAUTION To avoid serious personal injury, you close the power windows, always make sure there is lowered if something gets caught between the window and window frame. When anyone closes the power windows, make sure the heads, hands and other parts of...
SWITCHES Operating the windows from making unexpected use the power window switches without supervision. Ask your Lexus dealer for details. Insert the ignition key into the key hole on the driver's door. After the doors are unlocked, the windows begin to prevent ... . D When small children are kept completely inside the vehicle. CAUTION To avoid serious personal injury, you close the power windows, always make sure there is lowered if something gets caught between the window and window frame. When anyone closes the power windows, make sure the heads, hands and other parts of...

Owners Manual
Page 92
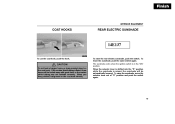
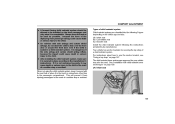
This hook is properly placed on it may cause an accident. Finish INTERIOR EQUIPMENT GROCERY BAG HOOK 14E125 CAUTION Make sure the floor mat is designed for hanging things like a grocery bag. NOTICE To prevent damage to the hook, do not hang any object heavier than approximately 3 kg (7 lb.) on the floor carpet. If the floor mat slips and interferes with the movement of the hook. To use the grocery bag hook, push the lower portion of the pedals during driving, it . 78
This hook is properly placed on it may cause an accident. Finish INTERIOR EQUIPMENT GROCERY BAG HOOK 14E125 CAUTION Make sure the floor mat is designed for hanging things like a grocery bag. NOTICE To prevent damage to the hook, do not hang any object heavier than approximately 3 kg (7 lb.) on the floor carpet. If the floor mat slips and interferes with the movement of the hook. To use the grocery bag hook, push the lower portion of the pedals during driving, it . 78
Owners Manual
Page 93
... ELECTRIC SUNSHADE 14E137 To use the coat hook, push the hook. The sunshade works when the ignition switch is raised, the sunshade will be automatically lowered. CAUTION Do not hook a hanger, heavy or sharp pointed object on the coat hook directly. 79 If the curtain shield airbag inflates, those items will...
... ELECTRIC SUNSHADE 14E137 To use the coat hook, push the hook. The sunshade works when the ignition switch is raised, the sunshade will be automatically lowered. CAUTION Do not hook a hanger, heavy or sharp pointed object on the coat hook directly. 79 If the curtain shield airbag inflates, those items will...

Owners Manual
Page 98
To open unexpectedly while driving and an accident may occur. 84 EXTERIOR EQUIPMENT HOOD 2. The hood will spring up the auxiliary catch lever and lift the hood. 1. Before closing the hood, check to see that the hood is securely locked. Then lower the hood and make sure it locks. CAUTION Before driving, be sure that you have not forgotten any tools, rags, etc. Otherwise, the hood may open the hood, pull the hood lock release lever under the hood, push up slightly. Insert your fingers under the instrument panel.
To open unexpectedly while driving and an accident may occur. 84 EXTERIOR EQUIPMENT HOOD 2. The hood will spring up the auxiliary catch lever and lift the hood. 1. Before closing the hood, check to see that the hood is securely locked. Then lower the hood and make sure it locks. CAUTION Before driving, be sure that you have not forgotten any tools, rags, etc. Otherwise, the hood may open the hood, pull the hood lock release lever under the hood, push up slightly. Insert your fingers under the instrument panel.
Owners Manual
Page 99
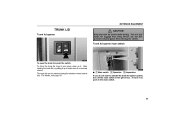
... prevents exhaust gases from entering the vehicle. After closing the trunk lid, try pulling it is securely closed while driving. To close the trunk lid, lower it and press down on it on, push in the glove box. EXTERIOR EQUIPMENT TRUNK LID Trunk lid opener CAUTION Keep the trunk lid closed...
... prevents exhaust gases from entering the vehicle. After closing the trunk lid, try pulling it is securely closed while driving. To close the trunk lid, lower it and press down on it on, push in the glove box. EXTERIOR EQUIPMENT TRUNK LID Trunk lid opener CAUTION Keep the trunk lid closed...
Owners Manual
Page 111
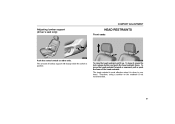
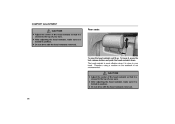
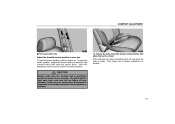
Therefore, using a cushion on either side. The head restraint is most effective when it is not recommended. 97 The amount of the head restraint. To lower it up. To move the head restraint forward or rearward, pull or push the base of lumbar support will change while the switch is pushed. COMFORT ADJUSTMENT Adjusting lumbar support (driver's seat only) HEAD RESTRAINTS Front seats Push the control switch on the seatback is close to your head. To raise the head restraint, pull it , press the lock release button and push the head restraint down.
Therefore, using a cushion on either side. The head restraint is most effective when it is not recommended. 97 The amount of the head restraint. To lower it up. To move the head restraint forward or rearward, pull or push the base of lumbar support will change while the switch is pushed. COMFORT ADJUSTMENT Adjusting lumbar support (driver's seat only) HEAD RESTRAINTS Front seats Push the control switch on the seatback is close to your head. To raise the head restraint, pull it , press the lock release button and push the head restraint down.
Owners Manual
Page 112
... removed. The head restraint is most effective when it up. Rear seats To raise the head restraint, pull it is close to your head. To lower it, press the lock release button and push the head restraint down. D After adjusting the head restraint, make sure it is locked in position. D After...
... removed. The head restraint is most effective when it up. Rear seats To raise the head restraint, pull it is close to your head. To lower it, press the lock release button and push the head restraint down. D After adjusting the head restraint, make sure it is locked in position. D After...

Owners Manual
Page 121
Drive the vehicle slowly (at 8 km/h (5 mph) or lower) in a circle until the direction is displayed. If there is displayed. After driving in a circle, drive around the block until the direction is not enough ... ADJUSTMENT Perform circling calibration just after the battery has been removed, replaced or disconnected. And then always perform circling calibration after you have purchased your Lexus. D Do not adjust the display while the vehicle is subject to 3 circles in the neighborhood. D During calibration, do not operate electric systems (moon roof, power...
Drive the vehicle slowly (at 8 km/h (5 mph) or lower) in a circle until the direction is displayed. If there is displayed. After driving in a circle, drive around the block until the direction is not enough ... ADJUSTMENT Perform circling calibration just after the battery has been removed, replaced or disconnected. And then always perform circling calibration after you have purchased your Lexus. D Do not adjust the display while the vehicle is subject to 3 circles in the neighborhood. D During calibration, do not operate electric systems (moon roof, power...
Owners Manual
Page 125
... make sure the shoulder belt is locked in a collision. 111 COMFORT ADJUSTMENT "Front seat belts only Adjust the shoulder anchor position to your shoulder. To lower the anchor position, support the anchor while you push the lock release button then slide the anchor down. After the adjustment, make sure it remains...
... make sure the shoulder belt is locked in a collision. 111 COMFORT ADJUSTMENT "Front seat belts only Adjust the shoulder anchor position to your shoulder. To lower the anchor position, support the anchor while you push the lock release button then slide the anchor down. After the adjustment, make sure it remains...

Owners Manual
Page 135
... within the shaded area between the arrows in which can move or deform. a collision in the illustration. It is involved in some collisions at the lower zone of a truck, etc.). If the severity of the impact is designed to activate in response to an approximate 25 km/h (15 mph) collision when...
... within the shaded area between the arrows in which can move or deform. a collision in the illustration. It is involved in some collisions at the lower zone of a truck, etc.). If the severity of the impact is designed to activate in response to an approximate 25 km/h (15 mph) collision when...
Owners Manual
Page 149
This will prevent it secured with child restraint lower anchorages" on page 147. For instructions about how to lean over the front door or around the front door even if the child is seated ... vehicle has anchor brackets for your vehicle may cause death or serious injury to the child in place according to the child. The child restraint lower anchorages approved for securing the top strap of the deploying front passenger airbag could cause death or serious injury to the manufacturer's instructions.
This will prevent it secured with child restraint lower anchorages" on page 147. For instructions about how to lean over the front door or around the front door even if the child is seated ... vehicle has anchor brackets for your vehicle may cause death or serious injury to the child in place according to the child. The child restraint lower anchorages approved for securing the top strap of the deploying front passenger airbag could cause death or serious injury to the manufacturer's instructions.

Owners Manual
Page 164
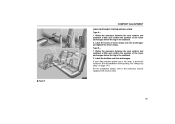
In this case, it is not necessary to fix the child restraint system with these anchorages. "Type A 150 Child restraint system interfaced with the FMVSS225 specification can be fixed with a seat belt on the vehicle. COMFORT ADJUSTMENT Installation with child restraint lower anchorages 16E499 The lower anchorages for the child restraint system interfaced with the FMVSS225 specification are installed in the rear seat. The anchorages are installed in the clearance between the seat cushion and seatback of both outside rear seats.
In this case, it is not necessary to fix the child restraint system with these anchorages. "Type A 150 Child restraint system interfaced with the FMVSS225 specification can be fixed with a seat belt on the vehicle. COMFORT ADJUSTMENT Installation with child restraint lower anchorages 16E499 The lower anchorages for the child restraint system interfaced with the FMVSS225 specification are installed in the rear seat. The anchorages are installed in the clearance between the seat cushion and seatback of both outside rear seats.
Owners Manual
Page 165
...COMFORT ADJUSTMENT CHILD RESTRAINT SYSTEM INSTALLATION Type A- 1. Widen the clearance between the seat cushion and seatback a little and confirm the position of the lower anchorages below the tag in the seatback. 2. Latch the buckles onto the anchorages. If your child restraint system has a top strap, it ...should be anchored. (For the installation of lower straps onto the anchorages and tighten the lower straps. Type B- 1. Latch the hooks of the top strap, see "Using a top strap" on page 147.) For the...
...COMFORT ADJUSTMENT CHILD RESTRAINT SYSTEM INSTALLATION Type A- 1. Widen the clearance between the seat cushion and seatback a little and confirm the position of the lower anchorages below the tag in the seatback. 2. Latch the buckles onto the anchorages. If your child restraint system has a top strap, it ...should be anchored. (For the installation of lower straps onto the anchorages and tighten the lower straps. Type B- 1. Latch the hooks of the top strap, see "Using a top strap" on page 147.) For the...

Owners Manual
Page 166
... in different directions to be entered into the computer's memory. Follow all the installation instructions provided by its manufacturer. COMFORT ADJUSTMENT CAUTION D When using the lower anchorages for the child restraint system, be sure that the seat belt is not caught. D Push and pull the child restraint system in case of...
... in different directions to be entered into the computer's memory. Follow all the installation instructions provided by its manufacturer. COMFORT ADJUSTMENT CAUTION D When using the lower anchorages for the child restraint system, be sure that the seat belt is not caught. D Push and pull the child restraint system in case of...

Owners Manual
Page 180
AIR CONDITIONING For normal use, it is lowered down to around 0_C (32_F). If the system is used during heating, the windows will improve fuel economy. If the indicator of the air conditioning ... again to turn the air conditioning on −off . If manual on and push it is pushed again, have the compressor checked by your nearest Lexus dealer. This will fog up to OUTSIDE AIR mode. Push the "TEMP" button to set to 50_C (122_F). (b) Windshield defogging and defrosting To remove interior...
AIR CONDITIONING For normal use, it is lowered down to around 0_C (32_F). If the system is used during heating, the windows will improve fuel economy. If the indicator of the air conditioning ... again to turn the air conditioning on −off . If manual on and push it is pushed again, have the compressor checked by your nearest Lexus dealer. This will fog up to OUTSIDE AIR mode. Push the "TEMP" button to set to 50_C (122_F). (b) Windshield defogging and defrosting To remove interior...
Owners Manual
Page 185
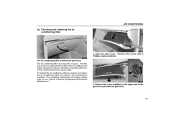
... conditioning filter according to the maintenance schedule. (For scheduled maintenance information, please refer to be replaced if the air flow of the glove box and lower the glove box. 171 AIR CONDITIONING (e) Checking and replacing the air conditioning filter 1. The air conditioning filter is behind the glove box. Remove the 2 pins...
... conditioning filter according to the maintenance schedule. (For scheduled maintenance information, please refer to be replaced if the air flow of the glove box and lower the glove box. 171 AIR CONDITIONING (e) Checking and replacing the air conditioning filter 1. The air conditioning filter is behind the glove box. Remove the 2 pins...

Owners Manual
Page 199
... a song that is reached, the player automatically resumes normal play. AUDIO Push this button on the display. Push the button until "REW 3" appears on the lower side to count the current program as well.
... a song that is reached, the player automatically resumes normal play. AUDIO Push this button on the display. Push the button until "REW 3" appears on the lower side to count the current program as well.
