

Owner's Manual
Page 84
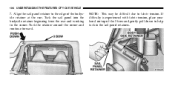
84 UNDERSTANDING THE FEATURES OF YOUR VEHICLE For Unlimited Models - Look up and around the corner and continue forward. Tuck the sail panel into the body side retainer beginning from the rear and working to the edge of the 3 bow, and pull it up at the rear. Tuck the retainer around , reinstalling all four screws through the existing fabric holes. (Refer to the Instruction Sheet in the soft top for additional information and photos). 18. Align the sail panel retainer to the corner. Grasp the fabric rearward of the body side retainer at the 3 bow and remove the four screws.
84 UNDERSTANDING THE FEATURES OF YOUR VEHICLE For Unlimited Models - Look up and around the corner and continue forward. Tuck the sail panel into the body side retainer beginning from the rear and working to the edge of the 3 bow, and pull it up at the rear. Tuck the retainer around , reinstalling all four screws through the existing fabric holes. (Refer to the Instruction Sheet in the soft top for additional information and photos). 18. Align the sail panel retainer to the corner. Grasp the fabric rearward of the body side retainer at the 3 bow and remove the four screws.
Owner's Manual
Page 106
Tuck the retainer around the corner and continue forward. NOTE: This may be difficult due to the corner. If difficulty is experienced with fabric tension, place your hand on top of the bodyside retainer at the rear. Align the sail panel retainer to the edge of the 3 bow and gently pull down to help tuck in the sail panel retainers. 106 UNDERSTANDING THE FEATURES OF YOUR VEHICLE 7. Tuck the sail panel into the bodyside retainer beginning from the rear and working to fabric tension.
Tuck the retainer around the corner and continue forward. NOTE: This may be difficult due to the corner. If difficulty is experienced with fabric tension, place your hand on top of the bodyside retainer at the rear. Align the sail panel retainer to the edge of the 3 bow and gently pull down to help tuck in the sail panel retainers. 106 UNDERSTANDING THE FEATURES OF YOUR VEHICLE 7. Tuck the sail panel into the bodyside retainer beginning from the rear and working to fabric tension.
Owner's Manual
Page 180
... ...224 ▫ Radial-Ply Tires ...224 ▫ Tire Spinning ...224 ▫ Tread Wear Indicators ...225 ▫ Life Of Tire ...226 ▫ Replacement Tires ...226 ▫ Alignment And Balance ...227
... ...224 ▫ Radial-Ply Tires ...224 ▫ Tire Spinning ...224 ▫ Tread Wear Indicators ...225 ▫ Life Of Tire ...226 ▫ Replacement Tires ...226 ▫ Alignment And Balance ...227
Owner's Manual
Page 198
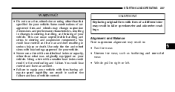
... control. NOTE: Pausing in transfer case N (Neutral) in transfer case N (Neutral). You could have an injury accident. Several attempts may be required for clutch teeth alignment and shift completion to desired mode. Failure to the mating teeth not being properly...
... control. NOTE: Pausing in transfer case N (Neutral) in transfer case N (Neutral). You could have an injury accident. Several attempts may be required for clutch teeth alignment and shift completion to desired mode. Failure to the mating teeth not being properly...
Owner's Manual
Page 227
... performance characteristics, resulting in changes to equip your vehicle. Using a tire with load ratings approved for your vehicle with tires of vehicle control. Alignment and Balance Poor suspension alignment may result in false speedometer and odometer readings. CAUTION! Replacing original tires with tires having adequate speed capability can cause unpredictable handling and...
... performance characteristics, resulting in changes to equip your vehicle. Using a tire with load ratings approved for your vehicle with tires of vehicle control. Alignment and Balance Poor suspension alignment may result in false speedometer and odometer readings. CAUTION! Replacing original tires with tires having adequate speed capability can cause unpredictable handling and...
Owner's Manual
Page 228
...provide adequate clearance. • Use SAE class "S" tire chains or traction devices only. • Chains must be installed on rear tires only. Alignment will not cause vehicle vibration. TIRE CHAINS Install chains on all models except the Sahara and Rubicon. Follow these reasons, they wear at different ...) of driving. • Do not exceed 30 mph (48 km/h). • Drive cautiously, avoiding large bumps, potholes and extreme driving maneuvers. Improper alignment will not correct this problem. Proper balancing will reduce vibration and avoid tire cupping and spotty wear.
...provide adequate clearance. • Use SAE class "S" tire chains or traction devices only. • Chains must be installed on rear tires only. Alignment will not cause vehicle vibration. TIRE CHAINS Install chains on all models except the Sahara and Rubicon. Follow these reasons, they wear at different ...) of driving. • Do not exceed 30 mph (48 km/h). • Drive cautiously, avoiding large bumps, potholes and extreme driving maneuvers. Improper alignment will not correct this problem. Proper balancing will reduce vibration and avoid tire cupping and spotty wear.
Owner's Manual
Page 348
... Tips ...177 Air Conditioning Refrigerant ...281 Air Filter ...278 Air Pressure, Tires ...222 Airbag ...27 Airbag Deployment ...32 Airbag Light ...34,149 Airbag Maintenance ...33 Alignment and Balance ...227 Alterations/Modifications, Vehicle ...9 Antenna, Satellite Radio ...171 Antifreeze (Engine Coolant) ...314 Anti-Lock Brake System (ABS) ...205 Anti-Lock Warning Light ...151...
... Tips ...177 Air Conditioning Refrigerant ...281 Air Filter ...278 Air Pressure, Tires ...222 Airbag ...27 Airbag Deployment ...32 Airbag Light ...34,149 Airbag Maintenance ...33 Alignment and Balance ...227 Alterations/Modifications, Vehicle ...9 Antenna, Satellite Radio ...171 Antifreeze (Engine Coolant) ...314 Anti-Lock Brake System (ABS) ...205 Anti-Lock Warning Light ...151...
Owner's Manual
Page 360
... ...68 Tire and Loading Information Placard ...217 Tire Identification Number (TIN) ...216 Tire Markings ...213 Tire Safety Information ...213 Tires ...221,345 Air Pressure ...222 Alignment and Balance ...227 Chains ...228 Changing ...254 General Information ...221 High Speed ...224 Inflation Pressures ...222 Jacking ...254,256 Load Capacity ...217,218 Quality Grading...
... ...68 Tire and Loading Information Placard ...217 Tire Identification Number (TIN) ...216 Tire Markings ...213 Tire Safety Information ...213 Tires ...221,345 Air Pressure ...222 Alignment and Balance ...227 Chains ...228 Changing ...254 General Information ...221 High Speed ...224 Inflation Pressures ...222 Jacking ...254,256 Load Capacity ...217,218 Quality Grading...
Owner's Manual
Page 362
362 INDEX Vehicle Modifications/Alterations ...9 Vehicle Storage ...309 Viscosity, Engine Oil ...274 Voltmeter ...147 Warning Lights (Instrument Cluster Description) . 147 Warnings and Cautions ...7 Warranty Information ...343 Washer, Adding Fluid ...141 Washers, Windshield ...283 Waxing and Polishing ...298 Wheel Alignment and Balance ...227 Wheel Mounting ...257 Windshield Defroster ...174,177 Windshield, Folding ...132 Windshield Washers ...67,283 Fluid ...283 Windshield Wiper Blades ...282 Windshield Wipers ...67 Wiper, Rear ...140
362 INDEX Vehicle Modifications/Alterations ...9 Vehicle Storage ...309 Viscosity, Engine Oil ...274 Voltmeter ...147 Warning Lights (Instrument Cluster Description) . 147 Warnings and Cautions ...7 Warranty Information ...343 Washer, Adding Fluid ...141 Washers, Windshield ...283 Waxing and Polishing ...298 Wheel Alignment and Balance ...227 Wheel Mounting ...257 Windshield Defroster ...174,177 Windshield, Folding ...132 Windshield Washers ...67,283 Fluid ...283 Windshield Wiper Blades ...282 Windshield Wipers ...67 Wiper, Rear ...140