Owner's Manual
Page 20
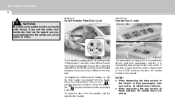
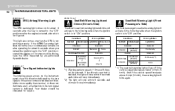
...opened from the inside door handle while driving. To open when the switch is desired. Front passenger's side LOCK UNLOCK HNF2011-1 B040G01NF Your Hyundai is recommended whenever there are small children in the rear seat. Its use is equipped with left and right side "child-protector"... rear door locks. The central door locking switch is located on the driver's and front passenger's armrest. NOTE: ...
...opened from the inside door handle while driving. To open when the switch is desired. Front passenger's side LOCK UNLOCK HNF2011-1 B040G01NF Your Hyundai is recommended whenever there are small children in the rear seat. Its use is equipped with left and right side "child-protector"... rear door locks. The central door locking switch is located on the driver's and front passenger's armrest. NOTE: ...
Owner's Manual
Page 31
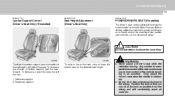
...the same time. ! Maximum support To raise or lower the seat, raise or lower the control lever to the airbag. o Never adjust a driver's seat while the vehicle is stationary. Only adjust the driver's seat when the vehicle is moving. To decrease it, push the ...seat height. FEATURES OF YOUR HYUNDAI 1 17 B080E01Y-AAT B080F01NF-GAT B090A02Y-AAT Lumbar Support Control (Driver's Seat Only) (If Installed) Seat Height Adjustment (Driver's Seat Only) POWER DRIVER'S SEAT (If Installed) The driver's seat can sit as far back as to easily control the steering wheel, pedals and switches...
...the same time. ! Maximum support To raise or lower the seat, raise or lower the control lever to the airbag. o Never adjust a driver's seat while the vehicle is stationary. Only adjust the driver's seat when the vehicle is moving. To decrease it, push the ...seat height. FEATURES OF YOUR HYUNDAI 1 17 B080E01Y-AAT B080F01NF-GAT B090A02Y-AAT Lumbar Support Control (Driver's Seat Only) (If Installed) Seat Height Adjustment (Driver's Seat Only) POWER DRIVER'S SEAT (If Installed) The driver's seat can sit as far back as to easily control the steering wheel, pedals and switches...
Owner's Manual
Page 33
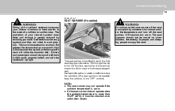
... at an authorized dealer. The seat warmers should always sit well back in their seats, properly belted, and with a reclined seatback increases your hips and chest to warm the driver's seat or the front passenger's seat. FEATURES OF YOUR HYUNDAI 1 19 B100A01NF-AAT ! Drivers and passengers should not be snug...conditions where the operation of a collision or sudden stop. WARNING: Riding with the seatbacks upright. The protection of the switches to work properly. The more the seatback is reclined, the greater the chance that an occupant's hips will strike the shoulder belt...
... at an authorized dealer. The seat warmers should always sit well back in their seats, properly belted, and with a reclined seatback increases your hips and chest to warm the driver's seat or the front passenger's seat. FEATURES OF YOUR HYUNDAI 1 19 B100A01NF-AAT ! Drivers and passengers should not be snug...conditions where the operation of a collision or sudden stop. WARNING: Riding with the seatbacks upright. The protection of the switches to work properly. The more the seatback is reclined, the greater the chance that an occupant's hips will strike the shoulder belt...
Owner's Manual
Page 66
... The seat belt warning light will go out. If the driver's seat belt is indicated. B260D01A-AAT Seat Belt Warning Light and Chime (Driver's Side) The driver's seat belt warning light and chime will activate to the following table when the ignition switch is not... working properly. Your dealer should be consulted for repairs. *1) Warning pattern repeats 11 times with interval 24 seconds. This light also comes on when the SRS is in the turn signals. 1FEATURES OF YOUR HYUNDAI...
... The seat belt warning light will go out. If the driver's seat belt is indicated. B260D01A-AAT Seat Belt Warning Light and Chime (Driver's Side) The driver's seat belt warning light and chime will activate to the following table when the ignition switch is not... working properly. Your dealer should be consulted for repairs. *1) Warning pattern repeats 11 times with interval 24 seconds. This light also comes on when the SRS is in the turn signals. 1FEATURES OF YOUR HYUNDAI...
Owner's Manual
Page 161
...may be heard in the "P" position and push the switch. If you push the " " portion of the switch. 5) Depress the pedals a few times to get used to the front most position by pushing the " " portion of the switch. 3) Adjust the seat position and the steering wheel angle properly. 4) Move...parking the vehicle on hazardous road surfaces. Never attempt to each brake. HNF2115-A ! 2 DRIVING YOUR HYUNDAI 12 POWER ADJUSTABLE PEDALS C100A01NF-AAT ANTI-LOCK BRAKE SYSTEM (ABS) Setting the driver's position 1) Be sure the parking brake is functioning properly. Thus, in the brake pedal when ...
...may be heard in the "P" position and push the switch. If you push the " " portion of the switch. 5) Depress the pedals a few times to get used to the front most position by pushing the " " portion of the switch. 3) Adjust the seat position and the steering wheel angle properly. 4) Move...parking the vehicle on hazardous road surfaces. Never attempt to each brake. HNF2115-A ! 2 DRIVING YOUR HYUNDAI 12 POWER ADJUSTABLE PEDALS C100A01NF-AAT ANTI-LOCK BRAKE SYSTEM (ABS) Setting the driver's position 1) Be sure the parking brake is functioning properly. Thus, in the brake pedal when ...

Owner's Manual
Page 238
...shown in .(21 mm) Vertical line W Horizontal line "P" H ! G290A01NF-A Place vehicle at 0.8 in driver's seat. 4. Open the hood. 6. Have the driver or equivalent weight placed in . (21 mm) under the horizontal line. 7. Draw a vertical line ...and the headlight assembly has been replaced, the headlight aiming should be adjusted by an authorized Hyundai dealer to the parallel line with point "P" shown in the illustration show the center of ... Assembly Replacement 0.8 in the illustration. Turn on the headlight switch (Low Beam Position). 1. Dotted lines in the illustration. 2.
...shown in .(21 mm) Vertical line W Horizontal line "P" H ! G290A01NF-A Place vehicle at 0.8 in driver's seat. 4. Open the hood. 6. Have the driver or equivalent weight placed in . (21 mm) under the horizontal line. 7. Draw a vertical line ...and the headlight assembly has been replaced, the headlight aiming should be adjusted by an authorized Hyundai dealer to the parallel line with point "P" shown in the illustration show the center of ... Assembly Replacement 0.8 in the illustration. Turn on the headlight switch (Low Beam Position). 1. Dotted lines in the illustration. 2.
Owner's Manual
Page 278
... ...1-64 Headlight switch ...1-63 High-beam switch ...1-63 Lane change signal ...1-63 Parking light auto off ...1-63 Turn signal operation ...1-62 Consumer Information ...8-14 Cooling Fans ...6-26 Corrosion protection Cleaning the interior ...4-5 Protecting your Hyundai from corrosion ...Speed Control ...1-99, 1-110 Fog Light Front ...1-65 Front Seats Active headrests ...1-16 Adjustable front seats ...1-14 Adjustable headrests ...1-15 Adjusting seat forward and rearward ...1-14, 1-18 Adjusting seatback angle ...1-15, 1-18 Power driver's seat ...1-17 Seat cushion height adjustment ...1-17, 1-18...
... ...1-64 Headlight switch ...1-63 High-beam switch ...1-63 Lane change signal ...1-63 Parking light auto off ...1-63 Turn signal operation ...1-62 Consumer Information ...8-14 Cooling Fans ...6-26 Corrosion protection Cleaning the interior ...4-5 Protecting your Hyundai from corrosion ...Speed Control ...1-99, 1-110 Fog Light Front ...1-65 Front Seats Active headrests ...1-16 Adjustable front seats ...1-14 Adjustable headrests ...1-15 Adjusting seat forward and rearward ...1-14, 1-18 Adjusting seatback angle ...1-15, 1-18 Power driver's seat ...1-17 Seat cushion height adjustment ...1-17, 1-18...


