
Owner's Manual
Page 60
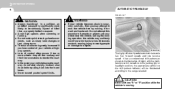
... Brake System indicator will still be a problem with E.B.D. (Electronic brake force distribution). If this occurs, have your vehicle checked by your Hyundai dealer as soon as possible. Turn Signal Indicator Lights The blinking green arrows on the instrument panel show the direction indicated by your vehicle ... ABS. B260F01A-AAT High Beam Indicator Light The high beam indicator light comes on whenever the headlights are switched to the "ON" position, this occurs, avoid sudden stops and have your Hyundai dealer as soon as possible. If the ABS SRI remains on, comes on while driving,...
... Brake System indicator will still be a problem with E.B.D. (Electronic brake force distribution). If this occurs, have your vehicle checked by your Hyundai dealer as soon as possible. Turn Signal Indicator Lights The blinking green arrows on the instrument panel show the direction indicated by your vehicle ... ABS. B260F01A-AAT High Beam Indicator Light The high beam indicator light comes on whenever the headlights are switched to the "ON" position, this occurs, avoid sudden stops and have your Hyundai dealer as soon as possible. If the ABS SRI remains on, comes on while driving,...
Owner's Manual
Page 69
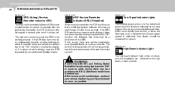
... but does not blink, or does not go on the headlights. NOTE: The ignition must be in the system. FEATURES OF YOUR HYUNDAI 1 57 MULTI-FUNCTION LIGHT SWITCH B340A01A-AAT B340B01A-AAT B340C03E-AAT COMBINATION TURN SIGNAL, HEADLIGHT AND HIGH-BEAM SWITCH Turn Signal Operation Pulling down to blink.... Check for a burnedout fuse or bulb or see your Hyundai dealer. The first position turns on the left side of the car ...
... but does not blink, or does not go on the headlights. NOTE: The ignition must be in the system. FEATURES OF YOUR HYUNDAI 1 57 MULTI-FUNCTION LIGHT SWITCH B340A01A-AAT B340B01A-AAT B340C03E-AAT COMBINATION TURN SIGNAL, HEADLIGHT AND HIGH-BEAM SWITCH Turn Signal Operation Pulling down to blink.... Check for a burnedout fuse or bulb or see your Hyundai dealer. The first position turns on the left side of the car ...
Owner's Manual
Page 70
... is in foggy, cloudy and rainy conditions. To flash the headlights, pull the switch lever toward you. To operate the automatic light feature, turn the barrel on at the same time. 1 FEATURES OF YOUR HYUNDAI 58 Parking Light Auto Off If you do not turn the parking lights "OFF" key out, the...
... is in foggy, cloudy and rainy conditions. To flash the headlights, pull the switch lever toward you. To operate the automatic light feature, turn the barrel on at the same time. 1 FEATURES OF YOUR HYUNDAI 58 Parking Light Auto Off If you do not turn the parking lights "OFF" key out, the...
Owner's Manual
Page 71
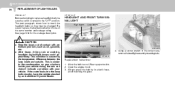
... using the wiper. If there is in the "ON" position. Low-speed operation 3. High-speed operation HXDFL354-A To turn on the headlight high beams, the front fog lights will come on the front fog lights, place the switch in the second position. NOTE: If you.... To use the intermittent wiper feature, place the wiper switch in this position, the interval between wipes can be removed manually. FEATURES OF YOUR HYUNDAI 1 59 WINDSHIELD WIPER AND WASHER SWITCH B360B01L-AAT B350A01A-AAT B350C01S-AAT FRONT FOG LIGHT SWITCH (If installed) Adjustable Intermittent Wiper Operation 1 2...
... using the wiper. If there is in the "ON" position. Low-speed operation 3. High-speed operation HXDFL354-A To turn on the headlight high beams, the front fog lights will come on the front fog lights, place the switch in the second position. NOTE: If you.... To use the intermittent wiper feature, place the wiper switch in this position, the interval between wipes can be removed manually. FEATURES OF YOUR HYUNDAI 1 59 WINDSHIELD WIPER AND WASHER SWITCH B360B01L-AAT B350A01A-AAT B350C01S-AAT FRONT FOG LIGHT SWITCH (If installed) Adjustable Intermittent Wiper Operation 1 2...

Owner's Manual
Page 85
... car behind you . 1. A vanity mirror is provided on the back of the roadway, traffic or other objects. Your Hyundai is equipped with a day/night inside rearview mirror automatically controls the glare of headlights of each time the vehicle is started. ! WARNING: Do not place the sun visor in such a manner that it...
... car behind you . 1. A vanity mirror is provided on the back of the roadway, traffic or other objects. Your Hyundai is equipped with a day/night inside rearview mirror automatically controls the glare of headlights of each time the vehicle is started. ! WARNING: Do not place the sun visor in such a manner that it...
Owner's Manual
Page 152
... ! In a collision, an unbelted occupant is significantly more wheels drop off the roadway and the driver oversteers to the parking light or headlight position, the appropriate symbol on to reenter the roadway. o Avoid high speeds when cornering or turning. o In the event your vehicle ...up! o The risk of control often occurs if two or more likely to be illuminated according to the range selected. ! 2 DRIVING YOUR HYUNDAI 8 AUTOMATIC TRANSAXLE C090A02Y-AAT ! o Never exceed posted speed limits. At night, with the multifunction switch turned on the shift pattern indicator will...
... ! In a collision, an unbelted occupant is significantly more wheels drop off the roadway and the driver oversteers to the parking light or headlight position, the appropriate symbol on to reenter the roadway. o Avoid high speeds when cornering or turning. o In the event your vehicle ...up! o The risk of control often occurs if two or more likely to be illuminated according to the range selected. ! 2 DRIVING YOUR HYUNDAI 8 AUTOMATIC TRANSAXLE C090A02Y-AAT ! o Never exceed posted speed limits. At night, with the multifunction switch turned on the shift pattern indicator will...

Owner's Manual
Page 162
2 DRIVING YOUR HYUNDAI 18 C170A01A-AAT TRAILER OR VEHICLE TOWING C190A02S-AAT HIGHER SPEED MOTORING Pre-Trip Inspections 1. WARNING: NOTE: Never exceed the maximum tire inflation pressure shown ... coolant and engine oil. 3. Worn-out tires can cause poor handling, loss of the tires. Since laws vary from State to drive with headlights on the tires. Ask your Hyundai dealer for further details before driving your lights regularly for towing trailers, cars, other types of vehicle control, collisions, injury, and even...
2 DRIVING YOUR HYUNDAI 18 C170A01A-AAT TRAILER OR VEHICLE TOWING C190A02S-AAT HIGHER SPEED MOTORING Pre-Trip Inspections 1. WARNING: NOTE: Never exceed the maximum tire inflation pressure shown ... coolant and engine oil. 3. Worn-out tires can cause poor handling, loss of the tires. Since laws vary from State to drive with headlights on the tires. Ask your Hyundai dealer for further details before driving your lights regularly for towing trailers, cars, other types of vehicle control, collisions, injury, and even...

Owner's Manual
Page 222
... premature failure. FOR MORE INFORMATION ABOUT YOUR HYUNDAI If you desire additional information about maintaining and servicing your Hyundai, you check the power steering hose connections for full levels of your Hyundai dealer's parts department. To check the power... steering fluid level, be heard immediately after the engine is started in driver's seat. 4. Have the driver or equivalent weight placed in extremely cold conditions (below - 4°F). 6 DO-IT-YOURSELFMAINTENANCE 24 POWER STEERING FLUID LEVEL G230A03A-AAT HEADLIGHT...
... premature failure. FOR MORE INFORMATION ABOUT YOUR HYUNDAI If you desire additional information about maintaining and servicing your Hyundai, you check the power steering hose connections for full levels of your Hyundai dealer's parts department. To check the power... steering fluid level, be heard immediately after the engine is started in driver's seat. 4. Have the driver or equivalent weight placed in extremely cold conditions (below - 4°F). 6 DO-IT-YOURSELFMAINTENANCE 24 POWER STEERING FLUID LEVEL G230A03A-AAT HEADLIGHT...
Owner's Manual
Page 223
... mm) High beam : 33.0 in the illustration. Low beam : 25.2 in. (639 mm) High beam : 23.3 in. (619 mm) "W" Distance between the headlights and the wall that main axis of light is parallel to the parallel line with point "P" shown in the illustration show the center of each... 0.8 in . (3,000 mm). Turn on the aiming screen. WARNING: H Ground line G290B01A-1 Horizontal aiming should be adjusted by an authorized Hyundai Dealer. Dotted lines in the illustration. 2. Adjust headlights so that the lights are tested against. : 118 in . (21 mm) under the horizontal line. 7.
... mm) High beam : 33.0 in the illustration. Low beam : 25.2 in. (639 mm) High beam : 23.3 in. (619 mm) "W" Distance between the headlights and the wall that main axis of light is parallel to the parallel line with point "P" shown in the illustration show the center of each... 0.8 in . (3,000 mm). Turn on the aiming screen. WARNING: H Ground line G290B01A-1 Horizontal aiming should be adjusted by an authorized Hyundai Dealer. Dotted lines in the illustration. 2. Adjust headlights so that the lights are tested against. : 118 in . (21 mm) under the horizontal line. 7.
Owner's Manual
Page 224
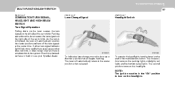
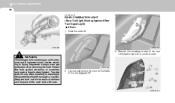
... number and wattage rating. G270A01E Replacement instructions: 1. HEADLIGHT AND FRONT TURN SIGNAL LIGHT High beam Low beam ! If the water leaks into the lamp bulb circuitry, have the vehicle checked by its plastic base, avoid touching the glass. Always grasp the bulb by an Authorized Hyundai Dealer. 4. Be sure to the "OFF...
... number and wattage rating. G270A01E Replacement instructions: 1. HEADLIGHT AND FRONT TURN SIGNAL LIGHT High beam Low beam ! If the water leaks into the lamp bulb circuitry, have the vehicle checked by its plastic base, avoid touching the glass. Always grasp the bulb by an Authorized Hyundai Dealer. 4. Be sure to the "OFF...

Owner's Manual
Page 225
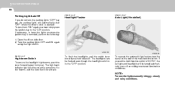
... from the back of the old bulb. 10. Turn the plastic cover counterclockwise and remove it. 8. Push the bulb spring to promptly dispose of the headlight. 6. Retighten the bulb spring and reconnect the power cord. 9. Disconnect the power cord from the replacement bulb and install the new bulb by matching the...
... from the back of the old bulb. 10. Turn the plastic cover counterclockwise and remove it. 8. Push the bulb spring to promptly dispose of the headlight. 6. Retighten the bulb spring and reconnect the power cord. 9. Disconnect the power cord from the replacement bulb and install the new bulb by matching the...
Owner's Manual
Page 226
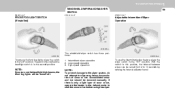
... mounting screws of the rear combination light with care. (1) HXDFL1014 2. WARNING: This halogen bulb contains gas under pressure and if impacted could shatter, resulting in a headlight. Always wear eye protection when servicing the bulb. Turn the bulb on the inside of the used bulb with a socket wrench. Unscrew and remove the...
... mounting screws of the rear combination light with care. (1) HXDFL1014 2. WARNING: This halogen bulb contains gas under pressure and if impacted could shatter, resulting in a headlight. Always wear eye protection when servicing the bulb. Turn the bulb on the inside of the used bulb with a socket wrench. Unscrew and remove the...
Owner's Manual
Page 259
... Anti-lock brake system ...2-12 Checking the brakes ...6-14 Fluid ...6-14 Pedal clearance ...6-19 Pedal freeplay ...6-19 Breaking-In your New Hyundai ...1-3 C Care of Cassette Tapes ...1-129 Care of Disc ...1-129 Catalytic Converter ...7-3 Changing the Climate Control Air Filter ...6-17 Child-... ...1-29 Cigarette Lighter ...1-63 Clock ...1-62 Clutch Checking fluid ...6-15 Pedal freeplay ...6-19 Combination Light Auto light ...1-58 Headlight flasher ...1-58 Headlight switch ...1-57 High-beam switch ...1-58 Lane change signal ...1-57 Parking light auto off ...1-58 Turn signal operation ...1-57...
... Anti-lock brake system ...2-12 Checking the brakes ...6-14 Fluid ...6-14 Pedal clearance ...6-19 Pedal freeplay ...6-19 Breaking-In your New Hyundai ...1-3 C Care of Cassette Tapes ...1-129 Care of Disc ...1-129 Catalytic Converter ...7-3 Changing the Climate Control Air Filter ...6-17 Child-... ...1-29 Cigarette Lighter ...1-63 Clock ...1-62 Clutch Checking fluid ...6-15 Pedal freeplay ...6-19 Combination Light Auto light ...1-58 Headlight flasher ...1-58 Headlight switch ...1-57 High-beam switch ...1-58 Lane change signal ...1-57 Parking light auto off ...1-58 Turn signal operation ...1-57...
Owner's Manual
Page 260
... Capacity ...9-2 Gauge ...1-51 Recommendations ...1-2 Fuel Filler Lid Remote release ...1-75 Fuses ...6-20 Fuse Panel Description ...6-35 G General Checks ...6-3 Glove Box ...1-70 H Hazard Warning System ...1-62 Headlight Aiming Adjustment ...6-24 Heating and Cooling Control ...1-83 Heating and Ventilation Air flow control ...1-84 Air intake control ...1-87 Bi-level heating ...1-88 Defrosting / Defogging...
... Capacity ...9-2 Gauge ...1-51 Recommendations ...1-2 Fuel Filler Lid Remote release ...1-75 Fuses ...6-20 Fuse Panel Description ...6-35 G General Checks ...6-3 Glove Box ...1-70 H Hazard Warning System ...1-62 Headlight Aiming Adjustment ...6-24 Heating and Cooling Control ...1-83 Heating and Ventilation Air flow control ...1-84 Air intake control ...1-87 Bi-level heating ...1-88 Defrosting / Defogging...


