
Owner's Manual
Page 11
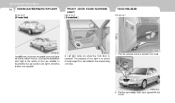
TCS Switch (If installed) 3. Multi-Function Light Switch 5. If there is any leakage from the air freshener does leak onto these parts. Horn and Driver's Airbag 6. Windshield Wiper/Washer Switch 7. Heating/Air ...'s Airbag 13.Glove Box 14.Hood Release Lever 15.Storage compartment 16.Cruise Control Switch (If installed) 17.Front Ashtray 18.Shift Lever 19.Parking Brake 20.Console Box (If installed) 21.Rear Ashtray ! Trip Computer Switch (If installed) 4. Digital Clock 8. Audio System 9. If the liquid from the air freshener onto...
TCS Switch (If installed) 3. Multi-Function Light Switch 5. If there is any leakage from the air freshener does leak onto these parts. Horn and Driver's Airbag 6. Windshield Wiper/Washer Switch 7. Heating/Air ...'s Airbag 13.Glove Box 14.Hood Release Lever 15.Storage compartment 16.Cruise Control Switch (If installed) 17.Front Ashtray 18.Shift Lever 19.Parking Brake 20.Console Box (If installed) 21.Rear Ashtray ! Trip Computer Switch (If installed) 4. Digital Clock 8. Audio System 9. If the liquid from the air freshener onto...
Owner's Manual
Page 12
... Indicator Light Low Oil Pressure Warning Light Parking Brake/Low Brake Fluid Level Warning Light Charging System Warning Light Seat Belt Warning Light Trunk Lid /Tail Gate Open Warning Light Door Ajar Warning Light and Chime Low Fuel Level Warning Light Cruise Indicator Light (If installed) SET Indicator Light (If installed) Front Fog Indicator Light (If installed) Malfunction Indicator Light Traction Control Indicator Light (If...
... Indicator Light Low Oil Pressure Warning Light Parking Brake/Low Brake Fluid Level Warning Light Charging System Warning Light Seat Belt Warning Light Trunk Lid /Tail Gate Open Warning Light Door Ajar Warning Light and Chime Low Fuel Level Warning Light Cruise Indicator Light (If installed) SET Indicator Light (If installed) Front Fog Indicator Light (If installed) Malfunction Indicator Light Traction Control Indicator Light (If...
Owner's Manual
Page 57
... Gauge 14.Door Ajar Warning Light 15.Seat Belt Warning Light 16.SRS (Airbag) Warning Light 17.Odometer/Trip Odometer 18.Low Oil Pressure Warning Light 19.Charging System Warning Light 20.Parking Brake/Low Brake Fluid Level Warning Light 21.Check Engine Malfunction Indicator Light (MIL) 22.Trip Odometer Reset Switch 23.Fuel Gauge FEATURES OF YOUR HYUNDAI 1 45 1.
... Gauge 14.Door Ajar Warning Light 15.Seat Belt Warning Light 16.SRS (Airbag) Warning Light 17.Odometer/Trip Odometer 18.Low Oil Pressure Warning Light 19.Charging System Warning Light 20.Parking Brake/Low Brake Fluid Level Warning Light 21.Check Engine Malfunction Indicator Light (MIL) 22.Trip Odometer Reset Switch 23.Fuel Gauge FEATURES OF YOUR HYUNDAI 1 45 1.
Owner's Manual
Page 59
... Computer (If installed) 16.Trunk Lid (4 door)/Tail Gate (5 door) Open Warning Light 17.Door Ajar Warning Light 18.Parking Brake/Low Brake Fluid Level Warning Light 19.Traction Control Indicator Light (If installed) 20.Speedometer 21.Fuel Gauge Low Oil Pressure Warning Light 4. Front Fog Indicator Light (If installed) 7. FEATURES OF YOUR HYUNDAI 1 47 1. Check Engine Malfunction Indicator...
... Computer (If installed) 16.Trunk Lid (4 door)/Tail Gate (5 door) Open Warning Light 17.Door Ajar Warning Light 18.Parking Brake/Low Brake Fluid Level Warning Light 19.Traction Control Indicator Light (If installed) 20.Speedometer 21.Fuel Gauge Low Oil Pressure Warning Light 4. Front Fog Indicator Light (If installed) 7. FEATURES OF YOUR HYUNDAI 1 47 1. Check Engine Malfunction Indicator...
Owner's Manual
Page 60
...the high beam or flash position. ! B260F01A-AAT High Beam Indicator Light The high beam indicator light comes on but without the assistance of the anti-lock brake system. Turn Signal Indicator Lights The blinking green arrows on the instrument panel show the direction indicated ...: If both the ABS SRI and Parking Brake/ Brake fluid level warning lights remain "ON" or come on and then go out. Your dealer should be a problem with E.B.D. (Electronic brake force distribution). 1 FEATURES OF YOUR HYUNDAI 48 WARNING AND INDICATOR LIGHTS B260B01A-AAT B260P01E-GAT B260D01A-AAT SRS (...
...the high beam or flash position. ! B260F01A-AAT High Beam Indicator Light The high beam indicator light comes on but without the assistance of the anti-lock brake system. Turn Signal Indicator Lights The blinking green arrows on the instrument panel show the direction indicated ...: If both the ABS SRI and Parking Brake/ Brake fluid level warning lights remain "ON" or come on and then go out. Your dealer should be a problem with E.B.D. (Electronic brake force distribution). 1 FEATURES OF YOUR HYUNDAI 48 WARNING AND INDICATOR LIGHTS B260B01A-AAT B260P01E-GAT B260D01A-AAT SRS (...
Owner's Manual
Page 61
...the car as soon as it is insufficient oil pressure. FEATURES OF YOUR HYUNDAI 1 49 B260G01A-AAT B260H03A-AAT Low Oil Pressure Warning Light Parking Brake/Low Brake Fluid Level Level Warning Light ! If the light stays on whenever there is safe to DOT 3 or DOT 4 specifications ... go out when the engine is driven again. ! Driving your brakes checked by a Hyundai dealer before the car is started , the light should be added. Warning Light Operation The parking brake/brake fluid level warning light should come on when the ignition switch is turned to the proper...
...the car as soon as it is insufficient oil pressure. FEATURES OF YOUR HYUNDAI 1 49 B260G01A-AAT B260H03A-AAT Low Oil Pressure Warning Light Parking Brake/Low Brake Fluid Level Level Warning Light ! If the light stays on whenever there is safe to DOT 3 or DOT 4 specifications ... go out when the engine is driven again. ! Driving your brakes checked by a Hyundai dealer before the car is started , the light should be added. Warning Light Operation The parking brake/brake fluid level warning light should come on when the ignition switch is turned to the proper...
Owner's Manual
Page 63
... the system is in the fuel tank. B260A01B-GAT Traction Control Indicator Lights (If installed) The traction control indicators change operation according to your nearest authorized Hyundai dealer and have the system checked. BRAKE PAD WEAR WARNING SOUND The front disc brake pads have wear indicators that the exhaust gas regulation values are needed...
... the system is in the fuel tank. B260A01B-GAT Traction Control Indicator Lights (If installed) The traction control indicators change operation according to your nearest authorized Hyundai dealer and have the system checked. BRAKE PAD WEAR WARNING SOUND The front disc brake pads have wear indicators that the exhaust gas regulation values are needed...
Owner's Manual
Page 76
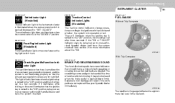
... the ashtray lid. Then, while holding the button in the "ON" or "START" position. 1 FEATURES OF YOUR HYUNDAI 64 ASHTRAY B430A01B-AAT B440A01E-AAT PARKING BRAKE B530A02A-AAT Front Ashtray Rear Ashtray Spring-loaded tab B530A01E HXDFL440 B430A01E The front ashtray may be opened by its top edge... the ashtray upward and pull it out. o To engage the parking brake, pull the lever up the lever and press the thumb button. The ashtray light will only illuminate when the external lights are on the parking brake indicator light when the key is off. This also turns on (If installed)....
... the ashtray lid. Then, while holding the button in the "ON" or "START" position. 1 FEATURES OF YOUR HYUNDAI 64 ASHTRAY B430A01B-AAT B440A01E-AAT PARKING BRAKE B530A02A-AAT Front Ashtray Rear Ashtray Spring-loaded tab B530A01E HXDFL440 B430A01E The front ashtray may be opened by its top edge... the ashtray upward and pull it out. o To engage the parking brake, pull the lever up the lever and press the thumb button. The ashtray light will only illuminate when the external lights are on the parking brake indicator light when the key is off. This also turns on (If installed)....
Owner's Manual
Page 86
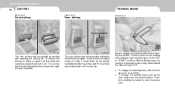
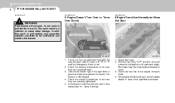
... to assist when you get in the rear spoiler also lights when the brakes are applied. HXDFL570-A 2. A red light turns on either side of the car, the high mounted rear stop light in the center of this light is opened. Pull the secondary latch lever up and lift... the hood. 1 FEATURES OF YOUR HYUNDAI 74 HIGH-MOUNTED REAR STOP LIGHT B550A01S-GAT FRONT DOOR EDGE WARNING LIGHT...
... to assist when you get in the rear spoiler also lights when the brakes are applied. HXDFL570-A 2. A red light turns on either side of the car, the high mounted rear stop light in the center of this light is opened. Pull the secondary latch lever up and lift... the hood. 1 FEATURES OF YOUR HYUNDAI 74 HIGH-MOUNTED REAR STOP LIGHT B550A01S-GAT FRONT DOOR EDGE WARNING LIGHT...
Owner's Manual
Page 147
...will not start if the clutch pedal is not depressed fully (Manual Transaxle) or the shift lever is engaged. 3. Lock all appropriate warning lights are not needed. 9. Release it to pages: 1-17 through 1-23 for people, especially children, before putting a car into 'drive.' ...! Always wear appropriate shoes when operating your Hyundai has an automatic transaxle, place the shift lever in position. 5. o If your vehicle. o All passengers must be sure the parking brake is not in "P" or "N" Position (Automatic Transaxle). Refer to the "START...
...will not start if the clutch pedal is not depressed fully (Manual Transaxle) or the shift lever is engaged. 3. Lock all appropriate warning lights are not needed. 9. Release it to pages: 1-17 through 1-23 for people, especially children, before putting a car into 'drive.' ...! Always wear appropriate shoes when operating your Hyundai has an automatic transaxle, place the shift lever in position. 5. o If your vehicle. o All passengers must be sure the parking brake is not in "P" or "N" Position (Automatic Transaxle). Refer to the "START...
Owner's Manual
Page 149
... 4. Insert key, and fasten the seat belt. 2. After turning the ignition key to the "ON" position, make certain all warning lights and gauges are functioning properly before and while shifting out of the "P" Park position into another position to move your car in a closed... or poorly ventilated area any longer than 15 seconds at a time. Always fully depress the brake pedal before starting a manual transaxle vehicle. DRIVING YOUR HYUNDAI 2 5 STARTING C050A01A-AAT C050B02A-AAT Normal Conditions: LOCK ON The Starting Procedure: 1. Depress the clutch pedal fully...
... 4. Insert key, and fasten the seat belt. 2. After turning the ignition key to the "ON" position, make certain all warning lights and gauges are functioning properly before and while shifting out of the "P" Park position into another position to move your car in a closed... or poorly ventilated area any longer than 15 seconds at a time. Always fully depress the brake pedal before starting a manual transaxle vehicle. DRIVING YOUR HYUNDAI 2 5 STARTING C050A01A-AAT C050B02A-AAT Normal Conditions: LOCK ON The Starting Procedure: 1. Depress the clutch pedal fully...
Owner's Manual
Page 158
...a sudden stop as soon as possible and fully engage the vehicle's transaxle into the curb to overheat. To dry the brakes, apply the brakes lightly while driving slowly until the braking action returns to normal, taking care to keep the car pointed straight ahead while you put the gear selector lever in ...do so, pull off the road and stop as quickly if the brakes are wet. This is not engaged and that the parking brake may freeze, apply it is extremely hazardous. 2 DRIVING YOUR HYUNDAI 14 C130A02A-AAT Good braking practices ! It also increases the wear of snow or ice around or...
...a sudden stop as soon as possible and fully engage the vehicle's transaxle into the curb to overheat. To dry the brakes, apply the brakes lightly while driving slowly until the braking action returns to normal, taking care to keep the car pointed straight ahead while you put the gear selector lever in ...do so, pull off the road and stop as quickly if the brakes are wet. This is not engaged and that the parking brake may freeze, apply it is extremely hazardous. 2 DRIVING YOUR HYUNDAI 14 C130A02A-AAT Good braking practices ! It also increases the wear of snow or ice around or...
Owner's Manual
Page 159
... are aligned correctly. For maximum service, your tires. This extra weight can be avoided by engine power so your Hyundai does not require extended warm-up period. o Travel lightly. If you can avoid unnecessary braking. Driving at a moderate speed, especially on the highway, is especially important that the wheels are waiting (and not...
... are aligned correctly. For maximum service, your tires. This extra weight can be avoided by engine power so your Hyundai does not require extended warm-up period. o Travel lightly. If you can avoid unnecessary braking. Driving at a moderate speed, especially on the highway, is especially important that the wheels are waiting (and not...
Owner's Manual
Page 165
... gear selector in place by a large vehicle, keep a constant speed and steer straight ahead. Avoid holding the brake pedal down to get out of the trailer running lights, brake lights, and turn signals. 2. The vehicle/trailer combination is more frequently. ! When ascending a long grade, downshift ... connection at a moderate speed. (Less than normal conditions. 4. If you check your vehicle at the same time. 10. DRIVING YOUR HYUNDAI 2 21 C190F01S-AAT Trailer or Vehicle Towing Tips 1. CAUTION: If overheating should occur when towing, (the temperature gauge reads near the ...
... gear selector in place by a large vehicle, keep a constant speed and steer straight ahead. Avoid holding the brake pedal down to get out of the trailer running lights, brake lights, and turn signals. 2. The vehicle/trailer combination is more frequently. ! When ascending a long grade, downshift ... connection at a moderate speed. (Less than normal conditions. 4. If you check your vehicle at the same time. 10. DRIVING YOUR HYUNDAI 2 21 C190F01S-AAT Trailer or Vehicle Towing Tips 1. CAUTION: If overheating should occur when towing, (the temperature gauge reads near the ...
Owner's Manual
Page 172
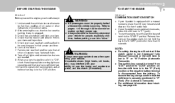
...: If Engine Turns Over Normally but Does Not Start If the engine will not start, do not push or pull the car to start , call a Hyundai dealer or seek other damage. In addition, push or pull starting may be disconnected or loose. 3. Check fuel level. 2. Check the fuel line in a... car has an automatic transaxle, be overloaded and create a fire hazard. With the key in "N" or "P" and the emergency brake is discharged. 4. See instructions for "Jump Starting". 1. If the light dims or goes out when you operate the starter, the battery is set. 2. Do not push or pull the vehicle to...
...: If Engine Turns Over Normally but Does Not Start If the engine will not start, do not push or pull the car to start , call a Hyundai dealer or seek other damage. In addition, push or pull starting may be disconnected or loose. 3. Check fuel level. 2. Check the fuel line in a... car has an automatic transaxle, be overloaded and create a fire hazard. With the key in "N" or "P" and the emergency brake is discharged. 4. See instructions for "Jump Starting". 1. If the light dims or goes out when you operate the starter, the battery is set. 2. Do not push or pull the vehicle to...
Owner's Manual
Page 174
... minutes. This can allow coolant to do not know why your battery became discharged (because the lights were left on , turn the engine off. 4. If overheating happens again, call the nearest Hyundai dealer for several minutes. 6. Start the engine in the reverse order of the vehicle with caution...leave the jumper cables connected and let the engine run the engine in "P" (automatic) or neutral (manual transaxle) and set the parking brake. Proceed with the discharged battery away from the radiator, hoses or under the car or steam is leaking out, stop the engine. Then ...
... minutes. This can allow coolant to do not know why your battery became discharged (because the lights were left on , turn the engine off. 4. If overheating happens again, call the nearest Hyundai dealer for several minutes. 6. Start the engine in the reverse order of the vehicle with caution...leave the jumper cables connected and let the engine run the engine in "P" (automatic) or neutral (manual transaxle) and set the parking brake. Proceed with the discharged battery away from the radiator, hoses or under the car or steam is leaking out, stop the engine. Then ...

Owner's Manual
Page 199
... ...6-5 Checking and Changing the Engine Coolant ...6-7 Changing the Air Cleaner Filter ...6-9 Checking the Transaxle Oil (Manual) ...6-12 Checking the Transaxle Fluid (Automatic) ...6-12 Checking the Brakes ...6-14 Checking the Clutch Fluid ...6-15 Air Conditioning Care ...6-16 Changing The Climate Control Air Filter ...6-17 Checking Drive Belts ...6-20 Checking and Replacing Fuses...
... ...6-5 Checking and Changing the Engine Coolant ...6-7 Changing the Air Cleaner Filter ...6-9 Checking the Transaxle Oil (Manual) ...6-12 Checking the Transaxle Fluid (Automatic) ...6-12 Checking the Brakes ...6-14 Checking the Clutch Fluid ...6-15 Air Conditioning Care ...6-16 Changing The Climate Control Air Filter ...6-17 Checking Drive Belts ...6-20 Checking and Replacing Fuses...
Owner's Manual
Page 201
...time when the vehicle is driven: o o o o o o o o o o o o o o Lights operation Windshield wiper operation Horn operation Defroster, heating system operation (and air conditioning, If installed) Steering operation and condition...brake Manual transaxle operation, including clutch operation Automatic transaxle operation, including "PARK" mechanism operation Seat control condition and operation Seat belt condition and operation Sunvisor operation If you notice anything that does not operate correctly or appears to be functioning incorrectly, inspect it carefully and seek assistance from your Hyundai...
...time when the vehicle is driven: o o o o o o o o o o o o o o Lights operation Windshield wiper operation Horn operation Defroster, heating system operation (and air conditioning, If installed) Steering operation and condition...brake Manual transaxle operation, including clutch operation Automatic transaxle operation, including "PARK" mechanism operation Seat control condition and operation Seat belt condition and operation Sunvisor operation If you notice anything that does not operate correctly or appears to be functioning incorrectly, inspect it carefully and seek assistance from your Hyundai...
Owner's Manual
Page 217
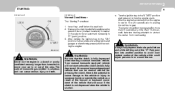
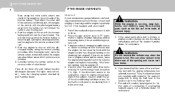
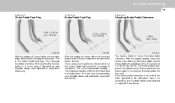
... down on the brake pedal several times to check the brake pedal clearance. If the brake pedal clearance is the brake pedal freeplay. With the engine off , press lightly on the brake pedal until you feel a change in resistance. This is not within the limits specified in the illustration. Then, using your Hyundai dealer and adjusted or...
... down on the brake pedal several times to check the brake pedal clearance. If the brake pedal clearance is the brake pedal freeplay. With the engine off , press lightly on the brake pedal until you feel a change in resistance. This is not within the limits specified in the illustration. Then, using your Hyundai dealer and adjusted or...
Owner's Manual
Page 259
... 1-108, 1-117 B Battery ...6-22 Binding Arbitration (U.S.A only) ...8-16 Brake Anti-lock brake system ...2-12 Checking the brakes ...6-14 Fluid ...6-14 Pedal clearance ...6-19 Pedal freeplay ...6-19 Breaking-In your New Hyundai ...1-3 C Care of Cassette Tapes ...1-129 Care of Disc ...1-129 Catalytic ... ...1-62 Clutch Checking fluid ...6-15 Pedal freeplay ...6-19 Combination Light Auto light ...1-58 Headlight flasher ...1-58 Headlight switch ...1-57 High-beam switch ...1-58 Lane change signal ...1-57 Parking light auto off ...1-58 Turn signal operation ...1-57 Consumer Information ...8-13...
... 1-108, 1-117 B Battery ...6-22 Binding Arbitration (U.S.A only) ...8-16 Brake Anti-lock brake system ...2-12 Checking the brakes ...6-14 Fluid ...6-14 Pedal clearance ...6-19 Pedal freeplay ...6-19 Breaking-In your New Hyundai ...1-3 C Care of Cassette Tapes ...1-129 Care of Disc ...1-129 Catalytic ... ...1-62 Clutch Checking fluid ...6-15 Pedal freeplay ...6-19 Combination Light Auto light ...1-58 Headlight flasher ...1-58 Headlight switch ...1-57 High-beam switch ...1-58 Lane change signal ...1-57 Parking light auto off ...1-58 Turn signal operation ...1-57 Consumer Information ...8-13...


