

Owner's Manual
Page 64
... inside rearview mirror controls automatically the glare of headlights of the car behind you . Adjust the rearview mirror to the desired position. ! The outside rearview mirrors, push them toward you is moving. The electric type day/night inside rear view mirror. 1- 52 FEATURES OF YOUR HYUNDAI B510C01A-AAT B520A01A-AAT B520B01O-GAT FOLDING...
... inside rearview mirror controls automatically the glare of headlights of the car behind you . Adjust the rearview mirror to the desired position. ! The outside rearview mirrors, push them toward you is moving. The electric type day/night inside rear view mirror. 1- 52 FEATURES OF YOUR HYUNDAI B510C01A-AAT B520A01A-AAT B520B01O-GAT FOLDING...
Owner's Manual
Page 184
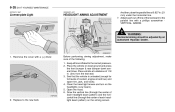
6- 26 DO-IT-YOURSELF MAINTENANCE G270H01Y-GAT G290A05Y-AAT License plate Light HEADLIGHT AIMING ADJUSTMENT And then, draw the parallel line at a distance of the following. 1. Before performing aiming adjustment, make sure of 118 in . (21 mm) under the horizontal line. 7. Place vehicle at 0.827 ...bumper down several times. Place the vehicle on the headlights (Low beam). 5. HEF-236 2. WARNING: Horizontal aiming should be adjusted by an authorized Hyundai Dealer. Open the hood. 6. Adjust each cut-off line of each headlight beam pattern) and the horizontal line (through the ...
6- 26 DO-IT-YOURSELF MAINTENANCE G270H01Y-GAT G290A05Y-AAT License plate Light HEADLIGHT AIMING ADJUSTMENT And then, draw the parallel line at a distance of the following. 1. Before performing aiming adjustment, make sure of 118 in . (21 mm) under the horizontal line. 7. Place vehicle at 0.827 ...bumper down several times. Place the vehicle on the headlights (Low beam). 5. HEF-236 2. WARNING: Horizontal aiming should be adjusted by an authorized Hyundai Dealer. Open the hood. 6. Adjust each cut-off line of each headlight beam pattern) and the horizontal line (through the ...

Owner's Manual
Page 185
...Low Beam: 51.97 in. (1,320mm) High Beam: 39.05 in. (992mm) "L" Distance between the headlights and the wall that main axis of light is aligned with point "P" shown in the illustration. 2. Adjust headlights so that the lights are tested against : 118 in. (3,000 mm) Cut-off line L H Ground ...line G290B02Y-1 If the vehicle has had front body repair and the headlight assembly has been replaced, the headlight aiming should be checked using the aiming ...
...Low Beam: 51.97 in. (1,320mm) High Beam: 39.05 in. (992mm) "L" Distance between the headlights and the wall that main axis of light is aligned with point "P" shown in the illustration. 2. Adjust headlights so that the lights are tested against : 118 in. (3,000 mm) Cut-off line L H Ground ...line G290B02Y-1 If the vehicle has had front body repair and the headlight assembly has been replaced, the headlight aiming should be checked using the aiming ...
Owner's Manual
Page 205
... Control ...1-66 Floor Mat Anchor ...1-62 Fog Light Front ...1-42 Front Seats Adjustable front seats ...1-10 Adjustable headrests ...1-11 Adjusting seat forward and rearward ...1-10 Adjusting seatback angle ...1-11 Fuel Capacity ...9-2 Gauge ...1-38 Unleaded gasoline ...1-2 Fuel Filler... Lid Remote release ...1-58 Fuses ...6-18 G General Everyday Checks ...6-4 Glove Box ...1-50 H Hazard Warning System ...1-44 Headlight...
... Control ...1-66 Floor Mat Anchor ...1-62 Fog Light Front ...1-42 Front Seats Adjustable front seats ...1-10 Adjustable headrests ...1-11 Adjusting seat forward and rearward ...1-10 Adjusting seatback angle ...1-11 Fuel Capacity ...9-2 Gauge ...1-38 Unleaded gasoline ...1-2 Fuel Filler... Lid Remote release ...1-58 Fuses ...6-18 G General Everyday Checks ...6-4 Glove Box ...1-50 H Hazard Warning System ...1-44 Headlight...


