
Owner's Manual
Page 55
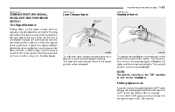
... turn them "ON" again, you do not turn the ignition key to the "ON" position. Parking light auto cut If you must be in the system. Check for a burnedout fuse or bulb or see your Hyundai dealer. Lane Change Signal RIGHT Headlight Switch LEFT HSM286 HSM284 To indicate a lane change, move the lever...
... turn them "ON" again, you do not turn the ignition key to the "ON" position. Parking light auto cut If you must be in the system. Check for a burnedout fuse or bulb or see your Hyundai dealer. Lane Change Signal RIGHT Headlight Switch LEFT HSM286 HSM284 To indicate a lane change, move the lever...
Owner's Manual
Page 125
...neutral and depress the clutch pedal fully. As with a manual transaxle, place the shift lever in a wide variety of warning lights and all lights and accessories that 15 seconds. To remove the key, always confirm that you turn it as soon as the engine starts. Do...challenging off all bulbs when key is disconnected from "ACC" position to anticipate problem. Check that were intended for more that are operating and that the shift lever is designed primarily for cornering at all the doors. 7. DRIVING YOUR HYUNDAI C030A01E-AAT 2- 3 ! The 4WD Santa Fe is securely ...
...neutral and depress the clutch pedal fully. As with a manual transaxle, place the shift lever in a wide variety of warning lights and all lights and accessories that 15 seconds. To remove the key, always confirm that you turn it as soon as the engine starts. Do...challenging off all bulbs when key is disconnected from "ACC" position to anticipate problem. Check that were intended for more that are operating and that the shift lever is designed primarily for cornering at all the doors. 7. DRIVING YOUR HYUNDAI C030A01E-AAT 2- 3 ! The 4WD Santa Fe is securely ...
Owner's Manual
Page 171
6. Do-It-Yourself Maintenance Engine Compartment ...6-2 General Checks ...6-5 Checking the Engine Oil ...6-6 Changing the Oil and Filter ...6-7 Checking and Changing the Engine Coolant ...6-8 Spark Plugs ...6-10 Changing the Air Cleaner Filter ...6-12 Checking the Transaxle Oil (Manual) ...6-13 Checking the Transaxle Fluid (Automatic) ...6-13 Checking the Brakes ...6-15 Air Conditioning Care ...6-17 Checking Drive Belts ...6-19 Checking and Replacing Fuses ...6-20 Checking the Battery ...6-21 Power Steering Fluid Level ...6-22 Replacement of Light Bulbs ...6-24 6
6. Do-It-Yourself Maintenance Engine Compartment ...6-2 General Checks ...6-5 Checking the Engine Oil ...6-6 Changing the Oil and Filter ...6-7 Checking and Changing the Engine Coolant ...6-8 Spark Plugs ...6-10 Changing the Air Cleaner Filter ...6-12 Checking the Transaxle Oil (Manual) ...6-13 Checking the Transaxle Fluid (Automatic) ...6-13 Checking the Brakes ...6-15 Air Conditioning Care ...6-17 Checking Drive Belts ...6-19 Checking and Replacing Fuses ...6-20 Checking the Battery ...6-21 Power Steering Fluid Level ...6-22 Replacement of Light Bulbs ...6-24 6
Owner's Manual
Page 194
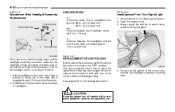
... 24 DO-IT-YOURSELF MAINTENANCE G290B01Y-AAT Adjustment After Headlight Assembly Replacement Vertical line Horizontal line W SPECIFICATION: "H"; Allow the bulb to reach the light bulbs so they may be changed. Always grasp the bulb by its plastic base, avoid touching the glass. Be sure to replace the burned-out...the headlights and the wall that main axis of light is parallel to center line of the body and is turned to replace a light bulb, be checked using an aiming chart as oil, gasoline, etc. G270A01O-AAT Headlight and Front Turn Signal Light 1. Turn on the headlight switch. (Low ...
... 24 DO-IT-YOURSELF MAINTENANCE G290B01Y-AAT Adjustment After Headlight Assembly Replacement Vertical line Horizontal line W SPECIFICATION: "H"; Allow the bulb to reach the light bulbs so they may be changed. Always grasp the bulb by its plastic base, avoid touching the glass. Be sure to replace the burned-out...the headlights and the wall that main axis of light is parallel to center line of the body and is turned to replace a light bulb, be checked using an aiming chart as oil, gasoline, etc. G270A01O-AAT Headlight and Front Turn Signal Light 1. Turn on the headlight switch. (Low ...
Owner's Manual
Page 196
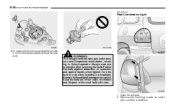
...headlight if damaged or cracked. Protect the bulb against abrasions or scratches and against liquids when lighted. Turn the bulb on only when installing in flying fragments. Keep the bulb out of the reach of children and dispose of the used bulb with a phillips screwdriver. Open the ...tail gate. 2. Always wear eye protection when servicing the bulb. 6- 26 DO-IT-YOURSELF MAINTENANCE G270B01O-AAT Rear Combination Light (2) (4) (1) (3) HSM332 G270A03O 12.To replace the front turn signal light bulb, take it out from the bulb holder ...
...headlight if damaged or cracked. Protect the bulb against abrasions or scratches and against liquids when lighted. Turn the bulb on only when installing in flying fragments. Keep the bulb out of the reach of children and dispose of the used bulb with a phillips screwdriver. Open the ...tail gate. 2. Always wear eye protection when servicing the bulb. 6- 26 DO-IT-YOURSELF MAINTENANCE G270B01O-AAT Rear Combination Light (2) (4) (1) (3) HSM332 G270A03O 12.To replace the front turn signal light bulb, take it out from the bulb holder ...
Owner's Manual
Page 197
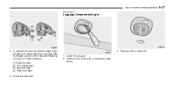
DO-IT-YOURSELF MAINTENANCE G270C01O-AAT 6- 27 Luggage Compartment Light (2) (3) (1) (4) HSM423 HSM342 3. To replace the rear combination light (stop/ tail light, turn signal light, back-up light, side mark light), take it out from the bulb holder by turning it counterclockwise. (1) Stop/Tail light (2) Turn signal light (3) Back-up light (4) Side mark light 4. Install the new bulb. Remove the cover with a new bulb. 1. HSM341 3. Replace with a flat-head screwdriver. Open the tail gate. 2.
DO-IT-YOURSELF MAINTENANCE G270C01O-AAT 6- 27 Luggage Compartment Light (2) (3) (1) (4) HSM423 HSM342 3. To replace the rear combination light (stop/ tail light, turn signal light, back-up light, side mark light), take it out from the bulb holder by turning it counterclockwise. (1) Stop/Tail light (2) Turn signal light (3) Back-up light (4) Side mark light 4. Install the new bulb. Remove the cover with a new bulb. 1. HSM341 3. Replace with a flat-head screwdriver. Open the tail gate. 2.
Owner's Manual
Page 198
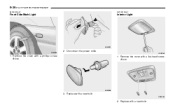
Remove the cover with a new bulb. HSM344 2. Replace with a flat-head screwdriver. Remove the cover with a new bulb. 6- 28 DO-IT-YOURSELF MAINTENANCE G270E01O-AAT G270G01O-AAT Front Side Mark Light Interior Light HSM335 2. HSM334 HSM343 1. HSM336 3. Replace with a phillips screwdriver. 1. Disconnect the power code.
Remove the cover with a new bulb. HSM344 2. Replace with a flat-head screwdriver. Remove the cover with a new bulb. 6- 28 DO-IT-YOURSELF MAINTENANCE G270E01O-AAT G270G01O-AAT Front Side Mark Light Interior Light HSM335 2. HSM334 HSM343 1. HSM336 3. Replace with a phillips screwdriver. 1. Disconnect the power code.
Owner's Manual
Page 199
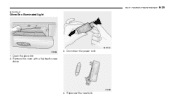
HTB284 4. Disconnect the power cord. 1. Open the glove box. 2. Remove the cover with a new bulb. Replace with a flat-head screwdriver. DO-IT-YOURSELF MAINTENANCE G270H01O-AAT 6- 29 Glove Box Illuminated Light G270E02L HSM366 3.
HTB284 4. Disconnect the power cord. 1. Open the glove box. 2. Remove the cover with a new bulb. Replace with a flat-head screwdriver. DO-IT-YOURSELF MAINTENANCE G270H01O-AAT 6- 29 Glove Box Illuminated Light G270E02L HSM366 3.
Owner's Manual
Page 219
10- 4 INDEX Hood Release ...1-63 Horn ...1-65 I Ignition Switch ...2-3 Instrument Cluster and Indicator Lights ...1-36 Instrument Panel Light Control (Rheostat) ...1-48 J Jump Starting ...3-2 K Key ...1-3 If you lose your keys ...3-11 Positions ...2-4 L Light Bulbs Replacement ...6-24 Limited-Slip Differential ...2-15 Luggage Net ...1-60 M Maintenance Intervals Explanation of scheduled maintenance items ...5-7 Maintenance under severe usage conditions ...5-6 Scheduled...
10- 4 INDEX Hood Release ...1-63 Horn ...1-65 I Ignition Switch ...2-3 Instrument Cluster and Indicator Lights ...1-36 Instrument Panel Light Control (Rheostat) ...1-48 J Jump Starting ...3-2 K Key ...1-3 If you lose your keys ...3-11 Positions ...2-4 L Light Bulbs Replacement ...6-24 Limited-Slip Differential ...2-15 Luggage Net ...1-60 M Maintenance Intervals Explanation of scheduled maintenance items ...5-7 Maintenance under severe usage conditions ...5-6 Scheduled...


