
Owner's Manual
Page 49
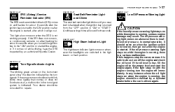
...oil level is running , turn signal system is insufficient oil pressure. B260D01A-AAT Turn Signal Indicator Lights The blinking green arrows on whenever the headlights are switched to the high beam or flash position. Your dealer should be checked by the turn off immediately. If the low oil pressure...to the proper level and start the engine again. In normal operation, it comes on while driving, have the SRS inspected by an authorized Hyundai Dealer. If the light stays on with the engine running , serious engine damage may result. Seat Belt Reminder Light and Chime The seat ...
...oil level is running , turn signal system is insufficient oil pressure. B260D01A-AAT Turn Signal Indicator Lights The blinking green arrows on whenever the headlights are switched to the high beam or flash position. Your dealer should be checked by the turn off immediately. If the low oil pressure...to the proper level and start the engine again. In normal operation, it comes on while driving, have the SRS inspected by an authorized Hyundai Dealer. If the light stays on with the engine running , serious engine damage may result. Seat Belt Reminder Light and Chime The seat ...
Owner's Manual
Page 55
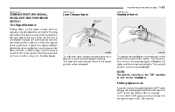
FEATURES OF YOUR HYUNDAI B340A01A-AAT B340B01A-AAT B340C03A-AAT 1- 43 COMBINATION TURN SIGNAL, HEADLIGHT AND HIGH-BEAM SWITCH Turn Signal Operation Pulling down to ... completed, the lever will automatically return to the center position and turn off the turn signals on the headlights. To turn them "ON" again, you do not turn the parking lights "OFF" after driving, ...lights will automatically return to blink. Check for a burnedout fuse or bulb or see your Hyundai dealer. To operate the headlights, turn on the right side of the car to the center position when released. Parking ...
FEATURES OF YOUR HYUNDAI B340A01A-AAT B340B01A-AAT B340C03A-AAT 1- 43 COMBINATION TURN SIGNAL, HEADLIGHT AND HIGH-BEAM SWITCH Turn Signal Operation Pulling down to ... completed, the lever will automatically return to the center position and turn off the turn signals on the headlights. To turn them "ON" again, you do not turn the parking lights "OFF" after driving, ...lights will automatically return to blink. Check for a burnedout fuse or bulb or see your Hyundai dealer. To operate the headlights, turn on the right side of the car to the center position when released. Parking ...
Owner's Manual
Page 56
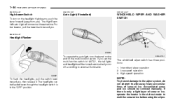
... prevent damage to the wiper system, do not attempt to "AUTO", the tail lights and headlights will come on the end of the multi-function switch. The headlights can be removed manually. 1- 44 FEATURES OF YOUR HYUNDAI B340D01A-AAT B340F01L-GAT B350A01A-AAT High-beam Switch To turn the barrel on at the...
... prevent damage to the wiper system, do not attempt to "AUTO", the tail lights and headlights will come on the end of the multi-function switch. The headlights can be removed manually. 1- 44 FEATURES OF YOUR HYUNDAI B340D01A-AAT B340F01L-GAT B350A01A-AAT High-beam Switch To turn the barrel on at the...

Owner's Manual
Page 58
... necessary to blink. They will light when the headlight switch is in the second position and the ignition key is in the ignition. The hazard warning lights will operate even though the key is not in the "ON" position. 1- 46 FEATURES OF YOUR HYUNDAI B350A01O-AAT B360A01A-AAT B370A01A-AAT Tailgate Wiper...
... necessary to blink. They will light when the headlight switch is in the second position and the ignition key is in the ignition. The hazard warning lights will operate even though the key is not in the "ON" position. 1- 46 FEATURES OF YOUR HYUNDAI B350A01O-AAT B360A01A-AAT B370A01A-AAT Tailgate Wiper...
Owner's Manual
Page 67
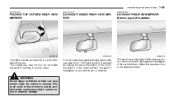
... REAR VIEW MIRROR (Electric type) (If installed) B510C01O B520A01O B520B01O To fold the outside rear view mirrors while the vehicle is moving. Your Hyundai is selected by flipping the tab at the bottom of control, and an accident which could result in narrow areas. The "night" position is... equipped with a day/night inside rearview mirror controls automatically the glare of headlights of cars behind you . The electric type day/night inside rear view mirror. In the "night" position, the glare of...
... REAR VIEW MIRROR (Electric type) (If installed) B510C01O B520A01O B520B01O To fold the outside rear view mirrors while the vehicle is moving. Your Hyundai is selected by flipping the tab at the bottom of control, and an accident which could result in narrow areas. The "night" position is... equipped with a day/night inside rearview mirror controls automatically the glare of headlights of cars behind you . The electric type day/night inside rear view mirror. In the "night" position, the glare of...
Owner's Manual
Page 141
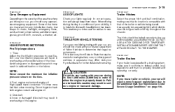
... in serious engine or transaxle damage. The hitch should carry appropriate emergency equipment. Tires: Adjust the tire inflation pressures to specification. DRIVING YOUR HYUNDAI C160K01A-AAT C180A01A-AAT C190B01S-AAT 2- 19 Carry Emergency Equipment Depending on the severity of the weather where you drive your trailer is equipped... with a braking system, make sure it conforms to federal and/or local regulations and that it is helpful to drive with headlights on low beam. Drive belt: A loose or damaged drive belt may want to check both engine coolant and engine oil. 3.
... in serious engine or transaxle damage. The hitch should carry appropriate emergency equipment. Tires: Adjust the tire inflation pressures to specification. DRIVING YOUR HYUNDAI C160K01A-AAT C180A01A-AAT C190B01S-AAT 2- 19 Carry Emergency Equipment Depending on the severity of the weather where you drive your trailer is equipped... with a braking system, make sure it conforms to federal and/or local regulations and that it is helpful to drive with headlights on low beam. Drive belt: A loose or damaged drive belt may want to check both engine coolant and engine oil. 3.
Owner's Manual
Page 193
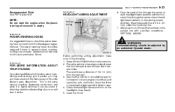
...headlights (Low beam). 5. Deterioration of the following. 1. See that you may purchase a factory Shop Manual at a distance of 118.1 in . (21 mm) under the horizontal line. 7. Keep all tires inflated to the parallel line with a phillips screwdriver VERTICAL AIMING. G250A01A-AAT FOR MORE INFORMATION ABOUT YOUR HYUNDAI... parallel line at regular intervals. DO-IT-YOURSELF MAINTENANCE 6- 23 Recommended Fluid Use PSF-3 type fluid G290A02O-AAT HEADLIGHT AIMING ADJUSTMENT Vertical aiming NOTE: Do not start the engine when the power steering oil reservoir is unloaded (except for...
...headlights (Low beam). 5. Deterioration of the following. 1. See that you may purchase a factory Shop Manual at a distance of 118.1 in . (21 mm) under the horizontal line. 7. Keep all tires inflated to the parallel line with a phillips screwdriver VERTICAL AIMING. G250A01A-AAT FOR MORE INFORMATION ABOUT YOUR HYUNDAI... parallel line at regular intervals. DO-IT-YOURSELF MAINTENANCE 6- 23 Recommended Fluid Use PSF-3 type fluid G290A02O-AAT HEADLIGHT AIMING ADJUSTMENT Vertical aiming NOTE: Do not start the engine when the power steering oil reservoir is unloaded (except for...
Owner's Manual
Page 194
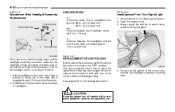
..."P" H Cut-off line H L Ground line G290A03O G260A01L-AAT If the vehicle has had front body repair and the headlight assembly has been replaced, the headlight aiming should be checked using an aiming chart as oil, gasoline, etc. Dotted lines in the illustration show the center of...HSM353 4. Always grasp the bulb by its plastic base, avoid touching the glass. 6- 24 DO-IT-YOURSELF MAINTENANCE G290B01Y-AAT Adjustment After Headlight Assembly Replacement Vertical line Horizontal line W SPECIFICATION: "H"; The next paragraph shows how to reach the light bulbs so they may be sure...
..."P" H Cut-off line H L Ground line G290A03O G260A01L-AAT If the vehicle has had front body repair and the headlight assembly has been replaced, the headlight aiming should be checked using an aiming chart as oil, gasoline, etc. Dotted lines in the illustration show the center of...HSM353 4. Always grasp the bulb by its plastic base, avoid touching the glass. 6- 24 DO-IT-YOURSELF MAINTENANCE G290B01Y-AAT Adjustment After Headlight Assembly Replacement Vertical line Horizontal line W SPECIFICATION: "H"; The next paragraph shows how to reach the light bulbs so they may be sure...
Owner's Manual
Page 195
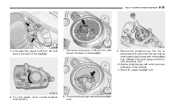
... base in the back of the old bulb. 11.Check for proper headlight aim. Push the bulb spring to promptly dispose of the headlight. 9. Disconnect the power cord from the bulb base in the back of the headlight. 7. G270A01O HSM330 6. Remove the protective cap from the replacement bulb ...and install the new bulb by matching the plastic base with the headlight hole. DO-IT-YOURSELF MAINTENANCE 6- 25 HSM328 HSM329 HSM331 5. Turn the ...
... base in the back of the old bulb. 11.Check for proper headlight aim. Push the bulb spring to promptly dispose of the headlight. 9. Disconnect the power cord from the bulb base in the back of the headlight. 7. G270A01O HSM330 6. Remove the protective cap from the replacement bulb ...and install the new bulb by matching the plastic base with the headlight hole. DO-IT-YOURSELF MAINTENANCE 6- 25 HSM328 HSM329 HSM331 5. Turn the ...
Owner's Manual
Page 196
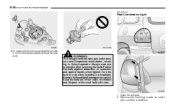
... (2) (4) (1) (3) HSM332 G270A03O 12.To replace the front turn signal light bulb, take it out from the bulb holder and install the new bulb. ! Replace the headlight if damaged or cracked. Always wear eye protection when servicing the bulb. HSM337 1. Keep the bulb out of the reach of children and dispose of... when installing in flying fragments. Open the tail gate. 2. HSM352 WARNING: This halogen bulb contains gas under pressure and if impacted could shatter, resulting in a headlight. Protect the bulb against abrasions or scratches and against liquids when lighted.
... (2) (4) (1) (3) HSM332 G270A03O 12.To replace the front turn signal light bulb, take it out from the bulb holder and install the new bulb. ! Replace the headlight if damaged or cracked. Always wear eye protection when servicing the bulb. HSM337 1. Keep the bulb out of the reach of children and dispose of... when installing in flying fragments. Open the tail gate. 2. HSM352 WARNING: This halogen bulb contains gas under pressure and if impacted could shatter, resulting in a headlight. Protect the bulb against abrasions or scratches and against liquids when lighted.
Owner's Manual
Page 217
... ...2-11 Checking the brakes ...6-15 Fluid ...6-15 Pedal clearance ...6-19 Pedal free-play ...6-19 Practices ...2-15 Breaking-In your New Hyundai ...1-3 C Calendar ...1-47 Care of Cassette Tapes ...1-109 Care of Disc ...1-109 Cargo Security Screen ...1-60 Catalytic Converter ...7-3 Child-......1-25 Cigarette Lighter ...1-48 Clock ...1-47 Clutch Checking fluid ...6-16 Pedal free-play ...6-18 Combination Light Auto light ...1-44 Headlight flasher ...1-44 Headlight switch ...1-43 High-beam switch ...1-44 Lane change signal ...1-43 Parking light auto cut ...1-43 Turn signal operation ...1-43...
... ...2-11 Checking the brakes ...6-15 Fluid ...6-15 Pedal clearance ...6-19 Pedal free-play ...6-19 Practices ...2-15 Breaking-In your New Hyundai ...1-3 C Calendar ...1-47 Care of Cassette Tapes ...1-109 Care of Disc ...1-109 Cargo Security Screen ...1-60 Catalytic Converter ...7-3 Child-......1-25 Cigarette Lighter ...1-48 Clock ...1-47 Clutch Checking fluid ...6-16 Pedal free-play ...6-18 Combination Light Auto light ...1-44 Headlight flasher ...1-44 Headlight switch ...1-43 High-beam switch ...1-44 Lane change signal ...1-43 Parking light auto cut ...1-43 Turn signal operation ...1-43...


