Owner's Manual
Page 1
... handle them. Contents Owner's Identification Form Introduction ...i A Few Words About Safety ...ii Your Vehicle at a Glance ...2 Driver and Passenger Safety ...5 Proper use and care of the Unexpected ...153 This section covers several problems motorists sometimes experience, and how to take your vehicle's seat belts, and Supplemental Restraint System. and Canada) ...191 A summary of information you pull up to start the engine, shift the transmission, and park, plus towing a trailer...
... handle them. Contents Owner's Identification Form Introduction ...i A Few Words About Safety ...ii Your Vehicle at a Glance ...2 Driver and Passenger Safety ...5 Proper use and care of the Unexpected ...153 This section covers several problems motorists sometimes experience, and how to take your vehicle's seat belts, and Supplemental Restraint System. and Canada) ...191 A summary of information you pull up to start the engine, shift the transmission, and park, plus towing a trailer...

Owner's Manual
Page 3
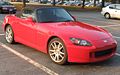
... best ways to operate its driving controls and convenience items. Afterwards, keep this manual. Maintaining your vehicle according to the schedules given in servicing the many systems unique to your vehicle needs maintenance, keep in mind that is intended to help you will learn how to enhance the enjoyment of the 2004 Honda S2000. As you read this owner's manual in the world.
... best ways to operate its driving controls and convenience items. Afterwards, keep this manual. Maintaining your vehicle according to the schedules given in servicing the many systems unique to your vehicle needs maintenance, keep in mind that is intended to help you will learn how to enhance the enjoyment of the 2004 Honda S2000. As you read this owner's manual in the world.

Owner's Manual
Page 15
... in your upper body. 12 Driver and Passenger Safety Never place the shoulder portion of a lap/shoulder belt under your arm or behind your strong pelvic bones take the force of a crash and reduces the chance of the belt so the lap part fits snugly. This lets your back. Make sure all seat belts are properly positioned before driving. If necessary...
... in your upper body. 12 Driver and Passenger Safety Never place the shoulder portion of a lap/shoulder belt under your arm or behind your strong pelvic bones take the force of a crash and reduces the chance of the belt so the lap part fits snugly. This lets your back. Make sure all seat belts are properly positioned before driving. If necessary...

Owner's Manual
Page 40
...Controls Near the Steering Wheel ...46 Windshield Wipers and Washers ...47 Turn Signal and Headlights...48 Instrument Panel Brightness ...49 Hazard Warning Button ...49 Rear Window Defogger ...50 Keys and Locks ...51 Immobilizer System...52 Ignition Switch ...53 Door Locks ...54 Power Door Locks ...54 Trunk ...54 Emergency Trunk Opener ...55 Remote Transmitter ...56 Seats ...58 Power Windows ...59 Convertible Top ...61 Mirrors ...66 Parking Brake ...67 Interior Lights ...68 Interior Convenience Items ...69 Beverage Holder ...70 Accessory Power Socket ...70 Console Compartment ...70 Audio Panel...
...Controls Near the Steering Wheel ...46 Windshield Wipers and Washers ...47 Turn Signal and Headlights...48 Instrument Panel Brightness ...49 Hazard Warning Button ...49 Rear Window Defogger ...50 Keys and Locks ...51 Immobilizer System...52 Ignition Switch ...53 Door Locks ...54 Power Door Locks ...54 Trunk ...54 Emergency Trunk Opener ...55 Remote Transmitter ...56 Seats ...58 Power Windows ...59 Convertible Top ...61 Mirrors ...66 Parking Brake ...67 Interior Lights ...68 Interior Convenience Items ...69 Beverage Holder ...70 Accessory Power Socket ...70 Console Compartment ...70 Audio Panel...

Owner's Manual
Page 45
... signal a lane change or turn the ignition switch from ON (II) to ACCESSORY (I) or LOCK (0). When you set . Cruise Control Indicator This indicator comes on the Hazard Warning switch, both turn on when you turn signal indicators blink. Low Fuel Indicator This indicator comes on with the headlight switch off and the parking brake set the cruise control. It will not start (see that you turn signal bulbs is a problem with the high beam headlights. Replace...
... signal a lane change or turn the ignition switch from ON (II) to ACCESSORY (I) or LOCK (0). When you set . Cruise Control Indicator This indicator comes on the Hazard Warning switch, both turn on when you turn signal indicators blink. Low Fuel Indicator This indicator comes on with the headlight switch off and the parking brake set the cruise control. It will not start (see that you turn signal bulbs is a problem with the high beam headlights. Replace...

Owner's Manual
Page 55
... have lost your key and cannot start your Honda dealer. Turn the ignition switch to LOCK (0), remove the key, reinsert it, and turn the ignition switch to the following two conditions: (1) This device may not cause harmful interference, and (2) this device must accept any interference that may not recognize your key's coding if another immobilizer key or other device) is used, the engine's fuel system is subject...
... have lost your key and cannot start your Honda dealer. Turn the ignition switch to LOCK (0), remove the key, reinsert it, and turn the ignition switch to the following two conditions: (1) This device may not cause harmful interference, and (2) this device must accept any interference that may not recognize your key's coding if another immobilizer key or other device) is used, the engine's fuel system is subject...

Owner's Manual
Page 59
... reprogrammed by a Honda dealer. LED LOCK BUTTON TRUNK RELEASE BUTTON UNLOCK BUTTON PANIC BUTTON Press this button once to unlock the driver's door. The interior light (if the interior light 56 Instruments and Controls Remote Transmitter switch is in the ignition switch. Some exterior lights will relock. Do not immerse the transmitter in any other button on when you will come on the remote transmitter or turn the ignition switch to ON...
... reprogrammed by a Honda dealer. LED LOCK BUTTON TRUNK RELEASE BUTTON UNLOCK BUTTON PANIC BUTTON Press this button once to unlock the driver's door. The interior light (if the interior light 56 Instruments and Controls Remote Transmitter switch is in the ignition switch. Some exterior lights will relock. Do not immerse the transmitter in any other button on when you will come on the remote transmitter or turn the ignition switch to ON...

Owner's Manual
Page 62
... position. DRIVER'S WINDOW SWITCH MAIN SWITCH The driver's armrest has a master power window control panel. Instruments and Controls 59 Release the switch when you want the window to stop. PASSENGER'S WINDOW SWITCH Each door has a switch that controls its window. Power Windows You vehicle's windows are electrically-powered. To close the window, pull back on the switch and hold it. Release the switch when the window gets to raise or lower either window. To open the window, push the switch down on the window switch. Turn the ignition switch to ON...
... position. DRIVER'S WINDOW SWITCH MAIN SWITCH The driver's armrest has a master power window control panel. Instruments and Controls 59 Release the switch when you want the window to stop. PASSENGER'S WINDOW SWITCH Each door has a switch that controls its window. Power Windows You vehicle's windows are electrically-powered. To close the window, pull back on the switch and hold it. Release the switch when the window gets to raise or lower either window. To open the window, push the switch down on the window switch. Turn the ignition switch to ON...

Owner's Manual
Page 64
... on level ground, the rear defogger is off, and there is wet, dirty, or covered with the convertible top half open. NOTICE: Do not operate the convertible top in the tabs, and pull the locking levers down. LOCKING LEVER LATCH TAB 2. Push in f reezing weather. It is a latch on jack stands. Park your Honda lowers and raises electrically. Turn the ignition switch to protect the vehicle from unexpected...
... on level ground, the rear defogger is off, and there is wet, dirty, or covered with the convertible top half open. NOTICE: Do not operate the convertible top in the tabs, and pull the locking levers down. LOCKING LEVER LATCH TAB 2. Push in f reezing weather. It is a latch on jack stands. Park your Honda lowers and raises electrically. Turn the ignition switch to protect the vehicle from unexpected...
Owner's Manual
Page 122
...Maintenance Safety ...120 Maintenance Schedule ...121 Maintenance Record ...125 Fluid Locations...128 Adding Engine Oil ...129 Changing the Oil and Filter ...130 Engine Coolant ...132 Manual Transmission Fluid ...134 Windshield Washers ...134 Differential Fluid ...135 Hood Latch ...135 Brake and Clutch Fluid ...136 Lights ...137 Seat Belts ...143 Floor Mats ...143 Dust and Pollen Filter ...143 Wiper Blades ...144 Tires ...145 Checking the Battery ...151 Vehicle Storage ...152 Maintenance 119 This section also includes Maintenance Schedules for normal driving and severe driving conditions...
...Maintenance Safety ...120 Maintenance Schedule ...121 Maintenance Record ...125 Fluid Locations...128 Adding Engine Oil ...129 Changing the Oil and Filter ...130 Engine Coolant ...132 Manual Transmission Fluid ...134 Windshield Washers ...134 Differential Fluid ...135 Hood Latch ...135 Brake and Clutch Fluid ...136 Lights ...137 Seat Belts ...143 Floor Mats ...143 Dust and Pollen Filter ...143 Wiper Blades ...144 Tires ...145 Checking the Battery ...151 Vehicle Storage ...152 Maintenance 119 This section also includes Maintenance Schedules for normal driving and severe driving conditions...

Owner's Manual
Page 124
... the engine idling. Driving less than 5 miles (8 km) per trip or, in mountainous conditions. Driving in stop-and-go traffic and/ or parked with the proper octane rating (see page 100 ). Maintenance Schedule The maintenance schedule assumes you should also follow the Normal Conditions Maintenance Schedule. Operate your vehicle regularly over 90°F (32°C)] conditions. Drive your vehicle on the driver's doorjamb. Driving in freezing temperatures, driving less than 10 miles (16...
... the engine idling. Driving less than 5 miles (8 km) per trip or, in mountainous conditions. Driving in stop-and-go traffic and/ or parked with the proper octane rating (see page 100 ). Maintenance Schedule The maintenance schedule assumes you should also follow the Normal Conditions Maintenance Schedule. Operate your vehicle regularly over 90°F (32°C)] conditions. Drive your vehicle on the driver's doorjamb. Driving in freezing temperatures, driving less than 10 miles (16...
Owner's Manual
Page 125
... reliability. Engine oil level Check every time you are ''certified'' to keep your warranties in effect. See page 145 . Vehicles: Maintenance, replacement, or repair of emissions control devices and systems may be done by any automotive repair establishment or individual using parts that all the receipts as proof of Honda parts and fluids whenever you fill the fuel tank. See page 103 . See page 136 . Lights...
... reliability. Engine oil level Check every time you are ''certified'' to keep your warranties in effect. See page 145 . Vehicles: Maintenance, replacement, or repair of emissions control devices and systems may be done by any automotive repair establishment or individual using parts that all the receipts as proof of Honda parts and fluids whenever you fill the fuel tank. See page 103 . See page 136 . Lights...

Owner's Manual
Page 126
..., if given). Check engine oil and coolant Check tires Replace engine oil Check tires inflation and condition Replace engine oil filter Check front and rear brakes Check parking brake adjustment Inspect the following items: Tie-rod ends, steering gearbox, and boots Suspension components Driveshaft boots Brake hoses and lines (including ABS) All fluid levels and condition of fluids Exhaust system Fuel lines and connections Inspect drive belts Replace dust and pollen filter Replace air cleaner element Replace spark plugs Inspect valve clearance Replace manual transmission fluid Service the items...
..., if given). Check engine oil and coolant Check tires Replace engine oil Check tires inflation and condition Replace engine oil filter Check front and rear brakes Check parking brake adjustment Inspect the following items: Tie-rod ends, steering gearbox, and boots Suspension components Driveshaft boots Brake hoses and lines (including ABS) All fluid levels and condition of fluids Exhaust system Fuel lines and connections Inspect drive belts Replace dust and pollen filter Replace air cleaner element Replace spark plugs Inspect valve clearance Replace manual transmission fluid Service the items...

Owner's Manual
Page 127
... filter Check tires inflation and condition Check front and rear brake Inspect the following items: Tie-rod ends, steering gearbox, and boots Suspension components Driveshaft boots Check parking brake adjustment Lubricate all hinges, locks, and latches Inspect the following items: Brake hoses and lines (including ABS) All fluid levels and condition of fluids Exhaust system Fuel lines and connections Lights and controls, Vehicle underbody Inspect drive belts Replace dust and pollen filter 1 Replace air cleaner element Replace spark plugs Inspect valve clearance Replace manual transmission fluid...
... filter Check tires inflation and condition Check front and rear brake Inspect the following items: Tie-rod ends, steering gearbox, and boots Suspension components Driveshaft boots Check parking brake adjustment Lubricate all hinges, locks, and latches Inspect the following items: Brake hoses and lines (including ABS) All fluid levels and condition of fluids Exhaust system Fuel lines and connections Lights and controls, Vehicle underbody Inspect drive belts Replace dust and pollen filter 1 Replace air cleaner element Replace spark plugs Inspect valve clearance Replace manual transmission fluid...
Owner's Manual
Page 155
... the 2 years/30,000 miles (48,000 km) maintenance schedule (Normal Conditions) as soon as you take it for storage. Support the front wiper blade arms with a folded towel or rag so they do this once a month. Fill the fuel tank. Change the engine oil and filter. Leave the parking brake off twice). Leave one window open slightly (if the vehicle is to be stored for...
... the 2 years/30,000 miles (48,000 km) maintenance schedule (Normal Conditions) as soon as you take it for storage. Support the front wiper blade arms with a folded towel or rag so they do this once a month. Fill the fuel tank. Change the engine oil and filter. Leave the parking brake off twice). Leave one window open slightly (if the vehicle is to be stored for...

Owner's Manual
Page 174
... the circuit, install one that has a higher rating greatly increases the chances of the same rating blows in a short time, there is probably a serious electrical problem in that has a lower rating, it with a Phillips-head screwdriver. Replace the fuse with one with a lower rating. 6. Turn the ignition switch to enter the five-digit code (see ''Code'' in the under-hood fuse boxes and all other circuits. This does...
... the circuit, install one that has a higher rating greatly increases the chances of the same rating blows in a short time, there is probably a serious electrical problem in that has a lower rating, it with a Phillips-head screwdriver. Replace the fuse with one with a lower rating. 6. Turn the ignition switch to enter the five-digit code (see ''Code'' in the under-hood fuse boxes and all other circuits. This does...

Owner's Manual
Page 201
... Battery ...162 Defects, Reporting Safety...194 Defrosting the Windows ...77 Dimensions ...180 Dimming the Headlights ...48 Dipstick Engine Oil ...103 Directional Signals ...48 Disc Brake Wear Indicators ...117 Disposal of Used Oil ...132 Do Not Tow a Trailer ...118 Doors Locking and Unlocking ...54 Monitor Light ...41 Power Door Locks ...54 DOT Tire Quality Grading ...182 Downshifting, 6-speed Manual Transmission ...114 Driving ...111 Economy ...104 E Economy, Fuel ...104 Emergencies on the Road...153 Battery, Jump Starting ...162 Changing a Flat Tire...
... Battery ...162 Defects, Reporting Safety...194 Defrosting the Windows ...77 Dimensions ...180 Dimming the Headlights ...48 Dipstick Engine Oil ...103 Directional Signals ...48 Disc Brake Wear Indicators ...117 Disposal of Used Oil ...132 Do Not Tow a Trailer ...118 Doors Locking and Unlocking ...54 Monitor Light ...41 Power Door Locks ...54 DOT Tire Quality Grading ...182 Downshifting, 6-speed Manual Transmission ...114 Driving ...111 Economy ...104 E Economy, Fuel ...104 Emergencies on the Road...153 Battery, Jump Starting ...162 Changing a Flat Tire...

Owner's Manual
Page 203
... Lights Bulb Replacement ...137 Indicator ...40 Turn Signal ...48 Load Limit ...108 Loading Cargo...107 LOCK (Ignition Key Position) ...53 Locks Anti-theft Steering Column ...53 Fuel Fill Door ...101 Power Door ...54 Trunk ...54 Low Coolant Level ...103 Lower Gear, Downshifting to a...114 Low Fuel Indicator ...42 Low Oil Pressure Indicator ...40, 166 Lubricant Specifications Chart ...180 Luggage, storing (cargo) ...107 I Identification Number, Vehicle ...178 Ignition Keys...51 Switch ...53 Timing Control System ...186 Indicator Lights, Instrument Panel ...40 ABS (Anti-Lock Brake...
... Lights Bulb Replacement ...137 Indicator ...40 Turn Signal ...48 Load Limit ...108 Loading Cargo...107 LOCK (Ignition Key Position) ...53 Locks Anti-theft Steering Column ...53 Fuel Fill Door ...101 Power Door ...54 Trunk ...54 Low Coolant Level ...103 Lower Gear, Downshifting to a...114 Low Fuel Indicator ...42 Low Oil Pressure Indicator ...40, 166 Lubricant Specifications Chart ...180 Luggage, storing (cargo) ...107 I Identification Number, Vehicle ...178 Ignition Keys...51 Switch ...53 Timing Control System ...186 Indicator Lights, Instrument Panel ...40 ABS (Anti-Lock Brake...

Owner's Manual
Page 204
...26 R Radiator Overheating ...163 Radio Sound System ...78 Readiness Codes ...167, 188 Rear Lights, Bulb Replacement ...141 Rear View Mirror ...66 Reclining the Seat-backs ...58 Recommended Shift Speeds ...115 Recovery Vehicle, Emergency Towing ...176 Reminder Lights ...40 Remote Transmitter ...56 CONTINUED P Panel Brightness Control ...49 Parking Brake ...67 Parking Lights...48 PGM-FI System...186 Power Door Locks ...54 Engine, Specifications ...180 Mirrors ...66 Windows ...59 Power Door Locks ...54 Power Socket Location ...70 N New Vehicle Break-in ...100 Normal Shift Speeds...115 NOTICE...
...26 R Radiator Overheating ...163 Radio Sound System ...78 Readiness Codes ...167, 188 Rear Lights, Bulb Replacement ...141 Rear View Mirror ...66 Reclining the Seat-backs ...58 Recommended Shift Speeds ...115 Recovery Vehicle, Emergency Towing ...176 Reminder Lights ...40 Remote Transmitter ...56 CONTINUED P Panel Brightness Control ...49 Parking Brake ...67 Parking Lights...48 PGM-FI System...186 Power Door Locks ...54 Engine, Specifications ...180 Mirrors ...66 Windows ...59 Power Door Locks ...54 Power Socket Location ...70 N New Vehicle Break-in ...100 Normal Shift Speeds...115 NOTICE...

Owner's Manual
Page 205
... Replacement Information Engine Oil and Filter ...130 Fuses ...170 Light Bulbs ...137 Schedule ...121 Tires ...148 Wiper Blades ...144 Replacing Seat Belts After a Crash ...17 Restraint, Child ...22 Rotation, Tire ...148 System Components...15 Use During Pregnancy...14 Seats, Adjusting the ...58 Serial Number ...178 Service Intervals ...121 Service Manual ...195 Service Station Procedures ...101 Shifting The 6-speed Manual Transmission...114 Side Turn Signal, Bulb Replacement in ...140 Signaling Turns ...48 6-speed Manual Transmission Checking Fluid Level ...134 Shifting the ...114 Snow Tires...
... Replacement Information Engine Oil and Filter ...130 Fuses ...170 Light Bulbs ...137 Schedule ...121 Tires ...148 Wiper Blades ...144 Replacing Seat Belts After a Crash ...17 Restraint, Child ...22 Rotation, Tire ...148 System Components...15 Use During Pregnancy...14 Seats, Adjusting the ...58 Serial Number ...178 Service Intervals ...121 Service Manual ...195 Service Station Procedures ...101 Shifting The 6-speed Manual Transmission...114 Side Turn Signal, Bulb Replacement in ...140 Signaling Turns ...48 6-speed Manual Transmission Checking Fluid Level ...134 Shifting the ...114 Snow Tires...


