Owner's Manual
Page 1
... the warranties covering your car. Maintenance ...149 The Maintenance Schedule shows you when you need when you need to the dealer. Appearance Care ...209 Tips on authorized manuals or go to the fuel pump. Things to look for if your car to take your car ever needs body repairs. Warranty and Customer Relations (U.S. Instruments and Controls ...41 Instrument panel indicator and gauge, and how to start the engine, shift the transmission, and park, plus towing a trailer...
... the warranties covering your car. Maintenance ...149 The Maintenance Schedule shows you when you need when you need to the dealer. Appearance Care ...209 Tips on authorized manuals or go to the fuel pump. Things to look for if your car to take your car ever needs body repairs. Warranty and Customer Relations (U.S. Instruments and Controls ...41 Instrument panel indicator and gauge, and how to start the engine, shift the transmission, and park, plus towing a trailer...

Owner's Manual
Page 2
... manual. Read the warranty booklet thoroughly so you understand the coverages and are certain you can refer to it preserves your investment. Maintaining your car according to the schedules given in this owner's manual in servicing the many systems unique to your Honda. California Proposition 65 Warning WARNING: This product contains or emits chemicals known to the State of the 2002 Honda S2000...
... manual. Read the warranty booklet thoroughly so you understand the coverages and are certain you can refer to it preserves your investment. Maintaining your car according to the schedules given in this owner's manual in servicing the many systems unique to your Honda. California Proposition 65 Warning WARNING: This product contains or emits chemicals known to the State of the 2002 Honda S2000...

Owner's Manual
Page 16
spreads the forces of a crash over your upper body. CONTINUED Driver and Passenger Safety 15 Improperly positioning the seat belts can cause serious injuries in a crash. This Never place the shoulder portion of internal injuries. Position the lap part of the belt as low as possible across the center of the belt so the lap part fits snugly. If necessary, pull up...
spreads the forces of a crash over your upper body. CONTINUED Driver and Passenger Safety 15 Improperly positioning the seat belts can cause serious injuries in a crash. This Never place the shoulder portion of internal injuries. Position the lap part of the belt as low as possible across the center of the belt so the lap part fits snugly. If necessary, pull up...

Owner's Manual
Page 42
...Controls Near the Steering Wheel ...50 Headlights ...51 Daytime Running Lights...52 Instrument Panel Brightness ...52 Turn Signals ...53 Windshield Wipers ...53 Windshield Washers ...54 Rear Window Defogger ...55 Keys and Locks ...56 Keys...56 Immobilizer System...57 Ignition Switch ...58 Power Door Locks ...60 Remote Transmitter ...61 Trunk ...64 Emergency Trunk Opener ...65 Console Compartments ...66 Seat Adjustments ...67 Power Windows ...68 Convertible Top ...70 Lowering the Convertible Top ...70 Raising the Convertible Top ...73 Convertible Top Cover ...75 Maintenance ...76 Hazard Warning...
...Controls Near the Steering Wheel ...50 Headlights ...51 Daytime Running Lights...52 Instrument Panel Brightness ...52 Turn Signals ...53 Windshield Wipers ...53 Windshield Washers ...54 Rear Window Defogger ...55 Keys and Locks ...56 Keys...56 Immobilizer System...57 Ignition Switch ...58 Power Door Locks ...60 Remote Transmitter ...61 Trunk ...64 Emergency Trunk Opener ...65 Console Compartments ...66 Seat Adjustments ...67 Power Windows ...68 Convertible Top ...70 Lowering the Convertible Top ...70 Raising the Convertible Top ...73 Convertible Top Cover ...75 Maintenance ...76 Hazard Warning...

Owner's Manual
Page 47
... on at any other drivers cannot see that you must refuel soon. 46 Instruments and Controls All turn signals on the headlights or release the parking brake. Indicator Lights Turn Signal and Hazard Warning Indicators The left or right turn signal light blinks when you signal a lane change or turn signal bulbs is burned out (see page 198 ). Cruise Control Indicator This lights when you have inserted a properly-coded ignition key. If the light does not blink...
... on at any other drivers cannot see that you must refuel soon. 46 Instruments and Controls All turn signals on the headlights or release the parking brake. Indicator Lights Turn Signal and Hazard Warning Indicators The left or right turn signal light blinks when you signal a lane change or turn signal bulbs is burned out (see page 198 ). Cruise Control Indicator This lights when you have inserted a properly-coded ignition key. If the light does not blink...

Owner's Manual
Page 58
... engine to it , and turn the ignition switch from theft. Keep other devices to start the engine. Use a plastic or leather key fob, not metal. When you insert the key. Turn the ignition switch to LOCK (0), remove the key, reinsert it . To make your vehicle's key and the ignition switch while trying to ON (II) again. If the system repeatedly does not recognize the coding of the key. CONTINUED Instruments and Controls...
... engine to it , and turn the ignition switch from theft. Keep other devices to start the engine. Use a plastic or leather key fob, not metal. When you insert the key. Turn the ignition switch to LOCK (0), remove the key, reinsert it . To make your vehicle's key and the ignition switch while trying to ON (II) again. If the system repeatedly does not recognize the coding of the key. CONTINUED Instruments and Controls...

Owner's Manual
Page 69
... the position you want . DRIVER'S WINDOW SWITCH MAIN SWITCH The driver's armrest has a master power window control panel. Close the window by pulling back on the window switch. To open the window, push the switch down until the window reaches the desired position. Turn the ignition switch to ON (II) to stop. Release the switch when you want the window to raise or lower either window. Power Windows Your car's windows are electricallypowered. PASSENGER'S WINDOW SWITCH Each door has a switch that controls its window.
... the position you want . DRIVER'S WINDOW SWITCH MAIN SWITCH The driver's armrest has a master power window control panel. Close the window by pulling back on the window switch. To open the window, push the switch down until the window reaches the desired position. Turn the ignition switch to ON (II) to stop. Release the switch when you want the window to raise or lower either window. Power Windows Your car's windows are electricallypowered. PASSENGER'S WINDOW SWITCH Each door has a switch that controls its window.

Owner's Manual
Page 71
... locking lever down. Extended exposure to deteriorate. 1. LATCH TAB LOCKING LEVER 3. Turn the ignition switch to raise the top whenever you park the car. Do not operate the convertible top if the car is running. Apply the parking brake. You can cause the convertible top to sunlight can damage the material and mechanism of your Honda lowers and raises electrically. Do not lower or raise the top while the engine...
... locking lever down. Extended exposure to deteriorate. 1. LATCH TAB LOCKING LEVER 3. Turn the ignition switch to raise the top whenever you park the car. Do not operate the convertible top if the car is running. Apply the parking brake. You can cause the convertible top to sunlight can damage the material and mechanism of your Honda lowers and raises electrically. Do not lower or raise the top while the engine...

Owner's Manual
Page 118
... when you reach the desired cruising speed, release the button. Push on the steering wheel. The CRUISE CONTROL light on the instrument panel comes on to the desired cruising speed and press the SET/decel button. To slow down to the desired speed, press the SET/decel button. Tap the brake or clutch pedal lightly with your speed in any of these ways: Press...
... when you reach the desired cruising speed, release the button. Push on the steering wheel. The CRUISE CONTROL light on the instrument panel comes on to the desired cruising speed and press the SET/decel button. To slow down to the desired speed, press the SET/decel button. Tap the brake or clutch pedal lightly with your speed in any of these ways: Press...

Owner's Manual
Page 123
... until it latches. 1. Shift to ''top off . The hood will pop up slightly. 2. Stop filling the tank after the fuel nozzle automatically clicks off '' the tank, leave some room for the fuel to the left until it clicks several times. If you feel the hood latch handle. Opening the Hood RELEASE HANDLE 124 Before Driving Slide your fingers under the lower left corner of the dashboard. Service Station Procedures...
... until it latches. 1. Shift to ''top off . The hood will pop up slightly. 2. Stop filling the tank after the fuel nozzle automatically clicks off '' the tank, leave some room for the fuel to the left until it clicks several times. If you feel the hood latch handle. Opening the Hood RELEASE HANDLE 124 Before Driving Slide your fingers under the lower left corner of the dashboard. Service Station Procedures...

Owner's Manual
Page 146
...159 Owner Maintenance Checks ...161 Fluid Locations...162 Engine Oil ...163 Adding Oil...163 Recommended Oil ...163 Synthetic Oil ...164 Additives ...164 Changing the Oil and Filter ...165 Cooling System ...167 Adding Engine Coolant ...167 Replacing Engine Coolant ...169 Windshield Washers ...173 6-speed Manual Transmission Fluid ...174 Differential Fluid ...175 Brake and Clutch Fluid ...176 Brake Fluid ...176 Brake System ...176 Clutch System ...177 Air Cleaner Element ...178 Hood Latch ...180 Spark Plugs ...180 Replacement ...180 Specifications ...182 Battery ...183 Wiper Blades ...186 Air...
...159 Owner Maintenance Checks ...161 Fluid Locations...162 Engine Oil ...163 Adding Oil...163 Recommended Oil ...163 Synthetic Oil ...164 Additives ...164 Changing the Oil and Filter ...165 Cooling System ...167 Adding Engine Coolant ...167 Replacing Engine Coolant ...169 Windshield Washers ...173 6-speed Manual Transmission Fluid ...174 Differential Fluid ...175 Brake and Clutch Fluid ...176 Brake Fluid ...176 Brake System ...176 Clutch System ...177 Air Cleaner Element ...178 Hood Latch ...180 Spark Plugs ...180 Replacement ...180 Specifications ...182 Battery ...183 Wiper Blades ...186 Air...
Owner's Manual
Page 151
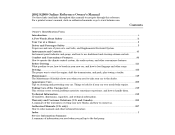
... Brake hoses and lines (including ABS) All fluid levels and condition of fluids Cooling system hoses and connections Exhaust system Fuel lines and connections 154 Maintenance Replace engine oil Replace engine oil filter Check engine oil and coolant Replace air cleaner element Inspect valve clearance Replace spark plugs Inspect drive belt Inspect idle speed Replace engine coolant Replace transmission fluid Replace rear differential fluid Inspect front and rear brakes Replace brake fluid Check parking brake adjustment Replace dust and pollen filter Check tire inflation and condition miles...
... Brake hoses and lines (including ABS) All fluid levels and condition of fluids Cooling system hoses and connections Exhaust system Fuel lines and connections 154 Maintenance Replace engine oil Replace engine oil filter Check engine oil and coolant Replace air cleaner element Inspect valve clearance Replace spark plugs Inspect drive belt Inspect idle speed Replace engine coolant Replace transmission fluid Replace rear differential fluid Inspect front and rear brakes Replace brake fluid Check parking brake adjustment Replace dust and pollen filter Check tire inflation and condition miles...

Owner's Manual
Page 152
...items in A, B. Do items in A. Check parking brake adjustment. Replace rear differential fluid. Do items in A. Replace engine oil filter. Do items in A. Do items in A, B, C as required for leaks. Inspect fuel lines and connections. Maintenance 155 Inspect suspension components. Inspect cooling system hoses and connections. Replace air cleaner element. Inspect front and rear brakes. Inspect valve clearance. Inspect exhaust system. Inspect drive belt. Service at each distance/time interval. Replace transmission fluid. Owners Refer to page 149 to determine...
...items in A, B. Do items in A. Check parking brake adjustment. Replace rear differential fluid. Do items in A. Replace engine oil filter. Do items in A. Do items in A, B, C as required for leaks. Inspect fuel lines and connections. Maintenance 155 Inspect suspension components. Inspect cooling system hoses and connections. Replace air cleaner element. Inspect front and rear brakes. Inspect valve clearance. Inspect exhaust system. Inspect drive belt. Service at each distance/time interval. Replace transmission fluid. Owners Refer to page 149 to determine...

Owner's Manual
Page 153
...) or 6 months Every 3 years (independent of mileage) Every 7,500 miles (12,000 km) Visually inspect the following conditions: Driving less than 10 miles (16 km) per trip or, in dusty conditions Inspect valve clearance Replace spark plugs Inspect drive belt Inspect idle speed Replace engine coolant Replace transmission fluid Replace rear differential fluid Inspect front and rear brakes Replace brake fluid Check parking brake adjustment Replace dust and pollen filter ( 1) Lubricate all hinges, locks and latches Check tire inflation and condition 15 24 12 60 75 105...
...) or 6 months Every 3 years (independent of mileage) Every 7,500 miles (12,000 km) Visually inspect the following conditions: Driving less than 10 miles (16 km) per trip or, in dusty conditions Inspect valve clearance Replace spark plugs Inspect drive belt Inspect idle speed Replace engine coolant Replace transmission fluid Replace rear differential fluid Inspect front and rear brakes Replace brake fluid Check parking brake adjustment Replace dust and pollen filter ( 1) Lubricate all hinges, locks and latches Check tire inflation and condition 15 24 12 60 75 105...
Owner's Manual
Page 161
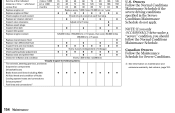
... motor oil if it meets the same requirements given for the engine or transmission will not increase your car. Additives Your Honda does not need any oil additives. Ambient Temperature An oil with a viscosity of SJ, and the proper weight as shown on the container's label tell you must follow the oil and filter change intervals given in the maintenance schedule. Select the oil for...
... motor oil if it meets the same requirements given for the engine or transmission will not increase your car. Additives Your Honda does not need any oil additives. Ambient Temperature An oil with a viscosity of SJ, and the proper weight as shown on the container's label tell you must follow the oil and filter change intervals given in the maintenance schedule. Select the oil for...

Owner's Manual
Page 205
... car indoors. If possible, run the engine for in Reverse. Leave the parking brake off the ground. Fill the fuel tank. Change the engine oil and filter (see page 154 ). Wash and dry the exterior completely. Make sure the carpeting, floor mats, etc. Put the transmission in the maintenance schedule are not needed unless the car has actually reached that mate with the door and trunk seals. are off . Also, apply a vehicle body...
... car indoors. If possible, run the engine for in Reverse. Leave the parking brake off the ground. Fill the fuel tank. Change the engine oil and filter (see page 154 ). Wash and dry the exterior completely. Make sure the carpeting, floor mats, etc. Put the transmission in the maintenance schedule are not needed unless the car has actually reached that mate with the door and trunk seals. are off . Also, apply a vehicle body...
Owner's Manual
Page 266
... the Windows ...89 Dimensions ...252 Dimming the Headlights ...51 Economy, Fuel ...127 Emergencies on the Road...219 Battery, Jump Starting ...228 Changing a Flat Tire ...221 Charging System Indicator ...235 Checking the Fuses...241 Dipstick Engine Oil ...125 Directional Signals ...53 Disc Brake Wear Indicators ...142 Disposal of Used Oil ...166 Do Not Tow a Trailer ...147 Doors Locking and Unlocking ...60 Monitor Light ...45 Power Door Locks ...60 DOT Tire Quality Grading ...254 Downshifting, 6-speed Manual Transmission ...140 Driving...
... the Windows ...89 Dimensions ...252 Dimming the Headlights ...51 Economy, Fuel ...127 Emergencies on the Road...219 Battery, Jump Starting ...228 Changing a Flat Tire ...221 Charging System Indicator ...235 Checking the Fuses...241 Dipstick Engine Oil ...125 Directional Signals ...53 Disc Brake Wear Indicators ...142 Disposal of Used Oil ...166 Do Not Tow a Trailer ...147 Doors Locking and Unlocking ...60 Monitor Light ...45 Power Door Locks ...60 DOT Tire Quality Grading ...254 Downshifting, 6-speed Manual Transmission ...140 Driving...

Owner's Manual
Page 268
......56 Switch ...58 Timing Control System ...259 Indicator Lights, Instrument Panel ...43 Inflation, Proper Tire ...191 Inside Mirror ...78 Inspection, Tire ...193 Instrument Panel ...42 Instrument Panel Brightness ...52 Interior Cleaning ...213 Interior Lights ...81 Introduction ...i L Label, Certification ...250 Lane Change, Signaling ...53 Lap/Shoulder Belts ...33 Leather, Cleaning ...214 Lights Bulb Replacement ...200 Indicator ...43 Turn Signal ...200 Loading Cargo...130 LOCK (Ignition Key Position) ...58 Locks Anti-theft Steering Column ...58 Fuel Fill Door ...123 Power Door ...60 Trunk...
......56 Switch ...58 Timing Control System ...259 Indicator Lights, Instrument Panel ...43 Inflation, Proper Tire ...191 Inside Mirror ...78 Inspection, Tire ...193 Instrument Panel ...42 Instrument Panel Brightness ...52 Interior Cleaning ...213 Interior Lights ...81 Introduction ...i L Label, Certification ...250 Lane Change, Signaling ...53 Lap/Shoulder Belts ...33 Leather, Cleaning ...214 Lights Bulb Replacement ...200 Indicator ...43 Turn Signal ...200 Loading Cargo...130 LOCK (Ignition Key Position) ...58 Locks Anti-theft Steering Column ...58 Fuel Fill Door ...123 Power Door ...60 Trunk...

Owner's Manual
Page 269
... Manual Transmission...139 Manual Transmission Fluid ...174 Meters, Gauges ...47 Methanol in Gasoline ...256 Mirrors, Adjusting ...78 Polishing and Waxing ...211 Power Door Locks ...60 Engine, Specifications ...252 Mirrors ...78 Windows ...68 Pregnancy, Using Seat Belts ...17 Protecting Adults ...12 Additional Safety Precautions ...18 Advice for Pregnant Women...17 Protecting Children ...19 Protecting Larger Children ...29 Protecting Small Children ...26 R Radiator Overheating ...231 Radio Sound System ...92 Readiness Codes ...261 Rear Lights, Bulb Replacement ...204 Rear...
... Manual Transmission...139 Manual Transmission Fluid ...174 Meters, Gauges ...47 Methanol in Gasoline ...256 Mirrors, Adjusting ...78 Polishing and Waxing ...211 Power Door Locks ...60 Engine, Specifications ...252 Mirrors ...78 Windows ...68 Pregnancy, Using Seat Belts ...17 Protecting Adults ...12 Additional Safety Precautions ...18 Advice for Pregnant Women...17 Protecting Children ...19 Protecting Larger Children ...29 Protecting Small Children ...26 R Radiator Overheating ...231 Radio Sound System ...92 Readiness Codes ...261 Rear Lights, Bulb Replacement ...204 Rear...

Owner's Manual
Page 270
Index Recovery Vehicle, Emergency Towing ...247 Reminder Lights ...43 Remote Transmitter ...61 Replacement Information Air Cleaner ...178 Engine Coolant...169 Engine Oil and Filter ...165 Fuses ...241 Light Bulbs ...200 Schedule ...152 Spark Plugs...180 Tires ...195 Wiper Blades ...186 Replacing Seat Belts After a Crash ...34 Restraint, Child ...19 Rotation, Tire ...194 Seat Belts ...8 Additional Information ...33 Advice for Pregnant Women...17 Cleaning ...214 Lap/Shoulder Belt ...33 Maintenance ...34 Reminder Light and Beeper ...44 System Components...33 Use During...
Index Recovery Vehicle, Emergency Towing ...247 Reminder Lights ...43 Remote Transmitter ...61 Replacement Information Air Cleaner ...178 Engine Coolant...169 Engine Oil and Filter ...165 Fuses ...241 Light Bulbs ...200 Schedule ...152 Spark Plugs...180 Tires ...195 Wiper Blades ...186 Replacing Seat Belts After a Crash ...34 Restraint, Child ...19 Rotation, Tire ...194 Seat Belts ...8 Additional Information ...33 Advice for Pregnant Women...17 Cleaning ...214 Lap/Shoulder Belt ...33 Maintenance ...34 Reminder Light and Beeper ...44 System Components...33 Use During...


