
Owner's Manual
Page 17
..., because a twisted belt can cause serious injury or death in a crash. Protecting Adults 5.Fasten and Position the Seat Belts Using a Lap/Shoulder Belt Insert the latch plate into the buckle, then tug on the belt to remove any slack from the shoulder part, then check that the belt is securely...
..., because a twisted belt can cause serious injury or death in a crash. Protecting Adults 5.Fasten and Position the Seat Belts Using a Lap/Shoulder Belt Insert the latch plate into the buckle, then tug on the belt to remove any slack from the shoulder part, then check that the belt is securely...

Owner's Manual
Page 18
...your arm instead of a lap/shoulder belt under your arm or behind your back. Insert the latch plate into the buckle, and tug on the belt to make sure the belt is too short, hold the... latch plate at a right angle and pull on the plate to adjust the seat belt anchor height. Driver... and Passenger Safety Never place the shoulder portion of your neck, or if it has four positions). Then insert the latch plate into the buckle marked CENTER. Using the Lap Belt If the seat belt touches or crosses your shoulder, you ...
...your arm instead of a lap/shoulder belt under your arm or behind your back. Insert the latch plate into the buckle, and tug on the belt to make sure the belt is too short, hold the... latch plate at a right angle and pull on the plate to adjust the seat belt anchor height. Driver... and Passenger Safety Never place the shoulder portion of your neck, or if it has four positions). Then insert the latch plate into the buckle marked CENTER. Using the Lap Belt If the seat belt touches or crosses your shoulder, you ...

Owner's Manual
Page 32
... according to secure a rear-facing child seat with either type of seat belt. For tips on how to the seat maker's instructions, then insert the latch plate into the buckle. Driver and Passenger Safety See page 32 for how to secure a child seat. With the child seat in the center back...
... according to secure a rear-facing child seat with either type of seat belt. For tips on how to the seat maker's instructions, then insert the latch plate into the buckle. Driver and Passenger Safety See page 32 for how to secure a child seat. With the child seat in the center back...

Owner's Manual
Page 34
...-seat passenger from locking the seat-back in the desired upright position (see page 12). Finally, follow instruction number 5 on page 30 for routing and latching the seat belt. Driver and Passenger Safety For proper protection, an infant must ride in a reclined, or semi-reclined position. In either case, we recommend...
...-seat passenger from locking the seat-back in the desired upright position (see page 12). Finally, follow instruction number 5 on page 30 for routing and latching the seat belt. Driver and Passenger Safety For proper protection, an infant must ride in a reclined, or semi-reclined position. In either case, we recommend...

Owner's Manual
Page 36
... the belt through the child seat according to the vehicle, and that the child is firmly secured to the seat maker's instructions, then insert the latch plate into the buckle. If you must be sure the child seat is properly strapped in serious injury or death if the airbags inflate.
... the belt through the child seat according to the vehicle, and that the child is firmly secured to the seat maker's instructions, then insert the latch plate into the buckle. If you must be sure the child seat is properly strapped in serious injury or death if the airbags inflate.

Owner's Manual
Page 38
...-lb (410 kg) force, and you are not wearing a seat belt in the center back seat with the Lap Belt Additional Precautions for routing and latching the seat belt. To install a forward-facing child seat in a crash, you are wearing a seat belt, the child can be able to hold a small child...
...-lb (410 kg) force, and you are not wearing a seat belt in the center back seat with the Lap Belt Additional Precautions for routing and latching the seat belt. To install a forward-facing child seat in a crash, you are wearing a seat belt, the child can be able to hold a small child...

Owner's Manual
Page 44
To fasten the belt, insert the latch plate into the buckle, then tug on the belt to help restrain your hips. The beeper will stop , the retractor automatically locks the belt to ... in the center back seat. During a collision or sudden stop after a few seconds, but it keeps some tension on until the driver's seat belt is latched. All lap/shoulder belts have an additional locking mechanism that goes over your shoulder, across your chest and across your belts. After exiting the vehicle...
To fasten the belt, insert the latch plate into the buckle, then tug on the belt to help restrain your hips. The beeper will stop , the retractor automatically locks the belt to ... in the center back seat. During a collision or sudden stop after a few seconds, but it keeps some tension on until the driver's seat belt is latched. All lap/shoulder belts have an additional locking mechanism that goes over your shoulder, across your chest and across your belts. After exiting the vehicle...

Owner's Manual
Page 45
... to wear the lap/shoulder belt properly. Models Honda provides a lifetime warranty on how to function properly during normal use. See page 15 for how to lengthen the lap belt, and how to make sure the buckle is latched. Honda will not provide good protection and should check the... condition of your Honda Warranty Information booklet for frays, cuts, burns, and wear. See page 16 for instructions on seat belts....
... to wear the lap/shoulder belt properly. Models Honda provides a lifetime warranty on how to function properly during normal use. See page 15 for how to lengthen the lap belt, and how to make sure the buckle is latched. Honda will not provide good protection and should check the... condition of your Honda Warranty Information booklet for frays, cuts, burns, and wear. See page 16 for instructions on seat belts....

Owner's Manual
Page 78
... door and pull the door open on an incline, use the stop on the support strut as shown. Pull the handle on it until it latches. The tool kit is in the tool kit. Lift up slightly. 3. Make sure the door and the hatch glass are locked securely before driving. The...
... door and pull the door open on an incline, use the stop on the support strut as shown. Pull the handle on it until it latches. The tool kit is in the tool kit. Lift up slightly. 3. Make sure the door and the hatch glass are locked securely before driving. The...

Owner's Manual
Page 80
... up on the lever on the lever under the seat cushion's front edge. Make all seat adjustments before you start driving. Let the seat-back latch in position. The height of the seat bottom and turn the rear dial to make sure it is adjustable.
... up on the lever on the lever under the seat cushion's front edge. Make all seat adjustments before you start driving. Let the seat-back latch in position. The height of the seat bottom and turn the rear dial to make sure it is adjustable.

Owner's Manual
Page 82
Rear Seat Armrest The angle of the rear seat. The rear seat armrests are located at the center of the rear seat-backs can be adjusted separately. Move the seat-back to use them down to the desired position, then release the knob. Make sure the seat-back latches in the new position. Instruments and Controls To change the angle of the seat-back, pull up on the knob on the top of the seat-back. Pivot them . Seats Rear Seat-back Adjustment See pages 12 - 14 for important safety information and warnings about how to properly position seats and seat-backs.
Rear Seat Armrest The angle of the rear seat. The rear seat armrests are located at the center of the rear seat-backs can be adjusted separately. Move the seat-back to use them down to the desired position, then release the knob. Make sure the seat-back latches in the new position. Instruments and Controls To change the angle of the seat-back, pull up on the knob on the top of the seat-back. Pivot them . Seats Rear Seat-back Adjustment See pages 12 - 14 for important safety information and warnings about how to properly position seats and seat-backs.

Owner's Manual
Page 83
...-back. 2. Lift the slide lever and slide the front seat forward as far as it in the pocket of the seat bottom until the seat latches. CONTINUED Instruments and Controls Seats Reclining the Front and Rear Seat-backs EX and SE models You can recline the seal-backs on the side...
...-back. 2. Lift the slide lever and slide the front seat forward as far as it in the pocket of the seat bottom until the seat latches. CONTINUED Instruments and Controls Seats Reclining the Front and Rear Seat-backs EX and SE models You can recline the seal-backs on the side...

Owner's Manual
Page 84
... and pushing it will go. The left and right halves of the seat-back and pivot the rear seatback backward. Instruments and Controls Store the latch plate for the center lap belt by rolling up on the knob on top of the rear seat can be folded up separately to their...
... and pushing it will go. The left and right halves of the seat-back and pivot the rear seatback backward. Instruments and Controls Store the latch plate for the center lap belt by rolling up on the knob on top of the rear seat can be folded up separately to their...

Owner's Manual
Page 89
... ON (II) to 2:00. For example: 1:06 would RESET to 1:00. 1:52 would RESET to display the time. 2. CONTINUED Instruments and Controls To store it latches. Digital Clock, Center Table Digital Clock H M R(RESET) 3. You can use the center table, pull up the outside edge of the next hour.
... ON (II) to 2:00. For example: 1:06 would RESET to 1:00. 1:52 would RESET to display the time. 2. CONTINUED Instruments and Controls To store it latches. Digital Clock, Center Table Digital Clock H M R(RESET) 3. You can use the center table, pull up the outside edge of the next hour.
Owner's Manual
Page 154
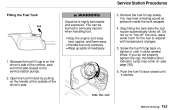
... it until it clicks several times. You may come on the driver's side of the driver's seat. Push the fuel fill door closed until it latches. Screw the fuel fill cap back on the handle at the outside of the vehicle, park with that side closest to expand with temperature changes...
... it until it clicks several times. You may come on the driver's side of the driver's seat. Push the fuel fill door closed until it latches. Screw the fuel fill cap back on the handle at the outside of the vehicle, park with that side closest to expand with temperature changes...

Owner's Manual
Page 155
.... Slide your fingers under the lower left until it releases the hood. Service Station Procedures Opening the Hood HOOD RELEASE HANDLE LATCH If you feel the hood latch handle. Before Driving Shift to the left corner of center. Push this handle up slightly. 2. The hood will pop up... until you can open the hood without lifting the hood latch handle, or the hood latch handle moves stiffly or does not spring back as before, the mechanism should be cleaned and lubricated (see page 227). 1.
.... Slide your fingers under the lower left until it releases the hood. Service Station Procedures Opening the Hood HOOD RELEASE HANDLE LATCH If you feel the hood latch handle. Before Driving Shift to the left corner of center. Push this handle up slightly. 2. The hood will pop up... until you can open the hood without lifting the hood latch handle, or the hood latch handle moves stiffly or does not spring back as before, the mechanism should be cleaned and lubricated (see page 227). 1.

Owner's Manual
Page 156
To close the hood, lift it up slightly to about a foot (30 cm) above the fender, then let it is securely latched. Wipe the dipstick with fuel. Put the support rod back into the hole on the front of its clip and insert the end into its ...
To close the hood, lift it up slightly to about a foot (30 cm) above the fender, then let it is securely latched. Wipe the dipstick with fuel. Put the support rod back into the hole on the front of its clip and insert the end into its ...

Owner's Manual
Page 197
... Differential Fluid...223 Brake and Clutch Fluid...224 Brake System...224 Clutch System...225 Power Steering...225 Air Cleaner Element...226 Hood Latch...227 Spark Plugs...227 Replacement...227 Specifications...228 Battery...229 Wiper Blades...231 Air Conditioning System...233 Air Conditioning Filter...234 Drive ...Belts...234 Timing Belt...235 Tires...235 Inflation...235 Recommended Tire Pressures for information on your Honda, you may want to take care of yourself. If you have the skills and tools to perform more complex maintenance tasks on...
... Differential Fluid...223 Brake and Clutch Fluid...224 Brake System...224 Clutch System...225 Power Steering...225 Air Cleaner Element...226 Hood Latch...227 Spark Plugs...227 Replacement...227 Specifications...228 Battery...229 Wiper Blades...231 Air Conditioning System...233 Air Conditioning Filter...234 Drive ...Belts...234 Timing Belt...235 Tires...235 Inflation...235 Recommended Tire Pressures for information on your Honda, you may want to take care of yourself. If you have the skills and tools to perform more complex maintenance tasks on...
Owner's Manual
Page 227
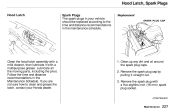
...maintenance schedule. Remove the spark plug with a multipurpose grease. Hood Latch, Spark Plugs Hood Latch Spark Plugs The spark plugs in your vehicle should be replaced according to clean and grease the latch, contact your Honda dealer. 1. Lubricate all the moving parts, including the pivot. ...Replacement SPARK PLUG CAP Clean the hood latch assembly with a mild cleaner, then lubricate it straight out. 3. CONTINUED...
...maintenance schedule. Remove the spark plug with a multipurpose grease. Hood Latch, Spark Plugs Hood Latch Spark Plugs The spark plugs in your vehicle should be replaced according to clean and grease the latch, contact your Honda dealer. 1. Lubricate all the moving parts, including the pivot. ...Replacement SPARK PLUG CAP Clean the hood latch assembly with a mild cleaner, then lubricate it straight out. 3. CONTINUED...

Owner's Manual
Page 314
... on...60 Head Restraints...79 Heating and Cooling...98 High Altitude, Starting at...167 High-Low Beam Switch ...60 High-mount Brake Light...237 Hood Latch...227 Hood, Opening the ...154 Horn...59 Hydraulic Clutch...224 Hydroplaning...180 Identification Number, Vehicle...292 Ignition Keys...69 Switch...69 Timing Control System...285...
... on...60 Head Restraints...79 Heating and Cooling...98 High Altitude, Starting at...167 High-Low Beam Switch ...60 High-mount Brake Light...237 Hood Latch...227 Hood, Opening the ...154 Horn...59 Hydraulic Clutch...224 Hydroplaning...180 Identification Number, Vehicle...292 Ignition Keys...69 Switch...69 Timing Control System...285...


