
Owner's Manual
Page 1
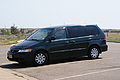
... Honda, and how to start the engine, shift the transmission, and park, plus towing a trailer. Technical Information ...319 ID numbers, dimensions, capacities, and technical information. Warranty and Customer Relations (U.S. Instruments and Controls ...55 Instrument panel indicator and gauge, and how to www.helminc.com. 2000 Odyssey Online Reference Owner's Manual Contents Owner's Identification Form Introduction ...i A Few Words About Safety ...ii Your Vehicle at a Glance ...2 Driver and Passenger Safety ...5 Proper use dashboard and steering column controls. For a printed owner...
... Honda, and how to start the engine, shift the transmission, and park, plus towing a trailer. Technical Information ...319 ID numbers, dimensions, capacities, and technical information. Warranty and Customer Relations (U.S. Instruments and Controls ...55 Instrument panel indicator and gauge, and how to www.helminc.com. 2000 Odyssey Online Reference Owner's Manual Contents Owner's Identification Form Introduction ...i A Few Words About Safety ...ii Your Vehicle at a Glance ...2 Driver and Passenger Safety ...5 Proper use dashboard and steering column controls. For a printed owner...
Owner's Manual
Page 2
...operate its driving controls and convenience items. Afterwards, keep your vehicle needs maintenance, keep in mind that is to answer any time. When your driving trouble-free while it at any questions and concerns. This information is dedicated to your Honda. Your Honda dealer ...new Honda. Maintaining your vehicle according to the schedules given in this manual helps to keep this manual. It will be pleased to read this manual, you avoid damage to your Honda, other property, or the environment. Read the warranty booklet thoroughly so you years of a 2000 Honda Odyssey ...
...operate its driving controls and convenience items. Afterwards, keep your vehicle needs maintenance, keep in mind that is to answer any time. When your driving trouble-free while it at any questions and concerns. This information is dedicated to your Honda. Your Honda dealer ...new Honda. Maintaining your vehicle according to the schedules given in this manual helps to keep this manual. It will be pleased to read this manual, you avoid damage to your Honda, other property, or the environment. Read the warranty booklet thoroughly so you years of a 2000 Honda Odyssey ...
Owner's Manual
Page 56
... Power Windows...112 Mirrors...115 Parking Brake...116 Digital Clock...117 Center Table...117 Beverage Holder...118 Sunglasses Holder...120 Sun Visor...121 Vanity Mirror...121 Rear Compartment...122 Center Pocket...122 Coin Holder...122 Storage Box...123 Coat Hook...123 Accessory Power Sockets...124 Interior Lights...125 Instruments and Controls Control Locations...56 Indicator Lights...57 Gauges...62 Controls Near the Steering Wheel...65 Headlights...66 Automatic Lighting Off Feature...67 Daytime Running Lights...67 Instrument Panel Brightness...67 Turn Signals...
... Power Windows...112 Mirrors...115 Parking Brake...116 Digital Clock...117 Center Table...117 Beverage Holder...118 Sunglasses Holder...120 Sun Visor...121 Vanity Mirror...121 Rear Compartment...122 Center Pocket...122 Coin Holder...122 Storage Box...123 Coat Hook...123 Accessory Power Sockets...124 Interior Lights...125 Instruments and Controls Control Locations...56 Indicator Lights...57 Gauges...62 Controls Near the Steering Wheel...65 Headlights...66 Automatic Lighting Off Feature...67 Daytime Running Lights...67 Instrument Panel Brightness...67 Turn Signals...
Owner's Manual
Page 61
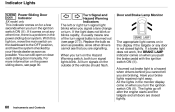
... ignition switch ON (II). Indicator Lights SLIDING Power Sliding Door DOOR Indicator EX model only This indicator comes on for a few seconds when you turn signals on the outside of the turn . The lights go off after the engine starts and the tailgate and all doors are braking. Turn Signal and Hazard Warning Indicators The left or right turn signal light blinks when you signal a lane change or turn signal bulbs is not closed tightly. If a brake light...
... ignition switch ON (II). Indicator Lights SLIDING Power Sliding Door DOOR Indicator EX model only This indicator comes on for a few seconds when you turn signals on the outside of the turn . The lights go off after the engine starts and the tailgate and all doors are braking. Turn Signal and Hazard Warning Indicators The left or right turn signal light blinks when you signal a lane change or turn signal bulbs is not closed tightly. If a brake light...

Owner's Manual
Page 73
... steering wheel to properly position the steering wheel. 3. Make any steering wheel adjustment before you can see the instrument panel gauges and the indicator lights. Adjusting the steering wheel position while driving may cause you have securely locked the steering wheel in a crash. To adjust the steering wheel upward or downward: 1. Push the lever under the steering column all the way down . Push the lever up to lose control of the vehicle...
... steering wheel to properly position the steering wheel. 3. Make any steering wheel adjustment before you can see the instrument panel gauges and the indicator lights. Adjusting the steering wheel position while driving may cause you have securely locked the steering wheel in a crash. To adjust the steering wheel upward or downward: 1. Push the lever under the steering column all the way down . Push the lever up to lose control of the vehicle...

Owner's Manual
Page 78
... lost your key and you turn the ignition switch from your key's coding if another immobilizer key or other devices to ON (II) again. Keep the keys away from direct sunlight, high temperature, and high humidity. The keys do not contain batteries. Instruments and Controls When you cannot start the engine. Keys and Locks These keys contain electronic circuits that may not recognize your vehicle's key and the ignition switch while...
... lost your key and you turn the ignition switch from your key's coding if another immobilizer key or other devices to ON (II) again. Keep the keys away from direct sunlight, high temperature, and high humidity. The keys do not contain batteries. Instruments and Controls When you cannot start the engine. Keys and Locks These keys contain electronic circuits that may not recognize your vehicle's key and the ignition switch while...

Owner's Manual
Page 113
... or lower either window. Close the window by pulling back on the switch and holding it . Turn the ignition switch to ON (II) to stop. To open the front passenger's window, push down until the window reaches the desired position. Release the switch when the window gets to the position you want . DRIVER'S WINDOW SWITCM MAIN SWITCH The driver's door armrest has a master power window control panel. Power Windows Your vehicle's front windows are also electrically-powered (see...
... or lower either window. Close the window by pulling back on the switch and holding it . Turn the ignition switch to ON (II) to stop. To open the front passenger's window, push down until the window reaches the desired position. Release the switch when the window gets to the position you want . DRIVER'S WINDOW SWITCM MAIN SWITCH The driver's door armrest has a master power window control panel. Power Windows Your vehicle's front windows are also electrically-powered (see...

Owner's Manual
Page 155
... the A/C switch on the front control panel is adjustable. To adjust the direction of air flow from a rear ceiling vent, move the tab in the position cooled air flows from the rear floor vents. Rear Ceiling Vents TAB LEVER The direction and quantity of the air coming from each rear ceiling vent is turned on. Comfort and Convenience Features The lever next to regulate the...
... the A/C switch on the front control panel is adjustable. To adjust the direction of air flow from a rear ceiling vent, move the tab in the position cooled air flows from the rear floor vents. Rear Ceiling Vents TAB LEVER The direction and quantity of the air coming from each rear ceiling vent is turned on. Comfort and Convenience Features The lever next to regulate the...

Owner's Manual
Page 219
... vehicle's handling and performance. Driving Based on the hitch should be approximately 10 percent of the trailer weight. It can make the trailer unstable and cause it to sway. To achieve a proper tongue load, start by the number of occupants in this section. Too little tongue load can also damage the engine and drivetrain. *: Including driver. Towing a Trailer Your Odyssey has been designed to tow a trailer...
... vehicle's handling and performance. Driving Based on the hitch should be approximately 10 percent of the trailer weight. It can make the trailer unstable and cause it to sway. To achieve a proper tongue load, start by the number of occupants in this section. Too little tongue load can also damage the engine and drivetrain. *: Including driver. Towing a Trailer Your Odyssey has been designed to tow a trailer...

Owner's Manual
Page 222
... attach trailer brakes to your vehicle's hydraulic system will need a wiring harness and converter. Since lighting and wiring vary with the Honda hitch (see page 220), or it may be obtained separately from your Honda dealer. If you use the trailer lighting connector, you choose electric brakes, be sure they are electronically actuated. Trailer Lights GROUND (BLACK) BACK-UP LIGHT (GREEN/BLACK) LEFT TURN SIGNAL (GREEN/BLUE) RIGHT TURN SIGNAL (GREEN/YELLOW) BRAKE LIGHT (WHITE...
... attach trailer brakes to your vehicle's hydraulic system will need a wiring harness and converter. Since lighting and wiring vary with the Honda hitch (see page 220), or it may be obtained separately from your Honda dealer. If you use the trailer lighting connector, you choose electric brakes, be sure they are electronically actuated. Trailer Lights GROUND (BLACK) BACK-UP LIGHT (GREEN/BLACK) LEFT TURN SIGNAL (GREEN/BLUE) RIGHT TURN SIGNAL (GREEN/YELLOW) BRAKE LIGHT (WHITE...

Owner's Manual
Page 224
... air conditioning off, reduce speed and, if necessary, pull to the side of the road to let the engine cool. If it can cause the automatic transmission to overheat. When driving down hills, reduce your vehicle's handling and performance, so driving with trailers. D3 is the proper shift lever position to use the foot brake or parking brake. Driving on Hills When climbing hills, closely watch your safety and the safety...
... air conditioning off, reduce speed and, if necessary, pull to the side of the road to let the engine cool. If it can cause the automatic transmission to overheat. When driving down hills, reduce your vehicle's handling and performance, so driving with trailers. D3 is the proper shift lever position to use the foot brake or parking brake. Driving on Hills When climbing hills, closely watch your safety and the safety...

Owner's Manual
Page 226
......241 Changing the Oil and Filter...241 Cooling System...243 Adding Engine Coolant...243 Replacing Engine Coolant...245 Windshield Washers...248 Automatic Transmission Fluid...249 Brake Fluid...250 Brake System...250 Power Steering...251 Air Cleaner Element...252 Hood Latch...254 Spark Plugs...254 Replacement...254 Specifications...256 Battery...257 Wiper Blades...259 Air Conditioning System...261 Air Conditioning Filter...262 Drive Belts...262 Timing Belt...263 Tires...263 Inflation...263 Inspection...265 Maintenance...266 Tire Rotation...266 Replacing Tires and Wheels...267 Wheels and Tires...
......241 Changing the Oil and Filter...241 Cooling System...243 Adding Engine Coolant...243 Replacing Engine Coolant...245 Windshield Washers...248 Automatic Transmission Fluid...249 Brake Fluid...250 Brake System...250 Power Steering...251 Air Cleaner Element...252 Hood Latch...254 Spark Plugs...254 Replacement...254 Specifications...256 Battery...257 Wiper Blades...259 Air Conditioning System...261 Air Conditioning Filter...262 Drive Belts...262 Timing Belt...263 Tires...263 Inflation...263 Inspection...265 Maintenance...266 Tire Rotation...266 Replacing Tires and Wheels...267 Wheels and Tires...

Owner's Manual
Page 229
... stress on reasonable roads within the legal speed limit. Operate your vehicle as scheduled to Follow: Service your vehicle's load limit. Always use your vehicle on the engine, brakes, and many other parts of safety, dependability, and emissions control performance. The services and time or distance intervals shown in the maintenance schedule assume you have your driving is done under one of the Maintenance Schedules on the driver's doorjamb. It...
... stress on reasonable roads within the legal speed limit. Operate your vehicle as scheduled to Follow: Service your vehicle's load limit. Always use your vehicle on the engine, brakes, and many other parts of safety, dependability, and emissions control performance. The services and time or distance intervals shown in the maintenance schedule assume you have your driving is done under one of the Maintenance Schedules on the driver's doorjamb. It...

Owner's Manual
Page 282
... possible, run the engine for a while periodically (preferably once a month). Disconnect the battery. Nonporous materials, such as cotton. The replacements called for in Park. Change the engine oil and filter (see page 230). Support the front and rear wiper blade arms with a "breathable" cover, one made from a porous material such as plastic sheeting, trap moisture, which can damage the paint. Fill the fuel tank. Cover the vehicle with...
... possible, run the engine for a while periodically (preferably once a month). Disconnect the battery. Nonporous materials, such as cotton. The replacements called for in Park. Change the engine oil and filter (see page 230). Support the front and rear wiper blade arms with a "breathable" cover, one made from a porous material such as plastic sheeting, trap moisture, which can damage the paint. Fill the fuel tank. Cover the vehicle with...
Owner's Manual
Page 288
... the ABS wheel sensors and wiring at each wheel. This is also a good idea in humid climates and areas subject to salt air. Carpeting and floor mats may remain damp for dampness. Corrosion Protection Two factors normally contribute to causing corrosion in your Honda. Dirt and road salt that collects in body cavities. This dampness can help keep your vehicle inspected and repaired...
... the ABS wheel sensors and wiring at each wheel. This is also a good idea in humid climates and areas subject to salt air. Carpeting and floor mats may remain damp for dampness. Corrosion Protection Two factors normally contribute to causing corrosion in your Honda. Dirt and road salt that collects in body cavities. This dampness can help keep your vehicle inspected and repaired...

Owner's Manual
Page 341
... Gauge...63 Octane Requirement...188 Oxygenated...326 Reserve Indicator...61 Tank, Filling the...189 Fuses, Checking the...312 Fabric, Cleaning...286 Fan, Interior...130, 142 Features, Comfort and Convenience...129 Filling the Fuel Tank...189 Filters Air...252 Air Conditioning...262 Oil...241 First Gear Position...207 Flashers, Hazard Warning...70 Flat Tire, Changing a...293 Fluids Automatic Transmission...249 Brake...250 Power Steering...251 Windshield Washer...248 FM Stereo Radio Reception...156, 168 Folding the Third Seat ...109 Gas Mileage...
... Gauge...63 Octane Requirement...188 Oxygenated...326 Reserve Indicator...61 Tank, Filling the...189 Fuses, Checking the...312 Fabric, Cleaning...286 Fan, Interior...130, 142 Features, Comfort and Convenience...129 Filling the Fuel Tank...189 Filters Air...252 Air Conditioning...262 Oil...241 First Gear Position...207 Flashers, Hazard Warning...70 Flat Tire, Changing a...293 Fluids Automatic Transmission...249 Brake...250 Power Steering...251 Windshield Washer...248 FM Stereo Radio Reception...156, 168 Folding the Third Seat ...109 Gas Mileage...

Owner's Manual
Page 344
... Child Seats with Tethers...43 Coolant...245 Engine Oil and Filter...241 Fuses...310 Light Bulbs...272 Schedule...228 Spark Plugs...254 Timing Belt...263 Tires...267 Wiper Blades...259 Replacing Seat Belts After a Crash...47 Reserve Tank, Engine Coolant...193 Reverse Gear Position...206 Rotation, Tire...266 Radiator Overheating...305 Radio/CD Sound System...167 Rear A / C Unit...152 Rear Compartment...122 Rear End Towing...317 Rear Lights, Bulb Replacement...274, 275 Rear View Mirror...115 Rear Window Defogger...71 Rear Windows...114 Rear Window Wiper and Washer.. 70 Reclining the Seat Backs...
... Child Seats with Tethers...43 Coolant...245 Engine Oil and Filter...241 Fuses...310 Light Bulbs...272 Schedule...228 Spark Plugs...254 Timing Belt...263 Tires...267 Wiper Blades...259 Replacing Seat Belts After a Crash...47 Reserve Tank, Engine Coolant...193 Reverse Gear Position...206 Rotation, Tire...266 Radiator Overheating...305 Radio/CD Sound System...167 Rear A / C Unit...152 Rear Compartment...122 Rear End Towing...317 Rear Lights, Bulb Replacement...274, 275 Rear View Mirror...115 Rear Window Defogger...71 Rear Windows...114 Rear Window Wiper and Washer.. 70 Reclining the Seat Backs...

Owner's Manual
Page 345
......48 Additional Safety Precautions...52 How the Automatic Seat Belt Tensioners Work...50 How the SRS Indicator Works...50 How Your Airbags Work...48 SRS Components ...48 SRS Service ...51 SRS Indicator ...50, 58 START (Ignition Key Position)...79 Starting the Engine...203 In Cold Weather at High Altitude...203 With a Dead Battery...303 Steam Coming from Engine...305 Steering Wheel Adjustment...72 Anti-theft Column Lock...78 Stereo Sound System...
......48 Additional Safety Precautions...52 How the Automatic Seat Belt Tensioners Work...50 How the SRS Indicator Works...50 How Your Airbags Work...48 SRS Components ...48 SRS Service ...51 SRS Indicator ...50, 58 START (Ignition Key Position)...79 Starting the Engine...203 In Cold Weather at High Altitude...203 With a Dead Battery...303 Steam Coming from Engine...305 Steering Wheel Adjustment...72 Anti-theft Column Lock...78 Stereo Sound System...

Owner's Manual
Page 346
... Tires...263 Air Pressure...263 Balancing...266 Checking Wear...265 Compact Spare...292 DOT Tire Quality Grading...324 Inflation...263 Inspection...265 Replacing...267 Rotating...266 Snow...269 Specifications...323 Tire Chains...269 Towing A Trailer ...218 Emergency Wrecker...317 Traction Control System (TCS)...213 Transmission Checking Fluid Level...249 Fluid Selection...249 Identification Number...321 Shifting the Automatic...205 Treadwear...324 Trip Meter...63 Turn Signals...68 Tools, Tire Changing...
... Tires...263 Air Pressure...263 Balancing...266 Checking Wear...265 Compact Spare...292 DOT Tire Quality Grading...324 Inflation...263 Inspection...265 Replacing...267 Rotating...266 Snow...269 Specifications...323 Tire Chains...269 Towing A Trailer ...218 Emergency Wrecker...317 Traction Control System (TCS)...213 Transmission Checking Fluid Level...249 Fluid Selection...249 Identification Number...321 Shifting the Automatic...205 Treadwear...324 Trip Meter...63 Turn Signals...68 Tools, Tire Changing...

Owner's Manual
Page 348
... Engine Oil: API Service SJ "Energy Conserving" oil, SAE 5W-30 viscosity (see page 251). Do not use ATF (see page 239). Brake Fluid: Genuine Honda DOT 3 Brake Fluid preferred, or a DOT 3 or DOT 4 brake fluid as a temporary replacement. Fuel Tank Capacity: 20.00 US gal (75.7 l, 16.65 Imp gal) Power Steering Fluid: Genuine Honda Power Steering Fluid preferred, or another brand of 86 or higher. Oil change capacity (including filter): 4.6 US qt (4.4 l, 3.9 Imp qt) Automatic Transmission Fluid: Honda...
... Engine Oil: API Service SJ "Energy Conserving" oil, SAE 5W-30 viscosity (see page 251). Do not use ATF (see page 239). Brake Fluid: Genuine Honda DOT 3 Brake Fluid preferred, or a DOT 3 or DOT 4 brake fluid as a temporary replacement. Fuel Tank Capacity: 20.00 US gal (75.7 l, 16.65 Imp gal) Power Steering Fluid: Genuine Honda Power Steering Fluid preferred, or another brand of 86 or higher. Oil change capacity (including filter): 4.6 US qt (4.4 l, 3.9 Imp qt) Automatic Transmission Fluid: Honda...


