Owner's Manual
Page 21
... do, they could be properly restrained by a crash or an inflating airbag. We recommend that can be caused by seat belts. Do not put any accessories on top of the belt as low as possible from the steering wheel or dashboard. Remember to keep the lap portion of a foldeddown back seat...
... do, they could be properly restrained by a crash or an inflating airbag. We recommend that can be caused by seat belts. Do not put any accessories on top of the belt as low as possible from the steering wheel or dashboard. Remember to keep the lap portion of a foldeddown back seat...
Owner's Manual
Page 40
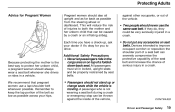
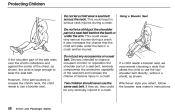
.... Devices intended to wear the seat belt. Protecting Children Do not let a child wear a seat belt across the neck. Do not let a child put any accessories on a seat belt. Driver and Passenger Safety If a child needs a booster seat, we recommend choosing a style that the child will slide under the arm. This...
.... Devices intended to wear the seat belt. Protecting Children Do not let a child wear a seat belt across the neck. Do not let a child put any accessories on a seat belt. Driver and Passenger Safety If a child needs a booster seat, we recommend choosing a style that the child will slide under the arm. This...

Owner's Manual
Page 53
... Brake...86 Digital Clock...87 Center Table...87 Beverage Holder...88 Built-in Table...89 Center Pocket...91 Storage Box...91 Cargo Floor Pockets...92 Accessory Power Socket...92 Tailgate Pocket...93 Cargo Hooks 93 Ashtrays...94 Interior Lights...94 Ceiling Light...94 Spotlights...95 Cargo Area Light...95 Ignition Switch... Headlights...60 Instruments and Controls Instruments and Controls This section gives information about the controls and displays that contribute to the daily operation of your Honda. All the essential controls are within easy reach.
... Brake...86 Digital Clock...87 Center Table...87 Beverage Holder...88 Built-in Table...89 Center Pocket...91 Storage Box...91 Cargo Floor Pockets...92 Accessory Power Socket...92 Tailgate Pocket...93 Cargo Hooks 93 Ashtrays...94 Interior Lights...94 Ceiling Light...94 Spotlights...95 Cargo Area Light...95 Ignition Switch... Headlights...60 Instruments and Controls Instruments and Controls This section gives information about the controls and displays that contribute to the daily operation of your Honda. All the essential controls are within easy reach.
Owner's Manual
Page 62
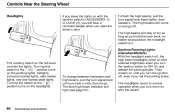
... normal operation when you turn them on for as long as you hold the lever back, no matter what position the headlight switch is in ACCESSORY (I) or LOCK (0), you will light (see page 55). The high beams will come on and go . They remain on the left lever controls the lights...
... normal operation when you turn them on for as long as you hold the lever back, no matter what position the headlight switch is in ACCESSORY (I) or LOCK (0), you will light (see page 55). The high beams will come on and go . They remain on the left lever controls the lights...
Owner's Manual
Page 71
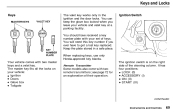
...explanation of the steering column. You will need this key number if you leave your set of keys. When replacing keys, use only Honda-approved key blanks. The ignition switch is on your vehicle: Ignition Doors Glove box Tailgate Some models also come with two master keys... and a valet key. It has four positions: LOCK (0) ACCESSORY (I) ON (II) START (III) CONTINUED Instruments and Controls Remote Transmitter Ignition Switch KEY NUMBER PLATE Your vehicle comes with two remote transmitters; ...
...explanation of the steering column. You will need this key number if you leave your set of keys. When replacing keys, use only Honda-approved key blanks. The ignition switch is on your vehicle: Ignition Doors Glove box Tailgate Some models also come with two master keys... and a valet key. It has four positions: LOCK (0) ACCESSORY (I) ON (II) START (III) CONTINUED Instruments and Controls Remote Transmitter Ignition Switch KEY NUMBER PLATE Your vehicle comes with two remote transmitters; ...
Owner's Manual
Page 72
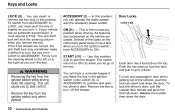
... ignition switch while driving locks the steering. Instruments and Controls The anti-theft lock will hear a reminder beeper if you let go of the key. ACCESSORY (I ) position and open the driver's door. Several of the vehicle, push the lock tab down and close the door. Use this position. Door Locks LOCK...down . To lock any passenger's door when getting out of the lights on the instrument panel come on as you turn the ignition switch from ACCESSORY to unlock. If the front wheels are usable. This can cause you can insert or remove the key only in Park. You can operate the...
... ignition switch while driving locks the steering. Instruments and Controls The anti-theft lock will hear a reminder beeper if you let go of the key. ACCESSORY (I ) position and open the driver's door. Several of the vehicle, push the lock tab down and close the door. Use this position. Door Locks LOCK...down . To lock any passenger's door when getting out of the lights on the instrument panel come on as you turn the ignition switch from ACCESSORY to unlock. If the front wheels are usable. This can cause you can insert or remove the key only in Park. You can operate the...
Owner's Manual
Page 94
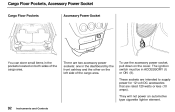
... socket, pull down on the cover. These sockets are intended to supply power for 12 volt DC accessories that are two accessory power sockets: one in the dashboard by the front ashtray and the other on the left side of the cargo area. Instruments and Controls The ...ignition switch must be in ACCESSORY (I) or ON (II). Cargo Floor Pockets, Accessory Power Socket Cargo Floor Pockets Accessory Power Socket You can store small items in the pockets located on both sides of the cargo area.
... socket, pull down on the cover. These sockets are intended to supply power for 12 volt DC accessories that are two accessory power sockets: one in the dashboard by the front ashtray and the other on the left side of the cargo area. Instruments and Controls The ...ignition switch must be in ACCESSORY (I) or ON (II). Cargo Floor Pockets, Accessory Power Socket Cargo Floor Pockets Accessory Power Socket You can store small items in the pockets located on both sides of the cargo area.
Owner's Manual
Page 109
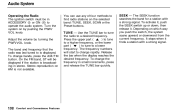
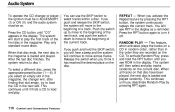
... the Preset buttons. The band and frequency that the radio was last tuned to change bands, press the A M / F M button. The frequency numbers will be in ACCESSORY (I) or ON (II) to find radio stations on which way you push the switch, the system scans upward or downward from the current frequency. You...
... the Preset buttons. The band and frequency that the radio was last tuned to change bands, press the A M / F M button. The frequency numbers will be in ACCESSORY (I) or ON (II) to find radio stations on which way you push the switch, the system scans upward or downward from the current frequency. You...

Owner's Manual
Page 116
... is operated by the radio controls. To operate this unit, use the instructions (except for the radio and cassette player. Your dealer also has an accessory indash single CD player available that came with the same controls used for those relating to six discs, providing several hours of continuous entertainment. It...
... is operated by the radio controls. To operate this unit, use the instructions (except for the radio and cassette player. Your dealer also has an accessory indash single CD player available that came with the same controls used for those relating to six discs, providing several hours of continuous entertainment. It...
Owner's Manual
Page 117
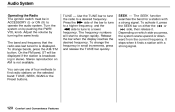
... a track. Press the CD button until it finds a CD to turn it has reached the desired place on that disc ends, the next disc in ACCESSORY (I) or ON (II) and the audio system must be on the CD. When that disc have been played, the next disc is loaded and played...
... a track. Press the CD button until it finds a CD to turn it has reached the desired place on that disc ends, the next disc in ACCESSORY (I) or ON (II) and the audio system must be on the CD. When that disc have been played, the next disc is loaded and played...
Owner's Manual
Page 121
... a strong signal. Stereo reproduction on which side you press, the system scans upward or downward from the current frequency. The frequency numbers will be in ACCESSORY (I) or ON (II) to is displayed. To change bands, press the A M / F M button. It stops when it . Comfort and Convenience Features Adjust the volume by pushing...
... a strong signal. Stereo reproduction on which side you press, the system scans upward or downward from the current frequency. The frequency numbers will be in ACCESSORY (I) or ON (II) to is displayed. To change bands, press the A M / F M button. It stops when it . Comfort and Convenience Features Adjust the volume by pushing...
Owner's Manual
Page 128
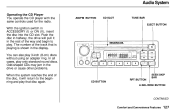
... adapter ring. Odd-shaped CDs may jam in the drive or cause other problems. When the system reaches the end of the disc, it in ACCESSORY (I) or ON (II), insert the disc into the CD slot. With the ignition switch in the rest of the track that disc again. Audio System...
... adapter ring. Odd-shaped CDs may jam in the drive or cause other problems. When the system reaches the end of the disc, it in ACCESSORY (I) or ON (II), insert the disc into the CD slot. With the ignition switch in the rest of the track that disc again. Audio System...

Owner's Manual
Page 139
... Filling the Fuel Tank...141 Opening the Hood...142 Oil Check...143 Engine Coolant Check...144 Fuel Economy...145 Vehicle Condition...145 Driving Habits...145 Accessories and Modifications...146 Carrying Cargo...148 Before Driving Before Driving Before you begin driving your vehicle, please read the information in this section will help...
... Filling the Fuel Tank...141 Opening the Hood...142 Oil Check...143 Engine Coolant Check...144 Fuel Economy...145 Vehicle Condition...145 Driving Habits...145 Accessories and Modifications...146 Carrying Cargo...148 Before Driving Before Driving Before you begin driving your vehicle, please read the information in this section will help...
Owner's Manual
Page 146
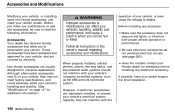
... warranty. Follow all instructions in which you to read the following information. If possible, have been designed and approved for assistance before installing any electronic accessory. Non-Honda accessories are improperly installed, or exceed your vehicle's electrical system capacity, they may fit on page 147 for universal applications. Be sure electronic...
... warranty. Follow all instructions in which you to read the following information. If possible, have been designed and approved for assistance before installing any electronic accessory. Non-Honda accessories are improperly installed, or exceed your vehicle's electrical system capacity, they may fit on page 147 for universal applications. Be sure electronic...
Owner's Manual
Page 147
... that decrease ground clearance increase the chance of undercarriage parts striking a curb, speed bump, or other raised object, which could cause your airbags to drive. Accessories and Modifications Modifications Do not remove any original equipment or modify your vehicle in the center of the steering wheel and on the airbag covers...
... that decrease ground clearance increase the chance of undercarriage parts striking a curb, speed bump, or other raised object, which could cause your airbags to drive. Accessories and Modifications Modifications Do not remove any original equipment or modify your vehicle in the center of the steering wheel and on the airbag covers...
Owner's Manual
Page 149
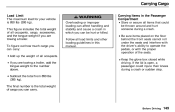
... of the seats. Overloading or improper loading can affect handling and stability and cause a crash in the Passenger Compartment Store or secure all occupants, cargo, accessories, and the tongue weight if you can carry. If the lid is 850 Ibs (395 kg).
... of the seats. Overloading or improper loading can affect handling and stability and cause a crash in the Passenger Compartment Store or secure all occupants, cargo, accessories, and the tongue weight if you can carry. If the lid is 850 Ibs (395 kg).
Owner's Manual
Page 154
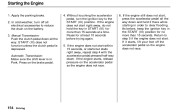
... the engine does not start . If the engine still does not start right away, do not hold it starts, lift your foot off all electrical accessories to step 5 if the engine does not start within 15 seconds, or starts but stalls right away, repeat step 4 with the accelerator pedal pressed half...
... the engine does not start . If the engine still does not start right away, do not hold it starts, lift your foot off all electrical accessories to step 5 if the engine does not start within 15 seconds, or starts but stalls right away, repeat step 4 with the accelerator pedal pressed half...
Owner's Manual
Page 155
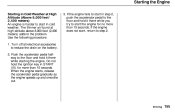
.../ 2,400 meters) An engine is harder to the floor and hold it there while starting the engine. Use the following procedure: 1. Turn off all electrical accessories to the problem. Push the accelerator pedal halfway to start in cold weather. Do not hold the ignition key in step 2, push the accelerator pedal...
.../ 2,400 meters) An engine is harder to the floor and hold it there while starting the engine. Use the following procedure: 1. Turn off all electrical accessories to the problem. Push the accelerator pedal halfway to start in cold weather. Do not hold the ignition key in step 2, push the accelerator pedal...
Owner's Manual
Page 171
Towing Equipment and Accessories Towing can catch the trailer if it meets federal, state, province, and local regulations. Hitches Any hitch used , and how much load you set up a ...
Towing Equipment and Accessories Towing can catch the trailer if it meets federal, state, province, and local regulations. Hitches Any hitch used , and how much load you set up a ...
Owner's Manual
Page 176
... lock. Make sure the radio and any items plugged into the accessory power sockets are turned off so you do not run down the battery. Automatic Transmission Start the engine. Follow the procedure exactly. Towing Your Vehicle Behind a Motorhome Your CR-V can be towed with all the positions (P, R, N, D,... procedure at legal highway speeds up to Neutral. After attaching the tow bar to your CR-V, check the transmission fluid level (see page 208). Do not overfill. Leave the ignition switch in ACCESSORY (I ) so the steering wheel does not lock. Driving If you tow more than 300...
... lock. Make sure the radio and any items plugged into the accessory power sockets are turned off so you do not run down the battery. Automatic Transmission Start the engine. Follow the procedure exactly. Towing Your Vehicle Behind a Motorhome Your CR-V can be towed with all the positions (P, R, N, D,... procedure at legal highway speeds up to Neutral. After attaching the tow bar to your CR-V, check the transmission fluid level (see page 208). Do not overfill. Leave the ignition switch in ACCESSORY (I ) so the steering wheel does not lock. Driving If you tow more than 300...

