Owner's Manual
Page 32
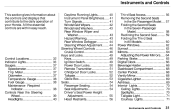
...easy reach. Instruments and Controls This section gives information about the controls and displays that contribute to the daily operation of your Honda. Daytime Running Lights...40 Instrument Panel Brightness...41 Turn Signals...41 Windshield Wipers...42 Windshield Washers...43 Rear Window Wiper and ...Washer...43 Hazard Warning...43 Rear Window Defogger...44 Steering Wheel Adjustment...44 Steering Wheel Controls ...46 Cruise Control...46 Keys and Locks...49 Keys...49 Ignition Switch...49 Power Door Locks...50 Remote Transmitter...51 Childproof Door Locks...52 Tailgate...52 Glove Box...53 ...
...easy reach. Instruments and Controls This section gives information about the controls and displays that contribute to the daily operation of your Honda. Daytime Running Lights...40 Instrument Panel Brightness...41 Turn Signals...41 Windshield Wipers...42 Windshield Washers...43 Rear Window Wiper and ...Washer...43 Hazard Warning...43 Rear Window Defogger...44 Steering Wheel Adjustment...44 Steering Wheel Controls ...46 Cruise Control...46 Keys and Locks...49 Keys...49 Ignition Switch...49 Power Door Locks...50 Remote Transmitter...51 Childproof Door Locks...52 Tailgate...52 Glove Box...53 ...

Owner's Manual
Page 39
... miles (12,000 km), the indicator will turn the ignition back ON (II). If someone else performs the maintenance, reset the indicator by inserting your key in the slot beside the indicator. Gauges Temperature Gauge This shows the temperature of the road. In severe driving conditions, such as very hot weather...
... miles (12,000 km), the indicator will turn the ignition back ON (II). If someone else performs the maintenance, reset the indicator by inserting your key in the slot beside the indicator. Gauges Temperature Gauge This shows the temperature of the road. In severe driving conditions, such as very hot weather...

Owner's Manual
Page 50
...facility. You can keep the glove box locked when you ever have received a key number plate with two kinds of the steering column. When replacing keys, use only Honda-approved key blanks. You will need this key number if you leave your car: Ignition Doors Glove box Tailgate The ignition switch... is on the right side of keys: a master key and a valet key. Keep the plate stored in the ...
...facility. You can keep the glove box locked when you ever have received a key number plate with two kinds of the steering column. When replacing keys, use only Honda-approved key blanks. You will need this key number if you leave your car: Ignition Doors Glove box Tailgate The ignition switch... is on the right side of keys: a master key and a valet key. Keep the plate stored in the ...

Owner's Manual
Page 51
...door lock switch. The lock tab on the car are usable. When you may have to turn the key from ACCESSORY to release the anti-theft lock. ON (II) - START (III) - Instruments and Controls... Use this position, you can insert or remove the key only in slightly as a test when you turn the ignition switch from LOCK to ACCESSORY, you turn the... page 33). All features and accessories on the tailgate also locks and unlocks when you remove the key. In this position only to unlock them. You will lock the steering column when you use the...
...door lock switch. The lock tab on the car are usable. When you may have to turn the key from ACCESSORY to release the anti-theft lock. ON (II) - START (III) - Instruments and Controls... Use this position, you can insert or remove the key only in slightly as a test when you turn the ignition switch from LOCK to ACCESSORY, you turn the... page 33). All features and accessories on the tailgate also locks and unlocks when you remove the key. In this position only to unlock them. You will lock the steering column when you use the...

Owner's Manual
Page 52
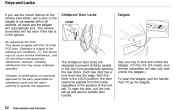
...lock tab in and close the door. To lock the driver's door, pull the outside , turn the key and hold it . All four doors and the tailgate will unlock. You can be locked from the outside...Pulling up the lock tab on each passenger's door locks and unlocks only that door. If you turn the key and release it , all doors and the tailgate will unlock when you unlock the passenger's door with the... only the driver's door unlocks. To unlock only the driver's door from the outside by using the key in or push the master switch down the lock tab on the top. Release the handle, then close...
...lock tab in and close the door. To lock the driver's door, pull the outside , turn the key and hold it . All four doors and the tailgate will unlock. You can be locked from the outside...Pulling up the lock tab on each passenger's door locks and unlocks only that door. If you turn the key and release it , all doors and the tailgate will unlock when you unlock the passenger's door with the... only the driver's door unlocks. To unlock only the driver's door from the outside by using the key in or push the master switch down the lock tab on the top. Release the handle, then close...
Owner's Manual
Page 53
Use your remote transmitter will not work if the key is in the ignition. EX model, your key to lock and unlock the tailgate. (On the U.S. Keys and Locks If you use the outside door handle. As required by the party responsible for compliance could void the user's authority to prevent children ...
Use your remote transmitter will not work if the key is in the ignition. EX model, your key to lock and unlock the tailgate. (On the U.S. Keys and Locks If you use the outside door handle. As required by the party responsible for compliance could void the user's authority to prevent children ...
Owner's Manual
Page 54
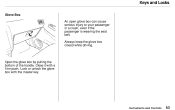
Keys and Locks Glove Box An open glove box can cause serious injury to your passenger in a crash, even if the passenger is wearing the seat belt. Close it with the master key. Instruments and Controls Open the glove box by pulling the bottom of the handle. Lock or unlock the glove box with a firm push. Always keep the glove box closed while driving.
Keys and Locks Glove Box An open glove box can cause serious injury to your passenger in a crash, even if the passenger is wearing the seat belt. Close it with the master key. Instruments and Controls Open the glove box by pulling the bottom of the handle. Lock or unlock the glove box with a firm push. Always keep the glove box closed while driving.
Owner's Manual
Page 119
Pause for no more than 15 seconds. As before trying again. 5. The thinner air found at least 10 seconds before , keep the ignition key in the START (III) position for at high altitude above 8,000 feet (2,400 meters) adds to the floor and hold it there while starting the ... to start within 15 seconds, or starts but stalls right away, repeat step 4 with the accelerator pedal pressed half-way down and hold the ignition key in Park. Make sure the shift lever is harder to start the engine for more than 15 seconds. Use the following procedure: 1. Turn off all...
Pause for no more than 15 seconds. As before trying again. 5. The thinner air found at least 10 seconds before , keep the ignition key in the START (III) position for at high altitude above 8,000 feet (2,400 meters) adds to the floor and hold it there while starting the ... to start within 15 seconds, or starts but stalls right away, repeat step 4 with the accelerator pedal pressed half-way down and hold the ignition key in Park. Make sure the shift lever is harder to start the engine for more than 15 seconds. Use the following procedure: 1. Turn off all...

Owner's Manual
Page 121
... must press on page 123. To shift to a complete stop before you are turning off the accelerator pedal. Use Park whenever you can remove the key from Park, see Shift Lock Release on the brake pedal and have done all of the above and still cannot move it out of Park...
... must press on page 123. To shift to a complete stop before you are turning off the accelerator pedal. Use Park whenever you can remove the key from Park, see Shift Lock Release on the brake pedal and have done all of the above and still cannot move it out of Park...

Owner's Manual
Page 123
... allows you to move the shift lever out of Park if the normal method of Park to use the Shift Lock Release, it means your Honda dealer. Push down on the brake pedal and pulling the shift lever does not work. 1. SHIFT LOCK RELEASE SLOT 5. If you exceed these speeds, you... or shift. Set the Parking brake. 2. The engine will feel the engine cut in the Shift Lock Release slot on the steering column. 4. Remove the key from the ignition switch. 3. Remove the key from the Shift Lock Release slot. Automatic Transmission Maximum Speeds The speeds in the engine's computer controls.
... allows you to move the shift lever out of Park if the normal method of Park to use the Shift Lock Release, it means your Honda dealer. Push down on the brake pedal and pulling the shift lever does not work. 1. SHIFT LOCK RELEASE SLOT 5. If you exceed these speeds, you... or shift. Set the Parking brake. 2. The engine will feel the engine cut in the Shift Lock Release slot on the steering column. 4. Remove the key from the ignition switch. 3. Remove the key from the Shift Lock Release slot. Automatic Transmission Maximum Speeds The speeds in the engine's computer controls.

Owner's Manual
Page 124
.... If the vehicle is firmly set can overheat or damage the rear brakes, and will cause the ABS indicator to drive away. Driving with the key or the remote transmitter. Place any packages, valuables, etc., in Park. This keeps the vehicle from moving and putting pressure on the instrument panel shows...
.... If the vehicle is firmly set can overheat or damage the rear brakes, and will cause the ABS indicator to drive away. Driving with the key or the remote transmitter. Place any packages, valuables, etc., in Park. This keeps the vehicle from moving and putting pressure on the instrument panel shows...

Owner's Manual
Page 199
... switch or starter motor. If the fuses are OK, there is discharged. Nothing Happens or the Starter Motor Operates Very Slowly When you turn the key to start up and run. You can then try to START (III), you try jump starting the car from a booster battery (see page 164). See...
... switch or starter motor. If the fuses are OK, there is discharged. Nothing Happens or the Starter Motor Operates Very Slowly When you turn the key to start up and run. You can then try to START (III), you try jump starting the car from a booster battery (see page 164). See...
Owner's Manual
Page 233
..., Fluid...218 Checking Fluid Level...157 Shifting...120 Shift Lever Positions...120 Shift Position Indicator...120 Shift Lock Release...123 Accessories Installation...115 ACCESSORY (Ignition Key Position)...50 Adding Automatic Transmission Fluid...152 Brake Fluid...158 Engine Coolant...152 Engine Oil...148 Power Steering Fluid...159 Windshield Washer Fluid...156 Additional...
..., Fluid...218 Checking Fluid Level...157 Shifting...120 Shift Lever Positions...120 Shift Position Indicator...120 Shift Lock Release...123 Accessories Installation...115 ACCESSORY (Ignition Key Position)...50 Adding Automatic Transmission Fluid...152 Brake Fluid...158 Engine Coolant...152 Engine Oil...148 Power Steering Fluid...159 Windshield Washer Fluid...156 Additional...
Owner's Manual
Page 236
... Chime...40 Replacing Halogen Bulbs ...179 Turning on...40 Head Restraints...56 Identification Number, Vehicle...218 If Your Car Has to be Towed...215 Ignition Keys...49 Switch...49 Timing Control System...226 Indicator Lights, Instrument Panel...33 Infant Restraint...22 Inflation, Proper Tire ...171 Inside Mirror...64 Inspection, Tire...173...
... Chime...40 Replacing Halogen Bulbs ...179 Turning on...40 Head Restraints...56 Identification Number, Vehicle...218 If Your Car Has to be Towed...215 Ignition Keys...49 Switch...49 Timing Control System...226 Indicator Lights, Instrument Panel...33 Infant Restraint...22 Inflation, Proper Tire ...171 Inside Mirror...64 Inspection, Tire...173...
Owner's Manual
Page 237
...the Car...197 Jack, Tire...195 Jump Starting...202 Neutral Gear Position...122 New Vehicle Break-in ...108 NOTICE, Explanation of...ii Numbers, Identification...218 Keys...49 Label, Certification...218 Lane Change, Signaling...41 Lap Belt...7 Lap/Shoulder Belts...6 Leaking of Exhaust into Car...29 Lighter, Cigarette...69 Lights Headlight Aiming... Trip...37 Oil Change, How to ...150 Change, When to...142 Checking Engine...112 Pressure Indicator...34, 206 Selecting Proper Viscosity Chart...149 ON (Ignition Key Position)...50 Opening the Hood ...111 Operation in Foreign Countries...109 CONTINUED
...the Car...197 Jack, Tire...195 Jump Starting...202 Neutral Gear Position...122 New Vehicle Break-in ...108 NOTICE, Explanation of...ii Numbers, Identification...218 Keys...49 Label, Certification...218 Lane Change, Signaling...41 Lap Belt...7 Lap/Shoulder Belts...6 Leaking of Exhaust into Car...29 Lighter, Cigarette...69 Lights Headlight Aiming... Trip...37 Oil Change, How to ...150 Change, When to...142 Checking Engine...112 Pressure Indicator...34, 206 Selecting Proper Viscosity Chart...149 ON (Ignition Key Position)...50 Opening the Hood ...111 Operation in Foreign Countries...109 CONTINUED
Owner's Manual
Page 239
......83 Spare Tire Inflating...194 Specifications...221 Spark Plugs, Replacing...162 Specifications Charts...220 Speed Control...46 Speedometer...37 SRS Indicator...16, 34 START (Ignition Key Position)...50 Starting the Engine...119 In Cold Weather at High Altitude...119 With a Dead Battery...202 Steam Coming from Engine...204 Steering Wheel Adjustment...
......83 Spare Tire Inflating...194 Specifications...221 Spark Plugs, Replacing...162 Specifications Charts...220 Speed Control...46 Speedometer...37 SRS Indicator...16, 34 START (Ignition Key Position)...50 Starting the Engine...119 In Cold Weather at High Altitude...119 With a Dead Battery...202 Steam Coming from Engine...204 Steering Wheel Adjustment...

Owner's Manual
Page 240
......76 VIN...218 Vinyl Cleaning...188 Viscosity, Oil...149 Underside, Cleaning...190 Unexpected, Taking Care of the...193 Uniform Tire Quality Grading...223 Warning Beepers Key in Ignition...50 Seat Belts...34 WARNING, Explanation of...ii Warning Labels, Location of...30 Warranty Coverages*...233 Washer, Windshield Checking the Fluid Level...156...
......76 VIN...218 Vinyl Cleaning...188 Viscosity, Oil...149 Underside, Cleaning...190 Unexpected, Taking Care of the...193 Uniform Tire Quality Grading...223 Warning Beepers Key in Ignition...50 Seat Belts...34 WARNING, Explanation of...ii Warning Labels, Location of...30 Warranty Coverages*...233 Washer, Windshield Checking the Fluid Level...156...

