Owner's Manual
Page 80
If you . This section will help you plan to add any accessories to your Honda, you should know how to check the levels of important fluids. Break-in Period ...82 Gasoline ...82 Oxygenated Fuels ...82 Driving in this section first. ... Before you begin driving your car, please read the information in Foreign Countries ...83 Service Station Procedures ...84 Filling the Fuel Tank ...84 Opening the Hood ...85 Oil Check ...86 Engine Coolant Check . . 87 Fuel Economy ...88 Vehicle Condition ...88 Driving Habits ...88 Accessories ...89 Loading Cargo ...90 Before Driving You...
If you . This section will help you plan to add any accessories to your Honda, you should know how to check the levels of important fluids. Break-in Period ...82 Gasoline ...82 Oxygenated Fuels ...82 Driving in this section first. ... Before you begin driving your car, please read the information in Foreign Countries ...83 Service Station Procedures ...84 Filling the Fuel Tank ...84 Opening the Hood ...85 Oil Check ...86 Engine Coolant Check . . 87 Fuel Economy ...88 Vehicle Condition ...88 Driving Habits ...88 Accessories ...89 Loading Cargo ...90 Before Driving You...
Owner's Manual
Page 84
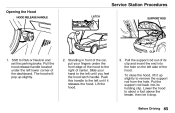
... of the car, put your hand to the left until you feel the hood latch handle. Lift the hood. 3. Put the support rod back into the hole on the left lower corner of the hood. To close the hood, lift it drop. Before Driving Pull the support rod out of center. ... into its holding clip. Service Station Procedures Opening the Hood HOOD RELEASE HANDLE LATCH SUPPORT ROD CLIP 1. Lower the hood to about a foot above the fender, then let it up slightly. 2. Shift to the left until it releases the hood. Pull the hood release handle located under the front edge of the...
... of the car, put your hand to the left until you feel the hood latch handle. Lift the hood. 3. Put the support rod back into the hole on the left lower corner of the hood. To close the hood, lift it drop. Before Driving Pull the support rod out of center. ... into its holding clip. Service Station Procedures Opening the Hood HOOD RELEASE HANDLE LATCH SUPPORT ROD CLIP 1. Lower the hood to about a foot above the fender, then let it up slightly. 2. Shift to the left until it releases the hood. Pull the hood release handle located under the front edge of the...
Owner's Manual
Page 91
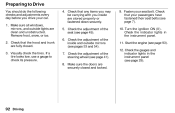
... day before you inside and outside lights are clean and unobstructed. Check the adjustment of the steering wheel (see page 93). 12. Check that the hood and trunk are securely closed . 3. Make sure all windows, mirrors, and outside mirrors (see page 7). 10. Visually check the tires. Fasten your car. 1. Check that...
... day before you inside and outside lights are clean and unobstructed. Check the adjustment of the steering wheel (see page 93). 12. Check that the hood and trunk are securely closed . 3. Make sure all windows, mirrors, and outside mirrors (see page 7). 10. Visually check the tires. Fasten your car. 1. Check that...

Owner's Manual
Page 116
... wear protective clothing while working in the engine compartment. Remove the oil drain bolt and washer from your Honda dealer) is required to the instructions that come with it off. Maintenance Open the hood and remove the oil fill cap. Install a new oil filter according to remove the filter. 4. Engine Oil 1. OIL...
... wear protective clothing while working in the engine compartment. Remove the oil drain bolt and washer from your Honda dealer) is required to the instructions that come with it off. Maintenance Open the hood and remove the oil fill cap. Install a new oil filter according to remove the filter. 4. Engine Oil 1. OIL...
Owner's Manual
Page 120
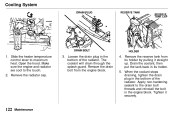
... reinstall the bolt in the bottom of the radiator. Drain the coolant, then put the tank back in the bottom of the radiator. Open the hood. Remove the radiator cap. 3. Remove the reserve tank from the engine block. 4. When the coolant stops draining, tighten the drain plug in the engine block...
... reinstall the bolt in the bottom of the radiator. Drain the coolant, then put the tank back in the bottom of the radiator. Open the hood. Remove the radiator cap. 3. Remove the reserve tank from the engine block. 4. When the coolant stops draining, tighten the drain plug in the engine block...
Owner's Manual
Page 143
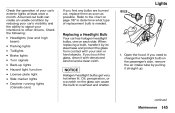
...) Parking lights Taillights Brake lights Turn signals Back-up . If you find any bulbs are burned out, replace them as soon as possible. Open the hood. Lights Check the operation of replacement bulb is needed. A burned out bulb can cause the bulb to change the headlight bulb on page 187 to...
...) Parking lights Taillights Brake lights Turn signals Back-up . If you find any bulbs are burned out, replace them as soon as possible. Open the hood. Lights Check the operation of replacement bulb is needed. A burned out bulb can cause the bulb to change the headlight bulb on page 187 to...
Owner's Manual
Page 165
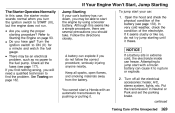
...may be an electrical problem, such as no power to START (III), but the engine does not run down, you have gas? Open the hood and check the physical condition of the battery (see page 177). NOTICE A battery can freeze. If you find nothing wrong, you turn the ignition...pump. If a battery sits in Neutral or Park and set the parking brake. If it to start your car: 1. Attempting to jump start a Honda with a frozen battery can cause it seems slushy or like a simple procedure, there are several precautions you do not try jump starting procedure? continued ...
...may be an electrical problem, such as no power to START (III), but the engine does not run down, you have gas? Open the hood and check the physical condition of the battery (see page 177). NOTICE A battery can freeze. If you find nothing wrong, you turn the ignition...pump. If a battery sits in Neutral or Park and set the parking brake. If it to start your car: 1. Attempting to jump start a Honda with a frozen battery can cause it seems slushy or like a simple procedure, there are several precautions you do not try jump starting procedure? continued ...
Owner's Manual
Page 167
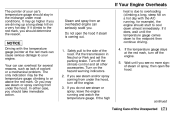
...for several reasons, such as lack of coolant or a mechanical problem. Turn off the engine. Put the transmission in the midrange under the hood. If it climbs to the red mark, you should determine the reason. Safely pull to the midpoint then continue driving. 4. If you .... Wait until the temperature gauge comes down almost immediately. NOTICE Driving with the A/C running and watch the temperature gauge. Do not open the hood. If you are driving up a long steep hill on the hazard warning indicators. 2. heat is coming from under most conditions. Turn on ...
...for several reasons, such as lack of coolant or a mechanical problem. Turn off the engine. Put the transmission in the midrange under the hood. If it climbs to the red mark, you should determine the reason. Safely pull to the midpoint then continue driving. 4. If you .... Wait until the temperature gauge comes down almost immediately. NOTICE Driving with the A/C running and watch the temperature gauge. Do not open the hood. If you are driving up a long steep hill on the hazard warning indicators. 2. heat is coming from under most conditions. Turn on ...

Owner's Manual
Page 169
... you can cause serious mechanical damage almost immediately. Start the engine and watch the oil pressure indicator. There is running , take immediate action. Open the hood and check the oil level (see page 115). 4. Taking Care of the Unexpected If this indicator comes on the dipstick (see page 115). Safely pull...
... you can cause serious mechanical damage almost immediately. Start the engine and watch the oil pressure indicator. There is running , take immediate action. Open the hood and check the oil level (see page 115). 4. Taking Care of the Unexpected If this indicator comes on the dipstick (see page 115). Safely pull...
Owner's Manual
Page 173
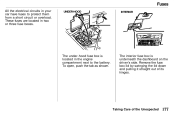
The interior fuse box is located in the engine compartment next to protect them from a short circuit or overload. Fuses All the electrical circuits in two or three fuse boxes. UNDER-HOOD INTERIOR The under-hood fuse box is underneath the dashboard on the driver's side. Taking Care of its hinges. To open, push the tab as shown. These fuses are located in your car have fuses to the battery. Remove the fuse box lid by swinging the lid down and pulling it straight out of the Unexpected
The interior fuse box is located in the engine compartment next to protect them from a short circuit or overload. Fuses All the electrical circuits in two or three fuse boxes. UNDER-HOOD INTERIOR The under-hood fuse box is underneath the dashboard on the driver's side. Taking Care of its hinges. To open, push the tab as shown. These fuses are located in your car have fuses to the battery. Remove the fuse box lid by swinging the lid down and pulling it straight out of the Unexpected
Owner's Manual
Page 175
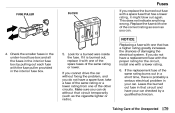
... or radio). If you do not have your car. Look for the circuit, install one with a lower rating. 6. Check the smaller fuses in the under-hood fuse box and all the fuses in the interior fuse box by a qualified technician. 4. Make sure you can . Fuses FUSE PULLER BLOWN If you replace...
... or radio). If you do not have your car. Look for the circuit, install one with a lower rating. 6. Check the smaller fuses in the under-hood fuse box and all the fuses in the interior fuse box by a qualified technician. 4. Make sure you can . Fuses FUSE PULLER BLOWN If you replace...
Owner's Manual
Page 203
... Beams ...37 Low Beams ...37 Replacing Halogen Bulbs .. 145 Turning on ...37 Heating and Cooling ...62 High Altitude, Starting a t ...94 High-Low Beam Switch ...33 Hood, Opening the ...85 Horn ...45 Hot Coolant, Warning About.. 120 Hydroplaning ...105 S w i t c h ...46 Timing Control System ...194 Indicator Lights, Instrument Panel ...29 Infant Restraint ...20...
... Beams ...37 Low Beams ...37 Replacing Halogen Bulbs .. 145 Turning on ...37 Heating and Cooling ...62 High Altitude, Starting a t ...94 High-Low Beam Switch ...33 Hood, Opening the ...85 Horn ...45 Hot Coolant, Warning About.. 120 Hydroplaning ...105 S w i t c h ...46 Timing Control System ...194 Indicator Lights, Instrument Panel ...29 Infant Restraint ...20...

Owner's Manual
Page 205
..., How to ...118 Change, When to ...109 Checking Engine ...115 Pressure Indicator ...31 Selecting Proper Viscosity Chart ...117 ON (Ignition Key Position) ...46 Opening the Hood ...85 Opening the Trunk ...48 Outside Mirrors ...53 Overheating, Engine ...171 Radiator Overheating ...171 Radio/Cassette Sound System ...69 Rear End Towing ...182 Rear Lights...
..., How to ...118 Change, When to ...109 Checking Engine ...115 Pressure Indicator ...31 Selecting Proper Viscosity Chart ...117 ON (Ignition Key Position) ...46 Opening the Hood ...85 Opening the Trunk ...48 Outside Mirrors ...53 Overheating, Engine ...171 Radiator Overheating ...171 Radio/Cassette Sound System ...69 Rear End Towing ...182 Rear Lights...


