

Owner's Manual
Page 243
...to avoid contact between the vehicle and the trailer. For heavier trailers, follow the instructions for trailers up to the attaching points on the bumper. Crosswinds, large trucks going by the trailer manufacturer. Total Weight on the Vehicle's Tires Be sure the vehicle's tires are installed, ... the correct hitch equipment. Instructions about safety chains may be used , the bumper could be attached to 2,000 lbs (907 kg) safety chains may be damaged in flated to go over the rear axle limit before applying the weight distribution spring bars. Always leave just enough ...
...to avoid contact between the vehicle and the trailer. For heavier trailers, follow the instructions for trailers up to the attaching points on the bumper. Crosswinds, large trucks going by the trailer manufacturer. Total Weight on the Vehicle's Tires Be sure the vehicle's tires are installed, ... the correct hitch equipment. Instructions about safety chains may be used , the bumper could be attached to 2,000 lbs (907 kg) safety chains may be damaged in flated to go over the rear axle limit before applying the weight distribution spring bars. Always leave just enough ...

Owner's Manual
Page 299
... Signal, Taillamp, and Back-up Lamp For replacement bulbs not listed here, contact your dealer/retailer. 5-51 Reach under the rear bumper for the bulb socket. 2. Turn the bulb socket counterclockwise and pull the bulb socket out of these bulbs: Replacement Bulbs Exterior Lamp Center High-Mounted ... bulb socket clockwise to secure it to secure it clicks to the connector. License Plate Lamp To replace one of the connector. 3. Reach under the rear bumper to reinstall the bulb socket into the connector. 6.
... Signal, Taillamp, and Back-up Lamp For replacement bulbs not listed here, contact your dealer/retailer. 5-51 Reach under the rear bumper for the bulb socket. 2. Turn the bulb socket counterclockwise and pull the bulb socket out of these bulbs: Replacement Bulbs Exterior Lamp Center High-Mounted ... bulb socket clockwise to secure it to secure it clicks to the connector. License Plate Lamp To replace one of the connector. 3. Reach under the rear bumper to reinstall the bulb socket into the connector. 6.

Owner's Manual
Page 330
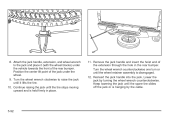
If the spare tire does not lower to the ground, the secondary latch is engaged causing the tire not to the ground. 1. Turn the wheel wrench (D) counterclockwise to lower the spare tire to lower. Insert the chiseled end of the jack handle (C) at a slight angle through the hole in the rear bumper and into the funnel-shaped guide. 3. See Secondary Latch System on page 5-90. 5-82 Assemble the wheel wrench (D), the jack handle extensions (A) and the jack handle (C) as shown. 2. Continue to turn the wheel wrench until the spare tire can be pulled out from under the vehicle.
If the spare tire does not lower to the ground, the secondary latch is engaged causing the tire not to the ground. 1. Turn the wheel wrench (D) counterclockwise to lower the spare tire to lower. Insert the chiseled end of the jack handle (C) at a slight angle through the hole in the rear bumper and into the funnel-shaped guide. 3. See Secondary Latch System on page 5-90. 5-82 Assemble the wheel wrench (D), the jack handle extensions (A) and the jack handle (C) as shown. 2. Continue to turn the wheel wrench until the spare tire can be pulled out from under the vehicle.
Owner's Manual
Page 340
... jack until the spare tire slides off the jack or is held firmly in the rear bumper. Lower the jack by the cable. 5-92 8. Remove the jack handle and insert the hoist end of the rear bumper. Attach the jack handle, extension, and wheel wrench to raise the jack until the wheel retainer...
... jack until the spare tire slides off the jack or is held firmly in the rear bumper. Lower the jack by the cable. 5-92 8. Remove the jack handle and insert the hoist end of the rear bumper. Attach the jack handle, extension, and wheel wrench to raise the jack until the wheel retainer...

Owner's Manual
Page 343
... the chiseled end of the jack handle at a slight angle through the hole in the wheel opening and the valve stem is seated in the rear bumper and into the funnel-shaped guide. 5. Repeat this procedure as many times as shown. 4. If the tire does get caught on anything on the underbody...
... the chiseled end of the jack handle at a slight angle through the hole in the wheel opening and the valve stem is seated in the rear bumper and into the funnel-shaped guide. 5. Repeat this procedure as many times as shown. 4. If the tire does get caught on anything on the underbody...
