Owner's Manual
Page 8
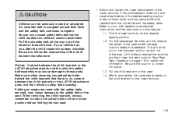
Adjust the driver's seat only when the vehicle is moving . Try to move the seat with your body to unlock it and release the bar. Lift the bar located under the front of the vehicle if you want it . The sudden movement could startle and confuse you, or make you push a pedal when you do not want to where you try to adjust a manual driver's seat while the vehicle is not moving . Slide the seat to . Front Seats Manual Seats {CAUTION: You can lose control of the seat to be sure the seat is locked in place. 1-2
Adjust the driver's seat only when the vehicle is moving . Try to move the seat with your body to unlock it and release the bar. Lift the bar located under the front of the vehicle if you want it . The sudden movement could startle and confuse you, or make you push a pedal when you do not want to where you try to adjust a manual driver's seat while the vehicle is not moving . Slide the seat to . Front Seats Manual Seats {CAUTION: You can lose control of the seat to be sure the seat is locked in place. 1-2

Owner's Manual
Page 12
... position. 2. Push and pull on the seatback to make sure it is locked. To return the seatback to make sure it is locked. Lift the recline lever. 2. Lift the lever fully without applying pressure to the seatback and the seatback will return to lock the seatback in place. 3. Push and pull on...
... position. 2. Push and pull on the seatback to make sure it is locked. To return the seatback to make sure it is locked. Lift the recline lever. 2. Lift the lever fully without applying pressure to the seatback and the seatback will return to lock the seatback in place. 3. Push and pull on...
Owner's Manual
Page 15
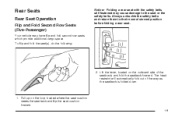
... Rear Seat Operation Flip and Fold Second Row Seats (Five-Passenger) Your vehicle may cause damage to their normal stowed position before folding a rear seat. 2. Lift the lever, located on the loop located where the seat cushion meets the seatback and flip the seat cushion forward. 1-9
... Rear Seat Operation Flip and Fold Second Row Seats (Five-Passenger) Your vehicle may cause damage to their normal stowed position before folding a rear seat. 2. Lift the lever, located on the loop located where the seat cushion meets the seatback and flip the seat cushion forward. 1-9

Owner's Manual
Page 16
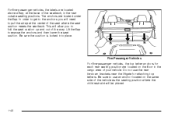
To return the seat(s) to the person sitting there. That could move forward in a sudden stop or crash. Lift the seatback until it is locked. 3. Push and pull on the seatback to make sure it is not locked, it is locked. 1. Push and pull ...
To return the seat(s) to the person sitting there. That could move forward in a sudden stop or crash. Lift the seatback until it is locked. 3. Push and pull on the seatback to make sure it is not locked, it is locked. 1. Push and pull ...

Owner's Manual
Page 18
... make sure it to the upright position. This could move forward in place. That could cause injury to the passenger seating position when finished. 3. Lift the seatback up to return it is folded or folded and tumbled.
... make sure it to the upright position. This could move forward in place. That could cause injury to the passenger seating position when finished. 3. Lift the seatback up to return it is folded or folded and tumbled.

Owner's Manual
Page 19
Lift up the seat, and then pull it is also folded, unhook the elastic loop, if equipped, on the back of the seatback. 5. Fold the panel, ...
Lift up the seat, and then pull it is also folded, unhook the elastic loop, if equipped, on the back of the seatback. 5. Fold the panel, ...
Owner's Manual
Page 52
Lift the flap to fold the seat cushion up and out of the way. Do not use an anchor located on the floor in ...
Lift the flap to fold the seat cushion up and out of the way. Do not use an anchor located on the floor in ...
Owner's Manual
Page 55
...: Children can be seriously injured or strangled if a shoulder belt is locked into place. 1.3. Refer to expose the anchors and then lower the seat cushion. Lift the flap to your vehicle has one, after the child restraint has been installed. Attach and tighten the lower attachments on the child restraint...
...: Children can be seriously injured or strangled if a shoulder belt is locked into place. 1.3. Refer to expose the anchors and then lower the seat cushion. Lift the flap to your vehicle has one, after the child restraint has been installed. Attach and tighten the lower attachments on the child restraint...
Owner's Manual
Page 93
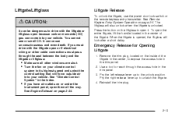
... come into your vehicle. Reinstall the trim plug. 2-13 Emergency Release for Opening Liftgate 1. Pry the right release lever up to open the entire liftgate, lift the handle located in the center of the liftgate in the Index. • If you must drive with the liftgate open them all other windows...
... come into your vehicle. Reinstall the trim plug. 2-13 Emergency Release for Opening Liftgate 1. Pry the right release lever up to open the entire liftgate, lift the handle located in the center of the liftgate in the Index. • If you must drive with the liftgate open them all other windows...

Owner's Manual
Page 96
...to expose the vanity mirror. Press the button downward to turn off when the cover is closed. 2-16 Pull the sun visor down and lift the mirror cover to open and close the drivers side (left) quarter glass for additional coverage. Lighted Visor Vanity Mirror Your vehicle may ...seat window separately. The lamps will turn on page 2-20. ( (Passenger's Quarter Glass): Sun Visors with Slide Rod Your vehicle may have to lift a cover to cover the side window. Power Rear Quarter Windows Your vehicle may have this feature. The switches that operate the windows are located on...
...to expose the vanity mirror. Press the button downward to turn off when the cover is closed. 2-16 Pull the sun visor down and lift the mirror cover to open and close the drivers side (left) quarter glass for additional coverage. Lighted Visor Vanity Mirror Your vehicle may ...seat window separately. The lamps will turn on page 2-20. ( (Passenger's Quarter Glass): Sun Visors with Slide Rod Your vehicle may have to lift a cover to cover the side window. Power Rear Quarter Windows Your vehicle may have this feature. The switches that operate the windows are located on...
Owner's Manual
Page 136
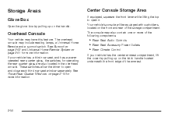
... on page 2-51 for operating the rear quarter glass are also located in the overhead console. If your vehicle has the center armrest compartment, lift the cover by pulling up on the latch handle located underneath the front edge of the armrest. 2-56 Center Console Storage Area If equipped, ...squeeze the front lever while lifting the top to open it. See Power Rear Quarter Windows on page 2-16 for more information. • Rear Seat Audio Controls • Rear ...
... on page 2-51 for operating the rear quarter glass are also located in the overhead console. If your vehicle has the center armrest compartment, lift the cover by pulling up on the latch handle located underneath the front edge of the armrest. 2-56 Center Console Storage Area If equipped, ...squeeze the front lever while lifting the top to open it. See Power Rear Quarter Windows on page 2-16 for more information. • Rear Seat Audio Controls • Rear ...
Owner's Manual
Page 140
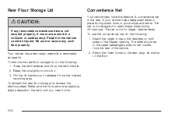
... Lid Convenience Net Your vehicle may have this feature. To remove the rear floor storage lid, do the following : 1. Press the latch release and lift up the latch handle. 2. A convenience net in the rear of the vehicle. 2. The label should be injured.
... Lid Convenience Net Your vehicle may have this feature. To remove the rear floor storage lid, do the following : 1. Press the latch release and lift up the latch handle. 2. A convenience net in the rear of the vehicle. 2. The label should be injured.

Owner's Manual
Page 367
Lift the hood, release the prop rod from its slot in the hood and return the prop to its retainer and put the prop rod into ... symbol on it to relieve pressure on properly. Before closing the hood, be sure all the filler caps are on the prop rod. Then lift the hood to latch fully. It is closed and repeat the process if necessary. 5-11 Hood Release 1. Remove the prop rod from its retainer.
Lift the hood, release the prop rod from its slot in the hood and return the prop to its retainer and put the prop rod into ... symbol on it to relieve pressure on properly. Before closing the hood, be sure all the filler caps are on the prop rod. Then lift the hood to latch fully. It is closed and repeat the process if necessary. 5-11 Hood Release 1. Remove the prop rod from its retainer.
Owner's Manual
Page 378
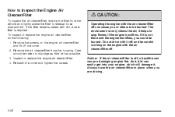
... cause you or others to dislodge as little dirt as possible. 3. it off, and be careful working on the engine air cleaner/filter and lift off , a backfire can cause a damaging engine fire. Do not drive with it helps to release loose dust and dirt. To inspect or...
... cause you or others to dislodge as little dirt as possible. 3. it off, and be careful working on the engine air cleaner/filter and lift off , a backfire can cause a damaging engine fire. Do not drive with it helps to release loose dust and dirt. To inspect or...

Owner's Manual
Page 385
... but to be too serious. Tow a trailer. If it cools down the accelerator until it is still no steam, the problem may decide not to lift the hood but see or hear no sign of steam, you are parked. Climb a long hill on , you get everyone out of steam, try this...
... but to be too serious. Tow a trailer. If it cools down the accelerator until it is still no steam, the problem may decide not to lift the hood but see or hear no sign of steam, you are parked. Climb a long hill on , you get everyone out of steam, try this...

Owner's Manual
Page 386
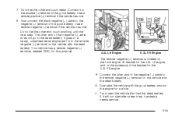
Radiator Pressure Cap C. The vehicle should be parked on a level surface. 4.2L L6 Engine A. Coolant Recovery Tank B. Coolant Recovery Tank B. Engine Fan 5-30 Radiator Pressure Cap C. Cooling System When you will see: 5.3L V8 Engine A. Engine Fan If the coolant inside the coolant recovery tank is what you decide it is safe to lift the hood, here is boiling, do not do anything else until it cools down.
Radiator Pressure Cap C. The vehicle should be parked on a level surface. 4.2L L6 Engine A. Coolant Recovery Tank B. Coolant Recovery Tank B. Engine Fan 5-30 Radiator Pressure Cap C. Cooling System When you will see: 5.3L V8 Engine A. Engine Fan If the coolant inside the coolant recovery tank is what you decide it is safe to lift the hood, here is boiling, do not do anything else until it cools down.

Owner's Manual
Page 399
... lamps that first. Find the positive (+) and negative (−) terminals on vehicles with the 5.3L V8 engine, and is located on the front engine lift bracket on each battery. The remote negative (−) terminal is marked GND (Ground). Your vehicle has a remote negative (−) jump starting terminal. People have been...
... lamps that first. Find the positive (+) and negative (−) terminals on vehicles with the 5.3L V8 engine, and is located on the front engine lift bracket on each battery. The remote negative (−) terminal is marked GND (Ground). Your vehicle has a remote negative (−) jump starting terminal. People have been...
Owner's Manual
Page 401
... negative (−) terminal, marked GND, for this purpose. 4.2L L6 Engine 5.3L V8 Engine The remote negative (−) terminal is located on the front engine lift bracket for a while. 11. Now start the vehicle that had the dead battery. Use a remote positive (+) terminal if the vehicle has one . It goes to...
... negative (−) terminal, marked GND, for this purpose. 4.2L L6 Engine 5.3L V8 Engine The remote negative (−) terminal is located on the front engine lift bracket for a while. 11. Now start the vehicle that had the dead battery. Use a remote positive (+) terminal if the vehicle has one . It goes to...
Owner's Manual
Page 406
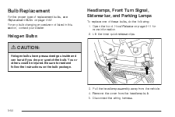
... section, contact your dealer. Hood Release on the bulb package. 3. Pull the headlamp assembly away from the headlamp bulb. 5. Remove the cover from the vehicle. 4. Lift the inner quick release clips. Be sure to read and follow the instructions on page 5-11 for more information. 2. Disconnect the wiring harness. 5-50 Headlamps...
... section, contact your dealer. Hood Release on the bulb package. 3. Pull the headlamp assembly away from the headlamp bulb. 5. Remove the cover from the vehicle. 4. Lift the inner quick release clips. Be sure to read and follow the instructions on page 5-11 for more information. 2. Disconnect the wiring harness. 5-50 Headlamps...

Owner's Manual
Page 409
... on the blade assembly pivot locking tab. Blade Pivot B. Hook Slot C. Any damage that are locked by your warranty. To remove the old wiper blades, lift the wiper arm until it from the wiper arm hook. 3. Blade Assembly D. Arm Assembly E. Locking Tab F. Allowing the wiper blade arm to touch the windshield...
... on the blade assembly pivot locking tab. Blade Pivot B. Hook Slot C. Any damage that are locked by your warranty. To remove the old wiper blades, lift the wiper arm until it from the wiper arm hook. 3. Blade Assembly D. Arm Assembly E. Locking Tab F. Allowing the wiper blade arm to touch the windshield...


