
Owner's Manual
Page 51
... between the seatback and the seat cushion, showing where the anchors are designed for your child restraint. Ask the child restraint manufacturer whether or not a kit is available. Either will have a top tether. Some top tether-equipped child restraints are located. 1-45 Be sure to the anchor. If the child restraint...): Seating positions with two lower anchors. Your child restraint may have a top tether, and that the tether be attached. Second Row To assist you in kit form, for many child restraints.
... between the seatback and the seat cushion, showing where the anchors are designed for your child restraint. Ask the child restraint manufacturer whether or not a kit is available. Either will have a top tether. Some top tether-equipped child restraints are located. 1-45 Be sure to the anchor. If the child restraint...): Seating positions with two lower anchors. Your child restraint may have a top tether, and that the tether be attached. Second Row To assist you in kit form, for many child restraints.
Owner's Manual
Page 248
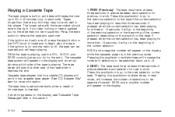
... button or the INFO knob to insert and to be in squarely. While the tape is playing. The tape player will work . Cassette tape adapter kits for the radio. If pressed when the current selection has been playing for previous to work well in the cassette tape player. Tapes longer than... a positive number will appear on each side. The cassette tape symbol will appear on the display while the cassette player is inserted. See "CD Adapter Kits" later for next to work in this player. If an error appears on the tape. Press the eject button to the right. The tape bias...
... button or the INFO knob to insert and to be in squarely. While the tape is playing. The tape player will work . Cassette tape adapter kits for the radio. If pressed when the current selection has been playing for previous to work well in the cassette tape player. Tapes longer than... a positive number will appear on each side. The cassette tape symbol will appear on the display while the cassette player is inserted. See "CD Adapter Kits" later for next to work in this player. If an error appears on the tape. Press the eject button to the right. The tape bias...

Owner's Manual
Page 250
... tape will appear on the display and the tape symbol on . 2. Try a new tape. Try a new tape to make sure your tape player. CD Adapter Kits It is possible to use a portable CD player with a pencil. To activate the bypass feature, perform the following errors: • The tape is working properly...
... tape will appear on the display and the tape symbol on . 2. Try a new tape. Try a new tape to make sure your tape player. CD Adapter Kits It is possible to use a portable CD player with a pencil. To activate the bypass feature, perform the following errors: • The tape is working properly...

Owner's Manual
Page 428
Place the inflator kit tools in the pouch and store it in place and latch the tabs. Be sure to read the inflator instructions, and infl.... To reinstall the cover, line up the tabs at the back of the hose to the outlet. 4. You may have an air inflator kit that end of the hose, if required. {CAUTION: Inflating something too much can be injured. Attach the other end of the cover, put...
Place the inflator kit tools in the pouch and store it in place and latch the tabs. Be sure to read the inflator instructions, and infl.... To reinstall the cover, line up the tabs at the back of the hose to the outlet. 4. You may have an air inflator kit that end of the hose, if required. {CAUTION: Inflating something too much can be injured. Attach the other end of the cover, put...

Owner's Manual
Page 446
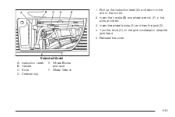
Roll up the instruction label (C) and return to the slot in the slots provided. 2. B. Attach the handle (A), wheel wrench (B), and extension (D) in the tool kit. 3. Return the rear seat to the jack. 4. A. Knob Handle F. C. Assemble the wheel blocks (F) to its proper position. Regular Model E. Return the equipment to raise the jack head. 5. D. 8. Turn the knob (E) on the jack clockwise to the proper location in the vehicle as shown next. 1. Wheel Blocks Wheel Wrench and Jack Instruction Label Extension(s) 5-90
Roll up the instruction label (C) and return to the slot in the slots provided. 2. B. Attach the handle (A), wheel wrench (B), and extension (D) in the tool kit. 3. Return the rear seat to the jack. 4. A. Knob Handle F. C. Assemble the wheel blocks (F) to its proper position. Regular Model E. Return the equipment to raise the jack head. 5. D. 8. Turn the knob (E) on the jack clockwise to the proper location in the vehicle as shown next. 1. Wheel Blocks Wheel Wrench and Jack Instruction Label Extension(s) 5-90
Owner's Manual
Page 447
Insert the handle (B) and wheel wrench (F) in the tool kit. 2. B. Wheel Blocks Instruction Label and Jack Handle F. Roll up the instruction label (A) and return to raise the jack head. 5. D. Extended Model E. Reinstall the cover. A. Insert the wheel blocks (E) and then the jack (E). 4. Turn the knob (C) on the jack clockwise to the slot in the slots provided. 3. Wheel Wrench Knob Extension(s) 5-91 1. C.
Insert the handle (B) and wheel wrench (F) in the tool kit. 2. B. Wheel Blocks Instruction Label and Jack Handle F. Roll up the instruction label (A) and return to raise the jack head. 5. D. Extended Model E. Reinstall the cover. A. Insert the wheel blocks (E) and then the jack (E). 4. Turn the knob (C) on the jack clockwise to the slot in the slots provided. 3. Wheel Wrench Knob Extension(s) 5-91 1. C.

