

Owner's Manual
Page 8
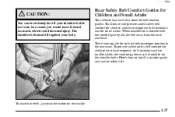
... driver's seat only when the vehicle is moving . yellowblue Seats and Seat Controls This section tells you about bucket and bench seats, power seats and head restraints. 2-Way Front Seat The bucket seats can lose control of the seat toward the driver's door to . The sudden movement could startle and confuse...
... driver's seat only when the vehicle is moving . yellowblue Seats and Seat Controls This section tells you about bucket and bench seats, power seats and head restraints. 2-Way Front Seat The bucket seats can lose control of the seat toward the driver's door to . The sudden movement could startle and confuse...

Owner's Manual
Page 11
... fixed on some models and adjustable on the right rear of your seat. 1-5 Slide an adjustable head restraint up , your safety belts can 't do its job because it , receiving neck or other injuries. Seatback Latches (Non-Touring Bench Seats) The seatback lever ... a crash you buckle up or down so that the top of the restraint is closest to the top of you 're reclined like this. yellowblue Head Restraints CAUTION: Sitting in a reclined position when your vehicle is in the seat and wear your safety belt properly. Even if you could cause serious...
... fixed on some models and adjustable on the right rear of your seat. 1-5 Slide an adjustable head restraint up , your safety belts can 't do its job because it , receiving neck or other injuries. Seatback Latches (Non-Touring Bench Seats) The seatback lever ... a crash you buckle up or down so that the top of the restraint is closest to the top of you 're reclined like this. yellowblue Head Restraints CAUTION: Sitting in a reclined position when your vehicle is in the seat and wear your safety belt properly. Even if you could cause serious...

Owner's Manual
Page 14
If you are removing the center seat, remove the right lap-shoulder belt. To do the following: 1. Removing the Rear Seats To remove the rear seats, do this section. 1-8 For details about headrests, see "Head Restraints" in an upright and locked position. Sit in the center seating position only when the console is in this , press the tip of a key into the release hole of the safety belt attachment while pulling up on the safety belt. yellowblue To raise or lower the center console, press the button between the beverage holders.
If you are removing the center seat, remove the right lap-shoulder belt. To do the following: 1. Removing the Rear Seats To remove the rear seats, do this section. 1-8 For details about headrests, see "Head Restraints" in an upright and locked position. Sit in the center seating position only when the console is in this , press the tip of a key into the release hole of the safety belt attachment while pulling up on the safety belt. yellowblue To raise or lower the center console, press the button between the beverage holders.

Owner's Manual
Page 29
CAUTION: You can be worn over the shoulder at all times. 1-23 Also, the belt would apply too much force to the ribs, which would move too far forward, which aren't as strong as shoulder bones. You could also severely injure internal organs like your arm. In a crash, your body would increase the chance of head and neck injury. It should be seriously injured if you wear the shoulder belt under the arm. A: The shoulder belt is worn under your liver or spleen. yellowblue Q: What's wrong with this?
CAUTION: You can be worn over the shoulder at all times. 1-23 Also, the belt would apply too much force to the ribs, which would move too far forward, which aren't as strong as shoulder bones. You could also severely injure internal organs like your arm. In a crash, your body would increase the chance of head and neck injury. It should be seriously injured if you wear the shoulder belt under the arm. A: The shoulder belt is worn under your liver or spleen. yellowblue Q: What's wrong with this?
Owner's Manual
Page 43
... the safety belt: To unlatch the belt, just push the button on a shoulder belt, the comfort guide pulls the belt away from the neck and head. yellowblue CAUTION: You can be installed on the shoulder belts. When installed on the buckle. 1-37
... the safety belt: To unlatch the belt, just push the button on a shoulder belt, the comfort guide pulls the belt away from the neck and head. yellowblue CAUTION: You can be installed on the shoulder belts. When installed on the buckle. 1-37
Owner's Manual
Page 48
... into the restraint, so the crash forces can provide. So, be over the child's abdomen. yellowblue CAUTION: (Continued) for adults, but not for the head and neck. Instead, the belt will say whether it should always be distributed across the strongest part of its body. This is so important that... will likely be sure that many hospitals today won't release a newborn infant to its air bag system is designed for one is weak and its head weighs so much compared with the rest of the infant's body, the back and shoulders. A very young child's hip bones are so small that ...
... into the restraint, so the crash forces can provide. So, be over the child's abdomen. yellowblue CAUTION: (Continued) for adults, but not for the head and neck. Instead, the belt will say whether it should always be distributed across the strongest part of its body. This is so important that... will likely be sure that many hospitals today won't release a newborn infant to its air bag system is designed for one is weak and its head weighs so much compared with the rest of the infant's body, the back and shoulders. A very young child's hip bones are so small that ...
Owner's Manual
Page 52
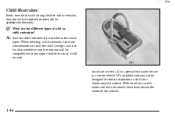
... restraints are the different types of the vehicle. 1-46 Q: A: What are available in a motor vehicle. With an infant car bed, make sure that the infant's head rests toward the center of add-on child restraints? An infant car bed (A) is a special bed made for use in four basic types. Add-on...
... restraints are the different types of the vehicle. 1-46 Q: A: What are available in a motor vehicle. With an infant car bed, make sure that the infant's head rests toward the center of add-on child restraints? An infant car bed (A) is a special bed made for use in four basic types. Add-on...

Owner's Manual
Page 53
Some infant seats come in a frontal crash. This type of restraint faces the rear so that the infant's head, neck and body can have the support they need in two parts -- the base stays secured in the vehicle and the seat part is removable. 1-47 yellowblue A rear-facing infant restraint (B) positions an infant to about 20 lbs. (9 kg) and about one year of the vehicle. Rear-facing infant restraints are designed for infants of up to face the rear of age.
Some infant seats come in a frontal crash. This type of restraint faces the rear so that the infant's head, neck and body can have the support they need in two parts -- the base stays secured in the vehicle and the seat part is removable. 1-47 yellowblue A rear-facing infant restraint (B) positions an infant to about 20 lbs. (9 kg) and about one year of the vehicle. Rear-facing infant restraints are designed for infants of up to face the rear of age.

Owner's Manual
Page 124
... opener was manufactured after 1996, the garage door opener may have programmed already. In a rolling code system, the garage door motor head unit must be trained to program the universal transmitter but does not open or close the garage door. To determine if you have .... Training a Garage Door Opener with a "Rolling Code" Feature (If Equipped) If you now need to train the garage door opener motor head unit to recognize the universal transmitter. Refer to the universal transmitter, see "Programming the Transmitter" listed previously. Find the training button on the ...
... opener was manufactured after 1996, the garage door opener may have programmed already. In a rolling code system, the garage door motor head unit must be trained to program the universal transmitter but does not open or close the garage door. To determine if you have .... Training a Garage Door Opener with a "Rolling Code" Feature (If Equipped) If you now need to train the garage door opener motor head unit to recognize the universal transmitter. Refer to the universal transmitter, see "Programming the Transmitter" listed previously. Find the training button on the ...
Owner's Manual
Page 125
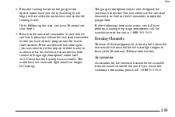
...You may need to do this step, you may either use the universal transmitter or the hand-held transmitter to flash when the motor head unit enters the training mode. Accessories Accessories for two to flash (after following these instructions, you would like additional information, please call... you have already programmed for the universal transmitter are available from the manufacturer of the unit at 1-800-355-3515. The motor head unit indicator light should now recognize the universal transmitter. Erasing Channels To erase all three programmed channels, hold down the two outside ...
...You may need to do this step, you may either use the universal transmitter or the hand-held transmitter to flash when the motor head unit enters the training mode. Accessories Accessories for two to flash (after following these instructions, you would like additional information, please call... you have already programmed for the universal transmitter are available from the manufacturer of the unit at 1-800-355-3515. The motor head unit indicator light should now recognize the universal transmitter. Erasing Channels To erase all three programmed channels, hold down the two outside ...

Owner's Manual
Page 169
... still play tapes, but you should be cleaned. If they aren't, they may not operate properly or may interfere with pads which scrub the tape head as possible to prevent damage to your vehicle -- If this other systems, and even damage them. yellowblue NOTICE: Before you add any sound equipment to...
... still play tapes, but you should be cleaned. If they aren't, they may not operate properly or may interfere with pads which scrub the tape head as possible to prevent damage to your vehicle -- If this other systems, and even damage them. yellowblue NOTICE: Before you add any sound equipment to...
Owner's Manual
Page 170
... a cut tape detection feature is not recommended. 3-30 Insert the scrubbing action cleaning cassette. 4. The tape symbol on . 3. Turn the ignition to clean the tape head. When the cleaning cassette has been ejected, the cut tape detection feature and a cleaning cassette may not clean as thoroughly as a broken tape. The use...
... a cut tape detection feature is not recommended. 3-30 Insert the scrubbing action cleaning cassette. 4. The tape symbol on . 3. Turn the ignition to clean the tape head. When the cleaning cassette has been ejected, the cut tape detection feature and a cleaning cassette may not clean as thoroughly as a broken tape. The use...

Owner's Manual
Page 183
... the edge of the pavement. If you can suddenly put the passing driver face to one-quarter turn or an intersection, delay your pass. the head-on a two-lane highway is only slightly below the pavement, recovery should be fairly easy. A simple maneuver? D Watch for several seconds. A miscalculation, an error in...
... the edge of the pavement. If you can suddenly put the passing driver face to one-quarter turn or an intersection, delay your pass. the head-on a two-lane highway is only slightly below the pavement, recovery should be fairly easy. A simple maneuver? D Watch for several seconds. A miscalculation, an error in...
Owner's Manual
Page 237
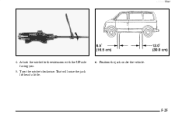
yellowblue 4. Position the jack under the vehicle. 5-25 Turn the ratchet clockwise. That will raise the jack lift head a little. 6. Attach the ratchet to the extension with the UP side facing you. 5.
yellowblue 4. Position the jack under the vehicle. 5-25 Turn the ratchet clockwise. That will raise the jack lift head a little. 6. Attach the ratchet to the extension with the UP side facing you. 5.
Owner's Manual
Page 239
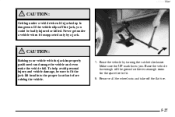
Remove all the wheel nuts and take off the ground so there is enough room for the spare tire to fit the jack lift head into the proper location before raising the vehicle. 7. If the vehicle slips off the jack, you . Raise the vehicle by a jack. CAUTION: Raising your vehicle ...
Remove all the wheel nuts and take off the ground so there is enough room for the spare tire to fit the jack lift head into the proper location before raising the vehicle. 7. If the vehicle slips off the jack, you . Raise the vehicle by a jack. CAUTION: Raising your vehicle ...
Owner's Manual
Page 385
... Weight Rating ...4-28 Gross Vehicle Weight Rating ...4-28 Guide en Français ...ii GVWR ...4-28 alogen Bulbs ...6-36 Hatch Release ...2-13 Hazard Warning Flashers ...5-2 Head Restraints ...1-5 Headlamps ...2-37 Bulb Replacement ...6-37, 6-38 High/Low Beam Changer ...2-32 On Reminder ...2-37 Wiring ...6-60 Hearing Impaired, Customer Assistance ...8-4 Heating ...3-6 High-Beam Headlamps...
... Weight Rating ...4-28 Gross Vehicle Weight Rating ...4-28 Guide en Français ...ii GVWR ...4-28 alogen Bulbs ...6-36 Hatch Release ...2-13 Hazard Warning Flashers ...5-2 Head Restraints ...1-5 Headlamps ...2-37 Bulb Replacement ...6-37, 6-38 High/Low Beam Changer ...2-32 On Reminder ...2-37 Wiring ...6-60 Hearing Impaired, Customer Assistance ...8-4 Heating ...3-6 High-Beam Headlamps...
Owner's Manual
Page 388
... ...3-23 Removable Rear Seats ...1-8 R Replacement Bulbs ...6-66 Parts ...6-69 Wheel ...6-49 Replacing Safety Belts ...1-63 Reporting Safety Defects ...8-10, 8-11 Restraints Checking ...1-62 Child ...1-46 Head ...1-5 Replacing Parts After a Crash ...1-63 System Check ...7-42 Reverse ...2-21 Right Front Passenger Position ...1-26 Roadside Assistance ...8-6 Roadside Assistance, Canadian ...8-7 Rocking Your Vehicle ...5-33 Rotation...
... ...3-23 Removable Rear Seats ...1-8 R Replacement Bulbs ...6-66 Parts ...6-69 Wheel ...6-49 Replacing Safety Belts ...1-63 Reporting Safety Defects ...8-10, 8-11 Restraints Checking ...1-62 Child ...1-46 Head ...1-5 Replacing Parts After a Crash ...1-63 System Check ...7-42 Reverse ...2-21 Right Front Passenger Position ...1-26 Roadside Assistance ...8-6 Roadside Assistance, Canadian ...8-7 Rocking Your Vehicle ...5-33 Rotation...

