Owner's Manual
Page 64
Do this section. 2-4 Check to keep the doors from opening beyond 90". Replace the assemblies the same way. The rear doors have a check assembly to make sure both doors are completely closed. To open the rear doors, push in the inside of the door. See the Caution following "Swing-Out Windows" in this on the latch release handle in on the clip and lift the check assembly up off the mounting bracket. To close the rear doors, close the driver's side door first. To fully open the driver's side rear door, pull on each door.
Do this section. 2-4 Check to keep the doors from opening beyond 90". Replace the assemblies the same way. The rear doors have a check assembly to make sure both doors are completely closed. To open the rear doors, push in the inside of the door. See the Caution following "Swing-Out Windows" in this on the latch release handle in on the clip and lift the check assembly up off the mounting bracket. To close the rear doors, close the driver's side door first. To fully open the driver's side rear door, pull on each door.
Owner's Manual
Page 66
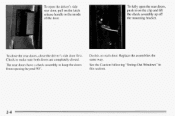
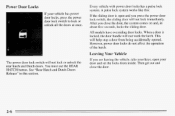
... leaving the vehicle, take your keys, open arid you close the door. 2-6 When a door is open your vehicle has power door locks, press the power door lock switch to lock or unlock all the doors at once. This will not work the latch. See "Rear Hatch and Dutch Doors Release" in about five seconds, locks the sliding...
... leaving the vehicle, take your keys, open arid you close the door. 2-6 When a door is open your vehicle has power door locks, press the power door lock switch to lock or unlock all the doors at once. This will not work the latch. See "Rear Hatch and Dutch Doors Release" in about five seconds, locks the sliding...
Owner's Manual
Page 69
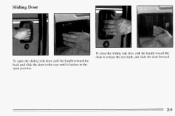
I _ iding Door To close the sliding side door, pull the handle toward the back and slide the door to the rear until it latches in the open position. 2-9 To open the sliding side door, pull the handle toward the front t o release the rear latch, and slide the door forward.
I _ iding Door To close the sliding side door, pull the handle toward the back and slide the door to the rear until it latches in the open position. 2-9 To open the sliding side door, pull the handle toward the front t o release the rear latch, and slide the door forward.

Owner's Manual
Page 70
... Security Lock Your vehicle's sliding side door is equipped with a child security door lock, located at the back of the sliding door, near the side door latch mechanism. To use this feature. If you don't cancel the security lock feature, adults or older children who ride in the rear won't be... seen from the outside . Unlock the door and open the sliding door from the outside on your sliding...
... Security Lock Your vehicle's sliding side door is equipped with a child security door lock, located at the back of the sliding door, near the side door latch mechanism. To use this feature. If you don't cancel the security lock feature, adults or older children who ride in the rear won't be... seen from the outside . Unlock the door and open the sliding door from the outside on your sliding...
Owner's Manual
Page 88
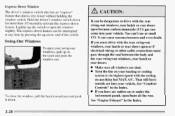
To close the window, pull the latch toward you and push it to its highest speed with the rear swing-out windows, rear hatch or rear doors open or if electrical wiring or other cable connections... must pass through the seal between the and body the rear swing-out windows, rear hatch or rear doors: Make sure all the way. You can cause unconsciousness and death. It can 't see or smell CO... drive with the rear swing-out windows, rear hatch or rear doors (CO)gas can be interrupted at any time by pressing the up on the latch and push the window out. If you must drive with the ...
To close the window, pull the latch toward you and push it to its highest speed with the rear swing-out windows, rear hatch or rear doors open or if electrical wiring or other cable connections... must pass through the seal between the and body the rear swing-out windows, rear hatch or rear doors: Make sure all the way. You can cause unconsciousness and death. It can 't see or smell CO... drive with the rear swing-out windows, rear hatch or rear doors (CO)gas can be interrupted at any time by pressing the up on the latch and push the window out. If you must drive with the ...
Owner's Manual
Page 103
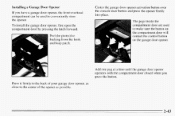
...firmly to the back or your garage door opener, as close to make sure the button on the compartment door will contact the control button on the garage door opener. To install the garage door opener, first open the compartment door by pressing the latch forward. Add one peg at a ...time until the garage door opener operates with the compartment door closed when you have a garage door opener, the...
...firmly to the back or your garage door opener, as close to make sure the button on the compartment door will contact the control button on the garage door opener. To install the garage door opener, first open the compartment door by pressing the latch forward. Add one peg at a ...time until the garage door opener operates with the compartment door closed when you have a garage door opener, the...
Owner's Manual
Page 342
... Make sure the safety belt reminder light and all body door hinges, the body hood, fuel door and rear compartment hinges, latches and locks including interior glove box and console doors, and any moving seat hardware. Body Lubrication Service Lubricate all your belts, buckles, latch plates, retractors and anchorages are working properly. Also look for...
... Make sure the safety belt reminder light and all body door hinges, the body hood, fuel door and rear compartment hinges, latches and locks including interior glove box and console doors, and any moving seat hardware. Body Lubrication Service Lubricate all your belts, buckles, latch plates, retractors and anchorages are working properly. Also look for...
Owner's Manual
Page 348
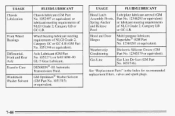
USAGE Hood Latch Assembly Pivots, Spring Anchor and Release Pawl Hood and Door Hinges Weatherstrip Conditioning Gas Line ~ FLUIDLUBRICANT Lubriplate lubricant aerosol (GM Part No. 12346293 or equivalent) or lubricant meeting requirements of NLGI Grade 2, Category LB or ...
USAGE Hood Latch Assembly Pivots, Spring Anchor and Release Pawl Hood and Door Hinges Weatherstrip Conditioning Gas Line ~ FLUIDLUBRICANT Lubriplate lubricant aerosol (GM Part No. 12346293 or equivalent) or lubricant meeting requirements of NLGI Grade 2, Category LB or ...

Owner's Manual
Page 365
...Vehicle Identlfication Number ...6-59 2-35 Lamps ...2-37 Dome ...Interior ...2-37 OnReminder ...2-36 1-5 Latches.Seatback ...Leaving Your Vehicle ...2-6 Leaving Your Vehicle with the Engine Running ...2-24 2-48 ...Short Trip/City Definition ...7-4 7-4 ShortTrip/CityIntervals ...Maintenance. Underbody ...6-56 9-5 Safety Belt Remmder ...ServiceEngineSoon ...Loading YourVehicle ...Locks Cylinders ...Door ...KeyLock Cylinder Service ...PowerDoor ...Sliding Door Child Security ...Steering Column Lock Check ...Lubricants and Fluids ...Lubrication Service. I O 7-44 7-47 7-42 2-47 1-2 Maintenance. ...
...Vehicle Identlfication Number ...6-59 2-35 Lamps ...2-37 Dome ...Interior ...2-37 OnReminder ...2-36 1-5 Latches.Seatback ...Leaving Your Vehicle ...2-6 Leaving Your Vehicle with the Engine Running ...2-24 2-48 ...Short Trip/City Definition ...7-4 7-4 ShortTrip/CityIntervals ...Maintenance. Underbody ...6-56 9-5 Safety Belt Remmder ...ServiceEngineSoon ...Loading YourVehicle ...Locks Cylinders ...Door ...KeyLock Cylinder Service ...PowerDoor ...Sliding Door Child Security ...Steering Column Lock Check ...Lubricants and Fluids ...Lubrication Service. I O 7-44 7-47 7-42 2-47 1-2 Maintenance. ...


