
Owner's Manual
Page 15
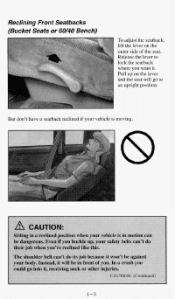
But don't have a seatback reclined your vehicle ismoving. if 1-3 Pull up on outer side of the seat. Release the lever to an upright position. Reclining Front Seatbacks (Bucket Seatsor 60/40 Bench) ?oadjust the seatback, lift the lever the on the lever and the seatwill go to lock the seatback where you want it.
But don't have a seatback reclined your vehicle ismoving. if 1-3 Pull up on outer side of the seat. Release the lever to an upright position. Reclining Front Seatbacks (Bucket Seatsor 60/40 Bench) ?oadjust the seatback, lift the lever the on the lever and the seatwill go to lock the seatback where you want it.
Owner's Manual
Page 16
Your seatback will move back and forth freely, unless you . Then the seatback will lock in place. There's one time the seatback may not fold without some help from you come to a sudden stop. The latch must be down a fairly steep hill. That's if your vehicle is parked going down for the seat to let people get into the back seat or reach the storage area behind the seat. Then it will fold forward. To fold a front seatback forward, push the seatback toward the rear as you lift this latch. Front Seatback Latches The frontseatback folds forward to work properly. 14
Your seatback will move back and forth freely, unless you . Then the seatback will lock in place. There's one time the seatback may not fold without some help from you come to a sudden stop. The latch must be down a fairly steep hill. That's if your vehicle is parked going down for the seat to let people get into the back seat or reach the storage area behind the seat. Then it will fold forward. To fold a front seatback forward, push the seatback toward the rear as you lift this latch. Front Seatback Latches The frontseatback folds forward to work properly. 14

Owner's Manual
Page 51
To open the door from the outside, lift the handle and pull the door open . 2-5 Your Doors And How They Work Side Doors To open the door from the inside,pull the lever toward you and push the door open .
To open the door from the outside, lift the handle and pull the door open . 2-5 Your Doors And How They Work Side Doors To open the door from the inside,pull the lever toward you and push the door open .
Owner's Manual
Page 54
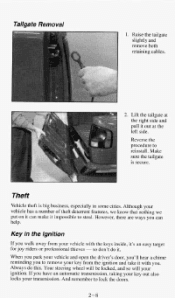
Lift the tailgate at the left side. Always do it can help. Although your transmission. However, there are ways you have an automatic transmission, taking your ...
Lift the tailgate at the left side. Always do it can help. Although your transmission. However, there are ways you have an automatic transmission, taking your ...

Owner's Manual
Page 97
... any electrical equipment when not in auxiliary electrical equipment. Some visors have a lighted mirror. Always turn on extended periods will drain your battery. 2-51 Just lift the cover up to turn any electrical equipment you can plug in use. NOTICE: When using the accessory power outlets, maximum electrical off load must...
... any electrical equipment when not in auxiliary electrical equipment. Some visors have a lighted mirror. Always turn on extended periods will drain your battery. 2-51 Just lift the cover up to turn any electrical equipment you can plug in use. NOTICE: When using the accessory power outlets, maximum electrical off load must...

Owner's Manual
Page 98
...'t be deposited. When it's ready, it will pop back by itself. ' Don't hold a cigarettelighter in all the way, and let go. To remove the ashtray, lift the release as high as possible, then remove tab the tray. 2-52 The ashtray must be completely pulled out to back away from the heating...
...'t be deposited. When it's ready, it will pop back by itself. ' Don't hold a cigarettelighter in all the way, and let go. To remove the ashtray, lift the release as high as possible, then remove tab the tray. 2-52 The ashtray must be completely pulled out to back away from the heating...

Owner's Manual
Page 99
Your console also includes a handy place to hold cups. Storage Compartments Your vehicle may have a console compartment between the bucket seats. To open while driving. 2-53 Two cup depressions are provided for your convenience, but the glovebox should not be open your glove box, squeezethe lever at the top the of console. To open it, just squeeze the leverin the front of the consolewhile lifting the top the of glovebox and lower the door.
Your console also includes a handy place to hold cups. Storage Compartments Your vehicle may have a console compartment between the bucket seats. To open while driving. 2-53 Two cup depressions are provided for your convenience, but the glovebox should not be open your glove box, squeezethe lever at the top the of console. To open it, just squeeze the leverin the front of the consolewhile lifting the top the of glovebox and lower the door.
Owner's Manual
Page 104
Warning lights go on your vehicle. Often gages and warning lights work together to let you have an automatic transmission, lift your foot off of the accelerator pedal. So please get to a higher gear, or liftyour foot off of your engine speed is running at its ...
Warning lights go on your vehicle. Often gages and warning lights work together to let you have an automatic transmission, lift your foot off of the accelerator pedal. So please get to a higher gear, or liftyour foot off of your engine speed is running at its ...

Owner's Manual
Page 192
Additional ramping maybe required for car-carrier equipment. Use safety chains and wheel straps. If your vehicle has thefour-wheel drive option, a dolly MUST be damaged. Use wheel lift or car-carrier equipment. Towing From the Front NOTICE: Do not tow with sling-type equipment front bumper system or will be used under the rearwheels when towingfrom the front.
Additional ramping maybe required for car-carrier equipment. Use safety chains and wheel straps. If your vehicle has thefour-wheel drive option, a dolly MUST be damaged. Use wheel lift or car-carrier equipment. Towing From the Front NOTICE: Do not tow with sling-type equipment front bumper system or will be used under the rearwheels when towingfrom the front.

Owner's Manual
Page 208
That will raise the jack lift head a little. I Before you start, block the frontand rear of the tire farthest away from the one' being changed. Then put your spare tire near the flat tire. Rotate the jackhandle to the right. Changing the Tire Start with the jack, wheel wrench and wheel blocks.
That will raise the jack lift head a little. I Before you start, block the frontand rear of the tire farthest away from the one' being changed. Then put your spare tire near the flat tire. Rotate the jackhandle to the right. Changing the Tire Start with the jack, wheel wrench and wheel blocks.
Owner's Manual
Page 225
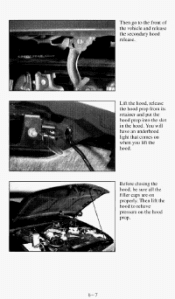
Then lift the hood to the front of the vehicle and release the secondary hood release. You will have an underhood light that comes on properly. Before closing the hood, be sure all the filler caps are on when you lift the hood. I Lift the hood, release the hood prop from its retainer and put the hood prop into the slot in the hood. Then go to relieve pressure on the hood prop- 6-7
Then lift the hood to the front of the vehicle and release the secondary hood release. You will have an underhood light that comes on properly. Before closing the hood, be sure all the filler caps are on when you lift the hood. I Lift the hood, release the hood prop from its retainer and put the hood prop into the slot in the hood. Then go to relieve pressure on the hood prop- 6-7
Owner's Manual
Page 258
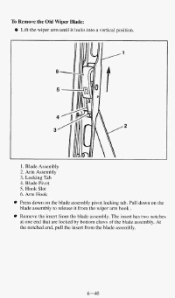
Arm Assembly 3. Hook Slot 6. Remove the insert from the blade assembly. To Remove the Old Wiper Blade: Lift the wiper arm until it from the wiper arm hook . Blade Pivot 5. Locking Tab 4. Arm Hook Press down on the blade assembly pivot locking tab. The insert has two notches at one end that are locked by bottom claws of the blade assembly. At the notched end, pull the insert from the blade assembly. Blade Assembly 2. Pull down on the blade assembly to release it locks into a vertical position. 1.
Arm Assembly 3. Hook Slot 6. Remove the insert from the blade assembly. To Remove the Old Wiper Blade: Lift the wiper arm until it from the wiper arm hook . Blade Pivot 5. Locking Tab 4. Arm Hook Press down on the blade assembly pivot locking tab. The insert has two notches at one end that are locked by bottom claws of the blade assembly. At the notched end, pull the insert from the blade assembly. Blade Assembly 2. Pull down on the blade assembly to release it locks into a vertical position. 1.