
Diesel Supplement 3rd Printing
Page 66
... with frozen coolant. • Sticking thermostat. • Overloading or pulling heavy trailers during hot weather. • Grill or radiator air blockage. • Slipping or missing drive belt. • Plugged or very dirty air filter. 66 2012 Diesel (67l) Supplement, 3rd Printing USA (fus) If the engine runs hot The following could cause...
... with frozen coolant. • Sticking thermostat. • Overloading or pulling heavy trailers during hot weather. • Grill or radiator air blockage. • Slipping or missing drive belt. • Plugged or very dirty air filter. 66 2012 Diesel (67l) Supplement, 3rd Printing USA (fus) If the engine runs hot The following could cause...

Owner Guide 4th Printing
Page 22
... center in the Maintenance and Specifications chapter for instructions. If the gauge is not restricted such as snow or debris blocking airflow through the grill. Fuel gauge: Indicates approximately how much fuel is left in the fuel tank (when the ignition is located in the instrument cluster and...traveled. Refer to lower the transmission temperature into the normal range. Altering the severity of the driving conditions is displayed on the steering wheel. 22 2012 F-250/350/450/550 (f23) Owners Guide, 4th Printing USA (fus) This can be caused by a long indicator chime. The fuel icon...
... center in the Maintenance and Specifications chapter for instructions. If the gauge is not restricted such as snow or debris blocking airflow through the grill. Fuel gauge: Indicates approximately how much fuel is left in the fuel tank (when the ignition is located in the instrument cluster and...traveled. Refer to lower the transmission temperature into the normal range. Altering the severity of the driving conditions is displayed on the steering wheel. 22 2012 F-250/350/450/550 (f23) Owners Guide, 4th Printing USA (fus) This can be caused by a long indicator chime. The fuel icon...
Owner Guide 4th Printing
Page 94
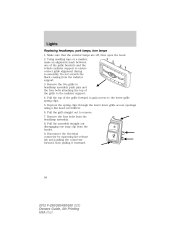
...Pull the assembly straight out disengaging one of the grille brackets and the vehicle radiator support to the lower grille spring clips. 5. Disconnect the electrical connector by squeezing the release tab and pushing the connector forward, then pulling it rearward. 94 2012 F-250/350/450/550 (f23) Owners Guide,... 4th Printing USA (fus) Remove the two grille to headlamp assembly push pins and the four bolts attaching the top of the grille forward to gain access to ensure correct grille alignment during re-assembly. Remove...
...Pull the assembly straight out disengaging one of the grille brackets and the vehicle radiator support to the lower grille spring clips. 5. Disconnect the electrical connector by squeezing the release tab and pushing the connector forward, then pulling it rearward. 94 2012 F-250/350/450/550 (f23) Owners Guide,... 4th Printing USA (fus) Remove the two grille to headlamp assembly push pins and the four bolts attaching the top of the grille forward to gain access to ensure correct grille alignment during re-assembly. Remove...
Owner Guide 4th Printing
Page 371
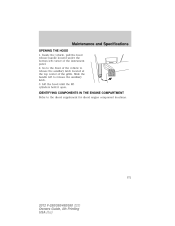
Go to the front of the vehicle to the diesel supplement for diesel engine component locations. 371 2012 F-250/350/450/550 (f23) Owners Guide, 4th Printing USA (fus) Lift the hood until the lift cylinders hold it open. Slide the handle left corner of the grille. IDENTIFYING COMPONENTS IN THE ENGINE COMPARTMENT Refer to release the auxiliary latch located at the top center of the instrument panel. 2. Inside the vehicle, pull the hood release handle located under the bottom left to release the auxiliary latch. 3. Maintenance and Specifications OPENING THE HOOD 1.
Go to the front of the vehicle to the diesel supplement for diesel engine component locations. 371 2012 F-250/350/450/550 (f23) Owners Guide, 4th Printing USA (fus) Lift the hood until the lift cylinders hold it open. Slide the handle left corner of the grille. IDENTIFYING COMPONENTS IN THE ENGINE COMPARTMENT Refer to release the auxiliary latch located at the top center of the instrument panel. 2. Inside the vehicle, pull the hood release handle located under the bottom left to release the auxiliary latch. 3. Maintenance and Specifications OPENING THE HOOD 1.
