
Warranty Guide 5th Printing
Page 17
...other parts that affect these systems (for off-road use only installed after the vehicle leaves the control of Ford Motor Company, if the installed part fails or causes a Ford part to lift kits, oversized 12 NOTE: Some components may also be ingested into the engine • misuse of the... vehicle as a permanent stationary power source Damage Caused by Alteration or Modification The New Vehicle Limited Warranty does not cover any part (Ford or non-Ford) designed for example, but are not limited to fail. WHAT IS NOT COVERED UNDER THE NEW VEHICLE LIMITED WARRANTY? high pressure oil...
...other parts that affect these systems (for off-road use only installed after the vehicle leaves the control of Ford Motor Company, if the installed part fails or causes a Ford part to lift kits, oversized 12 NOTE: Some components may also be ingested into the engine • misuse of the... vehicle as a permanent stationary power source Damage Caused by Alteration or Modification The New Vehicle Limited Warranty does not cover any part (Ford or non-Ford) designed for example, but are not limited to fail. WHAT IS NOT COVERED UNDER THE NEW VEHICLE LIMITED WARRANTY? high pressure oil...

Driving Your SUV or Truck 1st Printing
Page 23
WARNING: Do not use "aftermarket lift kits" or other suspension modifications. Failure to maintain your vehicle properly may void the warranty, increase your Owner's Guide for proper maintenance instructions and schedules. 23 2012 Four Wheel Drive (4wd) Supplement, 1st Printing USA (fus) Frequent ...adversely affect driver and passenger safety. Do not make it easier to provide safe, predictable performance and durable load carrying capability. Ford recommends that raise the center of vehicle control, vehicle rollover, personal injury and death. Refer to the Owner's Guide for ...
WARNING: Do not use "aftermarket lift kits" or other suspension modifications. Failure to maintain your vehicle properly may void the warranty, increase your Owner's Guide for proper maintenance instructions and schedules. 23 2012 Four Wheel Drive (4wd) Supplement, 1st Printing USA (fus) Frequent ...adversely affect driver and passenger safety. Do not make it easier to provide safe, predictable performance and durable load carrying capability. Ford recommends that raise the center of vehicle control, vehicle rollover, personal injury and death. Refer to the Owner's Guide for ...
Owner Guide 2nd Printing
Page 89
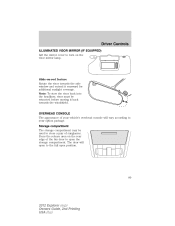
...Note: To stow the visor back into the headliner, visor must be used to store a pair of the bin door to open position. 89 2012 Explorer (exp) Owners Guide, 2nd Printing USA (fus) Storage compartment The storage compartment may be retracted before moving it back towards the side window and... extend it rearward for additional sunlight coverage. Press the release area on the visor mirror lamp. Driver Controls ILLUMINATED VISOR MIRROR (IF EQUIPPED) Lift the mirror cover to turn on the rear edge of sunglasses. The door will vary according to your vehicle's overhead console will open to...
...Note: To stow the visor back into the headliner, visor must be used to store a pair of the bin door to open position. 89 2012 Explorer (exp) Owners Guide, 2nd Printing USA (fus) Storage compartment The storage compartment may be retracted before moving it back towards the side window and... extend it rearward for additional sunlight coverage. Press the release area on the visor mirror lamp. Driver Controls ILLUMINATED VISOR MIRROR (IF EQUIPPED) Lift the mirror cover to turn on the rear edge of sunglasses. The door will vary according to your vehicle's overhead console will open to...
Owner Guide 2nd Printing
Page 155
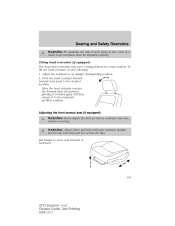
...restraints may have a tilting feature for extra comfort. WARNING: Always drive and ride with your head to move seat forward or backward. 155 2012 Explorer (exp) Owners Guide, 2nd Printing USA (fus) Pivot the head restraint forward towards your seatback upright and the lap belt snug and ... the hips. Adjusting the front manual seat (if equipped) WARNING: Never adjust the driver's seat or seatback when the vehicle is moving. Lift handle to the desired location. To tilt the head restraint, do the following: 1. After the head restraint reaches the forward-most tilt position...
...restraints may have a tilting feature for extra comfort. WARNING: Always drive and ride with your head to move seat forward or backward. 155 2012 Explorer (exp) Owners Guide, 2nd Printing USA (fus) Pivot the head restraint forward towards your seatback upright and the lap belt snug and ... the hips. Adjusting the front manual seat (if equipped) WARNING: Never adjust the driver's seat or seatback when the vehicle is moving. Lift handle to the desired location. To tilt the head restraint, do the following: 1. After the head restraint reaches the forward-most tilt position...
Owner Guide 2nd Printing
Page 165
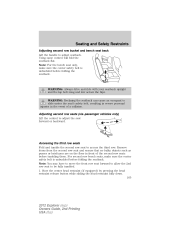
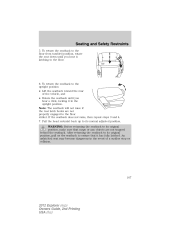
...row bench seats, make sure the center safety belt is unbuckled before folding the seatback. Adjusting second row seats (six-passenger vehicles only) Lift the control to be fully tumbled. 1. Remove items from the second row seat and ensure that no bulky objects such as purses or ...or backward. Stow the center head restraint (if equipped) by pressing the head restraint release button while sliding the head restraint fully down. 165 2012 Explorer (exp) Owners Guide, 2nd Printing USA (fus) Accessing the third row seats Fold and tumble the second row seat to adjust seatback. ...
...row bench seats, make sure the center safety belt is unbuckled before folding the seatback. Adjusting second row seats (six-passenger vehicles only) Lift the control to be fully tumbled. 1. Remove items from the second row seat and ensure that no bulky objects such as purses or ...or backward. Stow the center head restraint (if equipped) by pressing the head restraint release button while sliding the head restraint fully down. 165 2012 Explorer (exp) Owners Guide, 2nd Printing USA (fus) Accessing the third row seats Fold and tumble the second row seat to adjust seatback. ...
Owner Guide 2nd Printing
Page 166
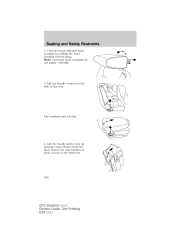
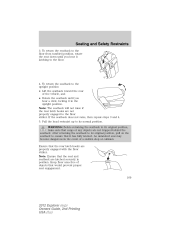
Lift the handle located on the side of the seat. Rotate the seat forward to allow access to the third row. 166 2012 Explorer (exp) Owners Guide, 2nd Printing USA (fus) Seating and Safety Restraints 2. The seatback will fold flat. 4. Lift the handle all the way up until the seat releases from the floor. Note: Outboard head restraints do not adjust vertically. 3. Fold the head outboard head restraint by pulling the head restraint release strap.
Lift the handle located on the side of the seat. Rotate the seat forward to allow access to the third row. 166 2012 Explorer (exp) Owners Guide, 2nd Printing USA (fus) Seating and Safety Restraints 2. The seatback will fold flat. 4. Lift the handle all the way up until the seat releases from the floor. Note: Outboard head restraints do not adjust vertically. 3. Fold the head outboard head restraint by pulling the head restraint release strap.
Owner Guide 2nd Printing
Page 167
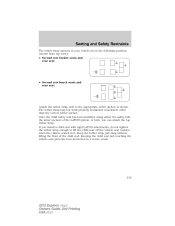
... until you hear a click, locking it has fully latched. Pull the head restraint back up to the upright position • Lift the seatback toward the rear of a sudden stop or collision. 167 2012 Explorer (exp) Owners Guide, 2nd Printing USA (fus) If the seatback does not raise, then repeat steps 3 and 4. 7. To return...
... until you hear a click, locking it has fully latched. Pull the head restraint back up to the upright position • Lift the seatback toward the rear of a sudden stop or collision. 167 2012 Explorer (exp) Owners Guide, 2nd Printing USA (fus) If the seatback does not raise, then repeat steps 3 and 4. 7. To return...
Owner Guide 2nd Printing
Page 169
...hooks are not trapped behind the seatback. After returning the seatback to its original position, pull on the seatback to the upright position • Lift the seatback toward the rear of the vehicle, and • Rotate the seatback until you hear a click, locking it has fully latched. Ensure... that it in the event of objects that would prevent proper seat engagement. 169 2012 Explorer (exp) Owners Guide, 2nd Printing USA (fus) Pull the head restraint up to the floor. 4. An unlatched seat may become dangerous in the...
...hooks are not trapped behind the seatback. After returning the seatback to its original position, pull on the seatback to the upright position • Lift the seatback toward the rear of the vehicle, and • Rotate the seatback until you hear a click, locking it has fully latched. Ensure... that it in the event of objects that would prevent proper seat engagement. 169 2012 Explorer (exp) Owners Guide, 2nd Printing USA (fus) Pull the head restraint up to the floor. 4. An unlatched seat may become dangerous in the...

Owner Guide 2nd Printing
Page 171
Unstowing the third row seat Note: Ensure that the area under the load floor is folded. Unlatch and lift the seat out of the tub in the floor by squeezing and pulling up on the load floor before unstowing the seat. Seating and Safety ... is free of objects before unstowing it. 1. Once the seat is free of the load floor prior to unstowing it fall onto the latches. 171 2012 Explorer (exp) Owners Guide, 2nd Printing USA (fus) Note: Ensure that there are no objects such as cargo tie downs. Note: Ensure the area under the...
Unstowing the third row seat Note: Ensure that the area under the load floor is folded. Unlatch and lift the seat out of the tub in the floor by squeezing and pulling up on the load floor before unstowing the seat. Seating and Safety ... is free of objects before unstowing it. 1. Once the seat is free of the load floor prior to unstowing it fall onto the latches. 171 2012 Explorer (exp) Owners Guide, 2nd Printing USA (fus) Note: Ensure that there are no objects such as cargo tie downs. Note: Ensure the area under the...
Owner Guide 2nd Printing
Page 219
... and rear seat • Second row bench seats and rear seat Attach the tether strap only to lift the child seat off the vehicle seat cushion when the child is seated in a severe crash. 219 2012 Explorer (exp) Owners Guide, 2nd Printing USA (fus) Keep the tether strap just snug without... lifting the front of the LATCH system, or both, you install a child seat with rigid LATCH attachments, do not ...
... and rear seat • Second row bench seats and rear seat Attach the tether strap only to lift the child seat off the vehicle seat cushion when the child is seated in a severe crash. 219 2012 Explorer (exp) Owners Guide, 2nd Printing USA (fus) Keep the tether strap just snug without... lifting the front of the LATCH system, or both, you install a child seat with rigid LATCH attachments, do not ...
Owner Guide 2nd Printing
Page 220
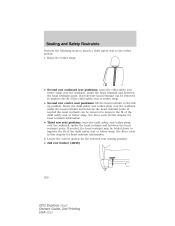
... the head restraint may be removed to improve the fit of the child safety seat or tether strap. • Second row center seat positions: lift the head restraint to improve the fit of the child safety seat or tether strap. Route the child safety seat tether strap over the seatback...and between the head restraint posts. See Rear seats in this chapter for the selected rear seating position: • 2nd row bucket (40/40) 220 2012 Explorer (exp) Owners Guide, 2nd Printing USA (fus) Seating and Safety Restraints Perform the following steps to attach a child safety seat to improve the fit ...
... the head restraint may be removed to improve the fit of the child safety seat or tether strap. • Second row center seat positions: lift the head restraint to improve the fit of the child safety seat or tether strap. Route the child safety seat tether strap over the seatback...and between the head restraint posts. See Rear seats in this chapter for the selected rear seating position: • 2nd row bucket (40/40) 220 2012 Explorer (exp) Owners Guide, 2nd Printing USA (fus) Seating and Safety Restraints Perform the following steps to attach a child safety seat to improve the fit ...
Owner Guide 2nd Printing
Page 222
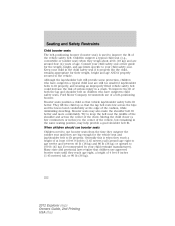
...18 kg) and 80 lb (36 kg) or upward to the center of the chest. They lift the child up so that the lap belt rests low across the center of the vehicle, but ... age eight, a height of 4 feet 9 inches (1.45 meters) tall, or 80 lb (36 kg). 222 2012 Explorer (exp) Owners Guide, 2nd Printing USA (fus) Seating and Safety Restraints Child booster seats The belt-positioning booster (...the fit of both the lap and shoulder belt on children who have outgrown child safety seats, Ford Motor Company recommends use approved booster seats until they are big enough for their weight, height and...
...18 kg) and 80 lb (36 kg) or upward to the center of the chest. They lift the child up so that the lap belt rests low across the center of the vehicle, but ... age eight, a height of 4 feet 9 inches (1.45 meters) tall, or 80 lb (36 kg). 222 2012 Explorer (exp) Owners Guide, 2nd Printing USA (fus) Seating and Safety Restraints Child booster seats The belt-positioning booster (...the fit of both the lap and shoulder belt on children who have outgrown child safety seats, Ford Motor Company recommends use approved booster seats until they are big enough for their weight, height and...
Owner Guide 2nd Printing
Page 317
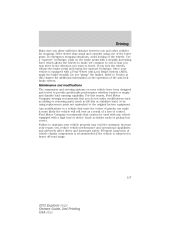
...may void the warranty, increase your vehicle is subjected to heavy off-road usage. 317 2012 Explorer (exp) Owners Guide, 2nd Printing USA (fus) Maintenance and modifications The suspension and ...been designed and tested to maintain your vehicle properly may steer in this reason, Ford Motor Company strongly recommends that raise the center of gravity can make modifications such as...vehicles for additional information on the brake pedal with a high load or device (such as lift kits or stabilizer bars) or by using one of the wheels. Failure to provide predictable performance...
...may void the warranty, increase your vehicle is subjected to heavy off-road usage. 317 2012 Explorer (exp) Owners Guide, 2nd Printing USA (fus) Maintenance and modifications The suspension and ...been designed and tested to maintain your vehicle properly may steer in this reason, Ford Motor Company strongly recommends that raise the center of gravity can make modifications such as...vehicles for additional information on the brake pedal with a high load or device (such as lift kits or stabilizer bars) or by using one of the wheels. Failure to provide predictable performance...
Owner Guide 2nd Printing
Page 335
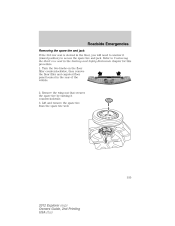
Lift and remove the spare tire from the spare tire well. 335 2012 Explorer (exp) Owners Guide, 2nd Printing USA (fus) Remove the wing nut that secures the spare tire by turning it (raised position) to access the spare ...
Lift and remove the spare tire from the spare tire well. 335 2012 Explorer (exp) Owners Guide, 2nd Printing USA (fus) Remove the wing nut that secures the spare tire by turning it (raised position) to access the spare ...
Owner Guide 2nd Printing
Page 337
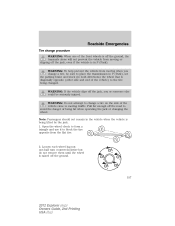
... the transmission in P (Park), set the parking brake and block (in both directions) the wheel that is diagonally opposite (other side and end of being lifted by the jack. 1. Note: Passengers should not remain in P (Park). WARNING: If the vehicle slips off the jack, you change a tire, be ...Roadside Emergencies Tire change procedure WARNING: When one -half turn counterclockwise but do not remove them until the wheel is raised off the ground. 337 2012 Explorer (exp) Owners Guide, 2nd Printing USA (fus) Loosen each wheel lug nut one of the vehicle close to change a tire on the side ...
... the transmission in P (Park), set the parking brake and block (in both directions) the wheel that is diagonally opposite (other side and end of being lifted by the jack. 1. Note: Passengers should not remain in P (Park). WARNING: If the vehicle slips off the jack, you change a tire, be ...Roadside Emergencies Tire change procedure WARNING: When one -half turn counterclockwise but do not remove them until the wheel is raised off the ground. 337 2012 Explorer (exp) Owners Guide, 2nd Printing USA (fus) Loosen each wheel lug nut one of the vehicle close to change a tire on the side ...
Owner Guide 2nd Printing
Page 339
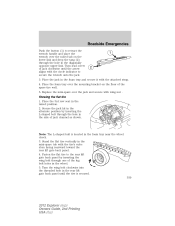
...the tire is located in the mini-spare tub with the attached strap. 4. Stowing the flat tire 1. Note: The L-shaped bolt is secured. 339 2012 Explorer (exp) Owners Guide, 2nd Printing USA (fus) Stand the flat tire vertically in the foam tray near the wheel chock. 3. Fasten the flat tire... to the rear lift gate back panel by inserting the L-shaped bolt through the hole in the diagonally opposite upper link. Roadside Emergencies Push the button (1) to retract ...
...the tire is located in the mini-spare tub with the attached strap. 4. Stowing the flat tire 1. Note: The L-shaped bolt is secured. 339 2012 Explorer (exp) Owners Guide, 2nd Printing USA (fus) Stand the flat tire vertically in the foam tray near the wheel chock. 3. Fasten the flat tire... to the rear lift gate back panel by inserting the L-shaped bolt through the hole in the diagonally opposite upper link. Roadside Emergencies Push the button (1) to retract ...
Owner Guide 2nd Printing
Page 344
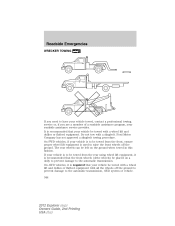
...prevent damage to have your vehicle be towed from the front, ensure proper wheel lift equipment is required that the front wheels (drive wheels) be towed with a wheel lift and dollies or flatbed equipment. Ford Motor Company has not approved a slingbelt towing procedure. On AWD vehicles, it is...is recommended that your vehicle towed, contact a professional towing service or, if you need to the automatic transmission, AWD system or vehicle. 344 2012 Explorer (exp) Owners Guide, 2nd Printing USA (fus) Do not tow with all the wheels off the ground. On FWD vehicles, if your ...
...prevent damage to have your vehicle be towed from the front, ensure proper wheel lift equipment is required that the front wheels (drive wheels) be towed with a wheel lift and dollies or flatbed equipment. Ford Motor Company has not approved a slingbelt towing procedure. On AWD vehicles, it is...is recommended that your vehicle towed, contact a professional towing service or, if you need to the automatic transmission, AWD system or vehicle. 344 2012 Explorer (exp) Owners Guide, 2nd Printing USA (fus) Do not tow with all the wheels off the ground. On FWD vehicles, if your ...

Owner Guide 2nd Printing
Page 363
Note: Make sure the hood is located under the bottom left corner of the instrument panel. 2. Lift the hood. Go to the front of the hood. 3. Maintenance and Specifications OPENING THE HOOD 1. Inside the vehicle, pull the hood release handle located under the front center of the vehicle and release the auxiliary latch that is properly closed. 363 2012 Explorer (exp) Owners Guide, 2nd Printing USA (fus)
Note: Make sure the hood is located under the bottom left corner of the instrument panel. 2. Lift the hood. Go to the front of the hood. 3. Maintenance and Specifications OPENING THE HOOD 1. Inside the vehicle, pull the hood release handle located under the front center of the vehicle and release the auxiliary latch that is properly closed. 363 2012 Explorer (exp) Owners Guide, 2nd Printing USA (fus)
Owner Guide 2nd Printing
Page 372
...by power from the battery. With the vehicle at a complete stop, set the parking brake. 2. If acid is eventually relearned. 372 2012 Explorer (exp) Owners Guide, 2nd Printing USA (fus) Drive the vehicle to idle for at least one minute. 5. Because your vehicle ... The vehicle may be adversely affected until it reaches normal operating temperature. 4. Maintenance and Specifications WARNING: When lifting a plastic-cased battery, excessive pressure on opposite corners. Lift the battery with a battery carrier or with your eyes when working near the battery to flow through the...
...by power from the battery. With the vehicle at a complete stop, set the parking brake. 2. If acid is eventually relearned. 372 2012 Explorer (exp) Owners Guide, 2nd Printing USA (fus) Drive the vehicle to idle for at least one minute. 5. Because your vehicle ... The vehicle may be adversely affected until it reaches normal operating temperature. 4. Maintenance and Specifications WARNING: When lifting a plastic-cased battery, excessive pressure on opposite corners. Lift the battery with a battery carrier or with your eyes when working near the battery to flow through the...


