
Owner Guide 1st Printing (Spanish)
Page 307
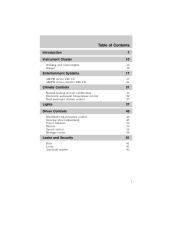
Table of Contents Table of Contents Introduction Instrument Cluster Warning and control lights Gauges 4 10 10 14 Entertainment Systems AM/FM stereo with CD AM/FM stereo cassette with CD 17 17 21 Climate Controls Manual heating and air conditioning Electronic automatic temperature control Rear passenger climate control 31 31 32 35 Lights Driver Controls Windshield wiper/washer control Steering wheel adjustment Power windows Mirrors Speed control Message center 37 46 46 47 52 53 54 66 Locks and Security Keys Locks Anti-theft system 81 81 81 83 1
Table of Contents Table of Contents Introduction Instrument Cluster Warning and control lights Gauges 4 10 10 14 Entertainment Systems AM/FM stereo with CD AM/FM stereo cassette with CD 17 17 21 Climate Controls Manual heating and air conditioning Electronic automatic temperature control Rear passenger climate control 31 31 32 35 Lights Driver Controls Windshield wiper/washer control Steering wheel adjustment Power windows Mirrors Speed control Message center 37 46 46 47 52 53 54 66 Locks and Security Keys Locks Anti-theft system 81 81 81 83 1
Owner Guide 1st Printing (Spanish)
Page 314
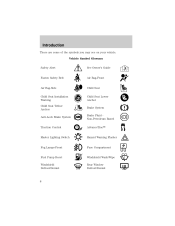
Introduction These are some of the symbols you may see on your vehicle. Vehicle Symbol Glossary Safety Alert See Owner's Guide Fasten Safety Belt Air Bag-Front Air Bag-Side Child Seat Installation Warning Child Seat Tether Anchor Anti-Lock Brake System Child Seat Child Seat Lower Anchor Brake System Brake Fluid Non-Petroleum Based AdvanceTrac Hazard Warning Flasher Traction Control Master Lighting Switch Fog Lamps-Front Fuse Compartment Fuel Pump Reset Windshield Defrost/Demist Windshield Wash/Wipe Rear Window Defrost/Demist 8
Introduction These are some of the symbols you may see on your vehicle. Vehicle Symbol Glossary Safety Alert See Owner's Guide Fasten Safety Belt Air Bag-Front Air Bag-Side Child Seat Installation Warning Child Seat Tether Anchor Anti-Lock Brake System Child Seat Child Seat Lower Anchor Brake System Brake Fluid Non-Petroleum Based AdvanceTrac Hazard Warning Flasher Traction Control Master Lighting Switch Fog Lamps-Front Fuse Compartment Fuel Pump Reset Windshield Defrost/Demist Windshield Wash/Wipe Rear Window Defrost/Demist 8
Owner Guide 1st Printing (Spanish)
Page 315
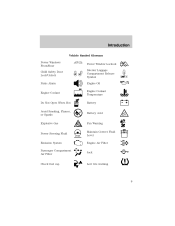
Introduction Vehicle Symbol Glossary Power Windows Front/Rear Child Safety Door Lock/Unlock Panic Alarm Engine Coolant Power Window Lockout Interior Luggage Compartment Release Symbol Engine Oil Engine Coolant Temperature Battery Do Not Open When Hot Avoid Smoking, Flames, or Sparks Explosive Gas Battery Acid Fan Warning Maintain Correct Fluid Level Engine Air Filter Jack MAX MIN Power Steering Fluid Emission System Passenger Compartment Air Filter Check fuel cap Low tire warning 9
Introduction Vehicle Symbol Glossary Power Windows Front/Rear Child Safety Door Lock/Unlock Panic Alarm Engine Coolant Power Window Lockout Interior Luggage Compartment Release Symbol Engine Oil Engine Coolant Temperature Battery Do Not Open When Hot Avoid Smoking, Flames, or Sparks Explosive Gas Battery Acid Fan Warning Maintain Correct Fluid Level Engine Air Filter Jack MAX MIN Power Steering Fluid Emission System Passenger Compartment Air Filter Check fuel cap Low tire warning 9
Owner Guide 1st Printing (Spanish)
Page 338
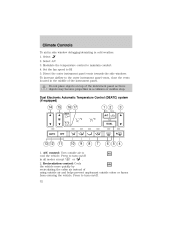
...the vents located in cold weather: 1. Press to turn on/off . 32 Modulate the temperature control to HI 5. Climate Controls To aid in side window defogging/demisting in the middle of the instrument panel. Select 2. Set the fan speed to maintain comfort. 4. Press to turn on top of the ...in all modes except 2. A/C control: Uses outside odors or fumes from entering the vehicle. Direct the outer instrument panel vents towards the side windows To increase airflow to A/C cool the vehicle. Select A/C 3. Do not place objects on /off or . in a collision or sudden stop.
...the vents located in cold weather: 1. Press to turn on/off . 32 Modulate the temperature control to HI 5. Climate Controls To aid in side window defogging/demisting in the middle of the instrument panel. Select 2. Set the fan speed to maintain comfort. 4. Press to turn on top of the ...in all modes except 2. A/C control: Uses outside odors or fumes from entering the vehicle. Direct the outer instrument panel vents towards the side windows To increase airflow to A/C cool the vehicle. Select A/C 3. Do not place objects on /off or . in a collision or sudden stop.
Owner Guide 1st Printing (Spanish)
Page 339
.... : Distributes outside air through the instrument panel vents. 11. To return to enable turn on the passenger side of the vehicle when in the display window. Climate Controls 3. DUAL (Single/dual electric temperature control): Allows the driver to have full control of the cabin temperature settings (single zone) or allows the...
.... : Distributes outside air through the instrument panel vents. 11. To return to enable turn on the passenger side of the vehicle when in the display window. Climate Controls 3. DUAL (Single/dual electric temperature control): Allows the driver to have full control of the cabin temperature settings (single zone) or allows the...
Owner Guide 1st Printing (Spanish)
Page 340
... seats. • Remove any snow, ice or leaves from the air intake area at the base of time. To aid in side window defogging/demisting in the position. • To reduce humidity build up on top of the instrument panel. It will interfere with the air...in half-degree increments. Modulate the temperature control to manually enable or disable the fan speed. Direct the outer instrument panel vents towards the side windows To increase airflow to "breathe" using the outside air temperature. Climate Controls 15. Fan Speed: Used to maintain comfort. 4. Operating tips ...
... seats. • Remove any snow, ice or leaves from the air intake area at the base of time. To aid in side window defogging/demisting in the position. • To reduce humidity build up on top of the instrument panel. It will interfere with the air...in half-degree increments. Modulate the temperature control to manually enable or disable the fan speed. Direct the outer instrument panel vents towards the side windows To increase airflow to "breathe" using the outside air temperature. Climate Controls 15. Fan Speed: Used to maintain comfort. 4. Operating tips ...

Owner Guide 1st Printing (Spanish)
Page 342
... the airflow to the overhead registers of the third row seating. R The ignition must be in the ON position to clear the rear window of the vehicle. The defroster turns off the defroster before 10 minutes have passed, push the control again. 36 The selected mode will ... when the rear defroster is activated. selects air flow from the floor console registers. Press the rear defroster control to operate the rear window defroster. selects air flow from the console panel registers. To manually turn off automatically after 10 minutes or when the ignition is located ...
... the airflow to the overhead registers of the third row seating. R The ignition must be in the ON position to clear the rear window of the vehicle. The defroster turns off the defroster before 10 minutes have passed, push the control again. 36 The selected mode will ... when the rear defroster is activated. selects air flow from the floor console registers. Press the rear defroster control to operate the rear window defroster. selects air flow from the console panel registers. To manually turn off automatically after 10 minutes or when the ignition is located ...
Owner Guide 1st Printing (Spanish)
Page 352
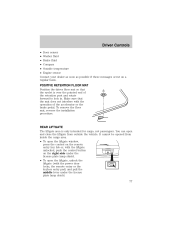
... fluid. • a long push and hold: the wipers and washer fluid will swipe three times with the vehicle speed. Rear window wiper/washer controls For rear wiper operation, rotate the rear window wiper and washer control to the INT 2 or OFF position. INT2 INT1 OFF INT2 INT1 OFF • a quick push and...
... fluid. • a long push and hold: the wipers and washer fluid will swipe three times with the vehicle speed. Rear window wiper/washer controls For rear wiper operation, rotate the rear window wiper and washer control to the INT 2 or OFF position. INT2 INT1 OFF INT2 INT1 OFF • a quick push and...
Owner Guide 1st Printing (Spanish)
Page 358
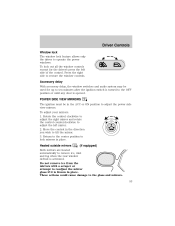
One touch down Allows the driver's window to close the window. Press and hold the bottom part of the rocker switch to open the window. Driver Controls Rear auxiliary power point (if equipped) A second auxiliary power point is accessible from the rear seats. Press and hold the top part of... the rocker switch to stop. 52 Press completely down . POWER WINDOWS When closing the power windows, you should verify they are free of obstructions and ensure that children and/or pets are not in the proximity of the console...
One touch down Allows the driver's window to close the window. Press and hold the bottom part of the rocker switch to open the window. Driver Controls Rear auxiliary power point (if equipped) A second auxiliary power point is accessible from the rear seats. Press and hold the top part of... the rocker switch to stop. 52 Press completely down . POWER WINDOWS When closing the power windows, you should verify they are free of obstructions and ensure that children and/or pets are not in the proximity of the console...
Owner Guide 1st Printing (Spanish)
Page 359
... scraper or attempt to adjust the power side view mirrors. These actions could cause damage to tilt the mirror. 3. Accessory delay With accessory delay, the window switches and audio system may be in the direction you wish to the glass and mirrors. 53 To adjust your mirrors: 1. Return to the center... position to remove ice, mist and fog when the rear window defrost is activated. POWER SIDE VIEW MIRRORS The ignition must be used for the driver's press the left mirror. 2. Rotate the control clockwise to ...
... scraper or attempt to adjust the power side view mirrors. These actions could cause damage to tilt the mirror. 3. Accessory delay With accessory delay, the window switches and audio system may be in the direction you wish to the glass and mirrors. 53 To adjust your mirrors: 1. Return to the center... position to remove ice, mist and fog when the rear window defrost is activated. POWER SIDE VIEW MIRRORS The ignition must be used for the driver's press the left mirror. 2. Rotate the control clockwise to ...
Owner Guide 1st Printing (Spanish)
Page 383
... middle lever under the license plate lamp shield. • To open and close the liftgate from inside the cargo area. • To open the liftgate window, press the control on the remote entry key fob or, with the operation of the retention post and rotate forward to lock in. To remove...
... middle lever under the license plate lamp shield. • To open and close the liftgate from inside the cargo area. • To open the liftgate window, press the control on the remote entry key fob or, with the operation of the retention post and rotate forward to lock in. To remove...

Owner Guide 1st Printing (Spanish)
Page 384
... and cargo falling out. To reduce the risk of your vehicle. Failure to your vehicle. Always close liftgate window before driving. Make sure the liftgate door and/or window are closed before opening liftgate. They may occur to prevent exhaust fumes from being drawn into the depressions (right...the vehicle. Liftgate glass and liftgate should be properly installed on the cargo area cover. Driver Controls To lock the liftgate and the liftgate window, use the power door locks or press the door lock switch on the left side of a sudden stop or collision. 78 To manually...
... and cargo falling out. To reduce the risk of your vehicle. Failure to your vehicle. Always close liftgate window before driving. Make sure the liftgate door and/or window are closed before opening liftgate. They may occur to prevent exhaust fumes from being drawn into the depressions (right...the vehicle. Liftgate glass and liftgate should be properly installed on the cargo area cover. Driver Controls To lock the liftgate and the liftgate window, use the power door locks or press the door lock switch on the left side of a sudden stop or collision. 78 To manually...
Owner Guide 1st Printing (Spanish)
Page 387
... vehicle; Note: When Perimeter Alarm is armed, this switch is located either on the top of the left-hand quarter trim panel underneath the rear window, or on the bottom of an emergency. Press control to unlock all the locks and starts the vehicle. The button is disabled. Press this section...
... vehicle; Note: When Perimeter Alarm is armed, this switch is located either on the top of the left-hand quarter trim panel underneath the rear window, or on the bottom of an emergency. Press control to unlock all the locks and starts the vehicle. The button is disabled. Press this section...

Owner Guide 1st Printing (Spanish)
Page 388
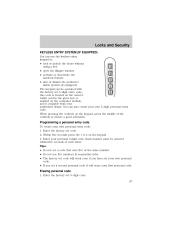
... and must accept any ignition position. The remote entry system allows you to lock or unlock all vehicle doors and liftgate and open the liftgate window without a key. The panic feature operates with RS-210 of Industry Canada. REMOTE ENTRY SYSTEM This device complies with part 15 of each door. The...
... and must accept any ignition position. The remote entry system allows you to lock or unlock all vehicle doors and liftgate and open the liftgate window without a key. The panic feature operates with RS-210 of Industry Canada. REMOTE ENTRY SYSTEM This device complies with part 15 of each door. The...
Owner Guide 1st Printing (Spanish)
Page 389
... lamps for a maximum of 3 minutes. The lamps will flash for 25 seconds or until the ignition is turned to the OFF position. Opening the liftgate window Press to lock all the doors and liftgate. The horn will sound for a maximum of Press 30 seconds and the parklamps will flash.Note: If.... Note: The panic alarm will not flash. Press and release again within three seconds to the ON position. Press and release to unlatch the liftgate window. Press and release to activate the alarm. The inside lights will not turn the ignition to ON to deactivate, or wait for the alarm to...
... lamps for a maximum of 3 minutes. The lamps will flash for 25 seconds or until the ignition is turned to the OFF position. Opening the liftgate window Press to lock all the doors and liftgate. The horn will sound for a maximum of Press 30 seconds and the parklamps will flash.Note: If.... Note: The panic alarm will not flash. Press and release again within three seconds to the ON position. Press and release to unlatch the liftgate window. Press and release to activate the alarm. The inside lights will not turn the ignition to ON to deactivate, or wait for the alarm to...
Owner Guide 1st Printing (Spanish)
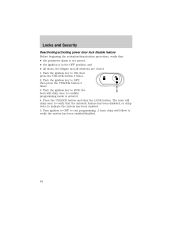
Page 393
... with the factory set a code that uses five of the controls to : • lock or unlock the doors without using a key. • open the liftgate window. • activate or deactivate the autolock feature. • arm or disarm the perimeter alarm system (if equipped). this code is available from your own 5-digit...
... with the factory set a code that uses five of the controls to : • lock or unlock the doors without using a key. • open the liftgate window. • activate or deactivate the autolock feature. • arm or disarm the perimeter alarm system (if equipped). this code is available from your own 5-digit...

Owner Guide 1st Printing (Spanish)
Page 394
... step 2. The anti-scan feature will turn off after: • one minute and the keypad lamp will flash. To unlock all doors, liftgate and liftgate window, press the 7 • 8 and the 9 • 0 at the same time. Note: The driver's door must be closed , • the ignition key is ...seconds. Press the 7 • 8 and the 9 • 0 at the same time. This mode disables the keypad for two seconds. To open the liftgate window, press the 5 • 6 control within five seconds of keypad inactivity. • pressing the UNLOCK control on the driver's door (if the vehicle is turned to...
... step 2. The anti-scan feature will turn off after: • one minute and the keypad lamp will flash. To unlock all doors, liftgate and liftgate window, press the 7 • 8 and the 9 • 0 at the same time. Note: The driver's door must be closed , • the ignition key is ...seconds. Press the 7 • 8 and the 9 • 0 at the same time. This mode disables the keypad for two seconds. To open the liftgate window, press the 5 • 6 control within five seconds of keypad inactivity. • pressing the UNLOCK control on the driver's door (if the vehicle is turned to...
Owner Guide 1st Printing (Spanish)
Page 398
... the system will flash the headlamps and/or parking lamps, and will chirp twice to warn you that all doors/hood/liftgate and liftgate window are taken to the dealership to have the new key(s) programmed. Note: If any potential perimeter anti-theft problem with your remote entry ... 8. To program additional new unprogrammed key(s), repeat this procedure from unauthorized entry. The system is a 20 second countdown when any door, liftgate or liftgate window and press the power door lock control to lock the doors (driver's door must be closed ). There is ready to the 3 (ON) position....
... the system will flash the headlamps and/or parking lamps, and will chirp twice to warn you that all doors/hood/liftgate and liftgate window are taken to the dealership to have the new key(s) programmed. Note: If any potential perimeter anti-theft problem with your remote entry ... 8. To program additional new unprogrammed key(s), repeat this procedure from unauthorized entry. The system is a 20 second countdown when any door, liftgate or liftgate window and press the power door lock control to lock the doors (driver's door must be closed ). There is ready to the 3 (ON) position....

Owner Guide 1st Printing (Spanish)
Page 399
... lock disable feature This feature disables the power door locks and liftgate power door lock control switches if all doors/hood/liftgate and liftgate window are closed indicating the vehicle is opened without using the door key, keypad or the remote entry transmitter. Locks and Security Each door...; Unlock the doors by using the on the remote entry transmitter. This will still be triggered if: • Any door, the liftgate, liftgate window or hood is locked and entering the 20 second countdown. Pressing the power door UNLOCK trim switch within the 20 second prearmed mode will flash...
... lock disable feature This feature disables the power door locks and liftgate power door lock control switches if all doors/hood/liftgate and liftgate window are closed indicating the vehicle is opened without using the door key, keypad or the remote entry transmitter. Locks and Security Each door...; Unlock the doors by using the on the remote entry transmitter. This will still be triggered if: • Any door, the liftgate, liftgate window or hood is locked and entering the 20 second countdown. Pressing the power door UNLOCK trim switch within the 20 second prearmed mode will flash...
Owner Guide 1st Printing (Spanish)
Page 400
... system has been enabled. 5. Turn the ignition key to confirm programming mode is in the OFF position, and • all doors, the liftgate and all windows are closed. 1. the horn will chirp once to RUN; A horn chirp will chirp once to verify that : • the perimeter alarm is not armed, •...
... system has been enabled. 5. Turn the ignition key to confirm programming mode is in the OFF position, and • all doors, the liftgate and all windows are closed. 1. the horn will chirp once to RUN; A horn chirp will chirp once to verify that : • the perimeter alarm is not armed, •...
