
Owner's Manual
Page 3
... Engine compartment Engine oil Battery Fuel information Air filter(s) Part numbers Refill capacities Lubricant specifications 136 140 141 144 151 165 169 170 171 Accessories Index 176 179 All rights reserved. Ford may change the contents without notice and without written authorization from Ford Motor Company. Copyright © 2002 Ford Motor Company 3 Reproduction by...
... Engine compartment Engine oil Battery Fuel information Air filter(s) Part numbers Refill capacities Lubricant specifications 136 140 141 144 151 165 169 170 171 Accessories Index 176 179 All rights reserved. Ford may change the contents without notice and without written authorization from Ford Motor Company. Copyright © 2002 Ford Motor Company 3 Reproduction by...

Owner's Manual
Page 9
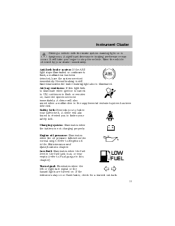
Introduction Vehicle Symbol Glossary Power Windows Front/Rear Child Safety Door Lock/Unlock Panic Alarm Engine Coolant Power Window Lockout Interior Luggage Compartment Release Symbol Engine Oil Engine Coolant Temperature Battery Do Not Open When Hot Avoid Smoking, Flames, or Sparks Explosive Gas Battery Acid Fan Warning Maintain Correct Fluid Level Engine Air Filter Jack MAX MIN Power Steering Fluid Emission System Passenger Compartment Air Filter Check fuel cap Low tire warning 9
Introduction Vehicle Symbol Glossary Power Windows Front/Rear Child Safety Door Lock/Unlock Panic Alarm Engine Coolant Power Window Lockout Interior Luggage Compartment Release Symbol Engine Oil Engine Coolant Temperature Battery Do Not Open When Hot Avoid Smoking, Flames, or Sparks Explosive Gas Battery Acid Fan Warning Maintain Correct Fluid Level Engine Air Filter Jack MAX MIN Power Steering Fluid Emission System Passenger Compartment Air Filter Check fuel cap Low tire warning 9
Owner's Manual
Page 11
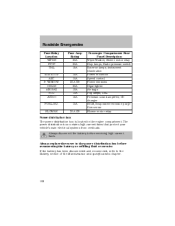
.... A chime will also sound to remind you longer to ABS flash, a malfunction has been detected, have the system serviced immediately. Charging system: Illuminates when the battery is illuminated. Low fuel: Illuminates when the fuel level in the supplemental restraint system has been detected. It will also sound when a malfunction in the...
.... A chime will also sound to remind you longer to ABS flash, a malfunction has been detected, have the system serviced immediately. Charging system: Illuminates when the battery is illuminated. Low fuel: Illuminates when the fuel level in the supplemental restraint system has been detected. It will also sound when a malfunction in the...

Owner's Manual
Page 19
... turn the audio system on for a long period when the engine is in the ACC or ON position. POWER-VOL PUSH NOTE: To prevent the battery from Dolby Laboratories Licensing Corporation. "Dolby " and the double-D symbol are registered trademarks of hiss and static during tape playback. AM/FM select The AM...
... turn the audio system on for a long period when the engine is in the ACC or ON position. POWER-VOL PUSH NOTE: To prevent the battery from Dolby Laboratories Licensing Corporation. "Dolby " and the double-D symbol are registered trademarks of hiss and static during tape playback. AM/FM select The AM...

Owner's Manual
Page 24
... AUTO M control to recall stations in memory preset control 1 will be randomly selected. NOTE: If the power supply is interrupted (the fuse blows or the battery is disconnected), the preset channels will start playing. The next selection will illuminate in the display. To disengage random play , press the RPT control again...
... AUTO M control to recall stations in memory preset control 1 will be randomly selected. NOTE: If the power supply is interrupted (the fuse blows or the battery is disconnected), the preset channels will start playing. The next selection will illuminate in the display. To disengage random play , press the RPT control again...

Owner's Manual
Page 25
... display mode Press the CLOCK control to 4:00. NOTE: If the power supply to the unit is interrupted (if the fuse blows or the vehicle's battery is on, the selected audio mode will be displayed for 10 seconds, then the display will need to 59 minutes), the hour setting will automatically...
... display mode Press the CLOCK control to 4:00. NOTE: If the power supply to the unit is interrupted (if the fuse blows or the vehicle's battery is on, the selected audio mode will be displayed for 10 seconds, then the display will need to 59 minutes), the hour setting will automatically...

Owner's Manual
Page 54
... properly latch the trunk may cause objects to activate the alarm. The typical operating range for your vehicle. Replacing the battery The remote entry transmitter uses one coin type three-volt lithium battery CR2032 or equivalent. Opening the trunk Press once to the vehicle. 54 Press and release to deactivate. Note: the...
... properly latch the trunk may cause objects to activate the alarm. The typical operating range for your vehicle. Replacing the battery The remote entry transmitter uses one coin type three-volt lithium battery CR2032 or equivalent. Opening the trunk Press once to the vehicle. 54 Press and release to deactivate. Note: the...

Owner's Manual
Page 55
... before beginning this procedure. Put the key in the ignition. 3. The remote transmitter should operate normally after battery replacement. Insert the new battery. How to reprogram your remote entry transmitters You must have your vehicle. Replacing lost remote entry transmitters If ...you can either reprogram them yourself, or take all remote entry transmitters (maximum of the battery. 4. To reprogram the remote entry 3 transmitters: 2 CK O0 1 1. Turn the key from your remote entry transmitter reprogrammed ...
... before beginning this procedure. Put the key in the ignition. 3. The remote transmitter should operate normally after battery replacement. Insert the new battery. How to reprogram your remote entry transmitters You must have your vehicle. Replacing lost remote entry transmitters If ...you can either reprogram them yourself, or take all remote entry transmitters (maximum of the battery. 4. To reprogram the remote entry 3 transmitters: 2 CK O0 1 1. Turn the key from your remote entry transmitter reprogrammed ...
Owner's Manual
Page 108
... from overloads. Roadside Emergencies Fuse/Relay Location WIPER STOP TAIL SUN ROOF ASC P. Always disconnect the battery before reconnecting the battery or refilling fluid reservoirs If the battery has been disconnected and reconnected, refer to the Battery section of the Maintenance and specifications chapter. 108 Always replace the cover to the power distribution box...
... from overloads. Roadside Emergencies Fuse/Relay Location WIPER STOP TAIL SUN ROOF ASC P. Always disconnect the battery before reconnecting the battery or refilling fluid reservoirs If the battery has been disconnected and reconnected, refer to the Battery section of the Maintenance and specifications chapter. 108 Always replace the cover to the power distribution box...

Owner's Manual
Page 114
... push-start your vehicle. 2. Preparing your vehicle. Use only a 12-volt supply to protect any excessive corrosion before you attach the battery cables. Check all other moving parts. 4. Over time, the adaptive learning process will not affect function or durability of the disabled vehicle..., sparks, or lit cigarettes. Automatic transmissions do not touch. Set the parking brake on in injury or vehicle damage. Turn all battery terminals and remove any electrical surges. Ensure that vent caps are tight and level. 5. This operation is installed, the transmission must ...
... push-start your vehicle. 2. Preparing your vehicle. Use only a 12-volt supply to protect any excessive corrosion before you attach the battery cables. Check all other moving parts. 4. Over time, the adaptive learning process will not affect function or durability of the disabled vehicle..., sparks, or lit cigarettes. Automatic transmissions do not touch. Set the parking brake on in injury or vehicle damage. Turn all battery terminals and remove any electrical surges. Ensure that vent caps are tight and level. 5. This operation is installed, the transmission must ...

Owner's Manual
Page 115
Connect the other end of the positive (+) cable to the positive (+) terminal of the discharged battery. Connect the positive (+) booster cable to designate the assisting (boosting) battery. 2. Roadside Emergencies Connecting the jumper cables 1. Note: In the illustrations, lightning bolts are used to the positive (+) terminal of the assisting battery. - - - + - + + + 115
Connect the other end of the positive (+) cable to the positive (+) terminal of the discharged battery. Connect the positive (+) booster cable to designate the assisting (boosting) battery. 2. Roadside Emergencies Connecting the jumper cables 1. Note: In the illustrations, lightning bolts are used to the positive (+) terminal of the assisting battery. - - - + - + + + 115

Owner's Manual
Page 116
... engine at moderately increased speed. 2. Make the final connection of the negative (-) cable to the negative (-) terminal of the stalled vehicle's engine, away from the battery and the carburetor/fuel injection system. Start the engine of both engines for an additional three minutes before disconnecting the jumper cables. 116 - - - + + + + - Roadside Emergencies... of fan blades, belts, moving parts of the booster vehicle and run both engines, or any fuel delivery system parts. Start the engine of the battery to be jumped. Jump starting 1.
... engine at moderately increased speed. 2. Make the final connection of the negative (-) cable to the negative (-) terminal of the stalled vehicle's engine, away from the battery and the carburetor/fuel injection system. Start the engine of both engines for an additional three minutes before disconnecting the jumper cables. 116 - - - + + + + - Roadside Emergencies... of fan blades, belts, moving parts of the booster vehicle and run both engines, or any fuel delivery system parts. Start the engine of the battery to be jumped. Jump starting 1.

Owner's Manual
Page 117
Roadside Emergencies Removing the jumper cables Remove the jumper cables in the reverse order that they were connected. 1. Note: In the illustrations, lightning bolts are used to designate the assisting (boosting) battery. 2. Remove the jumper cable on the negative (-) connection of the booster vehicle's battery. - - - - + + + + 117 Remove the jumper cable from the ground metal surface.
Roadside Emergencies Removing the jumper cables Remove the jumper cables in the reverse order that they were connected. 1. Note: In the illustrations, lightning bolts are used to designate the assisting (boosting) battery. 2. Remove the jumper cable on the negative (-) connection of the booster vehicle's battery. - - - - + + + + 117 Remove the jumper cable from the ground metal surface.

Owner's Manual
Page 118
Roadside Emergencies 3. Remove the jumper cable from the positive (+) terminal of the booster vehicle's battery. 4. After the disabled vehicle has been started and the jumper cables removed, allow it to idle for several minutes so the engine computer can relearn its idle conditions. 118 - - - + + - + + Remove the jumper cable from the positive (+) terminal of the disabled vehicle's battery.
Roadside Emergencies 3. Remove the jumper cable from the positive (+) terminal of the booster vehicle's battery. 4. After the disabled vehicle has been started and the jumper cables removed, allow it to idle for several minutes so the engine computer can relearn its idle conditions. 118 - - - + + - + + Remove the jumper cable from the positive (+) terminal of the disabled vehicle's battery.

Owner's Manual
Page 136
... To help you have enough ventilation. • Keep all fuel related parts. 2. Motorcraft parts are covered. Block the wheels to prevent the vehicle from the battery and all open flames and other burning (cigarettes) material away from moving parts. • Do not work on a hot engine. • Make sure that nothing...
... To help you have enough ventilation. • Keep all fuel related parts. 2. Motorcraft parts are covered. Block the wheels to prevent the vehicle from the battery and all open flames and other burning (cigarettes) material away from moving parts. • Do not work on a hot engine. • Make sure that nothing...

Owner's Manual
Page 140
Transmission fluid dipstick (automatic transaxle) 2. Power steering fluid reservoir 7. Windshield washer fluid reservoir 9. Brake fluid reservoir 140 Engine oil dipstick 6. Battery 3. Air filter assembly 4. Engine oil filler cap 5. Engine coolant reservoir 8. Maintenance and Specifications IDENTIFYING COMPONENTS IN THE ENGINE COMPARTMENT 2.0L DOHC Zetec engine 7 8 9 1 2 3 6 5 4 1.
Transmission fluid dipstick (automatic transaxle) 2. Power steering fluid reservoir 7. Windshield washer fluid reservoir 9. Brake fluid reservoir 140 Engine oil dipstick 6. Battery 3. Air filter assembly 4. Engine oil filler cap 5. Engine coolant reservoir 8. Maintenance and Specifications IDENTIFYING COMPONENTS IN THE ENGINE COMPARTMENT 2.0L DOHC Zetec engine 7 8 9 1 2 3 6 5 4 1.

Owner's Manual
Page 144
... in high temperature climates, check the battery electrolyte level. Therefore, do not use the appropriate Motorcraft oil filter (or another brand meeting Ford specifications) for your eyes. Maintenance and Specifications that does not meet Ford material and design specifications, start-up to... the "level indicator". If the battery needs water often, have the charging system checked....
... in high temperature climates, check the battery electrolyte level. Therefore, do not use the appropriate Motorcraft oil filter (or another brand meeting Ford specifications) for your eyes. Maintenance and Specifications that does not meet Ford material and design specifications, start-up to... the "level indicator". If the battery needs water often, have the charging system checked....

Owner's Manual
Page 145
... normal and will fully update transmission operation to idle for a minimum of children. Maintenance and Specifications When lifting a plastic-cased battery, excessive pressure on the end walls could cause acid to flow through the vent caps, resulting in P (Park) (automatic transaxle...transaxle), turn off all accessories and start the engine. 3. If acid is eventually relearned. When the battery is disconnected or a new battery is disconnected or a new battery installed, the transmission must relearn its adaptive strategy. With the vehicle at least one minute. 6. Allow...
... normal and will fully update transmission operation to idle for a minimum of children. Maintenance and Specifications When lifting a plastic-cased battery, excessive pressure on the end walls could cause acid to flow through the vent caps, resulting in P (Park) (automatic transaxle...transaxle), turn off all accessories and start the engine. 3. If acid is eventually relearned. When the battery is disconnected or a new battery is disconnected or a new battery installed, the transmission must relearn its adaptive strategy. With the vehicle at least one minute. 6. Allow...

Owner's Manual
Page 146
... your local authorized recycling center to 129° C (265° F). • Protection against rust and other forms of automotive batteries in the scheduled maintenance guide. Coolant concentration testing is reconnected. • Always dispose of corrosion. 146 The level of coolant should ... • Freeze protection down to -36° C (-34° F). • Boiling protection up to find out more about recycling automotive batteries. Call your local authorized standards for disposal. A 50-50 mixture of -36° C (-34° F). The coolant concentration should be ...
... your local authorized recycling center to 129° C (265° F). • Protection against rust and other forms of automotive batteries in the scheduled maintenance guide. Coolant concentration testing is reconnected. • Always dispose of corrosion. 146 The level of coolant should ... • Freeze protection down to -36° C (-34° F). • Boiling protection up to find out more about recycling automotive batteries. Call your local authorized standards for disposal. A 50-50 mixture of -36° C (-34° F). The coolant concentration should be ...

Owner's Manual
Page 160
... 20 minutes driving in small amounts, continuously checking the level until it reaches the range between the MIN and MAX lines. Be sure to its battery has just been serviced, the on-board diagnostics system is reset to a "not ready for I /M testing, a minimum of 30 minutes of city and highway driving...
... 20 minutes driving in small amounts, continuously checking the level until it reaches the range between the MIN and MAX lines. Be sure to its battery has just been serviced, the on-board diagnostics system is reset to a "not ready for I /M testing, a minimum of 30 minutes of city and highway driving...


