Owner's Manual
Page 6
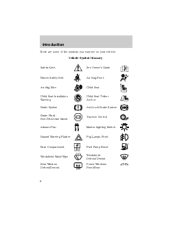
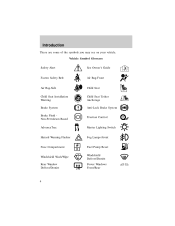
Vehicle Symbol Glossary Safety Alert See Owner's Guide Fasten Safety Belt Air Bag-Front Air Bag-Side Child Seat Installation Warning Brake System Brake Fluid Non-Petroleum Based AdvanceTrac Child Seat Child Seat Tether Anchor Anti-Lock Brake System Traction Control Master Lighting Switch Hazard Warning Flasher Fog Lamps-Front Fuse Compartment Fuel Pump Reset Windshield Defrost/Demist Power Windows Front/Rear Windshield Wash/Wipe Rear Window Defrost/Demist 6 Introduction These are some of the symbols you may see on your vehicle.
Vehicle Symbol Glossary Safety Alert See Owner's Guide Fasten Safety Belt Air Bag-Front Air Bag-Side Child Seat Installation Warning Brake System Brake Fluid Non-Petroleum Based AdvanceTrac Child Seat Child Seat Tether Anchor Anti-Lock Brake System Traction Control Master Lighting Switch Hazard Warning Flasher Fog Lamps-Front Fuse Compartment Fuel Pump Reset Windshield Defrost/Demist Power Windows Front/Rear Windshield Wash/Wipe Rear Window Defrost/Demist 6 Introduction These are some of the symbols you may see on your vehicle.
Owner's Manual
Page 37
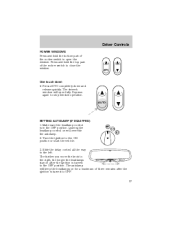
Press and hold the bottom part of the rocker switch to open fully. AUTO SETTING AUTOLAMP (IF EQUIPPED) 1. Turn the ignition to stop window operation. OFF 3. Depress again to the ON position or start the vehicle. The further you move the knob to the right,... position. The autolamp will keep the headlamps on will open the window. The driver's window will override the autolamp. 2. DELAY AUTOLAMP OFF MAX. 37 Driver Controls POWER WINDOWS Press and hold the top part of the rocker switch to close the window. One touch down • Press AUTO completely down and release ...
Press and hold the bottom part of the rocker switch to open fully. AUTO SETTING AUTOLAMP (IF EQUIPPED) 1. Turn the ignition to stop window operation. OFF 3. Depress again to the ON position or start the vehicle. The further you move the knob to the right,... position. The autolamp will keep the headlamps on will open the window. The driver's window will override the autolamp. 2. DELAY AUTOLAMP OFF MAX. 37 Driver Controls POWER WINDOWS Press and hold the top part of the rocker switch to close the window. One touch down • Press AUTO completely down and release ...
Owner's Manual
Page 117
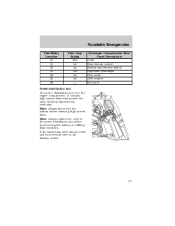
... Fuse Amp Rating 25A 5A 5A 15A 5A 5A - Passenger Compartment Fuse Panel Description Seats Rear climate control Heated rear window switch Highbeam headlamps Rear audio ABS module Not used Power distribution box The power distribution box is in the engine compartment. Note: Always disconnect the battery before reconnecting the battery or refilling fluid...
... Fuse Amp Rating 25A 5A 5A 15A 5A 5A - Passenger Compartment Fuse Panel Description Seats Rear climate control Heated rear window switch Highbeam headlamps Rear audio ABS module Not used Power distribution box The power distribution box is in the engine compartment. Note: Always disconnect the battery before reconnecting the battery or refilling fluid...
Owner Guide 6th Printing
Page 4
Introduction These are some of the symbols you may see on your vehicle. Vehicle Symbol Glossary Safety Alert See Owner's Guide Fasten Safety Belt Air Bag-Front Air Bag-Side Child Seat Installation Warning Brake System Brake Fluid Non-Petroleum Based AdvanceTrac Child Seat Child Seat Tether Anchorage Anti-Lock Brake System Traction Control Master Lighting Switch Hazard Warning Flasher Fog Lamps-Front Fuse Compartment Fuel Pump Reset Windshield Defrost/Demist Power Windows Front/Rear Windshield Wash/Wipe Rear Window Defrost/Demist 4
Introduction These are some of the symbols you may see on your vehicle. Vehicle Symbol Glossary Safety Alert See Owner's Guide Fasten Safety Belt Air Bag-Front Air Bag-Side Child Seat Installation Warning Brake System Brake Fluid Non-Petroleum Based AdvanceTrac Child Seat Child Seat Tether Anchorage Anti-Lock Brake System Traction Control Master Lighting Switch Hazard Warning Flasher Fog Lamps-Front Fuse Compartment Fuel Pump Reset Windshield Defrost/Demist Power Windows Front/Rear Windshield Wash/Wipe Rear Window Defrost/Demist 4
Owner Guide 6th Printing
Page 108
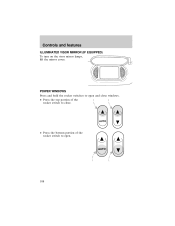
AUTO • Press the bottom portion of the rocker switch to open and close windows. • Press the top portion of the rocker switch to open . POWER WINDOWS Press and hold the rocker switches to close. Controls and features ILLUMINATED VISOR MIRROR (IF EQUIPPED) To turn on the visor mirror lamps, lift the mirror cover. AUTO 108
AUTO • Press the bottom portion of the rocker switch to open and close windows. • Press the top portion of the rocker switch to open . POWER WINDOWS Press and hold the rocker switches to close. Controls and features ILLUMINATED VISOR MIRROR (IF EQUIPPED) To turn on the visor mirror lamps, lift the mirror cover. AUTO 108

Owner Guide 6th Printing
Page 109
...up to ten minutes after the ignition switch is turned to the OFF position or until any door is located above the inside door release handle for the driver's press the left side of the driver power window control. AUTO Window lock The window lock feature allows only the driver to... right side to operate the power windows. Controls and features One touch down • Press AUTO completely down on the knob to unlock the door. 109 MANUAL DOOR LOCKS The manual door lock knob is opened. Accessory delay With accessory delay, the window switches and audio system may be deactivated...
...up to ten minutes after the ignition switch is turned to the OFF position or until any door is located above the inside door release handle for the driver's press the left side of the driver power window control. AUTO Window lock The window lock feature allows only the driver to... right side to operate the power windows. Controls and features One touch down • Press AUTO completely down on the knob to unlock the door. 109 MANUAL DOOR LOCKS The manual door lock knob is opened. Accessory delay With accessory delay, the window switches and audio system may be deactivated...

Owner Guide 6th Printing
Page 110
Controls and features POWER DOOR LOCKS Press control to lock or unlock all the doors. 110 POWER DOOR LOCK/UNLOCK INHIBIT If the interior trim switch does not operate, see the Perimeter alarm system in this button to unlock all doors. LIFTGATE An additional power door lock can be accessed by opening the liftgate. Press this section for more details. The button is located either on the top of the left-hand quarter trim panel underneath the rear window, or on the bottom of the left-hand quarter trim panel. Press control to lock all doors.
Controls and features POWER DOOR LOCKS Press control to lock or unlock all the doors. 110 POWER DOOR LOCK/UNLOCK INHIBIT If the interior trim switch does not operate, see the Perimeter alarm system in this button to unlock all doors. LIFTGATE An additional power door lock can be accessed by opening the liftgate. Press this section for more details. The button is located either on the top of the left-hand quarter trim panel underneath the rear window, or on the bottom of the left-hand quarter trim panel. Press control to lock all doors.
Owner Guide 6th Printing
Page 114
...or up. Liftgate glass and liftgate should be closed before opening liftgate. The liftgate door and window should never be opened from outside the vehicle. You can open the liftgate, unlock the liftgate (with the power door locks, the remote entry or the keyless entry pad) and pull the middle lever ...the driver floor mat so that the mat does not interfere with the operation of the cargo area. To lock the liftgate and the liftgate window, use the power door locks or press the door lock switch on the right side under the license plate lamp shield. • To open and close liftgate...
...or up. Liftgate glass and liftgate should be closed before opening liftgate. The liftgate door and window should never be opened from outside the vehicle. You can open the liftgate, unlock the liftgate (with the power door locks, the remote entry or the keyless entry pad) and pull the middle lever ...the driver floor mat so that the mat does not interfere with the operation of the cargo area. To lock the liftgate and the liftgate window, use the power door locks or press the door lock switch on the right side under the license plate lamp shield. • To open and close liftgate...
Owner Guide 6th Printing
Page 131
...features • Press the PANIC control on top of security protection. The SecuriLock passive anti-theft system is not compatible with non-Ford aftermarket remote start systems. Use of these systems may result in vehicle starting problems and a loss of the instrument panel. 131 To ...alarm system will be armed. • Press the liftgate window control on the remote entry transmitter. The liftgate and liftgate window are no longer armed, but the doors and hood are still armed. Pressing the power door UNLOCK trim switch within the 20 second prearmed mode will only shut off ...
...features • Press the PANIC control on top of security protection. The SecuriLock passive anti-theft system is not compatible with non-Ford aftermarket remote start systems. Use of these systems may result in vehicle starting problems and a loss of the instrument panel. 131 To ...alarm system will be armed. • Press the liftgate window control on the remote entry transmitter. The liftgate and liftgate window are no longer armed, but the doors and hood are still armed. Pressing the power door UNLOCK trim switch within the 20 second prearmed mode will only shut off ...


