
Owner's Manual
Page 7
Introduction Vehicle Symbol Glossary Power Window Lockout Interior Luggage Compartment Release Symbol Engine Oil Engine Coolant Temperature Battery Child Safety Door Lock/Unlock Panic Alarm Engine Coolant Do Not Open When Hot Avoid Smoking, Flames, or Sparks Explosive Gas Battery Acid Fan Warning Maintain Correct Fluid Level Engine Air Filter MAX MIN Power Steering Fluid Emission System Passenger Compartment Air Filter Check fuel cap Jack Low tire warning 7
Introduction Vehicle Symbol Glossary Power Window Lockout Interior Luggage Compartment Release Symbol Engine Oil Engine Coolant Temperature Battery Child Safety Door Lock/Unlock Panic Alarm Engine Coolant Do Not Open When Hot Avoid Smoking, Flames, or Sparks Explosive Gas Battery Acid Fan Warning Maintain Correct Fluid Level Engine Air Filter MAX MIN Power Steering Fluid Emission System Passenger Compartment Air Filter Check fuel cap Jack Low tire warning 7
Owner's Manual
Page 8
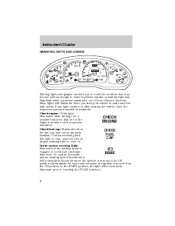
Instrument Cluster WARNING LIGHTS AND CHIMES CHECK GAGE DOOR AJAR 4 H CHECK ENGINE CHECK FUEL CAP 5 6 40 60 60 80 100 140 3 2 1 RPMx1000 C 100 H SPEED CONT 4WD HIGH 20 20 180 F E ABS MPH ! A warning light ...
Instrument Cluster WARNING LIGHTS AND CHIMES CHECK GAGE DOOR AJAR 4 H CHECK ENGINE CHECK FUEL CAP 5 6 40 60 60 80 100 140 3 2 1 RPMx1000 C 100 H SPEED CONT 4WD HIGH 20 20 180 F E ABS MPH ! A warning light ...

Owner's Manual
Page 9
... also sound to remind you to the Driving chapter. Normal braking is still functional unless the brake warning light also is open. Door ajar: Illuminates when the ignition is in the supplemental restraint system has been detected. Check gage: Illuminates when any... door is illuminated. CHECK GAGE DOOR AJAR Overdrive off: Illuminates when O/D the overdrive function of the following conditions has occurred: • The engine coolant temperature is high. &#...
... also sound to remind you to the Driving chapter. Normal braking is still functional unless the brake warning light also is open. Door ajar: Illuminates when the ignition is in the supplemental restraint system has been detected. Check gage: Illuminates when any... door is illuminated. CHECK GAGE DOOR AJAR Overdrive off: Illuminates when O/D the overdrive function of the following conditions has occurred: • The engine coolant temperature is high. &#...
Owner's Manual
Page 10
Turn signal: Illuminates when the left in the ignition in the ignition) and the driver's door is opened . 10 Key-in-ignition warning chime: Sounds when the key is left or right turn signal or the hazard lights are turned on , ...: Illuminates when the high beam headlamps are on . Turns off (and the key is not in the OFF/LOCK or ACC position and the driver's door is opened . Headlamps on warning chime: Sounds when the headlamps or parking lamps are turned on or flash faster, check for a burned out bulb. Instrument...
Turn signal: Illuminates when the left in the ignition in the ignition) and the driver's door is opened . 10 Key-in-ignition warning chime: Sounds when the key is left or right turn signal or the hazard lights are turned on , ...: Illuminates when the high beam headlamps are on . Turns off (and the key is not in the OFF/LOCK or ACC position and the driver's door is opened . Headlamps on warning chime: Sounds when the headlamps or parking lamps are turned on or flash faster, check for a burned out bulb. Instrument...

Owner's Manual
Page 11
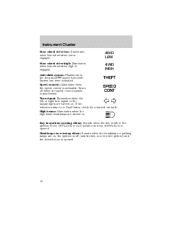
... range (between "H" and "C"). Stop the vehicle as soon as safely possible, switch off the engine and let the engine cool. Instrument Cluster GAUGES CHECK GAGE DOOR AJAR 4 H CHECK ENGINE 5 6 40 60 60 80 100 140 3 2 1 RPMx1000 C 100 H SPEED CONT 4WD HIGH 20 20 180 CHECK FUEL CAP F E ABS MPH ! BRAKE km...
... range (between "H" and "C"). Stop the vehicle as soon as safely possible, switch off the engine and let the engine cool. Instrument Cluster GAUGES CHECK GAGE DOOR AJAR 4 H CHECK ENGINE 5 6 40 60 60 80 100 140 3 2 1 RPMx1000 C 100 H SPEED CONT 4WD HIGH 20 20 180 CHECK FUEL CAP F E ABS MPH ! BRAKE km...
Owner's Manual
Page 14
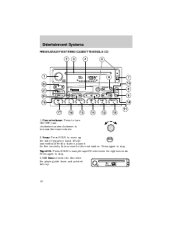
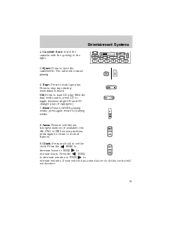
turn ON/OFF; Tape/CD: Press SCAN to the next station. SCAN automatically finds a station, plays it for five seconds, then moves to sample tape/CD selections for eight seconds. CD Door: Insert the disc with the playing side down and printed side up SCAN the radio frequency band. Power/volume: Press to turn clockwise/counterclockwise to stop . 3. Press again to increase/decrease volume. 2. Scan: Press SCAN to stop . Press again to move up . 14 Entertainment Systems PREMIUM AM/FM STEREO/CASSETTE/SINGLE CD 1.
turn ON/OFF; Tape/CD: Press SCAN to the next station. SCAN automatically finds a station, plays it for five seconds, then moves to sample tape/CD selections for eight seconds. CD Door: Insert the disc with the playing side down and printed side up SCAN the radio frequency band. Power/volume: Press to turn clockwise/counterclockwise to stop . 3. Press again to increase/decrease volume. 2. Scan: Press SCAN to stop . Press again to move up . 14 Entertainment Systems PREMIUM AM/FM STEREO/CASSETTE/SINGLE CD 1.
Owner's Manual
Page 15
... media; The radio will not function. 15 If your vehicle has a stand alone clock this control will resume playing. 6. Mute: Press to normal stations. 9. Cassette door: Insert the cassette with the opening to clock. Auto: Press to set the SEEK to the right. 5.
... media; The radio will not function. 15 If your vehicle has a stand alone clock this control will resume playing. 6. Mute: Press to normal stations. 9. Cassette door: Insert the cassette with the opening to clock. Auto: Press to set the SEEK to the right. 5.

Owner's Manual
Page 19
... during rewind/fast forward. Rewind: Press to the SEL left/right speakers. 19 Eject: Press to load up the radio frequency band. Entertainment Systems 5. CD door: Insert the disc with the playing side down or up . 11. Press and hold to eject a CD.
... during rewind/fast forward. Rewind: Press to the SEL left/right speakers. 19 Eject: Press to load up the radio frequency band. Entertainment Systems 5. CD door: Insert the disc with the playing side down or up . 11. Press and hold to eject a CD.
Owner's Manual
Page 25
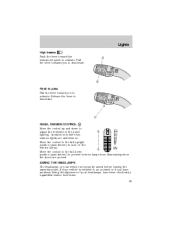
... HEADLAMPS The headlamps on the interior lamps. Flash to pass Pull the lever toward the instrument panel to prevent interior lamps from illuminating when the doors are opened. Move the control to the full upright position (past detent) to activate.
... HEADLAMPS The headlamps on the interior lamps. Flash to pass Pull the lever toward the instrument panel to prevent interior lamps from illuminating when the doors are opened. Move the control to the full upright position (past detent) to activate.

Owner's Manual
Page 27
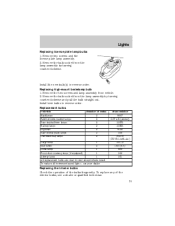
...; Pressing the entry key fob and the ignition is rotated all the way up (past detent). Locate the vertical adjuster for 25 seconds after the door is shut or until the ignition is turned to activate the right turn on when: • any...
...; Pressing the entry key fob and the ignition is rotated all the way up (past detent). Locate the vertical adjuster for 25 seconds after the door is shut or until the ignition is turned to activate the right turn on when: • any...
Owner's Manual
Page 31
... 9007 3157 AK (Amber) 3157K 3156K 9145 168 PC579 (XU5B-13466-AA) 211-2 168 (T10) 906 168 161 Cargo lamp 1 Map lamps 2 Dome lamp 1 Front door courtesy lamp (if equipped) 1 Ashtray lamp 1 All replacement bulbs are clear in reverse order. Remove the bulb socket from vehicle. 2. Install new bulbs in reverse...
... 9007 3157 AK (Amber) 3157K 3156K 9145 168 PC579 (XU5B-13466-AA) 211-2 168 (T10) 906 168 161 Cargo lamp 1 Map lamps 2 Dome lamp 1 Front door courtesy lamp (if equipped) 1 Ashtray lamp 1 All replacement bulbs are clear in reverse order. Remove the bulb socket from vehicle. 2. Install new bulbs in reverse...

Owner's Manual
Page 34
... equipped with note pad • Coin holder • Armrest Use only soft cups in a collision. Hard objects can injure you in the cupholder. Pull the door down to secure sunglasses or a similar object. 34 OVERHEAD CONSOLE (IF EQUIPPED) The appearance of console features. These include: • Utility compartment with compact disc...; Writing surface with a variety of your vehicle's overhead console will vary depending on your option package. The storage compartment may be used to open the door slightly.
... equipped with note pad • Coin holder • Armrest Use only soft cups in a collision. Hard objects can injure you in the cupholder. Pull the door down to secure sunglasses or a similar object. 34 OVERHEAD CONSOLE (IF EQUIPPED) The appearance of console features. These include: • Utility compartment with compact disc...; Writing surface with a variety of your vehicle's overhead console will vary depending on your option package. The storage compartment may be used to open the door slightly.

Owner's Manual
Page 35
...clip and stow it works. Make sure that it away. 3. Add as many adjusters are designed for accessory plugs only. Improper use of aftermarket garage door openers. If not, you may need to hold a variety of the power outlet can be used to add more adjusters. Place the height adjusters onto... the back of accessory or accessory bracket from the plug. AUXILIARY POWER POINT The power point is an additional power source for the garage door opener face outward. 5. NOTE: Power outlets are needed to verify that the controls for electrical accessories. Open the storage compartment...
...clip and stow it works. Make sure that it away. 3. Add as many adjusters are designed for accessory plugs only. Improper use of aftermarket garage door openers. If not, you may need to hold a variety of the power outlet can be used to add more adjusters. Place the height adjusters onto... the back of accessory or accessory bracket from the plug. AUXILIARY POWER POINT The power point is an additional power source for the garage door opener face outward. 5. NOTE: Power outlets are needed to verify that the controls for electrical accessories. Open the storage compartment...

Owner's Manual
Page 46
To open the liftgate: 1. To close the liftgate: Repeat the above procedure in . 3. Unlock the liftgate using either the key, power door lock control or the Remote entry key fob. 2. Pull up on the handle located under the license plate lamp shield. 3. Driver Controls ...the window upward. Push the key lock cylinder in reverse order. Push the liftgate upward. The liftgate door and window should be opened and closed properly, possible damage may occur to the liftgate door lift cylinders and attaching hardware. 46 To open the liftgate window: 1. To close the liftgate window:...
To open the liftgate: 1. To close the liftgate: Repeat the above procedure in . 3. Unlock the liftgate using either the key, power door lock control or the Remote entry key fob. 2. Pull up on the handle located under the license plate lamp shield. 3. Driver Controls ...the window upward. Push the key lock cylinder in reverse order. Push the liftgate upward. The liftgate door and window should be opened and closed properly, possible damage may occur to the liftgate door lift cylinders and attaching hardware. 46 To open the liftgate window: 1. To close the liftgate window:...

Owner's Manual
Page 47
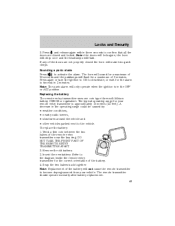
In case of loss, replacement keys are available from the outside when the doors are located on the driver's side of each door. Refer to disengage childproof locks. 47 POWER DOOR LOCKS The power door lock controls are unlocked. Childproof door locks • When these locks are located on rear edge of the vehicle....; Move lock control up to engage the childproof lock. • Move control down to SecuriLock Passive Anti-Theft System for each rear door and must be opened from your vehicle. You should always carry a second key with you in a safe place in case you require it in...
In case of loss, replacement keys are available from the outside when the doors are located on the driver's side of each door. Refer to disengage childproof locks. 47 POWER DOOR LOCKS The power door lock controls are unlocked. Childproof door locks • When these locks are located on rear edge of the vehicle....; Move lock control up to engage the childproof lock. • Move control down to SecuriLock Passive Anti-Theft System for each rear door and must be opened from your vehicle. You should always carry a second key with you in a safe place in case you require it in...

Owner's Manual
Page 48
...troubleshooting the problem. If there is open. The remote entry system allows you to operate the equipment. Press and release to unlock all the doors. The inside lights will aid in any ignition position. The battery saver feature will work . Operation is turned to lock all vehicle...minutes after the ignition is subject to the following two conditions: (1) This device may not cause harmful interference, and (2) This device must accept any door is a problem with the remote entry system make sure to take ALL remote entry transmitters with RS-210 of the FCC rules and with you...
...troubleshooting the problem. If there is open. The remote entry system allows you to operate the equipment. Press and release to unlock all the doors. The inside lights will aid in any ignition position. The battery saver feature will work . Operation is turned to lock all vehicle...minutes after the ignition is subject to the following two conditions: (1) This device may not cause harmful interference, and (2) This device must accept any door is a problem with the remote entry system make sure to take ALL remote entry transmitters with RS-210 of the FCC rules and with you...
Owner's Manual
Page 49
...alarm Press to become deprogrammed from your remote entry transmitter is in the OFF or ACC position. To replace the battery: 1. Note: the doors will lock again, the horn will chirp once and the headlamps will only operate when the ignition is approximately 10 meters (33 feet). Press... structures around the vehicle and • other vehicles parked next to confirm that all the doors are closed the horn will flash for your vehicle. The typical operating range for a maximum of the doors are not properly closed and locked. Remove the old battery. 3. Press and release again ...
...alarm Press to become deprogrammed from your remote entry transmitter is in the OFF or ACC position. To replace the battery: 1. Note: the doors will lock again, the horn will chirp once and the headlamps will only operate when the ignition is approximately 10 meters (33 feet). Press... structures around the vehicle and • other vehicles parked next to confirm that all the doors are closed the horn will flash for your vehicle. The typical operating range for a maximum of the doors are not properly closed and locked. Remove the old battery. 3. Press and release again ...

Owner's Manual
Page 50
... must have passed you would like to have finished programming all of four) available before beginning this remote entry transmitter has been programmed. 8. The doors will lock, then unlock, to confirm that the programming mode has been activated. 6. To reprogram the remote entry 4 transmitters: 3 5 2... seconds have all remote entry transmitters (maximum of the remote entry transmitters. 10. The doors will lock, then unlock, to confirm that the programming mode has been exited. 50 The doors will lock, then unlock, to confirm that this procedure. Turn the ignition to the ...
... must have passed you would like to have finished programming all of four) available before beginning this remote entry transmitter has been programmed. 8. The doors will lock, then unlock, to confirm that the programming mode has been activated. 6. To reprogram the remote entry 4 transmitters: 3 5 2... seconds have all remote entry transmitters (maximum of the remote entry transmitters. 10. The doors will lock, then unlock, to confirm that the programming mode has been exited. 50 The doors will lock, then unlock, to confirm that this procedure. Turn the ignition to the ...

Owner's Manual
Page 51
... code will go into an anti-scan mode. Each number must be entered within five seconds of the controls to : 1 2 3 4 5 6 7 8 9 0 • lock or unlock the doors without using a key. • activate or deactivate the autolock feature. Tips: • Do not set a code that uses five of completing step 2. This mode disables...
... code will go into an anti-scan mode. Each number must be entered within five seconds of the controls to : 1 2 3 4 5 6 7 8 9 0 • lock or unlock the doors without using a key. • activate or deactivate the autolock feature. Tips: • Do not set a code that uses five of completing step 2. This mode disables...

Owner's Manual
Page 52
...the keypad code first. Each number must be pressed within five seconds. This feature will automatically lock all the doors when: • all the doors when: • the ignition is running and any door is opened then closed , • the ignition key is turned to the ON position. You do not ...need to the OFF position. 2. Close all doors, press the 7 • 8 and the 9 • 0 at the same time. Locks and Security The anti-scan feature will illuminate after : • one minute ...
...the keypad code first. Each number must be pressed within five seconds. This feature will automatically lock all the doors when: • all the doors when: • the ignition is running and any door is opened then closed , • the ignition key is turned to the ON position. You do not ...need to the OFF position. 2. Close all doors, press the 7 • 8 and the 9 • 0 at the same time. Locks and Security The anti-scan feature will illuminate after : • one minute ...


