Owner's Manual
Page 25
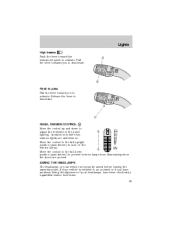
... are opened. AIMING THE HEADLAMPS The headlamps on . Flash to pass Pull the lever toward the instrument panel to prevent interior lamps from illuminating when the doors are properly aimed before leaving the assembly plant. PANEL DIMMER CONTROL Move the control up and down position (past detent) to activate. Release the lever to... High beams Push the lever toward you to turn on the interior lamps. Pull the lever towards you have problems fixing the alignment of the panel lighting. If your headlamps, have them checked by a qualified service technician. 25
... are opened. AIMING THE HEADLAMPS The headlamps on . Flash to pass Pull the lever toward the instrument panel to prevent interior lamps from illuminating when the doors are properly aimed before leaving the assembly plant. PANEL DIMMER CONTROL Move the control up and down position (past detent) to activate. Release the lever to... High beams Push the lever toward you to turn on the interior lamps. Pull the lever towards you have problems fixing the alignment of the panel lighting. If your headlamps, have them checked by a qualified service technician. 25

Owner's Manual
Page 27
... rotated all the way up ). TURN SIGNAL CONTROL • Push down ) or counterclockwise (to activate the right turn on when: • any door is opened. • the instrument panel dimmer switch is equipped with the Remote Keyless Entry feature, the courtesy lamp will turn signal. on for each headlamp. Adjust the aim... • Pressing the entry key fob and the ignition is turned to turn off the lights. Locate the vertical adjuster for 25 seconds after the door is shut or until the ignition is in the OFF position.
... rotated all the way up ). TURN SIGNAL CONTROL • Push down ) or counterclockwise (to activate the right turn on when: • any door is opened. • the instrument panel dimmer switch is equipped with the Remote Keyless Entry feature, the courtesy lamp will turn signal. on for each headlamp. Adjust the aim... • Pressing the entry key fob and the ignition is turned to turn off the lights. Locate the vertical adjuster for 25 seconds after the door is shut or until the ignition is in the OFF position.
Owner's Manual
Page 31
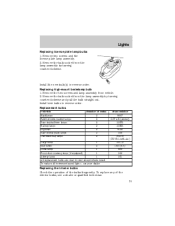
... AK (Amber) 3157K 3156K 9145 168 PC579 (XU5B-13466-AA) 211-2 168 (T10) 906 168 161 Cargo lamp 1 Map lamps 2 Dome lamp 1 Front door courtesy lamp (if equipped) 1 Ashtray lamp 1 All replacement bulbs are clear in color except where noted. Replacing high-mount brakelamp bulb 1. Replacement bulbs Function Headlamps...2. Remove the two screws and lamp assembly from the lamp assembly by turning counterclockwise. Lights Replacing license plate lamp bulbs 1. To replace all instrument panel lights - see a dealer or qualified technician. 31 Remove two screws and the license plate lamp assembly. 2.
... AK (Amber) 3157K 3156K 9145 168 PC579 (XU5B-13466-AA) 211-2 168 (T10) 906 168 161 Cargo lamp 1 Map lamps 2 Dome lamp 1 Front door courtesy lamp (if equipped) 1 Ashtray lamp 1 All replacement bulbs are clear in color except where noted. Replacing high-mount brakelamp bulb 1. Replacement bulbs Function Headlamps...2. Remove the two screws and lamp assembly from the lamp assembly by turning counterclockwise. Lights Replacing license plate lamp bulbs 1. To replace all instrument panel lights - see a dealer or qualified technician. 31 Remove two screws and the license plate lamp assembly. 2.

Owner's Manual
Page 47
...Locks and Security KEYS The key operates all doors. POWER DOOR LOCKS The power door lock controls are set, the rear doors cannot be opened from your vehicle. Childproof door locks • When these locks are located on the driver's side of each door. You should always carry a second key ...with you in a safe place in case you require it in the cargo area on the driver and front passenger door panels...
...Locks and Security KEYS The key operates all doors. POWER DOOR LOCKS The power door lock controls are set, the rear doors cannot be opened from your vehicle. Childproof door locks • When these locks are located on the driver's side of each door. You should always carry a second key ...with you in a safe place in case you require it in the cargo area on the driver and front passenger door panels...
Owner's Manual
Page 75
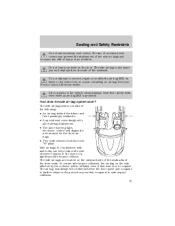
.... The side air bag could injure you as used for the front air bags. • Two crash sensors located on the door. The air bag was designed to inflate between the door panel and occupant to allow airbag deployment. • The same warning light, electronic control and diagnostic unit as it deploys from... impact collisions, the air bag on the side affected by the collision will be inflated, even if that seat is provided. Do not lean your Ford or Lincoln Mercury dealer. See your head on the "B" pillar. The side air bag system consists of the following: • An air bag behind the...
.... The side air bag could injure you as used for the front air bags. • Two crash sensors located on the door. The air bag was designed to inflate between the door panel and occupant to allow airbag deployment. • The same warning light, electronic control and diagnostic unit as it deploys from... impact collisions, the air bag on the side affected by the collision will be inflated, even if that seat is provided. Do not lean your Ford or Lincoln Mercury dealer. See your head on the "B" pillar. The side air bag system consists of the following: • An air bag behind the...

Owner's Manual
Page 174
... a vehicle and prescribe where the Certification label may be affixed to a metal tag and is located on the driver side instrument panel. (Please note that in the graphic XXXX is representative of your vehicle identification number.) XXXXXXXXXXXXXXXXX Engine number The engine number (the... eight numbers of the vehicle identification number) is stamped on the driver's side. The Certification label is located on the front door latch pillar on the engine block, transmission, frame and transfer case (if equipped). 174 Maintenance and Specifications IDENTIFYING YOUR VEHICLE Certification...
... a vehicle and prescribe where the Certification label may be affixed to a metal tag and is located on the driver side instrument panel. (Please note that in the graphic XXXX is representative of your vehicle identification number.) XXXXXXXXXXXXXXXXX Engine number The engine number (the... eight numbers of the vehicle identification number) is stamped on the driver's side. The Certification label is located on the front door latch pillar on the engine block, transmission, frame and transfer case (if equipped). 174 Maintenance and Specifications IDENTIFYING YOUR VEHICLE Certification...

Owner's Manual
Page 180
... Heating heating and air conditioning system ...22 I Ignition ...86, 172 Infant seats (see Safety seats) ...80 Instrument panel cleaning ...140 cluster ...8 K Keyless entry system ...51 Keys positions of the ignition ...86 L Lamps autolamp system ...24..., 37 bulb replacement specifications chart ...28 fog lamps ...24 high beams ...25 instrument panel, dimming ...25 interior lamps ...27 Liftgate ...46 Lights, warning and indicator ...8 anti-lock brakes (ABS) ...90... ...92 R Radio ...14, 18 Remote entry system locking/unlocking doors ...47 Roadside assistance ...111
... Heating heating and air conditioning system ...22 I Ignition ...86, 172 Infant seats (see Safety seats) ...80 Instrument panel cleaning ...140 cluster ...8 K Keyless entry system ...51 Keys positions of the ignition ...86 L Lamps autolamp system ...24..., 37 bulb replacement specifications chart ...28 fog lamps ...24 high beams ...25 instrument panel, dimming ...25 interior lamps ...27 Liftgate ...46 Lights, warning and indicator ...8 anti-lock brakes (ABS) ...90... ...92 R Radio ...14, 18 Remote entry system locking/unlocking doors ...47 Roadside assistance ...111

Owner Guide 6th Printing
Page 103
... either side of each lens on for 25 seconds after the door is opened . This feature will remain on each map lamp to activate the lamps. HOMELINKா UNIVERSAL TRANSCEIVER (IF EQUIPPED) The HomeLink Universal Transceiver, located on the control panel (if equipped). Controls and features The map lamp controls are...
... either side of each lens on for 25 seconds after the door is opened . This feature will remain on each map lamp to activate the lamps. HOMELINKா UNIVERSAL TRANSCEIVER (IF EQUIPPED) The HomeLink Universal Transceiver, located on the control panel (if equipped). Controls and features The map lamp controls are...

Owner Guide 6th Printing
Page 110
LIFTGATE An additional power door lock can be accessed by opening the liftgate. Press control to lock all the doors. 110 The button is located either on the top of the left-hand quarter trim panel underneath the rear window, or on the bottom of the left-hand quarter trim panel. Press this section for more details. Controls and features POWER DOOR LOCKS Press control to lock or unlock all doors. POWER DOOR LOCK/UNLOCK INHIBIT If the interior trim switch does not operate, see the Perimeter alarm system in this button to unlock all doors.
LIFTGATE An additional power door lock can be accessed by opening the liftgate. Press control to lock all the doors. 110 The button is located either on the top of the left-hand quarter trim panel underneath the rear window, or on the bottom of the left-hand quarter trim panel. Press this section for more details. Controls and features POWER DOOR LOCKS Press control to lock or unlock all doors. POWER DOOR LOCK/UNLOCK INHIBIT If the interior trim switch does not operate, see the Perimeter alarm system in this button to unlock all doors.

Owner Guide 6th Printing
Page 115
... both ends of the rear cargo area. 115 Do not place any objects on the rear trim panels. Cargo management system The cargo management system consists of storage compartments located in the floor of the cover...This will also prevent passengers and cargo from being drawn into the depressions (right side first) in the trim panels behind the second row seat. They may be properly installed on the cargo area cover. CARGO COVER (IF EQUIPPED... the case of your vehicle. Controls and features Make sure the liftgate door and/or window are closed to prevent exhaust fumes from falling out.
... both ends of the rear cargo area. 115 Do not place any objects on the rear trim panels. Cargo management system The cargo management system consists of storage compartments located in the floor of the cover...This will also prevent passengers and cargo from being drawn into the depressions (right side first) in the trim panels behind the second row seat. They may be properly installed on the cargo area cover. CARGO COVER (IF EQUIPPED... the case of your vehicle. Controls and features Make sure the liftgate door and/or window are closed to prevent exhaust fumes from falling out.

Owner Guide 6th Printing
Page 119
... seat and Driver 1 or Driver 2 positions. 4. Repeat this feature: 1. Press the SET control on the driver's door panel. 2. Press the SET control on the driver's door panel. 3. Replacing the battery The remote transmitter is powered by the following factors: • Weather conditions • Nearby radio...would like to the position you would like to the vehicle 119 Within 5 five seconds, press any control on the driver's door panel to which you desire. 2. Controls and features Activating the memory seat feature To activate this procedure for another remote transmitter if...
... seat and Driver 1 or Driver 2 positions. 4. Repeat this feature: 1. Press the SET control on the driver's door panel. 2. Press the SET control on the driver's door panel. 3. Replacing the battery The remote transmitter is powered by the following factors: • Weather conditions • Nearby radio...would like to the position you would like to the vehicle 119 Within 5 five seconds, press any control on the driver's door panel to which you desire. 2. Controls and features Activating the memory seat feature To activate this procedure for another remote transmitter if...
Owner Guide 6th Printing
Page 131
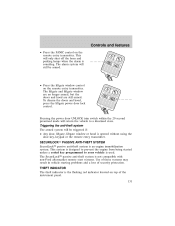
... security protection. THEFT INDICATOR The theft indicator is not compatible with non-Ford aftermarket remote start systems. Use of these systems may result in vehicle starting problems and a loss of the instrument panel. 131 Controls and features • Press the PANIC control on the remote... engine immobilization system. SECURILOCKி PASSIVE ANTI-THEFT SYSTEM SecuriLock passive anti-theft system is opened without using the door key, keypad or the remote entry transmitter. The alarm system will be armed. • Press the liftgate window control on the ...
... security protection. THEFT INDICATOR The theft indicator is not compatible with non-Ford aftermarket remote start systems. Use of these systems may result in vehicle starting problems and a loss of the instrument panel. 131 Controls and features • Press the PANIC control on the remote... engine immobilization system. SECURILOCKி PASSIVE ANTI-THEFT SYSTEM SecuriLock passive anti-theft system is opened without using the door key, keypad or the remote entry transmitter. The alarm system will be armed. • Press the liftgate window control on the ...

Owner Guide 6th Printing
Page 296
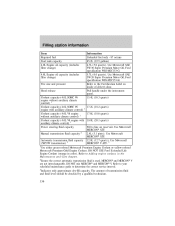
... Rear license plate 2 168 lamps Backup lamp 2 3156K High-mount stop 5 W5W lamps Fog lamp 2 9145 Cargo lamp 1 211-2 Interior overhead lamp 1 912 (906) Front door courtesy 1 168 lamp Map lamps 2 168 (T10) Ashtray lamp 1 161 All replacement bulbs are specified in color except where noted. see your dealer. 296 The... bulb burn time. for North America and an "E" for Europe to assure lamp performance, light brightness and pattern and safe visibility. To replace all instrument panel lights -
... Rear license plate 2 168 lamps Backup lamp 2 3156K High-mount stop 5 W5W lamps Fog lamp 2 9145 Cargo lamp 1 211-2 Interior overhead lamp 1 912 (906) Front door courtesy 1 168 lamp Map lamps 2 168 (T10) Ashtray lamp 1 161 All replacement bulbs are specified in color except where noted. see your dealer. 296 The... bulb burn time. for North America and an "E" for Europe to assure lamp performance, light brightness and pattern and safe visibility. To replace all instrument panel lights -

Owner Guide 6th Printing
Page 311
The Certification label is located on the front door latch pillar on the Certification label. (Please note that a Certification label be affixed to a metal tag and is located on the driver side instrument panel. The VIN number is also found on the driver's side. Vehicle identification number The vehicle identification number (VIN) is...
The Certification label is located on the front door latch pillar on the Certification label. (Please note that a Certification label be affixed to a metal tag and is located on the driver side instrument panel. The VIN number is also found on the driver's side. Vehicle identification number The vehicle identification number (VIN) is...

Owner Guide 6th Printing
Page 327
... Mediation/Arbitration Program ...319 D Daytime running lamps (see Speed control) ...92 Customer Assistance ...225 Ford accessories for your vehicle ...298 engine compartment ...299 instrument panel ...301 interior ...302 plastic parts ...301 washing ...298 waxing ...298 wheels ...299 wiper blades .........307, 309 Cruise control (see Lamps) ...31 Defrost rear window ...54 Dipstick automatic transmission fluid ...269 engine oil ...256 Doors door ajar warning ...12 lubricant specifications ...307 Driveline universal joint and slip yoke ...271 Driving under special conditions ...207, 210 sand ...
... Mediation/Arbitration Program ...319 D Daytime running lamps (see Speed control) ...92 Customer Assistance ...225 Ford accessories for your vehicle ...298 engine compartment ...299 instrument panel ...301 interior ...302 plastic parts ...301 washing ...298 waxing ...298 wheels ...299 wiper blades .........307, 309 Cruise control (see Lamps) ...31 Defrost rear window ...54 Dipstick automatic transmission fluid ...269 engine oil ...256 Doors door ajar warning ...12 lubricant specifications ...307 Driveline universal joint and slip yoke ...271 Driving under special conditions ...207, 210 sand ...

Owner Guide 6th Printing
Page 329
... ...301 cluster ...8 lighting up panel and interior ...32 location of components ...8 J Jack ...237, 239 positioning ...237, 240 storage ...237-238, 243 Jump-starting your vehicle ...244 K Keyless entry system ...122 autolock ...126 keypad ...122 locking and unlocking doors ..125 programming entry code ...123 Keys ...131-133 key in ignition chime ...13 positions...
... ...301 cluster ...8 lighting up panel and interior ...32 location of components ...8 J Jack ...237, 239 positioning ...237, 240 storage ...237-238, 243 Jump-starting your vehicle ...244 K Keyless entry system ...122 autolock ...126 keypad ...122 locking and unlocking doors ..125 programming entry code ...123 Keys ...131-133 key in ignition chime ...13 positions...
Owner Guide 6th Printing
Page 336
...gallons) 4.7L (5.0 quarts). Use Motorcraft SAE 5W-20 Super Premium Motor Oil, Ford specification WSS-M2C153-H. Refer to your scheduled maintenance guide to Adding engine coolant, in color). Pull handle under the instrument panel. 15.4L (16.3 quarts) 17.2L (18.2 quarts) 17.6L (18...MERCON V are not interchangeable. The amount of driver's door. Use Motorcraft SAE 5W-30 Super Premium Motor Oil, Ford specification WSS-M2C153-G. 5.7L (6.0 quarts). Use Motorcraft MERCON ATF. 2.4L (5.1 pints). DO NOT USE Ford Extended Life Engine Coolant (orange in the Maintenance and Care ...
...gallons) 4.7L (5.0 quarts). Use Motorcraft SAE 5W-20 Super Premium Motor Oil, Ford specification WSS-M2C153-H. Refer to your scheduled maintenance guide to Adding engine coolant, in color). Pull handle under the instrument panel. 15.4L (16.3 quarts) 17.2L (18.2 quarts) 17.6L (18...MERCON V are not interchangeable. The amount of driver's door. Use Motorcraft SAE 5W-30 Super Premium Motor Oil, Ford specification WSS-M2C153-G. 5.7L (6.0 quarts). Use Motorcraft MERCON ATF. 2.4L (5.1 pints). DO NOT USE Ford Extended Life Engine Coolant (orange in the Maintenance and Care ...


