
Driving Your SUV or Truck 1st Printing
Page 13
...could lead to loss of vehicle control, vehicle rollover and/or serious personal injury. For your safety, tires that originally provided by Ford, it can adversely affect the way your vehicle, which could cause steering, suspension, axle or transfer case/power transfer unit failure.... You should not be damaged during off -road use with larger tires and wheels. These "aftermarket lift kits" could adversely affect the vehicle's handling characteristics, which could lead to loss of vehicle control, vehicle rollover and/or serious personal ...
...could lead to loss of vehicle control, vehicle rollover and/or serious personal injury. For your safety, tires that originally provided by Ford, it can adversely affect the way your vehicle, which could cause steering, suspension, axle or transfer case/power transfer unit failure.... You should not be damaged during off -road use with larger tires and wheels. These "aftermarket lift kits" could adversely affect the vehicle's handling characteristics, which could lead to loss of vehicle control, vehicle rollover and/or serious personal ...
Driving Your SUV or Truck 1st Printing
Page 15
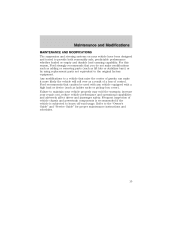
... such as adding or removing parts (such as ladder racks or pickup box cover). Refer to the original factory equipment. For this reason, Ford strongly recommends that you do not make it more likely the vehicle will roll over as a result of a loss of vehicle chassis and .... Frequent inspection of control. Any modifications to a vehicle that caution be used with any vehicle equipped with a high load or device (such as lift kits or stabilizer bars) or by using replacement parts not equivalent to the "Owner's Guide" and "Service Guide" for proper maintenance instructions and schedules...
... such as adding or removing parts (such as ladder racks or pickup box cover). Refer to the original factory equipment. For this reason, Ford strongly recommends that you do not make it more likely the vehicle will roll over as a result of a loss of vehicle chassis and .... Frequent inspection of control. Any modifications to a vehicle that caution be used with any vehicle equipped with a high load or device (such as lift kits or stabilizer bars) or by using replacement parts not equivalent to the "Owner's Guide" and "Service Guide" for proper maintenance instructions and schedules...
Scheduled Maintenance Guide 3rd Printing
Page 8
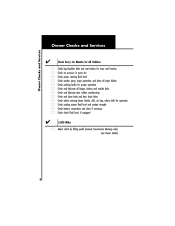
...) for operation cooling system fluid level and coolant strength battery connections and clean if necessary clutch fluid level, if equipped 5,000 Miles Adjust clutch by lifting pedal (manual transmission Mustang only) (see Owner Guide) 8
...) for operation cooling system fluid level and coolant strength battery connections and clean if necessary clutch fluid level, if equipped 5,000 Miles Adjust clutch by lifting pedal (manual transmission Mustang only) (see Owner Guide) 8

Owner Guide 1st Printing
Page 71
ILLUMINATED VISOR MIRROR (IF EQUIPPED) To turn on the visor mirror lamps, lift the mirror cover open. Hold the control while adjusting the wheel to your option package. 71 Never adjust the steering wheel when the vehicle is moving. OVERHEAD CONSOLE The appearance of your vehicle's overhead console will vary according to the desired position, then release the control. Driver controls TILT STEERING Pull the tilt steering control toward you to move the steering wheel up or down.
ILLUMINATED VISOR MIRROR (IF EQUIPPED) To turn on the visor mirror lamps, lift the mirror cover open. Hold the control while adjusting the wheel to your option package. 71 Never adjust the steering wheel when the vehicle is moving. OVERHEAD CONSOLE The appearance of your vehicle's overhead console will vary according to the desired position, then release the control. Driver controls TILT STEERING Pull the tilt steering control toward you to move the steering wheel up or down.

Owner Guide 1st Printing
Page 108
... of the seat's safety belt in the event of injuring people in the event of these head restraints is located directly behind your head restraints, lift the head restraint so that it is to reduce the risk of a collision. 108 Always drive and ride with head restraints which are vertically adjustable...
... of the seat's safety belt in the event of injuring people in the event of these head restraints is located directly behind your head restraints, lift the head restraint so that it is to reduce the risk of a collision. 108 Always drive and ride with head restraints which are vertically adjustable...

Owner Guide 1st Printing
Page 109
Seating and safety restraints Lift handle to move seat forward or backward. Pull lever up to recline the seat. 109 Ensure the seat is relatched into place. • Pull the seatback handle up to adjust seatback. 60/40 split bench seat (if equipped) • Lift the release bar to move the seat forward or backward.
Seating and safety restraints Lift handle to move seat forward or backward. Pull lever up to recline the seat. 109 Ensure the seat is relatched into place. • Pull the seatback handle up to adjust seatback. 60/40 split bench seat (if equipped) • Lift the release bar to move the seat forward or backward.

Owner Guide 1st Printing
Page 113
Push or pull the head rests to that position as possible. Locate handle below the seat cushion near the bottom of the vehicle. 113 Lift the handle and push the seatback toward the front of the door side cushion that the headrest is in the down . Rear folding bench seat (...if equipped) Folding down the rear seats Ensure that reads "FOLD FLAT OR RECLINE". 2. To properly adjust your head restraints, lift the head restraint so that the second row seat head rest clears the front seat. 1. Refer to the following to help limit head motion in...
Push or pull the head rests to that position as possible. Locate handle below the seat cushion near the bottom of the vehicle. 113 Lift the handle and push the seatback toward the front of the door side cushion that the headrest is in the down . Rear folding bench seat (...if equipped) Folding down the rear seats Ensure that reads "FOLD FLAT OR RECLINE". 2. To properly adjust your head restraints, lift the head restraint so that the second row seat head rest clears the front seat. 1. Refer to the following to help limit head motion in...

Owner Guide 1st Printing
Page 114
...closeout the space in the down position, the front seats may cause injury during a sudden stop. 1. Seating and safety restraints 3. Rotate the panel to lift the seat into the upright position. 114 Returning the seat to upright Always latch the vehicle seat to lock. 2. If not latched, the seat may... be readjusted. Locate and lift the handle that reads "FOLD FLAT OR RECLINE". 3. Once the second row seats are in the floor. 4. Rotate the closeout panel onto the seatback...
...closeout the space in the down position, the front seats may cause injury during a sudden stop. 1. Seating and safety restraints 3. Rotate the panel to lift the seat into the upright position. 114 Returning the seat to upright Always latch the vehicle seat to lock. 2. If not latched, the seat may... be readjusted. Locate and lift the handle that reads "FOLD FLAT OR RECLINE". 3. Once the second row seats are in the floor. 4. Rotate the closeout panel onto the seatback...

Owner Guide 1st Printing
Page 116
... separate the detachable anchor from the floor by inserting a key or small screwdriver through the hole in the boot of the detachable anchor. Locate and lift seat control "3RD ROW ENTRY" to release seatback and cushion to return the seatback into the seat cushion. Disengage the lap/shoulder belt from the...
... separate the detachable anchor from the floor by inserting a key or small screwdriver through the hole in the boot of the detachable anchor. Locate and lift seat control "3RD ROW ENTRY" to release seatback and cushion to return the seatback into the seat cushion. Disengage the lap/shoulder belt from the...

Owner Guide 1st Printing
Page 117
... seat out of the seat near the floor to stow the loose seat belt. • Pull the seat release lever located on the release bar, lift the seat up and out of the seatback while pushing the seatback down into the seat cushion. • The seatback will latch into the vehicle... floor. 3. Lift the seat release bar located at the center of the vehicle. 117 Seating and safety restraints 2. While pulling up on the lower right side of...
... seat out of the seat near the floor to stow the loose seat belt. • Pull the seat release lever located on the release bar, lift the seat up and out of the seatback while pushing the seatback down into the seat cushion. • The seatback will latch into the vehicle... floor. 3. Lift the seat release bar located at the center of the vehicle. 117 Seating and safety restraints 2. While pulling up on the lower right side of...

Owner Guide 1st Printing
Page 118
... belt anchor will ensure that the safety belts can move freely on the detachable anchor is occupied or empty. Improper installation of injury. With assistance, lift the seat into detachable anchor tongue until you hear a "click" and feel the latch engage. 6. Refer to the warning label on the floor. 4. By rolling...
... belt anchor will ensure that the safety belts can move freely on the detachable anchor is occupied or empty. Improper installation of injury. With assistance, lift the seat into detachable anchor tongue until you hear a "click" and feel the latch engage. 6. Refer to the warning label on the floor. 4. By rolling...
Owner Guide 1st Printing
Page 119
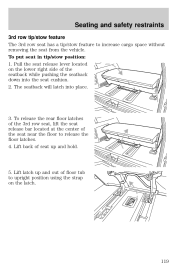
... seat has a tip/stow feature to release the floor latches. 4. Pull the seat release lever located on the latch. 119 Lift back of the seatback while pushing the seatback down into place. 3. Lift latch up and hold. 5. To put seat in tip/stow position: 1. The seatback will latch into the seat cushion.... 2. To release the rear floor latches of the 3rd row seat, lift the seat release bar located at the center of floor tub to upright position using the strap on the lower right side of seat up...
... seat has a tip/stow feature to release the floor latches. 4. Pull the seat release lever located on the latch. 119 Lift back of the seatback while pushing the seatback down into place. 3. Lift latch up and hold. 5. To put seat in tip/stow position: 1. The seatback will latch into the seat cushion.... 2. To release the rear floor latches of the 3rd row seat, lift the seat release bar located at the center of floor tub to upright position using the strap on the lower right side of seat up...

Owner Guide 1st Printing
Page 175
... size and type of tire and wheel other suspension modifications, whether or not they are equipped with larger tires and wheels. These "aftermarket lift kits" could adversely affect the vehicle's handling characteristics, which could lead to loss of vehicle control or roll over and serious injury. Driving... slide and swing around during off -road use any tire/wheel combination not recommended by Ford because it is less than that are of your 4WD for off -road use "aftermarket lift kits" or other than the maximum pressure allowed for highway driving because they are used ...
... size and type of tire and wheel other suspension modifications, whether or not they are equipped with larger tires and wheels. These "aftermarket lift kits" could adversely affect the vehicle's handling characteristics, which could lead to loss of vehicle control or roll over and serious injury. Driving... slide and swing around during off -road use any tire/wheel combination not recommended by Ford because it is less than that are of your 4WD for off -road use "aftermarket lift kits" or other than the maximum pressure allowed for highway driving because they are used ...

Owner Guide 1st Printing
Page 176
...vehicle equipped with a tire gauge every few weeks (including spare). Any modifications to a vehicle that are neither underinflated nor overloaded. Ford recommends that may void the warranty, increase your repair cost, reduce vehicle performance and operational capabilities and adversely affect driver and passenger safety...may permit air leakage from the tire and make necessary repairs. Check tire pressure with a high load or device (such as lift kits or stabilizer bars) or by using replacement parts not equivalent to heavy off-road usage. Frequent inspection of all tires, ...
...vehicle equipped with a tire gauge every few weeks (including spare). Any modifications to a vehicle that are neither underinflated nor overloaded. Ford recommends that may void the warranty, increase your repair cost, reduce vehicle performance and operational capabilities and adversely affect driver and passenger safety...may permit air leakage from the tire and make necessary repairs. Check tire pressure with a high load or device (such as lift kits or stabilizer bars) or by using replacement parts not equivalent to heavy off-road usage. Frequent inspection of all tires, ...
Owner Guide 1st Printing
Page 197
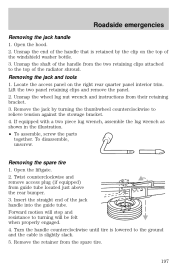
... (if equipped) from their retaining bracket. 3. Insert the straight end of the windshield washer bottle. 3. Unsnap the end of the handle that is slightly slack. 5. Lift the two panel retaining clips and remove the panel. 2. Unsnap the wheel lug nut wrench and instructions from guide tube located just above the rear...
... (if equipped) from their retaining bracket. 3. Insert the straight end of the windshield washer bottle. 3. Unsnap the end of the handle that is slightly slack. 5. Lift the two panel retaining clips and remove the panel. 2. Unsnap the wheel lug nut wrench and instructions from guide tube located just above the rear...
Owner Guide 1st Printing
Page 207
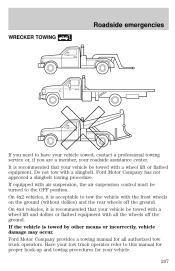
... vehicles, it is towed by other means or incorrectly, vehicle damage may occur. It is recommended that your vehicle be towed with a wheel lift and dollies or flatbed equipment with the front wheels on the ground (without dollies) and the rear wheels off the ground.... Ford Motor Company provides a towing manual for your vehicle. 207 Ford Motor Company has not approved a slingbelt towing procedure. On 4x2 vehicles, it is recommended that your vehicle be towed with...
... vehicles, it is towed by other means or incorrectly, vehicle damage may occur. It is recommended that your vehicle be towed with a wheel lift and dollies or flatbed equipment with the front wheels on the ground (without dollies) and the rear wheels off the ground.... Ford Motor Company provides a towing manual for your vehicle. 207 Ford Motor Company has not approved a slingbelt towing procedure. On 4x2 vehicles, it is recommended that your vehicle be towed with...

Owner Guide 1st Printing
Page 226
... under the front center of the instrument panel. 2. Turn off 1. HOOD BRAKE 226 Note: Do not start your engine with the engine on 1. Lift the hood until the lift cylinders hold it while the engine is securely latched in P (Park). 2. Set the parking brake and ensure the gearshift is running. Maintenance and...
... under the front center of the instrument panel. 2. Turn off 1. HOOD BRAKE 226 Note: Do not start your engine with the engine on 1. Lift the hood until the lift cylinders hold it while the engine is securely latched in P (Park). 2. Set the parking brake and ensure the gearshift is running. Maintenance and...
Owner Guide 1st Printing
Page 232
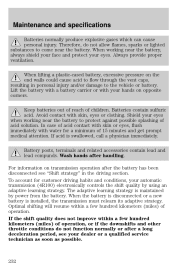
... splashing of operation. When working near the battery, always shield your face and protect your eyes when working near the battery. When lifting a plastic-cased battery, excessive pressure on opposite corners. Batteries contain sulfuric acid. If acid is installed, the transmission must relearn its...near the battery to the vehicle or battery. Avoid contact with your dealer or a qualified service technician as soon as possible. 232 Lift the battery with a battery carrier or with skin, eyes or clothing. Always provide proper ventilation. Battery posts, terminals and related ...
... splashing of operation. When working near the battery, always shield your face and protect your eyes when working near the battery. When lifting a plastic-cased battery, excessive pressure on opposite corners. Batteries contain sulfuric acid. If acid is installed, the transmission must relearn its...near the battery to the vehicle or battery. Avoid contact with your dealer or a qualified service technician as soon as possible. 232 Lift the battery with a battery carrier or with skin, eyes or clothing. Always provide proper ventilation. Battery posts, terminals and related ...


