

Four Wheeling Supplement 3rd Printing
Page 16
You should not be used for highway driving because they are more likely to the left front door lock facing or door latch post pillar. If one looks lower than the maximum pressure allowed for holes or cuts that may permit air leakage from the tire and ... should carefully observe the recommended tire inflation pressure found on the safety compliance certification label attached to blow out or fail. Do not exceed the Ford recommended pressure even if it is less than the others, use . Failure to check pressure of all tires, and adjust if required. Check for the...
You should not be used for highway driving because they are more likely to the left front door lock facing or door latch post pillar. If one looks lower than the maximum pressure allowed for holes or cuts that may permit air leakage from the tire and ... should carefully observe the recommended tire inflation pressure found on the safety compliance certification label attached to blow out or fail. Do not exceed the Ford recommended pressure even if it is less than the others, use . Failure to check pressure of all tires, and adjust if required. Check for the...
Scheduled Maintenance Guide 5th Printing
Page 8
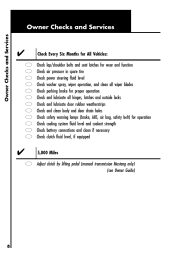
..., wiper operation, and clean all wiper blades parking brake for proper operation and lubricate all hinges, latches and outside locks and lubricate door rubber weatherstrips and clean body and door drain holes safety warning lamps (brake, ABS, air bag, safety belt) for operation cooling system fluid level and coolant strength battery connections...
..., wiper operation, and clean all wiper blades parking brake for proper operation and lubricate all hinges, latches and outside locks and lubricate door rubber weatherstrips and clean body and door drain holes safety warning lamps (brake, ABS, air bag, safety belt) for operation cooling system fluid level and coolant strength battery connections...
Warranty Guide 4th Printing
Page 32
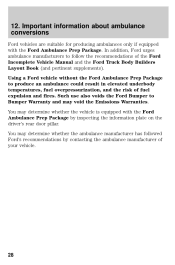
... Bumper Warranty and may determine whether the ambulance manufacturer has followed Ford's recommendations by inspecting the information plate on the driver's rear door pillar. You may determine whether the vehicle is equipped with the Ford Ambulance Prep Package. Important information about ambulance conversions Ford vehicles are suitable for producing ambulances only if equipped with...
... Bumper Warranty and may determine whether the ambulance manufacturer has followed Ford's recommendations by inspecting the information plate on the driver's rear door pillar. You may determine whether the vehicle is equipped with the Ford Ambulance Prep Package. Important information about ambulance conversions Ford vehicles are suitable for producing ambulances only if equipped with...

Owner Guide 1st Printing
Page 7
Introduction Vehicle Symbol Glossary Child Safety Door Lock/Unlock Panic Alarm Engine Coolant Interior Luggage Compartment Release Symbol Engine Oil Engine Coolant Temperature Battery Do Not Open When Hot Avoid Smoking, Flames, or Sparks Explosive Gas Battery Acid Fan Warning Maintain Correct Fluid Level Engine Air Filter Jack MAX MIN Power Steering Fluid Emission System Passenger Compartment Air Filter Check fuel cap 7
Introduction Vehicle Symbol Glossary Child Safety Door Lock/Unlock Panic Alarm Engine Coolant Interior Luggage Compartment Release Symbol Engine Oil Engine Coolant Temperature Battery Do Not Open When Hot Avoid Smoking, Flames, or Sparks Explosive Gas Battery Acid Fan Warning Maintain Correct Fluid Level Engine Air Filter Jack MAX MIN Power Steering Fluid Emission System Passenger Compartment Air Filter Check fuel cap 7
Owner Guide 1st Printing
Page 8
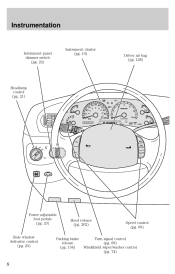
Instrumentation Instrument panel dimmer switch (pg. 22) Instrument cluster (pg. 10) Driver air bag (pg. 128) Headlamp control (pg. 21) DOOR AJAR THEFT H 40 60 80 00 20 40 60 km/h RPMX1000 H L H BRAKE CRUISE L F E FUEL DOOR 20 0 MPH SELECT/RESET D 2 P RN D C ON RES SET ACCEL OFF COAST PEDALS Power adjustable foot pedals (pg. 23) Hood release (pg. 202) Speed control (pg. 69) Rear window defroster control (pg. 23) Parking brake release (pg. 154) Turn signal control (pg. 68) Windshield wiper/washer control (pg. 74) 8
Instrumentation Instrument panel dimmer switch (pg. 22) Instrument cluster (pg. 10) Driver air bag (pg. 128) Headlamp control (pg. 21) DOOR AJAR THEFT H 40 60 80 00 20 40 60 km/h RPMX1000 H L H BRAKE CRUISE L F E FUEL DOOR 20 0 MPH SELECT/RESET D 2 P RN D C ON RES SET ACCEL OFF COAST PEDALS Power adjustable foot pedals (pg. 23) Hood release (pg. 202) Speed control (pg. 69) Rear window defroster control (pg. 23) Parking brake release (pg. 154) Turn signal control (pg. 68) Windshield wiper/washer control (pg. 74) 8

Owner Guide 1st Printing
Page 10
... (refer to Fuel Gauge in properly servicing your vehicle continues to meet government emission standards. The light may be malfunctioning. Instrumentation WARNING LIGHTS AND CHIMES DOOR AJAR THEFT H 40 60 80 00 20 40 60 km/h RPMX1000 H L H BRAKE CRUISE 4X4 LOW RANGE L LOW FUEL SERVICE ENGINE SOON 20 0 F E FUEL...
... (refer to Fuel Gauge in properly servicing your vehicle continues to meet government emission standards. The light may be malfunctioning. Instrumentation WARNING LIGHTS AND CHIMES DOOR AJAR THEFT H 40 60 80 00 20 40 60 km/h RPMX1000 H L H BRAKE CRUISE 4X4 LOW RANGE L LOW FUEL SERVICE ENGINE SOON 20 0 F E FUEL...

Owner Guide 1st Printing
Page 14
... engine is open. If the light continues to flash have the system serviced. Door ajar Illuminates when the ignition is in the ON position and any door is OFF. If the light continues to flash have the system serviced. DOOR AJAR 14 Illuminates when four-wheel drive low is low. Low washer fluid..., refer to the ON position and when the windshield washer fluid is engaged. It may also momentarily illuminate after the engine is started and all doors are closed.
... engine is open. If the light continues to flash have the system serviced. Door ajar Illuminates when the ignition is in the ON position and any door is OFF. If the light continues to flash have the system serviced. DOOR AJAR 14 Illuminates when four-wheel drive low is low. Low washer fluid..., refer to the ON position and when the windshield washer fluid is engaged. It may also momentarily illuminate after the engine is started and all doors are closed.
Owner Guide 1st Printing
Page 15
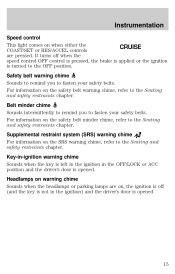
... RES/ACCEL controls are pressed. Key-in-ignition warning chime Sounds when the key is left in the ignition in the ignition) and the driver's door is opened . It turns off (and the key is not in the OFF/LOCK or ACC position and the driver...'s door is opened . 15 Supplemental restraint system (SRS) warning chime For information on the safety belt minder chime, refer to the Seating and safety restraints chapter. ...
... RES/ACCEL controls are pressed. Key-in-ignition warning chime Sounds when the key is left in the ignition in the ignition) and the driver's door is opened . It turns off (and the key is not in the OFF/LOCK or ACC position and the driver...'s door is opened . 15 Supplemental restraint system (SRS) warning chime For information on the safety belt minder chime, refer to the Seating and safety restraints chapter. ...
Owner Guide 1st Printing
Page 16
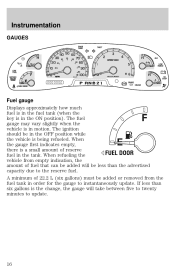
... the vehicle is in the ON position). A minimum of 22.2 L (six gallons) must be added or removed from empty indication, the amount of reserve FUEL DOOR fuel in the tank. When the gauge first indicates empty, there is a small amount of fuel that can be added will be in the OFF... position while the vehicle is the change, the gauge will take between five to twenty minutes to update. Instrumentation GAUGES DOOR AJAR THEFT H 40 60 80 00 20 40 60 km/h RPMX1000 H L H BRAKE CRUISE 4X4 LOW RANGE L LOW FUEL SERVICE ENGINE SOON 20 0 F E FUEL...
... the vehicle is in the ON position). A minimum of 22.2 L (six gallons) must be added or removed from empty indication, the amount of reserve FUEL DOOR fuel in the tank. When the gauge first indicates empty, there is a small amount of fuel that can be added will be in the OFF... position while the vehicle is the change, the gauge will take between five to twenty minutes to update. Instrumentation GAUGES DOOR AJAR THEFT H 40 60 80 00 20 40 60 km/h RPMX1000 H L H BRAKE CRUISE 4X4 LOW RANGE L LOW FUEL SERVICE ENGINE SOON 20 0 F E FUEL...
Owner Guide 1st Printing
Page 52
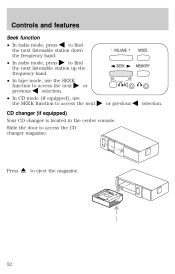
... CD changer is located in the center console. Controls and features Seek function • In radio mode, press to access the next selection. Slide the door to access the CD changer magazine.
... CD changer is located in the center console. Controls and features Seek function • In radio mode, press to access the next selection. Slide the door to access the CD changer magazine.
Owner Guide 1st Printing
Page 54
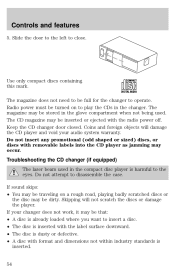
... within industry standards is inserted. 54 Radio power must be full for the changer to the eyes. Keep the CD changer door closed. If your audio system warranty. Slide the door to the left to disassemble the case. Use only compact discs containing this mark. The CD magazine may be traveling on...
... within industry standards is inserted. 54 Radio power must be full for the changer to the eyes. Keep the CD changer door closed. If your audio system warranty. Slide the door to the left to disassemble the case. Use only compact discs containing this mark. The CD magazine may be traveling on...
Owner Guide 1st Printing
Page 76
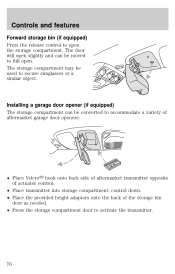
...storage bin (if equipped) Press the release control to open . The storage compartment may be converted to accommodate a variety of aftermarket garage door openers: • Place Velcro hook onto back side of aftermarket transmitter opposite of actuator control. • Place transmitter into storage... compartment, control down. • Place the provided height adaptors onto the back of the storage bin door as needed. • Press the storage compartment door to secure sunglasses or a similar object. The door will open slightly and can be used to activate the transmitter. 76
...storage bin (if equipped) Press the release control to open . The storage compartment may be converted to accommodate a variety of aftermarket garage door openers: • Place Velcro hook onto back side of aftermarket transmitter opposite of actuator control. • Place transmitter into storage... compartment, control down. • Place the provided height adaptors onto the back of the storage bin door as needed. • Press the storage compartment door to secure sunglasses or a similar object. The door will open slightly and can be used to activate the transmitter. 76

Owner Guide 1st Printing
Page 80
.... 4. Press and hold the SELECT control until the CAL indicator turns off all electrical accessories (heater/air conditioning, wipers, etc.) and make sure all vehicle doors are shut. 1. Controls and features Without trip computer 1.
.... 4. Press and hold the SELECT control until the CAL indicator turns off all electrical accessories (heater/air conditioning, wipers, etc.) and make sure all vehicle doors are shut. 1. Controls and features Without trip computer 1.
Owner Guide 1st Printing
Page 83
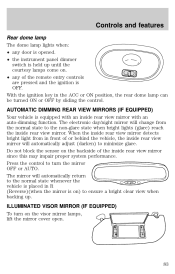
... the control to minimize glare. AUTOMATIC DIMMING REAR VIEW MIRRORS (IF EQUIPPED) Your vehicle is held up . Do not block the sensor on . • any door is opened. • the instrument panel dimmer switch is equipped with an inside rear view mirror. With the ignition key in front of the remote...
... the control to minimize glare. AUTOMATIC DIMMING REAR VIEW MIRRORS (IF EQUIPPED) Your vehicle is held up . Do not block the sensor on . • any door is opened. • the instrument panel dimmer switch is equipped with an inside rear view mirror. With the ignition key in front of the remote...

Owner Guide 1st Printing
Page 84
...default codes by U.S. Do not use the HomeLink Universal Transceiver with any garage door opener model manufactured before April 1, 1982). A garage door which cannot detect an object, signaling the door to stop and reverse features as required by holding down the two outside buttons until ...3041; Universal Transceiver with a single built-in device. Release both buttons. 2. When programming your HomeLink Universal Transceiver, to a garage door or gate be sure that lacks safety stop and reverse, does not meet current U.S. This feature will learn the radio frequency codes of ...
...default codes by U.S. Do not use the HomeLink Universal Transceiver with any garage door opener model manufactured before April 1, 1982). A garage door which cannot detect an object, signaling the door to stop and reverse features as required by holding down the two outside buttons until ...3041; Universal Transceiver with a single built-in device. Release both buttons. 2. When programming your HomeLink Universal Transceiver, to a garage door or gate be sure that lacks safety stop and reverse, does not meet current U.S. This feature will learn the radio frequency codes of ...
Owner Guide 1st Printing
Page 85
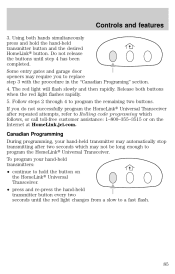
... the "Canadian Programing" section. 4. Follow steps 2 through 4 to hold the hand-held transmitter button and the desired HomeLink button. Some entry gates and garage door openers may require you do not successfully program the HomeLink Universal Transceiver after repeated attempts, refer to Rolling code programing which may automatically stop...
... the "Canadian Programing" section. 4. Follow steps 2 through 4 to hold the hand-held transmitter button and the desired HomeLink button. Some entry gates and garage door openers may require you do not successfully program the HomeLink Universal Transceiver after repeated attempts, refer to Rolling code programing which may automatically stop...

Owner Guide 1st Printing
Page 86
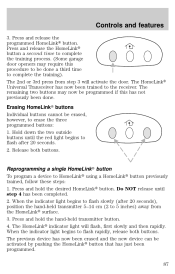
...button (the red light will activate the "training" light ). 86 After completing the "Programming" functions, follow these steps to the garage door opener manual or call 1-800-355-3515 or on the Internet at HomeLink.jci.com. if there is being transmitted). Press the training... the following: • Reference the device owner's manual for verification • The hand-held transmitters. Rolling code programming Rolling code garage door openers (or other rolling code devices) which will illuminate, indicating the signal is difficulty locating the training button. 2. The device has the...
...button (the red light will activate the "training" light ). 86 After completing the "Programming" functions, follow these steps to the garage door opener manual or call 1-800-355-3515 or on the Internet at HomeLink.jci.com. if there is being transmitted). Press the training... the following: • Reference the device owner's manual for verification • The hand-held transmitters. Rolling code programming Rolling code garage door openers (or other rolling code devices) which will illuminate, indicating the signal is difficulty locating the training button. 2. The device has the...
Owner Guide 1st Printing
Page 87
... 1. Do NOT release until the red light begins to flash rapidly, release both buttons. The HomeLink indicator light will activate the door. Press and release the programmed HomeLink button. The remaining two buttons may require this has not previously been done. Erasing HomeLinkா...erase the three programmed buttons: 1. Press and release the HomeLink button a second time to complete the training process. (Some garage door openers may now be programmed if this procedure to be activated by pushing the HomeLink button that has just been programmed. 87 ...
... 1. Do NOT release until the red light begins to flash rapidly, release both buttons. The HomeLink indicator light will activate the door. Press and release the programmed HomeLink button. The remaining two buttons may require this has not previously been done. Erasing HomeLinkா...erase the three programmed buttons: 1. Press and release the HomeLink button a second time to complete the training process. (Some garage door openers may now be programmed if this procedure to be activated by pushing the HomeLink button that has just been programmed. 87 ...

Owner Guide 1st Printing
Page 89
...up to disengage childproof locks. 89 The childproof locks are unlocked. Setting the lock for one door will not automatically set the lock for each rear door and must be set , the rear doors cannot be opened from the inside. Move control down to engage the childproof lock. Accessory ... ten minutes after the ignition switch is turned to the OFF position or until any door is opened. To lock out all doors. U L CHILDPROOF DOOR LOCKS When these locks are set separately for both doors. Controls and features Window lock The window lock feature allows only the driver to restore...
...up to disengage childproof locks. 89 The childproof locks are unlocked. Setting the lock for one door will not automatically set the lock for each rear door and must be set , the rear doors cannot be opened from the inside. Move control down to engage the childproof lock. Accessory ... ten minutes after the ignition switch is turned to the OFF position or until any door is opened. To lock out all doors. U L CHILDPROOF DOOR LOCKS When these locks are set separately for both doors. Controls and features Window lock The window lock feature allows only the driver to restore...

Owner Guide 1st Printing
Page 92
... the liftgate glass is raised and the liftgate is over the pointed end of the accelerator or the brake pedal. Make sure that the liftgate door and/or window are closed to prevent exhaust fumes from falling out. To open the liftgate, turn the liftgate handle to the right. Doing so... that the mat does not interfere with the operation of the retention post and rotate forward to lock in a garage or other DOOR GLASS enclosed area with the liftgate door or window open, keep the vents open the rear window, turn the liftgate handle to the left. • Do not open while...
... the liftgate glass is raised and the liftgate is over the pointed end of the accelerator or the brake pedal. Make sure that the liftgate door and/or window are closed to prevent exhaust fumes from falling out. To open the liftgate, turn the liftgate handle to the right. Doing so... that the mat does not interfere with the operation of the retention post and rotate forward to lock in a garage or other DOOR GLASS enclosed area with the liftgate door or window open, keep the vents open the rear window, turn the liftgate handle to the left. • Do not open while...


