Warranty Guide 1st Printing
Page 32
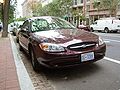
... by inspecting the information plate on the driver's rear door pillar. Important information about ambulance conversions Ford vehicles are suitable for producing ambulances only if equipped with the Ford Ambulance Prep Package by contacting the ambulance manufacturer of your vehicle. 28 Using a Ford vehicle without the Ford Ambulance Prep Package to follow the recommendations of fuel...
... by inspecting the information plate on the driver's rear door pillar. Important information about ambulance conversions Ford vehicles are suitable for producing ambulances only if equipped with the Ford Ambulance Prep Package by contacting the ambulance manufacturer of your vehicle. 28 Using a Ford vehicle without the Ford Ambulance Prep Package to follow the recommendations of fuel...

Owner Guide 1st Printing
Page 40
... on to play the CDs in the glove box when not being used. Skipping will damage the CD player and void your audio system warranty. ONLY use the magazine supplied with the groove of the disc holder. Keep the CD changer door closed. Ensure that the label on a rough road, playing badly scratched...
... on to play the CDs in the glove box when not being used. Skipping will damage the CD player and void your audio system warranty. ONLY use the magazine supplied with the groove of the disc holder. Keep the CD changer door closed. Ensure that the label on a rough road, playing badly scratched...
Owner Guide 1st Printing
Page 54
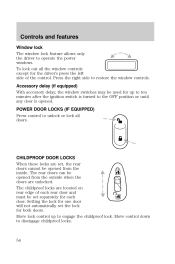
... switch is opened. Accessory delay (if equipped) With accessory delay, the window switches may be set separately for each rear door and must be used for both doors. The childproof locks are located on rear edge of the control. Move control down to restore the window controls. Press the... right side to disengage childproof locks. 54 The rear doors can be opened from the inside. CHILDPROOF DOOR LOCKS When these locks are ...
... switch is opened. Accessory delay (if equipped) With accessory delay, the window switches may be set separately for each rear door and must be used for both doors. The childproof locks are located on rear edge of the control. Move control down to restore the window controls. Press the... right side to disengage childproof locks. 54 The rear doors can be opened from the inside. CHILDPROOF DOOR LOCKS When these locks are ...
Owner Guide 1st Printing
Page 57
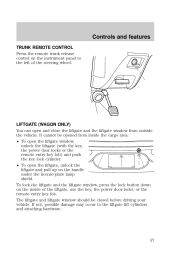
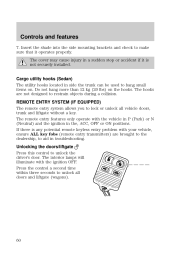
... pull up on the handle under the license plate lamp shield. If not, possible damage may occur to the left of the liftgate, use the key, the power door locks, or the remote entry key fob. Controls and features TRUNK REMOTE CONTROL Press the remote trunk release control on the inside the... cargo area. • To open the liftgate window, unlock the liftgate (with the key, the power door locks or the remote entry key fob) and push the key lock cylinder. • To open and close the liftgate and the liftgate window from...
... pull up on the handle under the license plate lamp shield. If not, possible damage may occur to the left of the liftgate, use the key, the power door locks, or the remote entry key fob. Controls and features TRUNK REMOTE CONTROL Press the remote trunk release control on the inside the... cargo area. • To open the liftgate window, unlock the liftgate (with the key, the power door locks or the remote entry key fob) and push the key lock cylinder. • To open and close the liftgate and the liftgate window from...
Owner Guide 1st Printing
Page 60
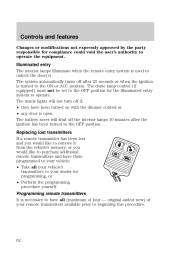
...only operate with your vehicle, ensure ALL key fobs (remote entry transmitters) are not designed to aid in side the trunk can be used to lock or unlock all doors and liftgate (wagons). 60 If there is not securely installed. The cover may cause injury in the, ACC, OFF or ON ...positions. The hooks are brought to the dealership, to restrain objects during a collision. Controls and features 7. Unlocking the doors/liftgate Press this control to make sure that it is any potential remote keyless entry problem with the vehicle in P (Park) or N (Neutral) and the...
...only operate with your vehicle, ensure ALL key fobs (remote entry transmitters) are not designed to aid in side the trunk can be used to lock or unlock all doors and liftgate (wagons). 60 If there is not securely installed. The cover may cause injury in the, ACC, OFF or ON ...positions. The hooks are brought to the dealership, to restrain objects during a collision. Controls and features 7. Unlocking the doors/liftgate Press this control to make sure that it is any potential remote keyless entry problem with the vehicle in P (Park) or N (Neutral) and the...
Owner Guide 1st Printing
Page 62
... is necessary to have all (maximum of your dealer for programming, or • Perform the programming procedure yourself Programming remote transmitters It is used to unlock the door(s). The inside lights will shut off the interior lamps 10 minutes after 25 seconds or when the ignition is open. original and/or new... from the vehicle's memory, or you would like to purchase additional remote transmitters and have been turned on with the dimmer control or • any door is turned to the ON or ACC position.
... is necessary to have all (maximum of your dealer for programming, or • Perform the programming procedure yourself Programming remote transmitters It is used to unlock the door(s). The inside lights will shut off the interior lamps 10 minutes after 25 seconds or when the ignition is open. original and/or new... from the vehicle's memory, or you would like to purchase additional remote transmitters and have been turned on with the dimmer control or • any door is turned to the ON or ACC position.

Owner Guide 1st Printing
Page 66
...system will be armed. Turn the key full travel (toward the front of the following actions: • Unlock the doors by using your keyless entry pad. 1 2 3 4 5 6 7 8 9 0 • Unlock the doors or liftgate with a key. This will only shut the horn OFF when the alarm is forced opened without... using your remote entry transmitter. • Unlock the doors by using the door key or the remote entry transmitter. • The trunk is sounding. Controls and features Disarming the system You...
...system will be armed. Turn the key full travel (toward the front of the following actions: • Unlock the doors by using your keyless entry pad. 1 2 3 4 5 6 7 8 9 0 • Unlock the doors or liftgate with a key. This will only shut the horn OFF when the alarm is forced opened without... using your remote entry transmitter. • Unlock the doors by using the door key or the remote entry transmitter. • The trunk is sounding. Controls and features Disarming the system You...

Owner Guide 1st Printing
Page 67
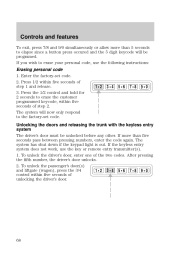
Enter the factory-set a code that the dealership gave you can use either code to ensure a good activation. Enter your own personal entry code 1. Do not set code (keypad will erase the first personal code in sequential ... 5-digit personal entry code. The factory-set 5-digit code that operates the keyless entry system. You can : 1 2 3 4 5 6 7 8 9 0 • lock or unlock the vehicle doors and liftgate (wagons) without using the key • open the trunk • arm and disarm the perimeter alarm system (if equipped) See also Remote entry system and Perimeter...
Enter the factory-set a code that the dealership gave you can use either code to ensure a good activation. Enter your own personal entry code 1. Do not set code (keypad will erase the first personal code in sequential ... 5-digit personal entry code. The factory-set 5-digit code that operates the keyless entry system. You can : 1 2 3 4 5 6 7 8 9 0 • lock or unlock the vehicle doors and liftgate (wagons) without using the key • open the trunk • arm and disarm the perimeter alarm system (if equipped) See also Remote entry system and Perimeter...
Owner Guide 1st Printing
Page 68
... wish to erase the customer programmed keycode, within five seconds of unlocking the driver's door. 68 Press the 1/2 control and hold for 2 seconds to erase your personal code, use the key or remote entry transmitter(s). 1. To unlock the passenger's door(s) and liftgate (wagon), press the 3/4 1 2 3 4 5 6 7 8 9 0 control within five seconds of the two codes...
... wish to erase the customer programmed keycode, within five seconds of unlocking the driver's door. 68 Press the 1/2 control and hold for 2 seconds to erase your personal code, use the key or remote entry transmitter(s). 1. To unlock the passenger's door(s) and liftgate (wagon), press the 3/4 1 2 3 4 5 6 7 8 9 0 control within five seconds of the two codes...
Owner Guide 1st Printing
Page 69
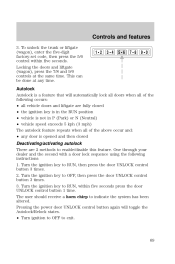
One through your dealer and the second with a door lock sequence using the following occurs: • all vehicle doors and liftgate are fully closed • the ignition key is in the RUN position • vehicle is not in P (Park) or N (Neutral) • vehicle speed ...exceeds 5 kph (3 mph) The autolock feature repeats when all of the above occur and: • any door is ...
One through your dealer and the second with a door lock sequence using the following occurs: • all vehicle doors and liftgate are fully closed • the ignition key is in the RUN position • vehicle is not in P (Park) or N (Neutral) • vehicle speed ...exceeds 5 kph (3 mph) The autolock feature repeats when all of the above occur and: • any door is ...

Owner Guide 1st Printing
Page 70
... anti-theft problem with your dealer and the second with a door lock sequence using the following instructions: 1. Turn the ignition key to OFF, then press the door UNLOCK control button 3 times. 3. Pressing the power door UNLOCK control button two times again will not operate. Your vehicle's engine... key while starting problems. If present, you start your vehicle. Turn the ignition key to RUN, within five seconds press the door UNLOCK control button 2 times. Each time you need to keep these systems may cause vehicle starting the engine. Turn the ignition ...
... anti-theft problem with your dealer and the second with a door lock sequence using the following instructions: 1. Turn the ignition key to OFF, then press the door UNLOCK control button 3 times. 3. Pressing the power door UNLOCK control button two times again will not operate. Your vehicle's engine... key while starting problems. If present, you start your vehicle. Turn the ignition key to RUN, within five seconds press the door UNLOCK control button 2 times. Each time you need to keep these systems may cause vehicle starting the engine. Turn the ignition ...

Owner Guide 1st Printing
Page 94
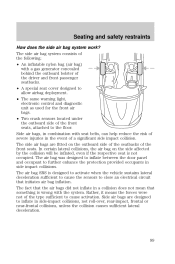
... belts to the safety belts. Seating and safety restraints AIR BAG SUPPLEMENTAL RESTRAINT SYSTEM - + 100 0 0 0 0 F FUEL DOOR > 3 4 5 H 60 140 2 RPMx1000 0 00000 E LOW COOLANT C THEFT 1 6 7 ABS CRUISE ! The air... or more impact and safing sensors. • the same indicator light, RCM (restraints control module) and diagnostic unit used for the Personal safety system. 94 P BRAKE 20 km/h 180 P R N D 2 1 0 AM H ...crashes for which the air bags are intended as a supplement to help Ford better understand real world collisions and further improve the safety of your vehicle ...
... belts to the safety belts. Seating and safety restraints AIR BAG SUPPLEMENTAL RESTRAINT SYSTEM - + 100 0 0 0 0 F FUEL DOOR > 3 4 5 H 60 140 2 RPMx1000 0 00000 E LOW COOLANT C THEFT 1 6 7 ABS CRUISE ! The air... or more impact and safing sensors. • the same indicator light, RCM (restraints control module) and diagnostic unit used for the Personal safety system. 94 P BRAKE 20 km/h 180 P R N D 2 1 0 AM H ...crashes for which the air bags are intended as a supplement to help Ford better understand real world collisions and further improve the safety of your vehicle ...

Owner Guide 1st Printing
Page 98
...an air bag SRS is provided. 98 Several air bag system components get hot after inflation. The use accessory seat covers. Failure to follow these instructions may prevent the deployment of the side air bags... of injury in the event of the front seats or in a collision. See your head on the door. Side air bag system (if equipped) Do not place objects or mount equipment on or near the ... personal injury in an accident. All occupants of air bag deployment. Do not lean your Ford or Lincoln Mercury dealer. Do not touch them after inflation. The side air bag could injure you...
...an air bag SRS is provided. 98 Several air bag system components get hot after inflation. The use accessory seat covers. Failure to follow these instructions may prevent the deployment of the side air bags... of injury in the event of the front seats or in a collision. See your head on the door. Side air bag system (if equipped) Do not place objects or mount equipment on or near the ... personal injury in an accident. All occupants of air bag deployment. Do not lean your Ford or Lincoln Mercury dealer. Do not touch them after inflation. The side air bag could injure you...
Owner Guide 1st Printing
Page 99
...seatbacks of the type sufficient to close an electrical circuit that something is not occupied. The air bag was designed to inflate between the door panel and occupant to further enhance the protection provided occupants in the event of the following: • An inflatable nylon bag (air ...reduce the risk of the front seats, attached to allow airbag deployment. • The same warning light, electronic control and diagnostic unit as used for the front air bags. • Two crash sensors located under the outboard side of severe injuries in side impact collisions. Rather, it ...
...seatbacks of the type sufficient to close an electrical circuit that something is not occupied. The air bag was designed to inflate between the door panel and occupant to further enhance the protection provided occupants in the event of the following: • An inflatable nylon bag (air ...reduce the risk of the front seats, attached to allow airbag deployment. • The same warning light, electronic control and diagnostic unit as used for the front air bags. • Two crash sensors located under the outboard side of severe injuries in side impact collisions. Rather, it ...
Owner Guide 1st Printing
Page 108
... all vehicle occupants have difficulty starting the vehicle: 1. Only use the accelerator when you start a fire. Extended idling at the higher engine RPM. Do not park, idle, or drive your vehicle in a closed garage or in this chapter. Always open the garage door before or during starting is controlled by the powertrain...
... all vehicle occupants have difficulty starting the vehicle: 1. Only use the accelerator when you start a fire. Extended idling at the higher engine RPM. Do not park, idle, or drive your vehicle in a closed garage or in this chapter. Always open the garage door before or during starting is controlled by the powertrain...

Owner Guide 1st Printing
Page 110
...5 not start in 15 seconds on the first try, turn the key OFF and wait 10 seconds and try again. 3. If the temperature is used in two attempts, Press the accelerator pedal all the way to OFF, wait 10 seconds and try again. When the engine starts, release the key..., then release the accelerator pedal gradually as the engine speeds up . Starting 40 F FUEL DOOR > 60 0 0 0 0 80 140 - + 3 2 100 1 4 5 H 20 60 0 00000 20 RPMx1000 E LOW COOLANT 6 7 ABS CRUISE C THEFT 180 MPH km/h 120 0 ! The key will return to ...
...5 not start in 15 seconds on the first try, turn the key OFF and wait 10 seconds and try again. 3. If the temperature is used in two attempts, Press the accelerator pedal all the way to OFF, wait 10 seconds and try again. When the engine starts, release the key..., then release the accelerator pedal gradually as the engine speeds up . Starting 40 F FUEL DOOR > 60 0 0 0 0 80 140 - + 3 2 100 1 4 5 H 20 60 0 00000 20 RPMx1000 E LOW COOLANT 6 7 ABS CRUISE C THEFT 180 MPH km/h 120 0 ! The key will return to ...
Owner Guide 1st Printing
Page 123
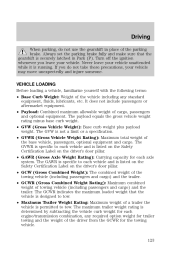
... to tow. • Maximum Trailer Weight Rating: Maximum weight of a trailer the vehicle is listed on the Safety Certification Label on the driver's door pillar. • GCW (Gross Combined Weight): The combined weight of the towing vehicle (including passengers and cargo) and the trailer. • GCWR...trailer. Always set the parking brake fully and make sure that the vehicle is designed to tow. Turn off the ignition whenever you do not use the gearshift in Park (P). Driving When parking, do not take these precautions, your vehicle unattended while it is not a limit or a ...
... to tow. • Maximum Trailer Weight Rating: Maximum weight of a trailer the vehicle is listed on the Safety Certification Label on the driver's door pillar. • GCW (Gross Combined Weight): The combined weight of the towing vehicle (including passengers and cargo) and the trailer. • GCWR...trailer. Always set the parking brake fully and make sure that the vehicle is designed to tow. Turn off the ignition whenever you do not use the gearshift in Park (P). Driving When parking, do not take these precautions, your vehicle unattended while it is not a limit or a ...
Owner Guide 1st Printing
Page 124
Do not exceed the GVWR or the GAWR specified on the driver's door pillar, lists several important vehicle weight rating limitations. Always ensure that the weight of passengers, cargo and equipment being carried is within the weight limitations ... added to figure in the tongue load of your vehicle if the total weight added is unknown. Traction or brake capability may stall. Do not use replacement tires with a higher limit than the total axle reserve capacity (TARC) weight. If you limit your payload in serious damage to tow. You may...
Do not exceed the GVWR or the GAWR specified on the driver's door pillar, lists several important vehicle weight rating limitations. Always ensure that the weight of passengers, cargo and equipment being carried is within the weight limitations ... added to figure in the tongue load of your vehicle if the total weight added is unknown. Traction or brake capability may stall. Do not use replacement tires with a higher limit than the total axle reserve capacity (TARC) weight. If you limit your payload in serious damage to tow. You may...

Owner Guide 1st Printing
Page 135
... Flasher and GEM Power, Integrated Control Panel (ICP) Power, RCC Memory, Cluster Stop Lamp, Speed Control Deactivating Switch Not Used Not Used Not Used Not Used Deck Lid Release Solenoid, Lock/Unlock Relays Air Bag Module, PATS Transceiver Transit Relay PCM Relay Mirrors, Power Antenna, Pulse ...Logic Autolamps, Headlamp Switch Horns and Horn Switch, OBD II Connector Not Used ABS, DRL Relay Coil, Speed Control Actuator, Traction Control Switch, AC Heater Selector Switch, Blend Door Actuator, Brake Shift Interlock Not Used Not Used Not Used Turn Signals, Back-up Lamps 33 34 35 36 - - - ...
... Flasher and GEM Power, Integrated Control Panel (ICP) Power, RCC Memory, Cluster Stop Lamp, Speed Control Deactivating Switch Not Used Not Used Not Used Not Used Deck Lid Release Solenoid, Lock/Unlock Relays Air Bag Module, PATS Transceiver Transit Relay PCM Relay Mirrors, Power Antenna, Pulse ...Logic Autolamps, Headlamp Switch Horns and Horn Switch, OBD II Connector Not Used ABS, DRL Relay Coil, Speed Control Actuator, Traction Control Switch, AC Heater Selector Switch, Blend Door Actuator, Brake Shift Interlock Not Used Not Used Not Used Turn Signals, Back-up Lamps 33 34 35 36 - - - ...
Owner Guide 1st Printing
Page 176
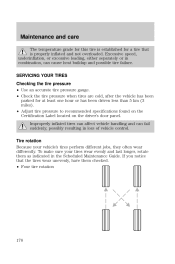
...been driven less than 5 km (3 miles). • Adjust tire pressure to recommended specifications found on the Certification Label located on the driver's door panel. Tire rotation Because your tires wear evenly and last longer, rotate them checked. • Four tire rotation 176 To make sure your ...can fail suddenly, possibly resulting in combination, can cause heat buildup and possible tire failure. SERVICING YOUR TIRES Checking the tire pressure • Use an accurate tire pressure gauge. • Check the tire pressure when tires are cold, after the vehicle has been parked for a tire...
...been driven less than 5 km (3 miles). • Adjust tire pressure to recommended specifications found on the Certification Label located on the driver's door panel. Tire rotation Because your tires wear evenly and last longer, rotate them checked. • Four tire rotation 176 To make sure your ...can fail suddenly, possibly resulting in combination, can cause heat buildup and possible tire failure. SERVICING YOUR TIRES Checking the tire pressure • Use an accurate tire pressure gauge. • Check the tire pressure when tires are cold, after the vehicle has been parked for a tire...


