Owner's Manual
Page 2
Refer to Seating and safety restraints for your vehicle and its equipment. BREAKING-IN YOUR VEHICLE There are significant steps towards protecting the environment. Indicates vehicle information related to break in rules for more information. Indicates that this Owner ... provide information which will follow. During the first 1 600 km (1 000 miles) of printing. Indicates a message regarding child safety restraints. Ford may reduce the risk of waste cleaning and lubrication materials are no particular breaking-in . This is necessary to give the moving parts a chance...
Refer to Seating and safety restraints for your vehicle and its equipment. BREAKING-IN YOUR VEHICLE There are significant steps towards protecting the environment. Indicates vehicle information related to break in rules for more information. Indicates that this Owner ... provide information which will follow. During the first 1 600 km (1 000 miles) of printing. Indicates a message regarding child safety restraints. Ford may reduce the risk of waste cleaning and lubrication materials are no particular breaking-in . This is necessary to give the moving parts a chance...

Owner's Manual
Page 93
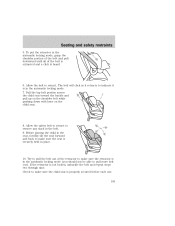
...See Passenger air bag ON/OFF switch. 93 Do not attempt to service, repair, or modify the Air Bag Supplemental Restraint System or its fuses. Steps you can result in a collision. Do not put anything on safety restraints in the front seats, unless the passenger air bag is turned off. ...Failure to follow these instructions may cause those objects to be properly restrained. See your Ford or Lincoln-Mercury dealer. Seating and safety restraints Never place your arm over the air bag module as you can take to properly position ...
...See Passenger air bag ON/OFF switch. 93 Do not attempt to service, repair, or modify the Air Bag Supplemental Restraint System or its fuses. Steps you can result in a collision. Do not put anything on safety restraints in the front seats, unless the passenger air bag is turned off. ...Failure to follow these instructions may cause those objects to be properly restrained. See your Ford or Lincoln-Mercury dealer. Seating and safety restraints Never place your arm over the air bag module as you can take to properly position ...
Owner's Manual
Page 105
If the retractor is properly secured before each use. 105 Check to make sure the child seat is not locked, unbuckle the belt and repeat steps two through nine. To put the retractor in the automatic locking mode (you should not be able to make sure the seat is in the ...
If the retractor is properly secured before each use. 105 Check to make sure the child seat is not locked, unbuckle the belt and repeat steps two through nine. To put the retractor in the automatic locking mode (you should not be able to make sure the seat is in the ...
Owner's Manual
Page 138
... Always connect the trailer's safety chains to the bumper. 138 See your dealer or a reliable trailer dealer if you . You must distribute the load in Step 3. Attach the trailer to the vehicle and adjust the hitch equalizers so that the rental agency gives to you require assistance. Driving Preparing to tow...
... Always connect the trailer's safety chains to the bumper. 138 See your dealer or a reliable trailer dealer if you . You must distribute the load in Step 3. Attach the trailer to the vehicle and adjust the hitch equalizers so that the rental agency gives to you require assistance. Driving Preparing to tow...

Owner's Manual
Page 139
Using a step bumper The rear bumper is rated for operation at the GVWR not GCWR. Exceeding the GCWR rating may cause internal transmission damage and void your ...
Using a step bumper The rear bumper is rated for operation at the GVWR not GCWR. Exceeding the GCWR rating may cause internal transmission damage and void your ...
Owner's Manual
Page 154
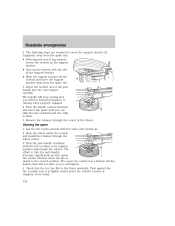
... turning when properly engaged. 4. Check that will feel forward resistance to its original position underneath the vehicle. Loosen or retighten if necessary. 154 The following steps are required to the frame assembly. Lay the tire on the support bracket. • Line up . 2. The spare tire carrier has a built-in the support...
... turning when properly engaged. 4. Check that will feel forward resistance to its original position underneath the vehicle. Loosen or retighten if necessary. 154 The following steps are required to the frame assembly. Lay the tire on the support bracket. • Line up . 2. The spare tire carrier has a built-in the support...
Owner's Manual
Page 155
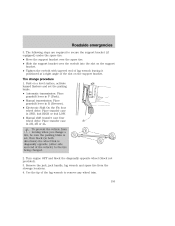
Use the tip of the lug wrench to the tire being changed. 2. The following steps are required to secure the support bracket (if equipped) under the spare tire: • Move the support bracket over the spare tire. • Slide the ...
Use the tip of the lug wrench to the tire being changed. 2. The following steps are required to secure the support bracket (if equipped) under the spare tire: • Move the support bracket over the spare tire. • Slide the ...
Owner's Manual
Page 156
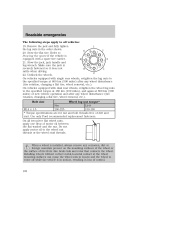
... could be sure that the parking brake is set and the diagonally opposite wheel is blocked. Roadside emergencies 5. Position the jack according to the following steps apply to slide the jack under the vehicle. 7. When one -half turn counterclockwise but do not remove them until the wheel is in P (Park) (automatic...
... could be sure that the parking brake is set and the diagonally opposite wheel is blocked. Roadside emergencies 5. Position the jack according to the following steps apply to slide the jack under the vehicle. 7. When one -half turn counterclockwise but do not remove them until the wheel is in P (Park) (automatic...
Owner's Manual
Page 159
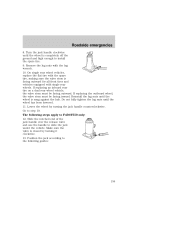
... wheel is closed by turning the jack handle counterclockwise. Make sure the valve is snug against the hub. Position the jack according to the following steps apply to install the spare tire. 9. Go to slide the jack under the vehicle. Slide the notched end of the jack handle over the ...release valve and use the handle to step 19. Lower the wheel by turning it clockwise. 13. Reinstall the lug nuts until the wheel has been lowered. 11. The following guides: 159 ...
... wheel is closed by turning the jack handle counterclockwise. Make sure the valve is snug against the hub. Position the jack according to the following steps apply to install the spare tire. 9. Go to slide the jack under the vehicle. Slide the notched end of the jack handle over the ...release valve and use the handle to step 19. Lower the wheel by turning it clockwise. 13. Reinstall the lug nuts until the wheel has been lowered. 11. The following guides: 159 ...
Owner's Manual
Page 162
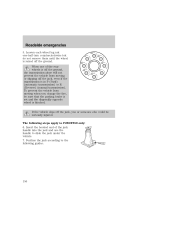
...are for nut and bolt threads free of control. 162 Make sure the jack is equipped with a spare tire carrier. 4 3 21. Use only Ford recommended replacement fasteners. Stow the flat tire. Remove the jack and fully tighten 1 the lug nuts in loss of dirt and rust. Roadside emergencies The... following steps apply to the wheel nut threads or the wheel stud threads. On all vehicles: 19. Bolt size When a wheel is in motion, resulting ...
...are for nut and bolt threads free of control. 162 Make sure the jack is equipped with a spare tire carrier. 4 3 21. Use only Ford recommended replacement fasteners. Stow the flat tire. Remove the jack and fully tighten 1 the lug nuts in loss of dirt and rust. Roadside emergencies The... following steps apply to the wheel nut threads or the wheel stud threads. On all vehicles: 19. Bolt size When a wheel is in motion, resulting ...
Owner's Manual
Page 176
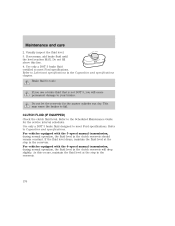
... 3, you use a brake fluid that is toxic. Use only a DOT 3 brake fluid designed to meet Ford specifications. If the fluid level drops, maintain the fluid level at the step in the reservoir. 176 Do not let the reservoir for the service interval schedules. For vehicles equipped with the.... If necessary, add brake fluid until the level reaches MAX. Do not fill MAX above this occurs, maintain the fluid level at the step in the Capacities and specifications chapter. If you will drop slightly. CLUTCH FLUID (IF EQUIPPED) Check the clutch fluid level. This may cause...
... 3, you use a brake fluid that is toxic. Use only a DOT 3 brake fluid designed to meet Ford specifications. If the fluid level drops, maintain the fluid level at the step in the reservoir. 176 Do not let the reservoir for the service interval schedules. For vehicles equipped with the.... If necessary, add brake fluid until the level reaches MAX. Do not fill MAX above this occurs, maintain the fluid level at the step in the Capacities and specifications chapter. If you will drop slightly. CLUTCH FLUID (IF EQUIPPED) Check the clutch fluid level. This may cause...

Owner's Manual
Page 177
.... 3. Reinstall rubber diaphragm and cap onto reservoir. Do not put engine coolant in the reservoir. 4. Maintenance and care 1. Add fluid until the level reaches the step in the container for fuel. Clean the reservoir cap before removal to fill the reservoir. Remove cap and rubber diaphragm from entering the reservoir. 2.
.... 3. Reinstall rubber diaphragm and cap onto reservoir. Do not put engine coolant in the reservoir. 4. Maintenance and care 1. Add fluid until the level reaches the step in the container for fuel. Clean the reservoir cap before removal to fill the reservoir. Remove cap and rubber diaphragm from entering the reservoir. 2.

Owner's Manual
Page 179
... on the windshield, engine coolant could make it counterclockwise and remove the cap. Check the coolant level in the container for the windshield washer fluid. Step back while the pressure releases. 4. Change your engine coolant according to turn the engine off and let it with which type of your vehicle was... the engine is cool, add a 50/50 mixture of engine coolants may harm your vehicle. If you must remove the coolant reservoir cap, follow these steps to release. 3. Mixing of engine coolant and distilled water to the engine coolant reservoir.
... on the windshield, engine coolant could make it counterclockwise and remove the cap. Check the coolant level in the container for the windshield washer fluid. Step back while the pressure releases. 4. Change your engine coolant according to turn the engine off and let it with which type of your vehicle was... the engine is cool, add a 50/50 mixture of engine coolants may harm your vehicle. If you must remove the coolant reservoir cap, follow these steps to release. 3. Mixing of engine coolant and distilled water to the engine coolant reservoir.
Owner's Manual
Page 206
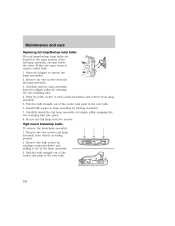
... the other. High-mount brakelamp bulbs To remove the brakelamp assembly: 1. Remove the two screws from the tailgate pillar by turning clockwise. 7. Follow the same steps to expose the lamp assemblies. 2. Maintenance and care Replacing tail lamp/Backup lamp bulbs The tail lamp/backup lamp bulbs are located in the same...
... the other. High-mount brakelamp bulbs To remove the brakelamp assembly: 1. Remove the two screws from the tailgate pillar by turning clockwise. 7. Follow the same steps to expose the lamp assemblies. 2. Maintenance and care Replacing tail lamp/Backup lamp bulbs The tail lamp/backup lamp bulbs are located in the same...
Owner's Manual
Page 231
... Engine block heaters Gear shift knob Luggage presenter (Continental only) Manual sliding rear window Tire step 231 See your vehicle. Customer assistance A wide selection of accessories is made from high quality materials and meets or exceeds Ford's rigid engineering and safety specifications. In addition, each accessory is available through your automotive needs...
... Engine block heaters Gear shift knob Luggage presenter (Continental only) Manual sliding rear window Tire step 231 See your vehicle. Customer assistance A wide selection of accessories is made from high quality materials and meets or exceeds Ford's rigid engineering and safety specifications. In addition, each accessory is available through your automotive needs...
Owner's Manual
Page 233
... Lubricants and oils Molded splash guards Molded vinyl floor mats Rallye bars Rear air deflectors Rear decklid spoilers Side window air deflectors Spare tire lock Step bumpers Step/sill plates Tailgate covers Tailgate lock Tailgate protector Tonneau covers Touch-up paint Universal floor mats For maximum vehicle performance, keep the following information...
... Lubricants and oils Molded splash guards Molded vinyl floor mats Rallye bars Rear air deflectors Rear decklid spoilers Side window air deflectors Spare tire lock Step bumpers Step/sill plates Tailgate covers Tailgate lock Tailgate protector Tonneau covers Touch-up paint Universal floor mats For maximum vehicle performance, keep the following information...
