Customer Assistance Guide 1st Printing
Page 9
...to the nearest Ford affiliate office. These quality accessories have been specifically engineered to clean your vehicle. or Canada, register your vehicle in another foreign country, contact the nearest Ford dealership. If you...Ford Custom Clearcoat Polish Ford Custom Silicone Gloss Polish Ford Custom Vinyl Protectant Ford Deluxe Leather and Vinyl Cleaner Ford Extra Strength Tar and Road Oil Remover Ford Extra Strength Upholstery Cleaner Ford Metal Surface Cleaner Ford Multi-Purpose Cleaner Ford Spot and Stain Remover Ford Super Premium Tire and Trim Dressing Ford Triple Clean Ford...
...to the nearest Ford affiliate office. These quality accessories have been specifically engineered to clean your vehicle. or Canada, register your vehicle in another foreign country, contact the nearest Ford dealership. If you...Ford Custom Clearcoat Polish Ford Custom Silicone Gloss Polish Ford Custom Vinyl Protectant Ford Deluxe Leather and Vinyl Cleaner Ford Extra Strength Tar and Road Oil Remover Ford Extra Strength Upholstery Cleaner Ford Metal Surface Cleaner Ford Multi-Purpose Cleaner Ford Spot and Stain Remover Ford Super Premium Tire and Trim Dressing Ford Triple Clean Ford...
Owner Guide 1st Printing
Page 14
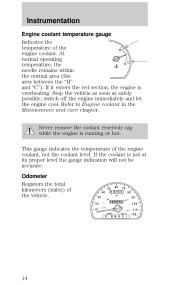
... MPH km/h P R N D 2 1 14 Odometer Registers the total kilometers (miles) of the H engine coolant. Refer to Engine coolant in the Maintenance and care chapter. Never remove the coolant reservoir cap while the engine is running or hot. This gauge indicates the temperature of the engine coolant, not the coolant level. At normal operating C temperature, the needle...
... MPH km/h P R N D 2 1 14 Odometer Registers the total kilometers (miles) of the H engine coolant. Refer to Engine coolant in the Maintenance and care chapter. Never remove the coolant reservoir cap while the engine is running or hot. This gauge indicates the temperature of the engine coolant, not the coolant level. At normal operating C temperature, the needle...
Owner Guide 1st Printing
Page 28
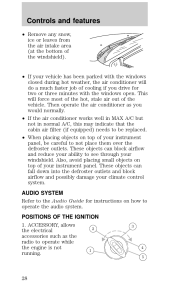
... fall down into the defroster outlets and block airflow and possibly damage your instrument panel, be careful to operate while the engine is not 1 running. 3 4 5 28 Controls and features • Remove any snow, ice or leaves from the air intake area (at the bottom of the windshield). • If your vehicle has...
... fall down into the defroster outlets and block airflow and possibly damage your instrument panel, be careful to operate while the engine is not 1 running. 3 4 5 28 Controls and features • Remove any snow, ice or leaves from the air intake area (at the bottom of the windshield). • If your vehicle has...

Owner Guide 1st Printing
Page 29
Release the key as soon as the engine starts. SPEED CONTROL (IF EQUIPPED) To turn speed control on roads that are winding, slippery, or unpaved. Vehicle speed cannot be controlled until the vehicle ... and features 2. ON, all accessories without locking the steering wheel. 4. Warning lights illuminated. LOCK, locks the steering wheel, automatic transmission gearshift lever and allows key removal. 3. START, cranks the engine. ON OFF Do not use the speed control in heavy traffic or on • Press ON. OFF, shuts off the...
Release the key as soon as the engine starts. SPEED CONTROL (IF EQUIPPED) To turn speed control on roads that are winding, slippery, or unpaved. Vehicle speed cannot be controlled until the vehicle ... and features 2. ON, all accessories without locking the steering wheel. 4. Warning lights illuminated. LOCK, locks the steering wheel, automatic transmission gearshift lever and allows key removal. 3. START, cranks the engine. ON OFF Do not use the speed control in heavy traffic or on • Press ON. OFF, shuts off the...
Owner Guide 1st Printing
Page 122
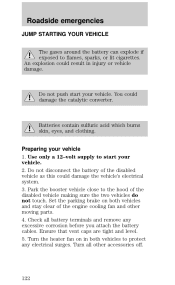
... attach the battery cables. You could result in both vehicles and stay clear of the engine cooling fan and other accessories off. 122 Ensure that vent caps are tight and level. 5. Turn all battery terminals and remove any electrical surges. Set the parking brake on in injury or vehicle damage. Do not...
... attach the battery cables. You could result in both vehicles and stay clear of the engine cooling fan and other accessories off. 122 Ensure that vent caps are tight and level. 5. Turn all battery terminals and remove any electrical surges. Set the parking brake on in injury or vehicle damage. Do not...
Owner Guide 1st Printing
Page 125
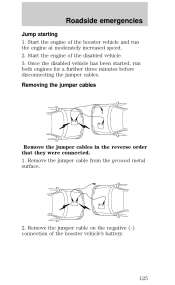
Once the disabled vehicle has been started, run the engine at moderately increased speed. 2. Removing the jumper cables Remove the jumper cables in the reverse order that they were connected. 1. Remove the jumper cable on the negative (-) connection of the disabled vehicle. 3. Roadside emergencies Jump starting 1. Start the engine of the booster vehicle's battery. - - - - + + + + 125 Remove the jumper cable from the ground metal surface. 2. Start the engine of the booster vehicle and run both engines for a further three minutes before disconnecting the jumper cables.
Once the disabled vehicle has been started, run the engine at moderately increased speed. 2. Removing the jumper cables Remove the jumper cables in the reverse order that they were connected. 1. Remove the jumper cable on the negative (-) connection of the disabled vehicle. 3. Roadside emergencies Jump starting 1. Start the engine of the booster vehicle's battery. - - - - + + + + 125 Remove the jumper cable from the ground metal surface. 2. Start the engine of the booster vehicle and run both engines for a further three minutes before disconnecting the jumper cables.
Owner Guide 1st Printing
Page 126
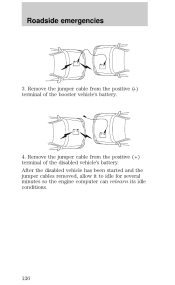
Remove the jumper cable from the positive (+) terminal of the booster vehicle's battery. 4. Remove the jumper cable from the positive ( +) terminal of the disabled vehicle's battery. After the disabled vehicle has been started and the jumper cables removed, allow it to idle for several minutes so the engine computer can relearn its idle conditions. 126 - - - + + - + + Roadside emergencies 3.
Remove the jumper cable from the positive (+) terminal of the booster vehicle's battery. 4. Remove the jumper cable from the positive ( +) terminal of the disabled vehicle's battery. After the disabled vehicle has been started and the jumper cables removed, allow it to idle for several minutes so the engine computer can relearn its idle conditions. 126 - - - + + - + + Roadside emergencies 3.

Owner Guide 1st Printing
Page 129
Maintenance and care 2. Turn off the engine and remove the key. 3. Lift the hood until the lift cylinders hold it while the engine is securely latched in P (Park). 2. Block the wheels to prevent the vehicle from moving unexpectedly. OPENING THE HOOD 1. Set the parking brake and ensure...located under the front center of the instrument panel. 2. Go to prevent the vehicle from moving unexpectedly. Working with the air cleaner removed and do not remove it open. 129 Block the wheels to the front of the vehicle and release the auxiliary latch that is located under the bottom ...
Maintenance and care 2. Turn off the engine and remove the key. 3. Lift the hood until the lift cylinders hold it while the engine is securely latched in P (Park). 2. Block the wheels to prevent the vehicle from moving unexpectedly. OPENING THE HOOD 1. Set the parking brake and ensure...located under the front center of the instrument panel. 2. Go to prevent the vehicle from moving unexpectedly. Working with the air cleaner removed and do not remove it open. 129 Block the wheels to the front of the vehicle and release the auxiliary latch that is located under the bottom ...

Owner Guide 1st Printing
Page 133
ADD 1 QT MIN FULL MAX 6. Open the hood. Turn the engine off and wait a few minutes for checking the engine oil . 1. Locate and carefully remove the engine oil indicator (dipstick). Insert the indicator fully, then remove it again. • If the oil level is between the ADD and FULL ...sure the vehicle is on application), the oil level is securely latched in P. 4. Protect yourself from engine heat. 5. Wipe the indicator clean. Maintenance and care ENGINE OIL Checking the engine oil Refer to the ЉService GuideЉ for the appropriate intervals for the oil to drain...
ADD 1 QT MIN FULL MAX 6. Open the hood. Turn the engine off and wait a few minutes for checking the engine oil . 1. Locate and carefully remove the engine oil indicator (dipstick). Insert the indicator fully, then remove it again. • If the oil level is between the ADD and FULL ...sure the vehicle is on application), the oil level is securely latched in P. 4. Protect yourself from engine heat. 5. Wipe the indicator clean. Maintenance and care ENGINE OIL Checking the engine oil Refer to the ЉService GuideЉ for the appropriate intervals for the oil to drain...

Owner Guide 1st Printing
Page 134
... range, add only certified engine oil of the recommended viscosity. Maintenance and care • If the oil level is not above the MAX mark, may cause engine damage. For instructions, refer to pour the engine oil into the opening. 3. Adding engine oil 1. Remove the engine oil filler cap and use... a funnel to Checking the engine oil in FULL mark on the dipstick. 134 Some oil must...
... range, add only certified engine oil of the recommended viscosity. Maintenance and care • If the oil level is not above the MAX mark, may cause engine damage. For instructions, refer to pour the engine oil into the opening. 3. Adding engine oil 1. Remove the engine oil filler cap and use... a funnel to Checking the engine oil in FULL mark on the dipstick. 134 Some oil must...

Owner Guide 1st Printing
Page 139
... cap counterclockwise until pressure begins to your vehicle originally equipped with orange coolant, use supplemental coolant 139 Slowly turn the engine off and let it counterclockwise and remove the cap. Step back while the pressure releases. 4. Do not use Ford Extended Life Engine Coolant F6AZ-19544-AA or a DEX-COOL equivalent that meets...
... cap counterclockwise until pressure begins to your vehicle originally equipped with orange coolant, use supplemental coolant 139 Slowly turn the engine off and let it counterclockwise and remove the cap. Step back while the pressure releases. 4. Do not use Ford Extended Life Engine Coolant F6AZ-19544-AA or a DEX-COOL equivalent that meets...
Owner Guide 1st Printing
Page 143
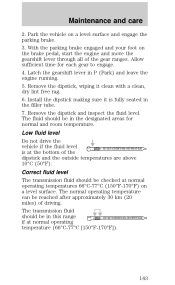
...on a level surface and engage the parking brake. 3. Park the vehicle on a level surface. Allow sufficient time for normal and room temperature. Remove the dipstick and inspect the fluid level. The normal operating temperature can be in the filler tube. 7. Maintenance and care 2. Correct fluid level The... operating temperature (66°C-77°C [150°F-170°F]). 143 The fluid should be in P (Park) and leave the engine running. 5. With the parking brake engaged and your foot on the brake pedal, start the engine and move the gearshift lever through all of driving.
...on a level surface and engage the parking brake. 3. Park the vehicle on a level surface. Allow sufficient time for normal and room temperature. Remove the dipstick and inspect the fluid level. The normal operating temperature can be in the filler tube. 7. Maintenance and care 2. Correct fluid level The... operating temperature (66°C-77°C [150°F-170°F]). 143 The fluid should be in P (Park) and leave the engine running. 5. With the parking brake engaged and your foot on the brake pedal, start the engine and move the gearshift lever through all of driving.

Owner Guide 1st Printing
Page 156
.../off . 156 The toxic effects of alcoholism. If fuel is splashed on the skin and/or clothing, promptly remove contaminated clothing and wash skin thoroughly with soap and water. Consult a physician immediately if you are immediately apparent....breathing of any kind can cause serious illness and permanent injury. • Avoid getting fuel liquid in the eyes, remove contact lenses (if worn), flush with fuel liquid or vapor causes skin irritation. • Be particularly careful if ...to seek proper medical attention could cause an adverse reaction. Turn the engine off feature.
.../off . 156 The toxic effects of alcoholism. If fuel is splashed on the skin and/or clothing, promptly remove contaminated clothing and wash skin thoroughly with soap and water. Consult a physician immediately if you are immediately apparent....breathing of any kind can cause serious illness and permanent injury. • Avoid getting fuel liquid in the eyes, remove contact lenses (if worn), flush with fuel liquid or vapor causes skin irritation. • Be particularly careful if ...to seek proper medical attention could cause an adverse reaction. Turn the engine off feature.

Owner Guide 1st Printing
Page 157
...you start the engine, the fuel filler cap may be properly installed. Otherwise, fuel may be under pressure. To install the cap, align the tabs on the cap with an authorized Motorcraft part. Turn the filler cap clockwise 1/8 of a turn until it being careful to remove the cap ...on when you or others. Pull to align the cap properly. If the "Service Engine Soon/Check Engine " indicator comes on and stays on the filler pipe. 5. If you hear a hissing sound, wait until it stops. 3. Turn off the engine, remove the fuel filler cap and reinstall it stops before completely...
...you start the engine, the fuel filler cap may be properly installed. Otherwise, fuel may be under pressure. To install the cap, align the tabs on the cap with an authorized Motorcraft part. Turn the filler cap clockwise 1/8 of a turn until it being careful to remove the cap ...on when you or others. Pull to align the cap properly. If the "Service Engine Soon/Check Engine " indicator comes on and stays on the filler pipe. 5. If you hear a hissing sound, wait until it stops. 3. Turn off the engine, remove the fuel filler cap and reinstall it stops before completely...

Owner Guide 1st Printing
Page 162
... started, do not turn off the engine until the above driving cycle. If your "Warranty Guide" for I /M test of vehicles are not permitted to pass an I /M test" condition. Your vehicle may be a legal requirement to intentionally remove an emission control device or prevent it may not pass the I/M test with at least...
... started, do not turn off the engine until the above driving cycle. If your "Warranty Guide" for I /M test of vehicles are not permitted to pass an I /M test" condition. Your vehicle may be a legal requirement to intentionally remove an emission control device or prevent it may not pass the I/M test with at least...
Owner Guide 1st Printing
Page 170
...brakes several times to remove grease and tar. Waxing your vehicle. Remove particles such as the body of special wheel surfaces. Use a tar remover to dry them. Cleaning the engine Engines are more efficient when they are clean because grease and dirt buildup keep the engine warmer than normal.... the wiper blades and windshield. Cleaning the wheels Wash with touch-up paint, repair foil or aerosol paint spray from the Ford accessory line. Never use acid-based or alcohol-based wheel cleaners, steel wool, fuel or strong detergents. Observe the application instructions...
...brakes several times to remove grease and tar. Waxing your vehicle. Remove particles such as the body of special wheel surfaces. Use a tar remover to dry them. Cleaning the engine Engines are more efficient when they are clean because grease and dirt buildup keep the engine warmer than normal.... the wiper blades and windshield. Cleaning the wheels Wash with touch-up paint, repair foil or aerosol paint spray from the Ford accessory line. Never use acid-based or alcohol-based wheel cleaners, steel wool, fuel or strong detergents. Observe the application instructions...

Owner Guide 1st Printing
Page 172
...After the cleaning is running; Cleaning the engine Cover the underhood electrical connections and terminals of time can corrode them and result in the running engine may cause internal damage. Do not clean plastic parts with a tar remover if necessary. Clean with thinners, solvents or... petroleum-based cleaners. 172 Maintenance and care • 3.0L Duratec engine V8 32 VALVE • 3.4L SHO engine • Never wash or rinse the engine while it is completed and with the engine not running, remove the protective ...
...After the cleaning is running; Cleaning the engine Cover the underhood electrical connections and terminals of time can corrode them and result in the running engine may cause internal damage. Do not clean plastic parts with a tar remover if necessary. Clean with thinners, solvents or... petroleum-based cleaners. 172 Maintenance and care • 3.0L Duratec engine V8 32 VALVE • 3.4L SHO engine • Never wash or rinse the engine while it is completed and with the engine not running, remove the protective ...

Owner Guide 1st Printing
Page 176
... V8 SHO engine FA-1630 FG-800-A BXT-36R N/A FA-1628 FL-400-S EV-234 AWSF-32FM * Refer to be reinstalled in the same cylinder. If a spark plug needs to Vehicle Emissions Control Information (VECI) decal for spark plug gap information. ** If a spark plug is removed for inspection..., it must be replaced, use only spark plugs with the service part number suffix letter ЉPPЉ as shown on the engine decal. 176 Cylinders No. 1, 2 and 3 have a "P" suffix.
... V8 SHO engine FA-1630 FG-800-A BXT-36R N/A FA-1628 FL-400-S EV-234 AWSF-32FM * Refer to be reinstalled in the same cylinder. If a spark plug needs to Vehicle Emissions Control Information (VECI) decal for spark plug gap information. ** If a spark plug is removed for inspection..., it must be replaced, use only spark plugs with the service part number suffix letter ЉPPЉ as shown on the engine decal. 176 Cylinders No. 1, 2 and 3 have a "P" suffix.


