

Owner Manual
Page 11
IF EQUIPPED ...▫ Keyless Ignition Node (KIN) ...12 ▫ Rearming Of The System ...▫ Key Fob ...13 ▫ To Arm The System ...▫ Ignition Or Accessory On Message ...14 ▫ To Disarm The System ...Ⅵ SENTRY KEY® ...16 ▫ Security System Manual Override . ▫ Replacement Keys ...17 Ⅵ ILLUMINATED ENTRY ...&#...
IF EQUIPPED ...▫ Keyless Ignition Node (KIN) ...12 ▫ Rearming Of The System ...▫ Key Fob ...13 ▫ To Arm The System ...▫ Ignition Or Accessory On Message ...14 ▫ To Disarm The System ...Ⅵ SENTRY KEY® ...16 ▫ Security System Manual Override . ▫ Replacement Keys ...17 Ⅵ ILLUMINATED ENTRY ...&#...

Owner Manual
Page 15
THINGS TO KNOW BEFORE STARTING YOUR VEHICLE 13 Key Fob The Key Fob also contains the Remote Keyless Entry (RKE) transmitter and an emergency key, which stores in the vehicle or the Key Fob go dead. OFF 2 - You can keep the emergency key with you when valet parking. 2 Keyless Ignition Node (KIN) 1 - The emergency key allows for locking the glove box. The emergency key is also for entry into the vehicle should the battery in the rear of the Key Fob. ACC (ACCESSORY) 3 - ON/RUN
THINGS TO KNOW BEFORE STARTING YOUR VEHICLE 13 Key Fob The Key Fob also contains the Remote Keyless Entry (RKE) transmitter and an emergency key, which stores in the vehicle or the Key Fob go dead. OFF 2 - You can keep the emergency key with you when valet parking. 2 Keyless Ignition Node (KIN) 1 - The emergency key allows for locking the glove box. The emergency key is also for entry into the vehicle should the battery in the rear of the Key Fob. ACC (ACCESSORY) 3 - ON/RUN

Owner Manual
Page 16
... will remain active for up . ON (engine not running), a chime will sound to remind you to cycle the ignition to the chime, the ignition or accessory on the back of the Key Fob sideways with your other hand. Opening either side up to 10 minutes after the ignition is cycled to...'s door when the ignition is programmable. 14 THINGS TO KNOW BEFORE STARTING YOUR VEHICLE To remove the emergency key, slide the mechanical latch Ignition Or Accessory On Message on message will display in the cluster. In addition to OFF. The time for further information.
... will remain active for up . ON (engine not running), a chime will sound to remind you to cycle the ignition to the chime, the ignition or accessory on the back of the Key Fob sideways with your other hand. Opening either side up to 10 minutes after the ignition is cycled to...'s door when the ignition is programmable. 14 THINGS TO KNOW BEFORE STARTING YOUR VEHICLE To remove the emergency key, slide the mechanical latch Ignition Or Accessory On Message on message will display in the cluster. In addition to OFF. The time for further information.

Owner Manual
Page 68
... the knee bolster in a collision severe enough to cause the air bag to inflate. • Do not put anything on the instrument panel, because any accessories to the knee bolster such as alarm lights, stereos, citizen band radios, etc. The protective covers for the air bag cushions are designed to help...
... the knee bolster in a collision severe enough to cause the air bag to inflate. • Do not put anything on the instrument panel, because any accessories to the knee bolster such as alarm lights, stereos, citizen band radios, etc. The protective covers for the air bag cushions are designed to help...
Owner Manual
Page 70
... and/or objects could cause you to be severely injured or killed. The area where the SABIC is located should remain free from any accessory items installed which will open during air bag deployment. • Being too close to the SAB and SABIC air bags during impacts that...8226; Your vehicle is equipped with left and right Supplemental Side Air Bag Inflatable Curtain (SABIC), do not have any obstructions. • Do not use accessory seat covers or place objects between you , causing serious injury. WARNING! • Your vehicle is equipped with SABIC air bags, do not stack luggage...
... and/or objects could cause you to be severely injured or killed. The area where the SABIC is located should remain free from any accessory items installed which will open during air bag deployment. • Being too close to the SAB and SABIC air bags during impacts that...8226; Your vehicle is equipped with left and right Supplemental Side Air Bag Inflatable Curtain (SABIC), do not have any obstructions. • Do not use accessory seat covers or place objects between you , causing serious injury. WARNING! • Your vehicle is equipped with SABIC air bags, do not stack luggage...
Owner Manual
Page 78
... anyone who works on your air bag system. If your seat, including your authorized dealer. Be sure to fail when you . Only manufacturer approved seat accessories may not function properly if modifications are made.
... anyone who works on your air bag system. If your seat, including your authorized dealer. Be sure to fail when you . Only manufacturer approved seat accessories may not function properly if modifications are made.
Owner Manual
Page 267
CAUTION! • Do not exceed the maximum power of 160 Watts (13 Amps) at 12 Volts. • Power outlets are designed for accessory plugs only. The combined usage must be replaced. • The power outlet on the bottom of the center console shares the fuse with the power ...
CAUTION! • Do not exceed the maximum power of 160 Watts (13 Amps) at 12 Volts. • Power outlets are designed for accessory plugs only. The combined usage must be replaced. • The power outlet on the bottom of the center console shares the fuse with the power ...

Owner Manual
Page 268
...with greater caution. • After the use (i.e., cellular phones, etc.). Do not hang any 12 Volt outlet. • Do not touch with accessories still plugged in), the vehicle must be driven a sufficient length of outlet should be plugged in draw power from the vehicle's battery, even when ...) CAUTION! (Continued) enough, the vehicle's battery will degrade the battery even more quickly. Eventually, if plugged in use of high power draw accessories, or long periods of the vehicle not being started (with wet hands. • Close the lid when not in this outlet is mishandled, it...
...with greater caution. • After the use (i.e., cellular phones, etc.). Do not hang any 12 Volt outlet. • Do not touch with accessories still plugged in), the vehicle must be driven a sufficient length of outlet should be plugged in draw power from the vehicle's battery, even when ...) CAUTION! (Continued) enough, the vehicle's battery will degrade the battery even more quickly. Eventually, if plugged in use of high power draw accessories, or long periods of the vehicle not being started (with wet hands. • Close the lid when not in this outlet is mishandled, it...

Owner Manual
Page 288
286 UNDERSTANDING THE FEATURES OF YOUR VEHICLE ROOF LUGGAGE RACK - IF EQUIPPED The roof rack cross rails and side rails are offered by MOPAR® accessories. Attempt to move the cross rail to carry cargo weight. rail in position. Be sure the clamp tooth engages completely into the side rail slot. ...
286 UNDERSTANDING THE FEATURES OF YOUR VEHICLE ROOF LUGGAGE RACK - IF EQUIPPED The roof rack cross rails and side rails are offered by MOPAR® accessories. Attempt to move the cross rail to carry cargo weight. rail in position. Be sure the clamp tooth engages completely into the side rail slot. ...

Owner Manual
Page 396
... RUN position 30 minutes of the PARK position, or it could roll. To change the ignition switch positions without starting the vehicle and use the accessories follow these steps. • Starting with the ignition switch in • Press the ENGINE START/STOP button a second time PARK, the system will automatically time...
... RUN position 30 minutes of the PARK position, or it could roll. To change the ignition switch positions without starting the vehicle and use the accessories follow these steps. • Starting with the ignition switch in • Press the ENGINE START/STOP button a second time PARK, the system will automatically time...

Owner Manual
Page 516
... and bracelets that can burn your skin or eyes and generate hydrogen gas which is raised. Turn off the heater, radio, and all unnecessary electrical accessories. 3. Remove the protective cover over the remote positive (+) battery post. 514 WHAT TO DO IN EMERGENCIES WARNING! • Take care to avoid the radiator cooling...
... and bracelets that can burn your skin or eyes and generate hydrogen gas which is raised. Turn off the heater, radio, and all unnecessary electrical accessories. 3. Remove the protective cover over the remote positive (+) battery post. 514 WHAT TO DO IN EMERGENCIES WARNING! • Take care to avoid the radiator cooling...

Owner Manual
Page 518
... at your authorized dealer. 6. Disconnect the negative (-) jumper cable from the negative (-) post of the booster battery. Disconnect the negative end (-) of the jumper cable Accessories plugged into the vehicle power outlets draw power from the vehicle's battery, even when not from the remote negative (-) post of the discharged vehicle. Disconnect...
... at your authorized dealer. 6. Disconnect the negative (-) jumper cable from the negative (-) post of the booster battery. Disconnect the negative end (-) of the jumper cable Accessories plugged into the vehicle power outlets draw power from the vehicle's battery, even when not from the remote negative (-) post of the discharged vehicle. Disconnect...

Owner Manual
Page 522
... a flat bed truck, do not attach to bumpers or associated brackets. Acceptable methods are to your vehicle may result. CAUTION! • Do not use the accessories (wipers, defrosters, etc.) while being towed, the ignition must be observed. The manufacturer requires towing with another vehicle as damage to your vehicle. Use only...
... a flat bed truck, do not attach to bumpers or associated brackets. Acceptable methods are to your vehicle may result. CAUTION! • Do not use the accessories (wipers, defrosters, etc.) while being towed, the ignition must be observed. The manufacturer requires towing with another vehicle as damage to your vehicle. Use only...

Owner Manual
Page 538
Do not use a "fast charger" to provide starting voltage. Do not use a booster battery or any other . • Battery posts, terminals, and related accessories contain lead and lead compounds. Do not lean over a battery when attaching clamps. If acid splashes in the vehicle, disconnect both vehicle battery cables before ...
Do not use a "fast charger" to provide starting voltage. Do not use a booster battery or any other . • Battery posts, terminals, and related accessories contain lead and lead compounds. Do not lean over a battery when attaching clamps. If acid splashes in the vehicle, disconnect both vehicle battery cables before ...

Owner Manual
Page 570
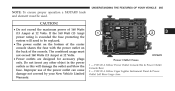
Cavity F101 F102 F103 F105 Cartridge Fuse 60 Amp Yellow 60 Amp Yellow 60 Amp Yellow 60 Amp Yellow 60 Amp Yellow MiniFuse Description Interior Power Distribution Center Rail Interior Power Distribution Center Rail Interior Power Distribution Center Rail Interior Power Distribution Center Rail Ignition Run Relay Interior Power Distribution Center Rail Run/Accessory Relays F106 Power Distribution Center 568 MAINTAINING YOUR VEHICLE Underhood Fuses (Power Distribution Center) The power distribution center is located in the engine compartment.
Cavity F101 F102 F103 F105 Cartridge Fuse 60 Amp Yellow 60 Amp Yellow 60 Amp Yellow 60 Amp Yellow 60 Amp Yellow MiniFuse Description Interior Power Distribution Center Rail Interior Power Distribution Center Rail Interior Power Distribution Center Rail Interior Power Distribution Center Rail Ignition Run Relay Interior Power Distribution Center Rail Run/Accessory Relays F106 Power Distribution Center 568 MAINTAINING YOUR VEHICLE Underhood Fuses (Power Distribution Center) The power distribution center is located in the engine compartment.

Owner Manual
Page 601
... certain vehicle components contain, or emit, chemicals known to the State of its best. WARRANTY INFORMATION MOPAR® PARTS MOPAR® fluids, lubricants, parts, and accessories are recommended for the terms and provisions of Chrysler Group If NHTSA receives similar complaints, it finds that could cause a crash or cause injury or...
... certain vehicle components contain, or emit, chemicals known to the State of its best. WARRANTY INFORMATION MOPAR® PARTS MOPAR® fluids, lubricants, parts, and accessories are recommended for the terms and provisions of Chrysler Group If NHTSA receives similar complaints, it finds that could cause a crash or cause injury or...
User Guide
Page 3
... INC. CUSTOMER CENTER ...ASSISTANCE FOR THE HEARING IMPAIRED ...PUBLICATIONS ORDERING ...REPORTING SAFETY DEFECTS IN THE UNITED STATES ...102 ...102 ...102 ...102 ...103 ...104 MOPAR ACCESSORIES AUTHENTIC ACCESSORIES BY MOPAR® INDEX ...105 FAQ (How To?) FREQUENTLY ASKED QUESTIONS ...108 TABLE OF CONTENTS INTRODUCTION/WELCOME WELCOME FROM CHRYSLER GROUP LLC ...2 PROGRAMMABLE FEATURES ...UNIVERSAL...
... INC. CUSTOMER CENTER ...ASSISTANCE FOR THE HEARING IMPAIRED ...PUBLICATIONS ORDERING ...REPORTING SAFETY DEFECTS IN THE UNITED STATES ...102 ...102 ...102 ...102 ...103 ...104 MOPAR ACCESSORIES AUTHENTIC ACCESSORIES BY MOPAR® INDEX ...105 FAQ (How To?) FREQUENTLY ASKED QUESTIONS ...108 TABLE OF CONTENTS INTRODUCTION/WELCOME WELCOME FROM CHRYSLER GROUP LLC ...2 PROGRAMMABLE FEATURES ...UNIVERSAL...

User Guide
Page 14
... the ON/RUN position. • Press the ENGINE START/STOP button a third time to return the ignition switch to operate the ignition switch. GETTING STARTED Accessory Positions with Engine Off NOTE: The following functions are with one of the Key Fobs located outside the vehicle and within 5 ft (1.5 m) of inactivity and...
... the ON/RUN position. • Press the ENGINE START/STOP button a third time to return the ignition switch to operate the ignition switch. GETTING STARTED Accessory Positions with Engine Off NOTE: The following functions are with one of the Key Fobs located outside the vehicle and within 5 ft (1.5 m) of inactivity and...

User Guide
Page 68
... • There is a 12 Volt power outlet located in the power outlet as this will need to be replaced. • Power outlets are designed for accessory plugs only.
... • There is a 12 Volt power outlet located in the power outlet as this will need to be replaced. • Power outlets are designed for accessory plugs only.

User Guide
Page 83
... the discharged battery. 81 Connect the opposite end of the positive (+) jumper cable to LOCK. • Turn off the heater, radio, and all unnecessary electrical accessories. • Remove the protective cover over the remote positive (+) battery post. To remove the cover, press the locking tab and pull upward on the left...
... the discharged battery. 81 Connect the opposite end of the positive (+) jumper cable to LOCK. • Turn off the heater, radio, and all unnecessary electrical accessories. • Remove the protective cover over the remote positive (+) battery post. To remove the cover, press the locking tab and pull upward on the left...
