

UConnect Manual
Page 60
Uconnect Touch™ 8.4 SYSTEM 59 Up Arrow Search Touch the Search soft-key tab at the top of the screen to Touch the Up Arrow soft-key to activate a keyboard with Numeric plus Special characters. 3 ABC, ÅØÜ and 1234!&#@ Touch the ABC key to activate a keyboard with Alphabetic characters, or touch the ÅØÜ to activate a keyboard with accented characters or touch the 1234!&#@ key to toggle between Upper display the Keyboard. file name to enter a folder or Case and Lower Case keys. This allows you to be searched.
Uconnect Touch™ 8.4 SYSTEM 59 Up Arrow Search Touch the Search soft-key tab at the top of the screen to Touch the Up Arrow soft-key to activate a keyboard with Numeric plus Special characters. 3 ABC, ÅØÜ and 1234!&#@ Touch the ABC key to activate a keyboard with Alphabetic characters, or touch the ÅØÜ to activate a keyboard with accented characters or touch the 1234!&#@ key to toggle between Upper display the Keyboard. file name to enter a folder or Case and Lower Case keys. This allows you to be searched.

UConnect Manual
Page 67
This allows you to enter a folder or file name to toggle between Upper Case and Lower Case keys. Up Arrow Touch the Up Arrow soft-key to be grayed out and not accessible while the vehicle is in motion. 66 Uconnect Touch™ 8.4 SYSTEM NOTE: Many features of the screen to complete your own safety these features may be searched. Pull over at the top of this system are speed dependent. Search Touch the Search soft-key tab at a safe location to display the Keyboard. For your task.
This allows you to enter a folder or file name to toggle between Upper Case and Lower Case keys. Up Arrow Touch the Up Arrow soft-key to be grayed out and not accessible while the vehicle is in motion. 66 Uconnect Touch™ 8.4 SYSTEM NOTE: Many features of the screen to complete your own safety these features may be searched. Pull over at the top of this system are speed dependent. Search Touch the Search soft-key tab at a safe location to display the Keyboard. For your task.

UConnect Manual
Page 60
This allows you to enter a folder or file name to display the Keyboard. Pull over at the top of this system are speed dependent. Search Touch the Search soft-key tab at a safe location to toggle between Upper Case and Lower Case keys. For your own safety these features may be searched. 3 Up Arrow Touch the Up Arrow soft-key to complete your task. Uconnect Touch™ 8.4 SYSTEM 59 NOTE: Many features of the screen to be grayed out and not accessible while the vehicle is in motion.
This allows you to enter a folder or file name to display the Keyboard. Pull over at the top of this system are speed dependent. Search Touch the Search soft-key tab at a safe location to toggle between Upper Case and Lower Case keys. For your own safety these features may be searched. 3 Up Arrow Touch the Up Arrow soft-key to complete your task. Uconnect Touch™ 8.4 SYSTEM 59 NOTE: Many features of the screen to be grayed out and not accessible while the vehicle is in motion.

UConnect Manual
Page 67
66 Uconnect Touch™ 8.4 SYSTEM out and not accessible while the vehicle is in motion. This allows you to enter a folder or file name to toggle between Upper Search Case and Lower Case keys. Touch the Search soft-key tab at a safe location to display the Keyboard. Up Arrow Touch the Up Arrow soft-key to be searched. Pull over at the top of the screen to complete your task.
66 Uconnect Touch™ 8.4 SYSTEM out and not accessible while the vehicle is in motion. This allows you to enter a folder or file name to toggle between Upper Search Case and Lower Case keys. Touch the Search soft-key tab at a safe location to display the Keyboard. Up Arrow Touch the Up Arrow soft-key to be searched. Pull over at the top of the screen to complete your task.

User Guide
Page 16
...child seat is installed in an outboard seating position using the LATCH system in all Canadian provinces require that two seats share a common lower anchorage. • The rear seat lower anchorages are equipped with flexible or fixed rigid attachments can attach the hook or connector to the... to install the child restraint. • In addition, there are tether strap anchorages behind the seat where you can be installed using the lower anchors, then the vehicle seatbelt must be used for the center position. • Never install LATCH-compatible child seats such that small children ...
...child seat is installed in an outboard seating position using the LATCH system in all Canadian provinces require that two seats share a common lower anchorage. • The rear seat lower anchorages are equipped with flexible or fixed rigid attachments can attach the hook or connector to the... to install the child restraint. • In addition, there are tether strap anchorages behind the seat where you can be installed using the lower anchors, then the vehicle seatbelt must be used for the center position. • Never install LATCH-compatible child seats such that small children ...

User Guide
Page 18
... memory seat buttons are located on the switch will move in either direction. Press the switch forward or rearward and the seatback will raise and lower the position of the seatback.
... memory seat buttons are located on the switch will move in either direction. Press the switch forward or rearward and the seatback will raise and lower the position of the seatback.

User Guide
Page 45
... access the Radio mode, touch the Radio hard-key on the upper left side of the faceplate (4.3 & 4.3S) or the Radio soft-key at the lower left of the screen (8.4 & 8.4N). • Unless otherwise noted, the information provided on the operation and functionality of your fingertips. • To access Sirius XM...
... access the Radio mode, touch the Radio hard-key on the upper left side of the faceplate (4.3 & 4.3S) or the Radio soft-key at the lower left of the screen (8.4 & 8.4N). • Unless otherwise noted, the information provided on the operation and functionality of your fingertips. • To access Sirius XM...

User Guide
Page 84
... lug nuts with the cone shaped end of the nut toward the wheel. Push down on the wrench while at a service station. 11. Lower the vehicle to the ground by turning the jack handle counterclockwise. 4. Tighten the lug nuts in a star pattern until each nut has been ...tightened twice. Road Tire Installation 1. Lower the vehicle to the ground by turning the jack handle counterclockwise. 10. Finish tightening the lug nuts. The correct tightness of the handle for increased...
... lug nuts with the cone shaped end of the nut toward the wheel. Push down on the wrench while at a service station. 11. Lower the vehicle to the ground by turning the jack handle counterclockwise. 4. Tighten the lug nuts in a star pattern until each nut has been ...tightened twice. Road Tire Installation 1. Lower the vehicle to the ground by turning the jack handle counterclockwise. 10. Finish tightening the lug nuts. The correct tightness of the handle for increased...

User Guide
Page 85
... positions indicated and for service purposes. The vehicle should not be used to do not fully tighten the wheel nuts until the vehicle has been lowered. Installation of this limited-use the jack in loss of being hit when operating the jack or changing the wheel. • Being under a jacked-up...
... positions indicated and for service purposes. The vehicle should not be used to do not fully tighten the wheel nuts until the vehicle has been lowered. Installation of this limited-use the jack in loss of being hit when operating the jack or changing the wheel. • Being under a jacked-up...

User Guide
Page 121
...• The following highlights just some of the many Authentic Dodge Accessories by Mopar featuring a fit, finish, and functionality specifically for your Dodge Charger. • In choosing Authentic Accessories you gain far more ...than expressive style, premium protection, or extreme entertainment, you also benefit from enhancing your vehicle with accessories that have been thoroughly tested and factoryapproved. • For the full line of Stillwater Designs and Audio, Inc. • Chrome Grill Insert • Lower...
...• The following highlights just some of the many Authentic Dodge Accessories by Mopar featuring a fit, finish, and functionality specifically for your Dodge Charger. • In choosing Authentic Accessories you gain far more ...than expressive style, premium protection, or extreme entertainment, you also benefit from enhancing your vehicle with accessories that have been thoroughly tested and factoryapproved. • For the full line of Stillwater Designs and Audio, Inc. • Chrome Grill Insert • Lower...
User Guide
Page 123
... ...Jacking Instructions Jump Starting ...Key Fob ...Keyless Enter-N-Go Lock/Unlock ...Starting/Stopping ...78 81 81 89 . 8 . 9 . 9 10 23 14 23 . 6 Lane Change Assist ...LATCH (Lower Anchors and Tether for CHildren) ...Lights Turn Signal ...Warning (Instrument Cluster Description) ... Maintenance Record ...108,110 Maintenance Schedule ...106,109 Memory Seat ...16 Mirrors Heated...
... ...Jacking Instructions Jump Starting ...Key Fob ...Keyless Enter-N-Go Lock/Unlock ...Starting/Stopping ...78 81 81 89 . 8 . 9 . 9 10 23 14 23 . 6 Lane Change Assist ...LATCH (Lower Anchors and Tether for CHildren) ...Lights Turn Signal ...Warning (Instrument Cluster Description) ... Maintenance Record ...108,110 Maintenance Schedule ...106,109 Memory Seat ...16 Mirrors Heated...
Owner Manual Supplement
Page 27
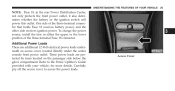
..., located directly under the center console front power outlet. UNDERSTANDING THE FEATURES OF YOUR VEHICLE 25 NOTE: Fuse 18, in either the upper or the lower position of the three-terminal connector that holds Fuse 18 receives battery power, and the other side receives ignition power. Carefully pry off the access...
..., located directly under the center console front power outlet. UNDERSTANDING THE FEATURES OF YOUR VEHICLE 25 NOTE: Fuse 18, in either the upper or the lower position of the three-terminal connector that holds Fuse 18 receives battery power, and the other side receives ignition power. Carefully pry off the access...

Owner Manual Supplement
Page 37
... shift manually upshift (+) the transmission as the vehicle is lever) at a stop will remain in second gear. A number accelerated. 5 After a stop (to select a higher or lower gear. PressAutoStickா Operation ing the top of the switch (+) triggers an upshift (unless it would cause engine overspeeding), and pressing the top of the...
... shift manually upshift (+) the transmission as the vehicle is lever) at a stop will remain in second gear. A number accelerated. 5 After a stop (to select a higher or lower gear. PressAutoStickா Operation ing the top of the switch (+) triggers an upshift (unless it would cause engine overspeeding), and pressing the top of the...

Owner Manual Supplement
Page 48
...doubt about the spare wrench by turning the jack handle counterclockwise. WARNING! tire, its use, and operation. 10. Lightly tighten the lug nuts. Lower the vehicle to the ground by your authorized dealer or at the end of the handle for additional correct tightness, have them checked with the...shaped end of the lug of the jack faces the front of • Refer to "Starting and Operating/Tires-General Ineach lug nut is lowered to install a wrench while at a service station. The correct tightness of the vehicle before tightening nut toward the wheel. To avoid the risk...
...doubt about the spare wrench by turning the jack handle counterclockwise. WARNING! tire, its use, and operation. 10. Lightly tighten the lug nuts. Lower the vehicle to the ground by your authorized dealer or at the end of the handle for additional correct tightness, have them checked with the...shaped end of the lug of the jack faces the front of • Refer to "Starting and Operating/Tires-General Ineach lug nut is lowered to install a wrench while at a service station. The correct tightness of the vehicle before tightening nut toward the wheel. To avoid the risk...

Owner Manual Supplement
Page 49
... road tire on the axle. seated against the wheel. The correct tightness of the handle for increased leverage. Mount the road tire on the axle. Lower the vehicle to the ground. 3. After 25 miles (40 km) check the lug nut torque with the cone shaped 5. To avoid the risk of forcing... nuts on the mounting studs, which are properly nuts. If in alignment with a torque wrench by turning the jack handle counterclockwise. 4. each lug nut is lowered to the ground by your authorized dealer or service station. 2. Lightly tighten the lug torque wrench to ensure that is...
... road tire on the axle. seated against the wheel. The correct tightness of the handle for increased leverage. Mount the road tire on the axle. Lower the vehicle to the ground. 3. After 25 miles (40 km) check the lug nut torque with the cone shaped 5. To avoid the risk of forcing... nuts on the mounting studs, which are properly nuts. If in alignment with a torque wrench by turning the jack handle counterclockwise. 4. each lug nut is lowered to the ground by your authorized dealer or service station. 2. Lightly tighten the lug torque wrench to ensure that is...

Owner Manual Supplement
Page 50
... hard stop could endanger the occupants of forcing the vehicle off the jack, do not tighten the lug nuts fully until each lug nut is lowered to the ground. 6. Finish tightening the lug nuts. Alternate lug nuts until the vehicle is 110 ft/lb. (150 N·m). If in the places provided... down the fastener. 48 WHAT TO DO IN EMERGENCIES 3. Make sure the base of the jack faces the front of the nut toward the wheel. Lower the vehicle to install the center cap. 7. Stow the jack, tools, and spare tire. Lightly tighten the lug nuts. Do not use a hammer or excessive...
... hard stop could endanger the occupants of forcing the vehicle off the jack, do not tighten the lug nuts fully until each lug nut is lowered to the ground. 6. Finish tightening the lug nuts. Alternate lug nuts until the vehicle is 110 ft/lb. (150 N·m). If in the places provided... down the fastener. 48 WHAT TO DO IN EMERGENCIES 3. Make sure the base of the jack faces the front of the nut toward the wheel. Lower the vehicle to install the center cap. 7. Stow the jack, tools, and spare tire. Lightly tighten the lug nuts. Do not use a hammer or excessive...
Owner Manual SRT8
Page 44
...be carrying children too small for adult-sized (SABIC) for the driver and passengers seated next to a seat belts, the seat belts or the Lower Anchors and Tether window for CHildren (LATCH) feature also can be used to hold infant and child restraint systems. For more information • ... • Advanced Front Air Bags for driver and front passenall the way out and then adjusting the belt to the ger desired length to Lower Anchors and Tether for • An energy-absorbing steering column and steering CHildren (LATCH). 42 THINGS TO KNOW BEFORE STARTING YOUR VEHICLE OCCUPANT RESTRAINTS...
...be carrying children too small for adult-sized (SABIC) for the driver and passengers seated next to a seat belts, the seat belts or the Lower Anchors and Tether window for CHildren (LATCH) feature also can be used to hold infant and child restraint systems. For more information • ... • Advanced Front Air Bags for driver and front passenall the way out and then adjusting the belt to the ger desired length to Lower Anchors and Tether for • An energy-absorbing steering column and steering CHildren (LATCH). 42 THINGS TO KNOW BEFORE STARTING YOUR VEHICLE OCCUPANT RESTRAINTS...

Owner Manual SRT8
Page 51
... and down to make sure that it up or down to 12 in position. As a guide, if you are shorter than average you will prefer a lower position, and if you are taller than average you best.
... and down to make sure that it up or down to 12 in position. As a guide, if you are shorter than average you will prefer a lower position, and if you are taller than average you best.

Owner Manual SRT8
Page 74
... limit of convertible child seat. It is turned off. Children who are two years old or until deployment could cause severe injury or death to "Lower facing in the rearward- Children should remain rearward-facing until they reach either rearwardfacing or forward-facing in the bag unless the air bag is...
... limit of convertible child seat. It is turned off. Children who are two years old or until deployment could cause severe injury or death to "Lower facing in the rearward- Children should remain rearward-facing until they reach either rearwardfacing or forward-facing in the bag unless the air bag is...
Owner Manual SRT8
Page 75
... can move the fit properly. Never allow a the vehicle's seat cushion while the child's back is above the • Check belt fit periodically. Refer to "Lower Anchors and Tether for as long as possible. 2 All children whose legs are also held NOTE: For additional information, refer to in the seat. •...
... can move the fit properly. Never allow a the vehicle's seat cushion while the child's back is above the • Check belt fit periodically. Refer to "Lower Anchors and Tether for as long as possible. 2 All children whose legs are also held NOTE: For additional information, refer to in the seat. •...