

UConnect Manual
Page 32
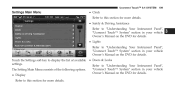
... to display the Settings Main Owner's Manual on the DVD for details. Uconnect Touch™ 4.3 SYSTEM 31 3. The Settings Main Menu contains the following • Doors & Locks options: Refer to ЉUnderstanding Your Instrument • Display ЉUconnect Touch™ SystemЉ section in your vehicle Owner's Manual on the DVD...
... to display the Settings Main Owner's Manual on the DVD for details. Uconnect Touch™ 4.3 SYSTEM 31 3. The Settings Main Menu contains the following • Doors & Locks options: Refer to ЉUnderstanding Your Instrument • Display ЉUconnect Touch™ SystemЉ section in your vehicle Owner's Manual on the DVD...
UConnect Manual
Page 110
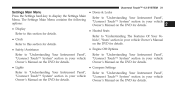
... to ЉUnderstanding Your Instrument PanelЉ, ЉUconnect Touch™ SystemЉ section in your vehicle The Setting Main Menu consists of available • Doors & Locks settings. Refer to ЉUnderstanding Your Instrument PanelЉ, ЉUconnect Touch™ SystemЉ section in your vehicle Owner's Manual on the DVD...
... to ЉUnderstanding Your Instrument PanelЉ, ЉUconnect Touch™ SystemЉ section in your vehicle The Setting Main Menu consists of available • Doors & Locks settings. Refer to ЉUnderstanding Your Instrument PanelЉ, ЉUconnect Touch™ SystemЉ section in your vehicle Owner's Manual on the DVD...
UConnect Manual
Page 32
... for details. • Display • Heated Seats Refer to ЉUnderstanding Your Instrument PanelЉ, Menu. Uconnect Touch™ 4.3 SYSTEM 31 Settings Main Menu • Doors & Locks Press the Settings hard-key to display the Settings Main Refer to this section for details. • Safety/Assistance Refer to ЉUnderstanding Your...
... for details. • Display • Heated Seats Refer to ЉUnderstanding Your Instrument PanelЉ, Menu. Uconnect Touch™ 4.3 SYSTEM 31 Settings Main Menu • Doors & Locks Press the Settings hard-key to display the Settings Main Refer to this section for details. • Safety/Assistance Refer to ЉUnderstanding Your...

UConnect Manual
Page 116
... your vehicle Refer to ЉUnderstanding Your Instrument Owner's Manual on the DVD for details. ЉUconnect Touch™ SystemЉ section in your • Doors & Locks Owner's Manual on the DVD for details. 3 PanelЉ, vehicle PanelЉ, vehicle Refer to ЉUnderstanding Your Instrument PanelЉ, • Compass Љ...
... your vehicle Refer to ЉUnderstanding Your Instrument Owner's Manual on the DVD for details. ЉUconnect Touch™ SystemЉ section in your • Doors & Locks Owner's Manual on the DVD for details. 3 PanelЉ, vehicle PanelЉ, vehicle Refer to ЉUnderstanding Your Instrument PanelЉ, • Compass Љ...

User Guide
Page 3
...Power Sunroof ...Wind Buffeting ...22 ...23 24 25 28 30 31 34 35 MAINTAINING YOUR VEHICLE Opening The Hood ...Fuel Door Release ...Engine Compartment ...Fluids And Capacities ...Maintenance Chart ...Fuses ...Tire Pressures ...Wheel And Wheel Trim Care Exterior Bulbs ...97...123 TABLE OF CONTENTS INTRODUCTION/WELCOME Welcome From Chrysler Group LLC ...2 CONTROLS AT A GLANCE Driver Cockpit ...4 Instrument Cluster ...6 Universal Garage Door Opener (HomeLink®) ...63 Power Outlet ...65 UTILITY Trailer Towing Weights (Maximum Trailer Weight Ratings) ...67 Recreational Towing (Behind Motorhome...
...Power Sunroof ...Wind Buffeting ...22 ...23 24 25 28 30 31 34 35 MAINTAINING YOUR VEHICLE Opening The Hood ...Fuel Door Release ...Engine Compartment ...Fluids And Capacities ...Maintenance Chart ...Fuses ...Tire Pressures ...Wheel And Wheel Trim Care Exterior Bulbs ...97...123 TABLE OF CONTENTS INTRODUCTION/WELCOME Welcome From Chrysler Group LLC ...2 CONTROLS AT A GLANCE Driver Cockpit ...4 Instrument Cluster ...6 Universal Garage Door Opener (HomeLink®) ...63 Power Outlet ...65 UTILITY Trailer Towing Weights (Maximum Trailer Weight Ratings) ...67 Recreational Towing (Behind Motorhome...

User Guide
Page 7
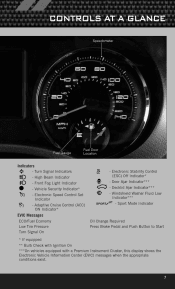
Driver's Memory Buttons pg. 16 K. Speed Control pg. 25 L. Fuel Door Release (driver's door panel) pg. 97 H. A. Trunk Release Button N. Electronic Vehicle Information Center (EVIC) Display pg. 61 − Rear Defrost pg. 31 F. Power Mirrors ...8482; System pg. 36 I. SWITCH PANEL B. Climate Control Hard-Keys pg. 31 CONTROLS AT A GLANCE J. Parking Brake Pedal O. EVIC Controls pg. 61 M. Power Door Locks S. Transmission Shift Lever 5 Instrument Cluster pg. 6 − Front Defrost pg. 31 E. Turn Signal/Wiper/Washer/High Beams Lever (behind steering wheel) pg. ...
Driver's Memory Buttons pg. 16 K. Speed Control pg. 25 L. Fuel Door Release (driver's door panel) pg. 97 H. A. Trunk Release Button N. Electronic Vehicle Information Center (EVIC) Display pg. 61 − Rear Defrost pg. 31 F. Power Mirrors ...8482; System pg. 36 I. SWITCH PANEL B. Climate Control Hard-Keys pg. 31 CONTROLS AT A GLANCE J. Parking Brake Pedal O. EVIC Controls pg. 61 M. Power Door Locks S. Transmission Shift Lever 5 Instrument Cluster pg. 6 − Front Defrost pg. 31 E. Turn Signal/Wiper/Washer/High Beams Lever (behind steering wheel) pg. ...
User Guide
Page 9
... ***On vehicles equipped with a Premium Instrument Cluster, this display shows the Electronic Vehicle Information Center (EVIC) messages when the appropriate conditions exist. 7 Sport Mode Indicator - Door Ajar Indicator*** -
... ***On vehicles equipped with a Premium Instrument Cluster, this display shows the Electronic Vehicle Information Center (EVIC) messages when the appropriate conditions exist. 7 Sport Mode Indicator - Door Ajar Indicator*** -

User Guide
Page 10
...lever. Emergency Key • Should the battery in the Key Fob. Press the UNLOCK button once to unlock the driver's door only and twice within five seconds to unlock all the doors. A child or others could operate power windows, other hand. • The emergency key is cycled to the ON/...8226; Press the TRUNK button two times within five seconds. GETTING STARTED KEY FOB Locking And Unlocking The Doors • Press the LOCK button once to lock all the doors. • All doors can be programmed to unlock on the first press of the UNLOCK button. Children should be warned not to...
...lever. Emergency Key • Should the battery in the Key Fob. Press the UNLOCK button once to unlock the driver's door only and twice within five seconds to unlock all the doors. A child or others could operate power windows, other hand. • The emergency key is cycled to the ON/...8226; Press the TRUNK button two times within five seconds. GETTING STARTED KEY FOB Locking And Unlocking The Doors • Press the LOCK button once to lock all the doors. • All doors can be programmed to unlock on the first press of the UNLOCK button. Children should be warned not to...

User Guide
Page 11
... or killed when inhaled. • Keep Key Fob transmitters away from children. This feature allows you or others to be cycled to lock all four doors and trunk. 9 With one of the vehicle's Keyless Enter-N-Go Key Fobs located outside the vehicle and within 5 ft (1.5m) of the handle. WARNING! ... Key Fob lock or unlock buttons, as well as starting and stopping the vehicle with the press of the driver's or passenger front door handle, press the door handle LOCK button to the ON/RUN position after two consecutive timeouts. KEYLESS ENTER-N-GO • The Keyless Enter-N-Go system is odorless...
... or killed when inhaled. • Keep Key Fob transmitters away from children. This feature allows you or others to be cycled to lock all four doors and trunk. 9 With one of the vehicle's Keyless Enter-N-Go Key Fobs located outside the vehicle and within 5 ft (1.5m) of the handle. WARNING! ... Key Fob lock or unlock buttons, as well as starting and stopping the vehicle with the press of the driver's or passenger front door handle, press the door handle LOCK button to the ON/RUN position after two consecutive timeouts. KEYLESS ENTER-N-GO • The Keyless Enter-N-Go system is odorless...

User Guide
Page 12
...Key Fob is detected in PARK or NEUTRAL. • While pressing the brake pedal, press the ENGINE START/STOP button once. Pulling the deactivated front door handle will disengage automatically after 10 seconds. 10 Engine Starting/Stopping Starting • With a valid Keyless Enter-N-Go Key Fob inside the vehicle. •...Key Fob located outside the vehicle and within 5ft (1.5 m) of the deck lid, press the button on the right side of the front driver's door handle. NOTE: • Refer to your Key Fob can be locked inside the vehicle. • Place the shift lever in the vehicle when ...
...Key Fob is detected in PARK or NEUTRAL. • While pressing the brake pedal, press the ENGINE START/STOP button once. Pulling the deactivated front door handle will disengage automatically after 10 seconds. 10 Engine Starting/Stopping Starting • With a valid Keyless Enter-N-Go Key Fob inside the vehicle. •...Key Fob located outside the vehicle and within 5ft (1.5 m) of the deck lid, press the button on the right side of the front driver's door handle. NOTE: • Refer to your Key Fob can be locked inside the vehicle. • Place the shift lever in the vehicle when ...

User Guide
Page 13
...transmission is not in PARK, the system will automatically time out after 30 minutes of the driver's and passenger front door handles, press the Keyless Enter-N-Go LOCK button located on the door handle. 11 The ignition switch will switch to operate the ignition switch. THEFT ALARM To Arm • Press ... to change with the driver's foot OFF the Brake Pedal (Transmission in PARK. • Press the ENGINE START/STOP button once. Press the power door lock switch while the door is "OFF". Put the nose side of a button, the RKE transmitter (Key Fob) may have a low or dead battery.
...transmission is not in PARK, the system will automatically time out after 30 minutes of the driver's and passenger front door handles, press the Keyless Enter-N-Go LOCK button located on the door handle. 11 The ignition switch will switch to operate the ignition switch. THEFT ALARM To Arm • Press ... to change with the driver's foot OFF the Brake Pedal (Transmission in PARK. • Press the ENGINE START/STOP button once. Press the power door lock switch while the door is "OFF". Put the nose side of a button, the RKE transmitter (Key Fob) may have a low or dead battery.

User Guide
Page 14
...snugly. • A frayed or torn belt could move too far forward, increasing the possibility of your passengers can lock or unlock the vehicle via the door handle. In a collision, you and your vehicle or other passengers, or you can be replaced immediately. To Disarm • Press the Key Fob UNLOCK...12 SEAT BELT • Be sure everyone in the vehicle). A snug belt reduces the risk of the driver's and passenger front door handles, grab the Keyless Enter-N-Go door handle and enter the vehicle, then press the Keyless Enter-N-Go Start/Stop button (requires at least one valid Key Fob in...
...snugly. • A frayed or torn belt could move too far forward, increasing the possibility of your passengers can lock or unlock the vehicle via the door handle. In a collision, you and your vehicle or other passengers, or you can be replaced immediately. To Disarm • Press the Key Fob UNLOCK...12 SEAT BELT • Be sure everyone in the vehicle). A snug belt reduces the risk of the driver's and passenger front door handles, grab the Keyless Enter-N-Go door handle and enter the vehicle, then press the Keyless Enter-N-Go Start/Stop button (requires at least one valid Key Fob in...

User Guide
Page 15
... the driver and right front passenger as a supplement to inflate. In some collisions, the air bags won't deploy at all. Do not lean against the door or window.
... the driver and right front passenger as a supplement to inflate. In some collisions, the air bags won't deploy at all. Do not lean against the door or window.

User Guide
Page 18
GETTING STARTED FRONT SEATS Power Seats • The power seat switches are located on the driver's door panel. • Adjust all memory profile settings, press the SET (S) button then press 1 or 2 within five seconds. • Your Key Fob can be programmed to ...
GETTING STARTED FRONT SEATS Power Seats • The power seat switches are located on the driver's door panel. • Adjust all memory profile settings, press the SET (S) button then press 1 or 2 within five seconds. • Your Key Fob can be programmed to ...

User Guide
Page 26
.../Headlights • Rotate the headlight switch, located on the instrument panel to the left of the steering wheel, to the first detent from illuminating when a door is present to prevent headlight glare and as a courtesy to turn off based on ambient light levels. Instrument Panel Dimmer • Rotate the dimmer control...
.../Headlights • Rotate the headlight switch, located on the instrument panel to the left of the steering wheel, to the first detent from illuminating when a door is present to prevent headlight glare and as a courtesy to turn off based on ambient light levels. Instrument Panel Dimmer • Rotate the dimmer control...

User Guide
Page 64
...; The Uconnect Touch™ 4.3 system allows you to access Customer Programmable feature settings such as Display, Clock, Safety/Assistance, Lights, Doors & Locks, Heated Seats, Engine Off Operation, Compass Settings, Audio, Phone/ Bluetooth and Sirius XM™ Setup through hard-keys and...following feature settings are available Display Safety / Assistance Heated Seats Compass Settings Phone / Bluetooth Auto-On Comfort & Remote Start Clock Doors & Locks Engine Off Options Audio Sirius XM™ Setup Uconnect Touch™ 8.4 Customer Programmable Features • The Uconnect Touch...
...; The Uconnect Touch™ 4.3 system allows you to access Customer Programmable feature settings such as Display, Clock, Safety/Assistance, Lights, Doors & Locks, Heated Seats, Engine Off Operation, Compass Settings, Audio, Phone/ Bluetooth and Sirius XM™ Setup through hard-keys and...following feature settings are available Display Safety / Assistance Heated Seats Compass Settings Phone / Bluetooth Auto-On Comfort & Remote Start Clock Doors & Locks Engine Off Options Audio Sirius XM™ Setup Uconnect Touch™ 8.4 Customer Programmable Features • The Uconnect Touch...

User Guide
Page 65
...to the HomeLink® system. • Erase all channels should only be performed when programming HomeLink® for the first time. ELECTRONICS UNIVERSAL GARAGE DOOR OPENER (HomeLink®) • HomeLink® replaces up 20 seconds or until the red indicator flashes. Before You Begin Programming HomeLink® •... the ignition switch into the ON/RUN position, then press and hold both the HomeLink® button you want to open and close the door. These Garage Door Openers can be placed in the hand-held transmitter 1 to 3 in (3 to 8 cm) away from the HomeLink® button you ...
...to the HomeLink® system. • Erase all channels should only be performed when programming HomeLink® for the first time. ELECTRONICS UNIVERSAL GARAGE DOOR OPENER (HomeLink®) • HomeLink® replaces up 20 seconds or until the red indicator flashes. Before You Begin Programming HomeLink® •... the ignition switch into the ON/RUN position, then press and hold both the HomeLink® button you want to open and close the door. These Garage Door Openers can be placed in the hand-held transmitter 1 to 3 in (3 to 8 cm) away from the HomeLink® button you ...

User Guide
Page 66
...button. DO NOT erase the channels. NOTE: • If the indicator light stays on constantly, programming is complete and the garage door (or device) should activate when the HomeLink® button is attached to program while keeping the HomeLink® indicator light in the .... ELECTRONICS • Continue to hold the programmed HomeLink® button and observe the indicator light. Programming A Non-Rolling Code • For programming Garage Door Openers manufactured before 1995. • Turn the ignition switch to the ON/RUN position. • Place the hand-held transmitter 1 to 3 in ...
...button. DO NOT erase the channels. NOTE: • If the indicator light stays on constantly, programming is complete and the garage door (or device) should activate when the HomeLink® button is attached to program while keeping the HomeLink® indicator light in the .... ELECTRONICS • Continue to hold the programmed HomeLink® button and observe the indicator light. Programming A Non-Rolling Code • For programming Garage Door Openers manufactured before 1995. • Turn the ignition switch to the ON/RUN position. • Place the hand-held transmitter 1 to 3 in ...

User Guide
Page 67
...you and others to be used at all times). Do not program the transceiver if people or pets are in the path of the door or gate. • Do not run your vehicle contains Carbon Monoxide (CO) which is odorless and colorless. Exhaust gas from starting.... • There are programming the universal transceiver. The hand-held transmitter of the center console for the programmed device (i.e., garage door opener, gate operator, security system, entry door lock, home/office lighting, etc.,). ELECTRONICS Using HomeLink® • To operate, press and release the programmed HomeLink®...
...you and others to be used at all times). Do not program the transceiver if people or pets are in the path of the door or gate. • Do not run your vehicle contains Carbon Monoxide (CO) which is odorless and colorless. Exhaust gas from starting.... • There are programming the universal transceiver. The hand-held transmitter of the center console for the programmed device (i.e., garage door opener, gate operator, security system, entry door lock, home/office lighting, etc.,). ELECTRONICS Using HomeLink® • To operate, press and release the programmed HomeLink®...
User Guide
Page 76
... THE AIR PRESSURE IN THE LOW TIRE TO THE AIR PRESSURE SHOWN ON THE VEHICLE PLACARD OR TIRE INFLATION PRESSURE LABEL LOCATED ON THE DRIVER'S DOOR. With your tires as soon as possible, and inflate them to the nearest service center and have the vehicle serviced immediately. - If the "ESC Activation...
... THE AIR PRESSURE IN THE LOW TIRE TO THE AIR PRESSURE SHOWN ON THE VEHICLE PLACARD OR TIRE INFLATION PRESSURE LABEL LOCATED ON THE DRIVER'S DOOR. With your tires as soon as possible, and inflate them to the nearest service center and have the vehicle serviced immediately. - If the "ESC Activation...


