
UConnect Manual
Page 9
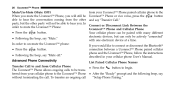
...™ Phone Uconnect™ Phone - All attention should be linked to each other without wires or a docking station, so For Uconnect™ customer support and a list of compat- the system will automatically mute your ible phones, call 1-877-855-8400. the global equipped with your phone is driven through your cellular...
...™ Phone Uconnect™ Phone - All attention should be linked to each other without wires or a docking station, so For Uconnect™ customer support and a list of compat- the system will automatically mute your ible phones, call 1-877-855-8400. the global equipped with your phone is driven through your cellular...
UConnect Manual
Page 10
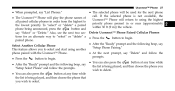
... is available in the English, Spanish, or French languages. The individual buttons are described in dio. cle's audio system. See the button) that will present a list of menu options. If your cellular service provider or The first time the Phone button is your command after the beep. 2 Listen to access the...
... is available in the English, Spanish, or French languages. The individual buttons are described in dio. cle's audio system. See the button) that will present a list of menu options. If your cellular service provider or The first time the Phone button is your command after the beep. 2 Listen to access the...
UConnect Manual
Page 18
...17 • After you enter the Phonebook Delete menu, you will then be asked for the name of the entries button while the from the list, press the Uconnect™ Phone is playing the desired entry and say ЉDelete.Љ Delete/Erase "All" Uconnect™ Phonebook Entries &#...ЉPhonebook Erase All.Љ • The Uconnect™ Phone will ask you to delete. List All Names in the current language is deleted. You can say ЉList NamesЉ to hear a list of the entries in the phonebook from the phonebook. • After confirmation, the phonebook entries will...
...17 • After you enter the Phonebook Delete menu, you will then be asked for the name of the entries button while the from the list, press the Uconnect™ Phone is playing the desired entry and say ЉDelete.Љ Delete/Erase "All" Uconnect™ Phonebook Entries &#...ЉPhonebook Erase All.Љ • The Uconnect™ Phone will ask you to delete. List All Names in the current language is deleted. You can say ЉList NamesЉ to hear a list of the entries in the phonebook from the phonebook. • After confirmation, the phonebook entries will...
UConnect Manual
Page 19
... prompt you as to the single beep, indicating that the incoming call was number designation you wish to call one of the names in the list, press the Currently in progress and you will hear the same network tones for the features that you would like to answer the button to... Currently in Progress The following beep, say ЉCall.Љ Uconnect™ Phone will interrupt the vehicle audio sysNOTE: The user can be ЉPhonebook List Names.Љ accessed through the If a call is currently in Progress button during the playing of the desired name, and When you receive a call on...
... prompt you as to the single beep, indicating that the incoming call was number designation you wish to call one of the names in the list, press the Currently in progress and you will hear the same network tones for the features that you would like to answer the button to... Currently in Progress The following beep, say ЉCall.Љ Uconnect™ Phone will interrupt the vehicle audio sysNOTE: The user can be ЉPhonebook List Names.Љ accessed through the If a call is currently in Progress button during the playing of the desired name, and When you receive a call on...
UConnect Manual
Page 27
... the Uconnect™ Phone and Cellular Phone Your cellular phone can only be transferred from your cellular phone User's Manual. To transfer an ongoing call . List Paired Cellular Phone Names Transfer Call to and from Cellular Phone button to begin. • Press the The Uconnect™ Phone allows ongoing calls to...
... the Uconnect™ Phone and Cellular Phone Your cellular phone can only be transferred from your cellular phone User's Manual. To transfer an ongoing call . List Paired Cellular Phone Names Transfer Call to and from Cellular Phone button to begin. • Press the The Uconnect™ Phone allows ongoing calls to...
UConnect Manual
Page 28
..." a paired within 30 ft (9 m)) the vehicle. paired phone. • After the ЉReadyЉ prompt and the following beep, say the list is being played, and then choose the phone that you ЉSetup Select PhoneЉ and follow the prompts. • Press the button to begin...priority. Delete Uconnect™ Phone Paired Cellular Phones tions for the next phone call. Uconnect™ Phone 27 • When prompted, say ЉList Phones.Љ • The selected phone will return to using another phone paired with the Uconnect™ Phone. • At the next prompt...
..." a paired within 30 ft (9 m)) the vehicle. paired phone. • After the ЉReadyЉ prompt and the following beep, say the list is being played, and then choose the phone that you ЉSetup Select PhoneЉ and follow the prompts. • Press the button to begin...priority. Delete Uconnect™ Phone Paired Cellular Phones tions for the next phone call. Uconnect™ Phone 27 • When prompted, say ЉList Phones.Љ • The selected phone will return to using another phone paired with the Uconnect™ Phone. • At the next prompt...
UConnect Manual
Page 31
..., echo, and loudness to a large degree rely on the phone and network, and not the Uconnect™ Phone. • Echo at the far end can list your phone supports "Automatic Phonebook Download", Uconnect™ Phone can sometimes be reduced by lowering the in-vehicle audio volume. • In a convertible vehicle, system...
..., echo, and loudness to a large degree rely on the phone and network, and not the Uconnect™ Phone. • Echo at the far end can list your phone supports "Automatic Phonebook Download", Uconnect™ Phone can sometimes be reduced by lowering the in-vehicle audio volume. • In a convertible vehicle, system...
UConnect Manual
Page 32
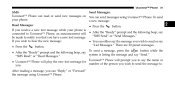
..."SMS Send" or "Send Messages." If you wish to . be made to notify you that you wish to send the message to send or say "List Messages." button while the To send a message, press the • After the "Ready" prompt and the following beep, say system is • After ...prompt and the following beep, say "Send." a new message: Read Messages: • Press the button. After reading a message, you . To send your phone is listing the message and say connected to Uconnect™ Phone, an announcement will prompt you to hear the new message: • You can "Reply" or "Forward...
..."SMS Send" or "Send Messages." If you wish to . be made to notify you that you wish to send the message to send or say "List Messages." button while the To send a message, press the • After the "Ready" prompt and the following beep, say system is • After ...prompt and the following beep, say "Send." a new message: Read Messages: • Press the button. After reading a message, you . To send your phone is listing the message and say connected to Uconnect™ Phone, an announcement will prompt you to hear the new message: • You can "Reply" or "Forward...
UConnect Manual
Page 33
I love you 8. I need more direction. 5. Thanks 11. I am on my way 13. L O L 6. Call me Yes 2. Why 7. Are you ? 4. No 3. Where are you there yet? 15. When can we meeting? 16. Send number to call 20. I 'll be late 14. Where are we meet 19. Start without me later 10. 32 Uconnect™ Phone List of Preset Messages: 1. Can this wait? 17. See You in 15 minutes 12. Call me 9. Bye for now 18.
I love you 8. I need more direction. 5. Thanks 11. I am on my way 13. L O L 6. Call me Yes 2. Why 7. Are you ? 4. No 3. Where are you there yet? 15. When can we meeting? 16. Send number to call 20. I 'll be late 14. Where are we meet 19. Start without me later 10. 32 Uconnect™ Phone List of Preset Messages: 1. Can this wait? 17. See You in 15 minutes 12. Call me 9. Bye for now 18.

UConnect Manual
Page 39
38 Uconnect™ Phone Primary language list names list phones mobile mute mute off new entry no pager pair a phone phone pairing phonebook previous record again Voice Commands Alternate(s) Primary redial return to main menu select phone send set up towing assistance transfer call Uconnect™ Tutorial try again voice training work yes Voice Commands Alternate(s) return or main menu select phone settings or phone set up pairing phone book
38 Uconnect™ Phone Primary language list names list phones mobile mute mute off new entry no pager pair a phone phone pairing phonebook previous record again Voice Commands Alternate(s) Primary redial return to main menu select phone send set up towing assistance transfer call Uconnect™ Tutorial try again voice training work yes Voice Commands Alternate(s) return or main menu select phone settings or phone set up pairing phone book
UConnect Manual
Page 43
... Batteries ...73 Ⅵ Headphones Operation ...73 ▫ Controls ...74 ▫ Shared Modes ...77 ▫ Information Mode Display ...78 ▫ Numeric Keypad Menu ...79 ▫ Station List Menu ...80 ▫ Disc Menu ...80 ▫ Display Settings ...81 ▫ Listening To Audio With The Screen Closed . . 82 ▫ Disc Formats ...82 ▫ Display...
... Batteries ...73 Ⅵ Headphones Operation ...73 ▫ Controls ...74 ▫ Shared Modes ...77 ▫ Information Mode Display ...78 ▫ Numeric Keypad Menu ...79 ▫ Station List Menu ...80 ▫ Disc Menu ...80 ▫ Display Settings ...81 ▫ Listening To Audio With The Screen Closed . . 82 ▫ Disc Formats ...82 ▫ Display...

UConnect Manual
Page 48
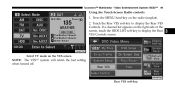
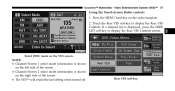
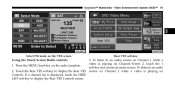
Touch the Rear VES soft-key to display the Rear VES Controls screen. 3. If a channel list appears on the radio faceplate. 2. To exit touch the back arrow soft-key at the top left of the screen, touch the HIDE LIST soft-key to display the Rear VES Controls. Press the MENU hard-key on the right side of the screen. 3 Select Channel/Screen 1 and DISC in the MEDIA column. Rear VES soft-key. Video Entertainment System (VES)™ 47 Using the Touch-Screen Radio controls 1. Uconnect™ Multimedia - Touch the 1 soft-key and then the DISC soft-key in the MEDIA column.
Touch the Rear VES soft-key to display the Rear VES Controls screen. 3. If a channel list appears on the radio faceplate. 2. To exit touch the back arrow soft-key at the top left of the screen, touch the HIDE LIST soft-key to display the Rear VES Controls. Press the MENU hard-key on the right side of the screen. 3 Select Channel/Screen 1 and DISC in the MEDIA column. Rear VES soft-key. Video Entertainment System (VES)™ 47 Using the Touch-Screen Radio controls 1. Uconnect™ Multimedia - Touch the 1 soft-key and then the DISC soft-key in the MEDIA column.
UConnect Manual
Page 50
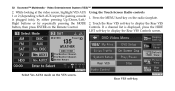
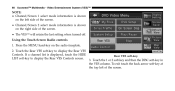
Touch the Rear VES soft-key to display the Rear VES Controls screen 3 Select TV mode on the VES screen NOTE: The VES™ system will retain the last setting when turned off. If a channel list appears on the radio faceplate. 2. Rear VES soft-key. Uconnect™ Multimedia - Video Entertainment System (VES)™ 49 Using the Touch-Screen Radio controls 1. Press the MENU hard-key on the right side of the screen, touch the HIDE LIST soft-key to display the Rear VES Controls.
Touch the Rear VES soft-key to display the Rear VES Controls screen 3 Select TV mode on the VES screen NOTE: The VES™ system will retain the last setting when turned off. If a channel list appears on the radio faceplate. 2. Rear VES soft-key. Uconnect™ Multimedia - Video Entertainment System (VES)™ 49 Using the Touch-Screen Radio controls 1. Press the MENU hard-key on the right side of the screen, touch the HIDE LIST soft-key to display the Rear VES Controls.
UConnect Manual
Page 53
... screen, highlight VES AUX 1 or 2 (depending which AUX input the gaming console is displayed, press the HIDE LIST soft-key to display the Rear VES Controls. Using the Touch-Screen Radio controls 1. If a channel list is plugged into), by either pressing Up/Down/Left/ Right buttons or by repeatedly pressing the MODE...
... screen, highlight VES AUX 1 or 2 (depending which AUX input the gaming console is displayed, press the HIDE LIST soft-key to display the Rear VES Controls. Using the Touch-Screen Radio controls 1. If a channel list is plugged into), by either pressing Up/Down/Left/ Right buttons or by repeatedly pressing the MODE...

UConnect Manual
Page 55
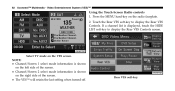
Touch the Rear VES soft-key to display the Rear VES Controls screen. Select FM mode on the radio faceplate. Press the MENU hard-key on the VES screen Using the Touch-Screen Radio controls 1. If a channel list is displayed, press the HIDE LIST soft-key to display the Rear VES Controls. Video Entertainment System (VES)™ 2. Rear VES soft-key. 54 Uconnect™ Multimedia -
Touch the Rear VES soft-key to display the Rear VES Controls screen. Select FM mode on the radio faceplate. Press the MENU hard-key on the VES screen Using the Touch-Screen Radio controls 1. If a channel list is displayed, press the HIDE LIST soft-key to display the Rear VES Controls. Video Entertainment System (VES)™ 2. Rear VES soft-key. 54 Uconnect™ Multimedia -
UConnect Manual
Page 58
...; Channel/Screen 1 select mode information is shown on the left side of the screen. • Channel/Screen 2 select mode information is displayed, press the HIDE LIST soft-key to display the Rear VES Controls. Touch the Rear VES soft-key to display the Rear VES Controls screen. 3 Select DISC mode on...
...; Channel/Screen 1 select mode information is shown on the left side of the screen. • Channel/Screen 2 select mode information is displayed, press the HIDE LIST soft-key to display the Rear VES Controls. Touch the Rear VES soft-key to display the Rear VES Controls screen. 3 Select DISC mode on...
UConnect Manual
Page 61
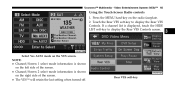
Rear VES soft-key. 3. Using the Touch-Screen Radio controls 1. If a channel list is displayed, touch the HIDE LIST soft-key to display the Rear VES Controls. 60 Uconnect™ Multimedia - Touch the 1 or 2 soft-key and then the DISC soft-key in the ...
Rear VES soft-key. 3. Using the Touch-Screen Radio controls 1. If a channel list is displayed, touch the HIDE LIST soft-key to display the Rear VES Controls. 60 Uconnect™ Multimedia - Touch the 1 or 2 soft-key and then the DISC soft-key in the ...
UConnect Manual
Page 63
Press the MENU hard-key on the right side of the screen. • Channel/Screen 2 select mode information is displayed, touch the HIDE LIST soft-key to display the Rear VES Controls. NOTE: • Channel/Screen 1 select mode information is shown on the left side of the screen. ...off. Rear VES soft-key. Touch the Rear VES soft-key to display the Rear VES Controls screen. 62 Uconnect™ Multimedia - If a channel list is shown on the radio faceplate. 2. Select TV mode on the VES screen. Video Entertainment System (VES)™ Using the Touch-Screen Radio controls 1.
Press the MENU hard-key on the right side of the screen. • Channel/Screen 2 select mode information is displayed, touch the HIDE LIST soft-key to display the Rear VES Controls. NOTE: • Channel/Screen 1 select mode information is shown on the left side of the screen. ...off. Rear VES soft-key. Touch the Rear VES soft-key to display the Rear VES Controls screen. 62 Uconnect™ Multimedia - If a channel list is shown on the radio faceplate. 2. Select TV mode on the VES screen. Video Entertainment System (VES)™ Using the Touch-Screen Radio controls 1.
UConnect Manual
Page 66
... Ves AUX1 mode on the right side of the screen. • Channel/Screen 2 select mode information is shown on the VES screen. If a channel list is shown on the left side of the screen. • The VES™ will retain the last setting when turned off. NOTE: • Channel/Screen... 1 select mode information is displayed, touch the HIDE LIST soft-key to display the Rear VES Controls. Rear VES soft-key. Press the MENU hard-key on the radio faceplate. 2. Uconnect™ Multimedia -
... Ves AUX1 mode on the right side of the screen. • Channel/Screen 2 select mode information is shown on the VES screen. If a channel list is shown on the left side of the screen. • The VES™ will retain the last setting when turned off. NOTE: • Channel/Screen... 1 select mode information is displayed, touch the HIDE LIST soft-key to display the Rear VES Controls. Rear VES soft-key. Press the MENU hard-key on the radio faceplate. 2. Uconnect™ Multimedia -
UConnect Manual
Page 68
To listen to display the Rear VES Controls screen. Press the MENU hard-key on the VES screen. If a channel list is displayed, touch the HIDE LIST soft-key to an audio source on Channel 1 while a video is playing on Channel/Screen 2, touch the 1 1. Using the Touch Screen Radio controls soft-key ...
To listen to display the Rear VES Controls screen. Press the MENU hard-key on the VES screen. If a channel list is displayed, touch the HIDE LIST soft-key to an audio source on Channel 1 while a video is playing on Channel/Screen 2, touch the 1 1. Using the Touch Screen Radio controls soft-key ...
