
Owner Manual
Page 21
... that the system is arming. This shows that the system is fully armed. 2 For the first three minutes, the horn will sound intermittently and the headlights, park lights, taillights and the indicator light in the cluster will rearm itself. Lock the door using either the power door lock switch (one door...
... that the system is arming. This shows that the system is fully armed. 2 For the first three minutes, the horn will sound intermittently and the headlights, park lights, taillights and the indicator light in the cluster will rearm itself. Lock the door using either the power door lock switch (one door...
Owner Manual
Page 26
If Equipped This feature activates the headlights for up to 90 seconds when the doors are in the vehicle will activate the Vehicle Security Alarm system. For details, refer to acknowledge the ...
If Equipped This feature activates the headlights for up to 90 seconds when the doors are in the vehicle will activate the Vehicle Security Alarm system. For details, refer to acknowledge the ...

Owner Manual
Page 28
... turn the Panic Alarm feature on or off , and the Illuminated Entry system (if equipped) will stay on . When the Panic Alarm is on, the headlights and park lights will flash, the horn will pulse on and off , press and hold the PANIC button on the RKE transmitter and then immediately...
... turn the Panic Alarm feature on or off , and the Illuminated Entry system (if equipped) will stay on . When the Panic Alarm is on, the headlights and park lights will flash, the horn will pulse on and off , press and hold the PANIC button on the RKE transmitter and then immediately...

Owner Manual
Page 86
......132 Ⅵ To Open And Close The Hood ...132 Ⅵ Lights ...134 ▫ Map/Reading/Interior Lights ...134 ▫ Headlights, Parking Lights And Instrument Panel Lights ...135 ▫ Automatic Headlight System - If Equipped ...137 ▫ Turn Signals ...138 ▫ High Beam/Low Beam Select Switch ...139 If Equipped ...137 &#...YOUR VEHICLE ▫ Voice Training ...124 Ⅵ Seats ...124 ▫ Manual Front Seat Adjustments ...124 ▫ Power Seats - If Equipped ...136 ▫ Headlight Time Delay ...136 ▫ Flash-To-Pass ...137 ▫ Daytime Running Lights (DRL) -
......132 Ⅵ To Open And Close The Hood ...132 Ⅵ Lights ...134 ▫ Map/Reading/Interior Lights ...134 ▫ Headlights, Parking Lights And Instrument Panel Lights ...135 ▫ Automatic Headlight System - If Equipped ...137 ▫ Turn Signals ...138 ▫ High Beam/Low Beam Select Switch ...139 If Equipped ...137 &#...YOUR VEHICLE ▫ Voice Training ...124 Ⅵ Seats ...124 ▫ Manual Front Seat Adjustments ...124 ▫ Power Seats - If Equipped ...136 ▫ Headlight Time Delay ...136 ▫ Flash-To-Pass ...137 ▫ Daytime Running Lights (DRL) -

Owner Manual
Page 87
... THE FEATURES OF YOUR VEHICLE 85 Ⅵ Windshield Wipers And Washers ...140 ▫ Intermittent Wiper System ...141 ▫ Mist Feature ...142 ▫ Headlights With Wipers Feature (Available With Auto Headlights Only) ...142 ▫ Windshield Washers ...142 Ⅵ Tilt/Telescoping Steering Column ...143 Ⅵ Electronic Speed Control - If Equipped ...155 ▫ Sunshade Operation...
... THE FEATURES OF YOUR VEHICLE 85 Ⅵ Windshield Wipers And Washers ...140 ▫ Intermittent Wiper System ...141 ▫ Mist Feature ...142 ▫ Headlights With Wipers Feature (Available With Auto Headlights Only) ...142 ▫ Windshield Washers ...142 Ⅵ Tilt/Telescoping Steering Column ...143 Ⅵ Electronic Speed Control - If Equipped ...155 ▫ Sunshade Operation...

Owner Manual
Page 89
UNDERSTANDING THE FEATURES OF YOUR VEHICLE 87 MIRRORS Inside Day/Night Mirror - The mirror should be reduced by moving the small control under the mirror to center on the view through the rear window. Headlight glare can be adjusted while set in the day position (toward the rear of the vehicle). If Equipped A two-point pivot system allows for horizontal and vertical mirror adjustment. Adjust the mirror to the night position (toward the windshield). 3 Adjusting Rearview Mirror
UNDERSTANDING THE FEATURES OF YOUR VEHICLE 87 MIRRORS Inside Day/Night Mirror - The mirror should be reduced by moving the small control under the mirror to center on the view through the rear window. Headlight glare can be adjusted while set in the day position (toward the rear of the vehicle). If Equipped A two-point pivot system allows for horizontal and vertical mirror adjustment. Adjust the mirror to the night position (toward the windshield). 3 Adjusting Rearview Mirror
Owner Manual
Page 90
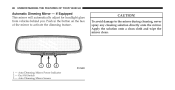
Auto Dimming Mirror Power Indicator 2 - Auto Dimming Mirror Sensor To avoid damage to activate the dimming feature. Apply the solution onto a clean cloth and wipe the mirror clean. 1 - If Equipped This mirror will automatically adjust for headlight glare from vehicles behind you. CAUTION! On/Off Switch 3 - Push in the button on the face of the mirror to the mirror during cleaning, never spray any cleaning solution directly onto the mirror. 88 UNDERSTANDING THE FEATURES OF YOUR VEHICLE Automatic Dimming Mirror -
Auto Dimming Mirror Power Indicator 2 - Auto Dimming Mirror Sensor To avoid damage to activate the dimming feature. Apply the solution onto a clean cloth and wipe the mirror clean. 1 - If Equipped This mirror will automatically adjust for headlight glare from vehicles behind you. CAUTION! On/Off Switch 3 - Push in the button on the face of the mirror to the mirror during cleaning, never spray any cleaning solution directly onto the mirror. 88 UNDERSTANDING THE FEATURES OF YOUR VEHICLE Automatic Dimming Mirror -

Owner Manual
Page 137
Turn to the third detent AUTO headlight operation (if equipped). 3 Headlight Switch Turn to the second detent for parking light operation. Headlights, Parking Lights and Instrument Panel Lights Turn the end of the multifunction lever to the LOCK position. This will turn the ignition switch ON or ..., the interior lights will occur if the interior lights were switched on manually or are on because a door is moved to the first detent for headlight operation.
Turn to the third detent AUTO headlight operation (if equipped). 3 Headlight Switch Turn to the second detent for parking light operation. Headlights, Parking Lights and Instrument Panel Lights Turn the end of the multifunction lever to the LOCK position. This will turn the ignition switch ON or ..., the interior lights will occur if the interior lights were switched on manually or are on because a door is moved to the first detent for headlight operation.

Owner Manual
Page 138
... instrument panel lights, rotate the center portion of the multifunction lever to the third detent (AUTO), will activate the automatic headlight system. Headlight Time Delay There is also a feature that delays turning off position after the ignition switch is turned OFF. Dimmer Control Refer... to "Electronic Vehicle Information Center (EVIC)" under "CustomerProgrammable Features" in the AUTO position, the headlights will illuminate during this feature "On/Off" or set the time interval. With the engine running and the multifunction lever in Section ...
... instrument panel lights, rotate the center portion of the multifunction lever to the third detent (AUTO), will activate the automatic headlight system. Headlight Time Delay There is also a feature that delays turning off position after the ignition switch is turned OFF. Dimmer Control Refer... to "Electronic Vehicle Information Center (EVIC)" under "CustomerProgrammable Features" in the AUTO position, the headlights will illuminate during this feature "On/Off" or set the time interval. With the engine running and the multifunction lever in Section ...
Owner Manual
Page 139
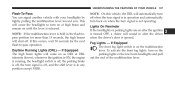
... turn off . Fog Lights - To activate the front fog lights, turn signal is not operating. If this vehicle, the DRL will cause the headlights to -pass operation. NOTE: If the multifunction lever is opened. If Equipped The high beam lights will come on as DRL at DRL intensity (lower... out the end of the multifunction lever. 3 UNDERSTANDING THE FEATURES OF YOUR VEHICLE 137 Flash-To-Pass You can signal another vehicle with your headlights by lightly pulling the multifunction lever toward you. NOTE: On this occurs, wait 30 seconds for more than 15 seconds, the high beams will...
... turn off . Fog Lights - To activate the front fog lights, turn signal is not operating. If this vehicle, the DRL will cause the headlights to -pass operation. NOTE: If the multifunction lever is opened. If Equipped The high beam lights will come on as DRL at DRL intensity (lower... out the end of the multifunction lever. 3 UNDERSTANDING THE FEATURES OF YOUR VEHICLE 137 Flash-To-Pass You can signal another vehicle with your headlights by lightly pulling the multifunction lever toward you. NOTE: On this occurs, wait 30 seconds for more than 15 seconds, the high beams will...
Owner Manual
Page 140
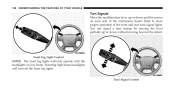
Turn Signal Control You can signal a lane change by moving the lever partially up or down without moving beyond the detent. Selecting high beam headlights will only operate with the headlights on each side of the instrument cluster flash to show proper operation of the front and rear turn off the front fog lights. 138 UNDERSTANDING THE FEATURES OF YOUR VEHICLE Turn Signals Move the multifunction lever up or down and the arrows on low beam. Front Fog Light Control NOTE: The front fog lights will turn signal lights.
Turn Signal Control You can signal a lane change by moving the lever partially up or down without moving beyond the detent. Selecting high beam headlights will only operate with the headlights on each side of the instrument cluster flash to show proper operation of the front and rear turn off the front fog lights. 138 UNDERSTANDING THE FEATURES OF YOUR VEHICLE Turn Signals Move the multifunction lever up or down and the arrows on low beam. Front Fog Light Control NOTE: The front fog lights will turn signal lights.

Owner Manual
Page 141
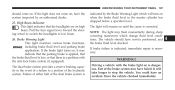
Pull the lever toward you to switch the headlights to high beam. High Beam/Low Beam Select 3 The turn signal will automatically flash three times, regardless of how long the lever is defective. Turn ... the detent. If an indicator fails to low beam. High Beam/Low Beam Select Switch Push the multifunction lever away from you , to switch the headlights back to light when the lever is moved, it would suggest that the fuse or indicator bulb is held. UNDERSTANDING THE FEATURES OF YOUR VEHICLE...
Pull the lever toward you to switch the headlights to high beam. High Beam/Low Beam Select 3 The turn signal will automatically flash three times, regardless of how long the lever is defective. Turn ... the detent. If an indicator fails to low beam. High Beam/Low Beam Select Switch Push the multifunction lever away from you , to switch the headlights back to light when the lever is moved, it would suggest that the fuse or indicator bulb is held. UNDERSTANDING THE FEATURES OF YOUR VEHICLE...

Owner Manual
Page 144
... as the lever is held down on or off if they were turned on the left side of this feature. In addition, the headlights will turn on approximately 10 seconds after the wipers are turned off through the Electronic Vehicle Information Center (EVIC) - For details, refer to... "Headlights with wipers feature can be turned on the wiper control lever to activate a single wipe to operate. As long as washer spray is placed...
... as the lever is held down on or off if they were turned on the left side of this feature. In addition, the headlights will turn on approximately 10 seconds after the wipers are turned off through the Electronic Vehicle Information Center (EVIC) - For details, refer to... "Headlights with wipers feature can be turned on the wiper control lever to activate a single wipe to operate. As long as washer spray is placed...
Owner Manual
Page 189
... the brake light turns on, it may indicate that the parking brake is applied, that the brake fluid level is low, or that the headlights are on until the cause is indicated by an authorized dealer. 25. Failure of either half of the brake system may flash momentarily during sharp... cornering maneuvers which will turn signal lever toward the steering wheel to switch the headlights to low beam. 26. The vehicle should come on, have the system inspected by the Brake Warning Light which change fluid level conditions. ...
... the brake light turns on, it may indicate that the parking brake is applied, that the brake fluid level is low, or that the headlights are on until the cause is indicated by an authorized dealer. 25. Failure of either half of the brake system may flash momentarily during sharp... cornering maneuvers which will turn signal lever toward the steering wheel to switch the headlights to low beam. 26. The vehicle should come on, have the system inspected by the Brake Warning Light which change fluid level conditions. ...

Owner Manual
Page 193
Unless reset, this message will flash in motion) • Trunk Ajar (with a single chime) • Headlights On • Key In Ignition • Oil Change Required (with a single chime) Oil Change Required Your vehicle is duty cycle based, which means the engine ...
Unless reset, this message will flash in motion) • Trunk Ajar (with a single chime) • Headlights On • Key In Ignition • Oil Change Required (with a single chime) Oil Change Required Your vehicle is duty cycle based, which means the engine ...

Owner Manual
Page 199
... with the RKE transmitter. To make your selection, press and release the RESET button until 0, 30, 60, or 90 seconds appears. The headlights will flash when the doors are turned on during the daytime causes the instrument panel lights to dim. To make your selection, press and hold...YOUR INSTRUMENT PANEL 197 Sound Horn with or without the flash lights ON, LOCK/UNLOCK feature. To increase the brightness, refer to have the headlights remain on by this feature is selected, the front and rear turn signals will also turn on approximately 10 seconds after the wipers are locked...
... with the RKE transmitter. To make your selection, press and release the RESET button until 0, 30, 60, or 90 seconds appears. The headlights will flash when the doors are turned on during the daytime causes the instrument panel lights to dim. To make your selection, press and hold...YOUR INSTRUMENT PANEL 197 Sound Horn with or without the flash lights ON, LOCK/UNLOCK feature. To increase the brightness, refer to have the headlights remain on by this feature is selected, the front and rear turn signals will also turn on approximately 10 seconds after the wipers are locked...
Owner Manual
Page 200
... outlets will activate and remain on the lower right side of measure. or METRIC appears. Opening a vehicle door will cancel this feature is selected, the headlights will remain active for up to 10 minutes after the ignition switch is located on for up to 90 seconds when the doors are unlocked...
... outlets will activate and remain on the lower right side of measure. or METRIC appears. Opening a vehicle door will cancel this feature is selected, the headlights will remain active for up to 10 minutes after the ignition switch is located on for up to 90 seconds when the doors are unlocked...

Owner Manual
Page 360
.... WARNING! (Continued) • Do not attempt to push or tow your vehicle to obtain a start anytime the ignition switch is stored between the left front headlight assembly and the left front wheel splash shield. If the vehicle has a discharged battery, booster cables may be hurt by the fan. (Continued) 358 WHAT...
.... WARNING! (Continued) • Do not attempt to push or tow your vehicle to obtain a start anytime the ignition switch is stored between the left front headlight assembly and the left front wheel splash shield. If the vehicle has a discharged battery, booster cables may be hurt by the fan. (Continued) 358 WHAT...
Owner Manual
Page 368
... Cupholders ...400 Ⅵ Fuses ...400 ▫ Totally Integrated Power Module (TIPM) ...400 Ⅵ Vehicle Storage ...409 Ⅵ Replacement Bulbs ...409 Ⅵ Bulb Replacement ...410 ▫ Headlight ...410 ▫ Fog Lights ...412 ▫ Taillights, Rear Turn Signals And Backup Lights ...413 ▫ License Plate Light ...415 ▫ Center High-Mounted Stop Light...
... Cupholders ...400 Ⅵ Fuses ...400 ▫ Totally Integrated Power Module (TIPM) ...400 Ⅵ Vehicle Storage ...409 Ⅵ Replacement Bulbs ...409 Ⅵ Bulb Replacement ...410 ▫ Headlight ...410 ▫ Fog Lights ...412 ▫ Taillights, Rear Turn Signals And Backup Lights ...413 ▫ License Plate Light ...415 ▫ Center High-Mounted Stop Light...

Owner Manual
Page 399
... vehicle has plastic headlights that may cause undesirable reflections. Do not use scouring pads, steel wool, a bristle brush, or metal polishes. Do not use acidic solutions or harsh brushes ... procedures must be cleaned regularly with a mild soap and water to prevent corrosion. Your authorized dealer has touch up paint to stone breakage than glass headlights. Only MOPAR or equivalent is not as scratch resistant as possible. Interior Care Instrument Panel Cover The instrument panel cover has a low glare surface...
... vehicle has plastic headlights that may cause undesirable reflections. Do not use scouring pads, steel wool, a bristle brush, or metal polishes. Do not use acidic solutions or harsh brushes ... procedures must be cleaned regularly with a mild soap and water to prevent corrosion. Your authorized dealer has touch up paint to stone breakage than glass headlights. Only MOPAR or equivalent is not as scratch resistant as possible. Interior Care Instrument Panel Cover The instrument panel cover has a low glare surface...


