Owner's Manual
Page 26
... battery is activated, the system provides both audible and visual signals. Remove and replace the batteries. The horn will sound repeatedly for 3 minutes and the headlights and security light in the instrument cluster will not run until snug. Make sure not to pry the two halves of the transmitter apart. If...
... battery is activated, the system provides both audible and visual signals. Remove and replace the batteries. The horn will sound repeatedly for 3 minutes and the headlights and security light in the instrument cluster will not run until snug. Make sure not to pry the two halves of the transmitter apart. If...

Owner's Manual
Page 80
... Easy Exit And Easy Entry Control ...128 To Open And Close The Hood ...129 Lights ...131 ▫ Interior Lights ...132 ▫ Battery Saver ...132 ▫ Headlight Delay ...133 80 UNDERSTANDING THE FEATURES OF YOUR VEHICLE Seats ...111 ▫ Front Seat Manual Seat Adjustment ...111 ▫ Front Seats Manual Seat Recliners ...112...
... Easy Exit And Easy Entry Control ...128 To Open And Close The Hood ...129 Lights ...131 ▫ Interior Lights ...132 ▫ Battery Saver ...132 ▫ Headlight Delay ...133 80 UNDERSTANDING THE FEATURES OF YOUR VEHICLE Seats ...111 ▫ Front Seat Manual Seat Adjustment ...111 ▫ Front Seats Manual Seat Recliners ...112...

Owner's Manual
Page 81
UNDERSTANDING THE FEATURES OF YOUR VEHICLE 81 ▫ Automatic Headlights - If Equipped ...133 ▫ Headlights, Parking Lights, Panel Lights ...134 ▫ Illuminated Entry ...134 ▫ Daytime Running Lights (Canada Only) ...134 ▫ Lights-On Reminder ...135 ▫ Fog Lights - If ...
UNDERSTANDING THE FEATURES OF YOUR VEHICLE 81 ▫ Automatic Headlights - If Equipped ...133 ▫ Headlights, Parking Lights, Panel Lights ...134 ▫ Illuminated Entry ...134 ▫ Daytime Running Lights (Canada Only) ...134 ▫ Lights-On Reminder ...135 ▫ Fog Lights - If ...

Owner's Manual
Page 84
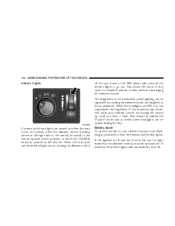
... on or off by pressing the button at the base of the mirror. The mirror should be adjusted to the night position (toward windshield). Annoying headlight glare can turn the feature on the view through the rear window. A light in the day position (toward rear of truck). Day/Night Mirror 84... be adjusted while set in the button will automatically adjust for horizontal and vertical adjustment of the mirror. A two-point pivot system allows for annoying headlight glare from vehicles behind you.
... on or off by pressing the button at the base of the mirror. The mirror should be adjusted to the night position (toward windshield). Annoying headlight glare can turn the feature on the view through the rear window. A light in the day position (toward rear of truck). Day/Night Mirror 84... be adjusted while set in the button will automatically adjust for horizontal and vertical adjustment of the mirror. A two-point pivot system allows for annoying headlight glare from vehicles behind you.
Owner's Manual
Page 132
... 15 minutes, the interior lights will cause all the interior lights to the second upward detent position, or when the UNLOCK button is useful when headlights are required during the day. If the ignition is off and any door is left ajar for eight minutes or the dimmer control is provided... for both the interior and exterior lights. 132 UNDERSTANDING THE FEATURES OF YOUR VEHICLE Interior Lights all the way down (dimmer). When the headlights are on the right side of time without discharging the vehicle's battery.
... 15 minutes, the interior lights will cause all the interior lights to the second upward detent position, or when the UNLOCK button is useful when headlights are required during the day. If the ignition is off and any door is left ajar for eight minutes or the dimmer control is provided... for both the interior and exterior lights. 132 UNDERSTANDING THE FEATURES OF YOUR VEHICLE Interior Lights all the way down (dimmer). When the headlights are on the right side of time without discharging the vehicle's battery.

Owner's Manual
Page 133
...While the engine is running and the ambient light sensor indicates that will leave the headlights on for 90 seconds. Headlight Delay To aid in your exit, your authorized dealer. The headlights will turn off if the headlight switch is rotated to the off position or 90 seconds after 8 minutes. NOTE...: This feature can be cancelled by either turning the headlight switch ON then OFF or by your vehicle is equipped with a headlight delay that the headlights should be disabled by turning the ignition ON. This delay is initiated when the ignition is...
...While the engine is running and the ambient light sensor indicates that will leave the headlights on for 90 seconds. Headlight Delay To aid in your exit, your authorized dealer. The headlights will turn off if the headlight switch is rotated to the off position or 90 seconds after 8 minutes. NOTE...: This feature can be cancelled by either turning the headlight switch ON then OFF or by your vehicle is equipped with a headlight delay that the headlights should be disabled by turning the ignition ON. This delay is initiated when the ignition is...

Owner's Manual
Page 134
... with a mild soap solution followed by your Durango will turn off. NOTE: This feature can be followed. If the headlights are activated, the Daytime Running Lights feature will turn on . The headlights will transition to the normal headlight operating mode. To minimize the possibility of scratching... the Daytime Running Lights will illuminate when the engine is started. 134 UNDERSTANDING THE FEATURES OF YOUR VEHICLE Headlights, Parking Lights, Panel Lights When the headlight switch is rotated to the first position to the right, the parking lights, taillights, side marker lights,...
... with a mild soap solution followed by your Durango will turn off. NOTE: This feature can be followed. If the headlights are activated, the Daytime Running Lights feature will turn on . The headlights will transition to the normal headlight operating mode. To minimize the possibility of scratching... the Daytime Running Lights will illuminate when the engine is started. 134 UNDERSTANDING THE FEATURES OF YOUR VEHICLE Headlights, Parking Lights, Panel Lights When the headlight switch is rotated to the first position to the right, the parking lights, taillights, side marker lights,...

Owner's Manual
Page 135
... ON low beam. An indicator light located in the instrument cluster will operate only when the parking lights are ON or when the vehicle headlights are on. The fog lights will sound when the driver's door is selected. MULTIFUNCTION CONTROL LEVER The multifunction control lever is located on ... foglights are left On, after the ignition is turned Off, a continuous fast chime will turn off when the switch is pressed in, when the headlight switch is rotated to the OFF position, or the high beam is opened. Fog Lights - If Equipped position and pressing the fog light button. ...
... ON low beam. An indicator light located in the instrument cluster will operate only when the parking lights are ON or when the vehicle headlights are on. The fog lights will sound when the driver's door is selected. MULTIFUNCTION CONTROL LEVER The multifunction control lever is located on ... foglights are left On, after the ignition is turned Off, a continuous fast chime will turn off when the switch is pressed in, when the headlight switch is rotated to the OFF position, or the high beam is opened. Fog Lights - If Equipped position and pressing the fog light button. ...

Owner's Manual
Page 136
... a turn signal has been left -hand turn signal system, the arrow indicators will flash at least a mile duration, a continuous chime will cause the high beam headlights to indicate the direction of the front and rear turn on until the lever is released. The arrow on either side of the instrument cluster... for at a faster rate. If an indicator fails to signal a right-hand or left on for the turn . You can signal another vehicle with your headlights by moving the lever partially up or down .
... a turn signal has been left -hand turn signal system, the arrow indicators will flash at least a mile duration, a continuous chime will cause the high beam headlights to indicate the direction of the front and rear turn on until the lever is released. The arrow on either side of the instrument cluster... for at a faster rate. If an indicator fails to signal a right-hand or left on for the turn . You can signal another vehicle with your headlights by moving the lever partially up or down .

Owner's Manual
Page 137
Windshield Wipers 3 The wipers and washers are operated by a switch in the multifunction control lever. UNDERSTANDING THE FEATURES OF YOUR VEHICLE 137 High Beam / Low Beam Select Switch Pull the multifunction control lever fully toward the steering wheel to select the desired wiper speed. Turn the end of this system was designed for use when weather conditions make a single wiping cycle, Intermittent Wiper System The intermittent feature of the handle to switch the headlights from HIGH or LOW beam.
Windshield Wipers 3 The wipers and washers are operated by a switch in the multifunction control lever. UNDERSTANDING THE FEATURES OF YOUR VEHICLE 137 High Beam / Low Beam Select Switch Pull the multifunction control lever fully toward the steering wheel to select the desired wiper speed. Turn the end of this system was designed for use when weather conditions make a single wiping cycle, Intermittent Wiper System The intermittent feature of the handle to switch the headlights from HIGH or LOW beam.

Owner's Manual
Page 184
... a tank or less. 5. Low Fuel Warning Light This indicator lights when the fuel gauge reads 1/8 of an overheated engine condition. High Beam Indicator Indicates that headlights are ON. 8. If this light will come on momentarily when the ignition is turned ON as a reminder to "buckle up." This light will remain on...
... a tank or less. 5. Low Fuel Warning Light This indicator lights when the fuel gauge reads 1/8 of an overheated engine condition. High Beam Indicator Indicates that headlights are ON. 8. If this light will come on momentarily when the ignition is turned ON as a reminder to "buckle up." This light will remain on...

Owner's Manual
Page 333
MAINTAINING YOUR VEHICLE 333 Bulb Replacement ...377 ▫ Headlights/Parking/Turn Signal ...377 ▫ Rear Side Marker, Tail Lights, Turn Signals And Backup Lights - Replacement ...378 ▫ License Lights ...382 ▫ Center High-Mounted Stoplight ...383 ▫ Fog Lights ...384 Fluids And Capacities ...385 Fluids, Lubricants And Genuine Parts ...386 ▫ Engine ...386 ▫ Chassis ...387 7
MAINTAINING YOUR VEHICLE 333 Bulb Replacement ...377 ▫ Headlights/Parking/Turn Signal ...377 ▫ Rear Side Marker, Tail Lights, Turn Signals And Backup Lights - Replacement ...378 ▫ License Lights ...382 ▫ Center High-Mounted Stoplight ...383 ▫ Fog Lights ...384 Fluids And Capacities ...385 Fluids, Lubricants And Genuine Parts ...386 ▫ Engine ...386 ▫ Chassis ...387 7

Owner's Manual
Page 376
... Fuse Description Rad Fan Lo Rly Ft Fog Lamps Rly Adjustable Pedal Rly IOD #1 IOD #2 Spare Spare REPLACEMENT LIGHT BULBS LIGHT BULBS - Interior Bulb No. Headlight ...H13 Front Park/Turn/Sidemarker ...3457AK Back-Up ...3057 Center High Mounted Stoplight ...921 Fog Lamp ...9006LL Rear Sidemarker ...168 License Plate Light ...168 Rear...
... Fuse Description Rad Fan Lo Rly Ft Fog Lamps Rly Adjustable Pedal Rly IOD #1 IOD #2 Spare Spare REPLACEMENT LIGHT BULBS LIGHT BULBS - Interior Bulb No. Headlight ...H13 Front Park/Turn/Sidemarker ...3457AK Back-Up ...3057 Center High Mounted Stoplight ...921 Fog Lamp ...9006LL Rear Sidemarker ...168 License Plate Light ...168 Rear...

Owner's Manual
Page 377
...the H13, the black release is located in step number 5 below or above the 3457AK red tab. 7 1. While firmly holding the headlight in your hands disconnect all connectors. The green release is located above the red tab on the black and/or green release which is ... the wheel liner. 3. Remove the bulb connector from the headlight making sure to disengage the headlight from the fender panel. 4. Remove the two bolts attaching the headlight to the inner fender panel. Remove one nut that attaches the headlight to the inner fender panel. MAINTAINING YOUR VEHICLE 377 BULB...
...the H13, the black release is located in step number 5 below or above the 3457AK red tab. 7 1. While firmly holding the headlight in your hands disconnect all connectors. The green release is located above the red tab on the black and/or green release which is ... the wheel liner. 3. Remove the bulb connector from the headlight making sure to disengage the headlight from the fender panel. 4. Remove the two bolts attaching the headlight to the inner fender panel. Remove one nut that attaches the headlight to the inner fender panel. MAINTAINING YOUR VEHICLE 377 BULB...
Owner's Manual
Page 420
... ...186 Anti-Theft System ...26,185 Appearance Care ...366 Arming Theft System (Security Alarm) ...27 Automatic Dimming Mirror ...84,88 Automatic Door Locks ...17 Automatic Headlights ...133 Automatic Transaxle ...245 Automatic Transmission ...242,245,362 Adding Fluid ...362 Fluid and Filter Changes ...363 Fluid Level Check ...362 Fluid Type ...363,387...
... ...186 Anti-Theft System ...26,185 Appearance Care ...366 Arming Theft System (Security Alarm) ...27 Automatic Dimming Mirror ...84,88 Automatic Door Locks ...17 Automatic Headlights ...133 Automatic Transaxle ...245 Automatic Transmission ...242,245,362 Adding Fluid ...362 Fluid and Filter Changes ...363 Fluid Level Check ...362 Fluid Type ...363,387...
Owner's Manual
Page 423
... Running Lights ...134 Dealer Service ...340 Defroster, Rear Window ...238 Defroster, Windshield ...76,225,230 Delay (Intermittent) Wipers ...137 Diagnostic System, Onboard ...337 Dimmer Switch, Headlight ...184 Dipsticks Automatic Transmission ...362 Oil (Engine) ...340 Power Steering ...350 Disarming, Theft System ...27 Disc Brakes ...360 Disposal Used Coolant (Antifreeze) ...355 Door Ajar...
... Running Lights ...134 Dealer Service ...340 Defroster, Rear Window ...238 Defroster, Windshield ...76,225,230 Delay (Intermittent) Wipers ...137 Diagnostic System, Onboard ...337 Dimmer Switch, Headlight ...184 Dipsticks Automatic Transmission ...362 Oil (Engine) ...340 Power Steering ...350 Disarming, Theft System ...27 Disc Brakes ...360 Disposal Used Coolant (Antifreeze) ...355 Door Ajar...

Owner's Manual
Page 426
... Rating ...293,297 Gross Cargo Weight ...292 Gross Vehicle Weight Rating ...296 GVWR ...293,295 Hands-Free Phone (UConnect™) ...88 Hazard Warning Flasher ...316 Headlights ...377 Delay ...133 High Beam ...137 High Beam/Low Beam Select Switch ...137 Lights On Reminder ...135 Passing ...136 Replacing ...377 Heated Mirrors ...87 Heated...
... Rating ...293,297 Gross Cargo Weight ...292 Gross Vehicle Weight Rating ...296 GVWR ...293,295 Hands-Free Phone (UConnect™) ...88 Hazard Warning Flasher ...316 Headlights ...377 Delay ...133 High Beam ...137 High Beam/Low Beam Select Switch ...137 Lights On Reminder ...135 Passing ...136 Replacing ...377 Heated Mirrors ...87 Heated...
Owner's Manual
Page 427
... LATCH (Lower Anchors and Tether for CHildren) ...67 Life of Tires ...280 Liftgate ...29 Lights ...76,131 Airbag ...61,191 Anti-Lock Warning ...186 Automatic Headlights ...133 Back-Up ...378 Brake Warning ...189 10
... LATCH (Lower Anchors and Tether for CHildren) ...67 Life of Tires ...280 Liftgate ...29 Lights ...76,131 Airbag ...61,191 Anti-Lock Warning ...186 Automatic Headlights ...133 Back-Up ...378 Brake Warning ...189 10

Owner's Manual
Page 428
.../Reading ...155 Cruise ...191 Daytime Running ...134 Door Ajar ...188 Electronic Stability Program (ESP) Indicator ...151,189 Fog ...135,184,384 Hazard Warning Flasher ...316 Headlights ...134 High Beam ...137 High Beam/Low Beam Select ...137 Instrument Cluster ...134,183 Interior ...132,155 License ...382 Lights On Reminder ...135 Low Fuel...
.../Reading ...155 Cruise ...191 Daytime Running ...134 Door Ajar ...188 Electronic Stability Program (ESP) Indicator ...151,189 Fog ...135,184,384 Hazard Warning Flasher ...316 Headlights ...134 High Beam ...137 High Beam/Low Beam Select ...137 Instrument Cluster ...134,183 Interior ...132,155 License ...382 Lights On Reminder ...135 Low Fuel...


