

Owner Manual
Page 48
... Control Module • AIRBAG Readiness Light • Driver Airbag • Passenger Airbag • Steering Wheel and Column • Instrument Panel • Crash Sensor • Interconnecting Wiring • Knee Impact Bolsters • Passenger Side Frontal Airbag ON/OFF Switch (Standard Cab Vehicles Only) WARNING! • Relying on the airbags alone could cause...
... Control Module • AIRBAG Readiness Light • Driver Airbag • Passenger Airbag • Steering Wheel and Column • Instrument Panel • Crash Sensor • Interconnecting Wiring • Knee Impact Bolsters • Passenger Side Frontal Airbag ON/OFF Switch (Standard Cab Vehicles Only) WARNING! • Relying on the airbags alone could cause...
Owner Manual
Page 49
... 8 seconds when the ignition is in any part of the system, it detects a fault with the front airbag system) • Side impact sensors • Interconnecting Wiring How The Airbag System Works • The airbag control module determines if a frontal collision is severe enough to require the airbags to inflate. • The...
... 8 seconds when the ignition is in any part of the system, it detects a fault with the front airbag system) • Side impact sensors • Interconnecting Wiring How The Airbag System Works • The airbag control module determines if a frontal collision is severe enough to require the airbags to inflate. • The...
Owner Manual
Page 55
You could cause it to fail when you . Do not modify the components or wiring, including adding any kind of badges or stickers to repair any part of the airbag system yourself. Be sure to tell anyone who works on ...
You could cause it to fail when you . Do not modify the components or wiring, including adding any kind of badges or stickers to repair any part of the airbag system yourself. Be sure to tell anyone who works on ...
Owner Manual
Page 84
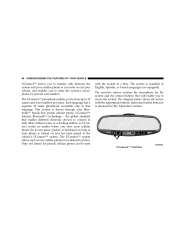
... on and has been paired to the vehicle's UConnect™ system. the global standard that enables different electronic devices to connect to each other without wires or a docking station, so UConnect works no matter where you stow your cellular phone (be used with the appropriate buttons. The system is discussed in...
... on and has been paired to the vehicle's UConnect™ system. the global standard that enables different electronic devices to connect to each other without wires or a docking station, so UConnect works no matter where you stow your cellular phone (be used with the appropriate buttons. The system is discussed in...
Owner Manual
Page 117
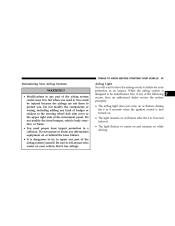
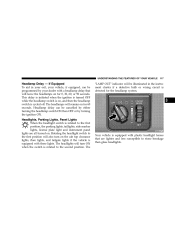
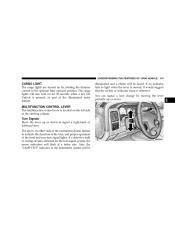
... the second position. If Equipped To aid in your exit, your vehicle, if equipped, can be illuminated in the instrument cluster if a defective bulb or wiring circuit is detected for 60 seconds. Headlights, Parking Lights, Panel Lights When the headlight switch is equipped with these lights. UNDERSTANDING THE FEATURES OF YOUR...
... the second position. If Equipped To aid in your exit, your vehicle, if equipped, can be illuminated in the instrument cluster if a defective bulb or wiring circuit is detected for 60 seconds. Headlights, Parking Lights, Panel Lights When the headlight switch is equipped with these lights. UNDERSTANDING THE FEATURES OF YOUR...
Owner Manual
Page 119
... that the switch or indicator lamp is located on the left -hand turn signal system, the arrow indicators will be heard. If a defective bulb or wiring circuit is pressed, as part of the illuminated entry feature. You can signal a lane change by rotating the dimmer control to indicate the direction of...
... that the switch or indicator lamp is located on the left -hand turn signal system, the arrow indicators will be heard. If a defective bulb or wiring circuit is pressed, as part of the illuminated entry feature. You can signal a lane change by rotating the dimmer control to indicate the direction of...
Owner Manual
Page 140
... to replace this Programming Step 3 with ЉProgrammingЉ step two. Do not repeat step one. This can usually be found where the hanging antenna wire is pressed and released. NOTE: To program the remaining two HomeLink buttons, begin with procedures noted in which to initiate step eight. Firmly press and...
... to replace this Programming Step 3 with ЉProgrammingЉ step two. Do not repeat step one. This can usually be found where the hanging antenna wire is pressed and released. NOTE: To program the remaining two HomeLink buttons, begin with procedures noted in which to initiate step eight. Firmly press and...
Owner Manual
Page 157
...document. Once the cables are not recommended for slide-in campers. If the truck is a 3500 dual rear wheel model, unplug the tailgate wire harness from the box. Unlatch the tailgate and remove the support cables by releasing the lock tang from the pivot, then rotate and pull ... mounting of a camper unit with an overhang, the tailgate can be provided. For safety reasons, follow all instructions in the truck pickup box. 3 NOTE: When a cap or pickup camper is installed on a vehicle, an alternate CHMSL (Center High Mounted Stop Light) must be removed quickly. UNDERSTANDING THE FEATURES OF...
...document. Once the cables are not recommended for slide-in campers. If the truck is a 3500 dual rear wheel model, unplug the tailgate wire harness from the box. Unlatch the tailgate and remove the support cables by releasing the lock tang from the pivot, then rotate and pull ... mounting of a camper unit with an overhang, the tailgate can be provided. For safety reasons, follow all instructions in the truck pickup box. 3 NOTE: When a cap or pickup camper is installed on a vehicle, an alternate CHMSL (Center High Mounted Stop Light) must be removed quickly. UNDERSTANDING THE FEATURES OF...
Owner Manual
Page 171
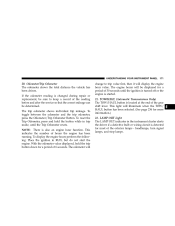
..., and stop lamps. 4 To display the engine hours perform the following: Place the ignition in the instrument cluster alerts the driver if a defective bulb or wiring circuit is detected for more information.) 22. The engine hours will be determined. UNDERSTANDING YOUR INSTRUMENT PANEL 171 20. To toggle between the odometer and...
..., and stop lamps. 4 To display the engine hours perform the following: Place the ignition in the instrument cluster alerts the driver if a defective bulb or wiring circuit is detected for more information.) 22. The engine hours will be determined. UNDERSTANDING YOUR INSTRUMENT PANEL 171 20. To toggle between the odometer and...
Owner Manual
Page 231
... running smoothly. This could cause electrocution. The engine block heater cord is routed under the hood to the right side of cranking with grounded, three-wire extension cord.
... running smoothly. This could cause electrocution. The engine block heater cord is routed under the hood to the right side of cranking with grounded, three-wire extension cord.
Owner Manual
Page 292
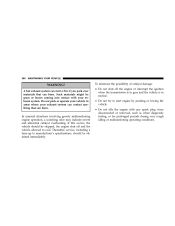
... your vehicle is not kept in civil penalties being assessed against you continue to run out of performance, have your vehicle with any spark plug wires disconnected or removed. • Do not idle the engine for prolonged periods during very rough idle or malfunctioning operating conditions. • Do not allow vehicle...
... your vehicle is not kept in civil penalties being assessed against you continue to run out of performance, have your vehicle with any spark plug wires disconnected or removed. • Do not idle the engine for prolonged periods during very rough idle or malfunctioning operating conditions. • Do not allow vehicle...
Owner Manual
Page 298
...between your vehicle and trailer. • Do not interconnect the hydraulic brake system or vacuum system of the trailer. Standard equipment on 2500/3500 Models are trailer tow ready and DO NOT REQUIRE any special axle lubes or additives. Limited slip rear axles on 1500 models ... excess of 2,000 lbs (907 kg) • Use an approved wiring harness connector on your vehicle with that of your vehicle. • Safety chains must always be added. 2500/3500 Models • The Axles on all RAM pickup models provides a 4-way trailer tow connector located 298 STARTING AND OPERATING ...
...between your vehicle and trailer. • Do not interconnect the hydraulic brake system or vacuum system of the trailer. Standard equipment on 2500/3500 Models are trailer tow ready and DO NOT REQUIRE any special axle lubes or additives. Limited slip rear axles on 1500 models ... excess of 2,000 lbs (907 kg) • Use an approved wiring harness connector on your vehicle with that of your vehicle. • Safety chains must always be added. 2500/3500 Models • The Axles on all RAM pickup models provides a 4-way trailer tow connector located 298 STARTING AND OPERATING ...
Owner Manual
Page 299
Do not cut or splice wiring to the brake circuits. • Be sure the trailer is the cause of many trailer accidents. (For a Љ5th WheelЉ style trailer, this range ...
Do not cut or splice wiring to the brake circuits. • Be sure the trailer is the cause of many trailer accidents. (For a Љ5th WheelЉ style trailer, this range ...
Owner Manual
Page 301
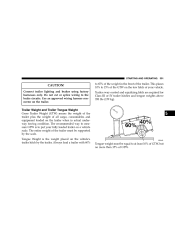
...your fully loaded trailer on the tow hitch of the trailer. This places 10% to 15% of the GTW on a vehicle scale. Use an approved wiring harness connector on the vehicle's trailer hitch by the scale. The entire weight of the trailer must be supported by the trailer. Trailer sway control... more than 15% of the weight in actual underway towing condition. Connect trailer lighting and brakes using factory harnesses only. Do not cut or splice wiring to 65% of GTW. The recommended way to measure GTW is the weight placed on the trailer. Always load a trailer with 60% to the ...
...your fully loaded trailer on the tow hitch of the trailer. This places 10% to 15% of the GTW on a vehicle scale. Use an approved wiring harness connector on the vehicle's trailer hitch by the scale. The entire weight of the trailer must be supported by the trailer. Trailer sway control... more than 15% of the weight in actual underway towing condition. Connect trailer lighting and brakes using factory harnesses only. Do not cut or splice wiring to 65% of GTW. The recommended way to measure GTW is the weight placed on the trailer. Always load a trailer with 60% to the ...
Owner Manual
Page 360
... or operate your vehicle in motion. • Do not try to manufacturer's specifications, should be grass or leaves coming into contact with any spark plug wires disconnected or removed, such as when diagnostic testing, or for prolonged periods during very rough idling or malfunctioning operating conditions.
... or operate your vehicle in motion. • Do not try to manufacturer's specifications, should be grass or leaves coming into contact with any spark plug wires disconnected or removed, such as when diagnostic testing, or for prolonged periods during very rough idling or malfunctioning operating conditions.
Owner Manual
Page 397
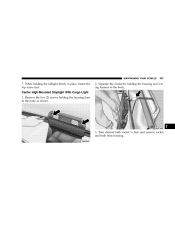
While holding the housing/lens to the body. 7 3. Separate the connector holding the housing and wiring harness to the body as shown. 2. Turn desired bulb socket 1⁄4 turn and remove socket and bulb from housing. Remove the two (2) screws holding the taillight firmly in place, fasten the top screw first. Center High-Mounted Stoplight With Cargo Light 1. MAINTAINING YOUR VEHICLE 397 7.
While holding the housing/lens to the body. 7 3. Separate the connector holding the housing and wiring harness to the body as shown. 2. Turn desired bulb socket 1⁄4 turn and remove socket and bulb from housing. Remove the two (2) screws holding the taillight firmly in place, fasten the top screw first. Center High-Mounted Stoplight With Cargo Light 1. MAINTAINING YOUR VEHICLE 397 7.
Owner Manual Diesel
Page 48
... Control Module • AIRBAG Readiness Light • Driver Airbag • Passenger Airbag • Steering Wheel and Column • Instrument Panel • Crash Sensor • Interconnecting Wiring • Knee Impact Bolsters • Passenger Side Frontal Airbag ON/OFF Switch (Standard Cab Vehicles Only) WARNING! • Relying on the airbags alone could cause...
... Control Module • AIRBAG Readiness Light • Driver Airbag • Passenger Airbag • Steering Wheel and Column • Instrument Panel • Crash Sensor • Interconnecting Wiring • Knee Impact Bolsters • Passenger Side Frontal Airbag ON/OFF Switch (Standard Cab Vehicles Only) WARNING! • Relying on the airbags alone could cause...
Owner Manual Diesel
Page 49
... airbag system) • Window Bags Above the Side Windows. • Airbag Control Module (shared with the front airbag system) • Side impact sensors • Interconnecting Wiring How The Airbag System Works • The airbag control module determines if a frontal collision is severe enough to require the airbags to 8 seconds when the...
... airbag system) • Window Bags Above the Side Windows. • Airbag Control Module (shared with the front airbag system) • Side impact sensors • Interconnecting Wiring How The Airbag System Works • The airbag control module determines if a frontal collision is severe enough to require the airbags to 8 seconds when the...

Owner Manual Diesel
Page 55
... comes on and remains on your protection in a collision. Be sure to tell anyone who works on while driving. 2 Do not modify the components or wiring, including adding any kind of badges or stickers to the steering wheel hub trim cover or the upper right side of the instrument panel. Do...
... comes on and remains on your protection in a collision. Be sure to tell anyone who works on while driving. 2 Do not modify the components or wiring, including adding any kind of badges or stickers to the steering wheel hub trim cover or the upper right side of the instrument panel. Do...

Owner Manual Diesel
Page 84
... 32 name phonebook accessible only in the ЉOperationЉ section. the global standard that enables different electronic devices to connect to each other without wires or a docking station, so UConnect works no matter where you stow your cellular phone (be linked to system. UConnect™ features Bluetooth™ technology - 84...
... 32 name phonebook accessible only in the ЉOperationЉ section. the global standard that enables different electronic devices to connect to each other without wires or a docking station, so UConnect works no matter where you stow your cellular phone (be linked to system. UConnect™ features Bluetooth™ technology - 84...

