
Owner's Manual
Page 26
Avoid touching the new batteries with rubbing alcohol. 3. The horn will pulse, headlights/park lights will flash, the Vehicle Theft Alarm/Immobilizer light, located in the instrument cluster, will flash, and the vehicle will then rearm itself. Test transmitter operation. Make sure there is ...Separating Transmitter Halves With the transmitter buttons facing down, use a thin coin to pry the two halves of light only operation the system will not start. Remove and replace the batteries. Make sure not to disarm it with your fingers. When the alarm is an even "gap" between the...
Avoid touching the new batteries with rubbing alcohol. 3. The horn will pulse, headlights/park lights will flash, the Vehicle Theft Alarm/Immobilizer light, located in the instrument cluster, will flash, and the vehicle will then rearm itself. Test transmitter operation. Make sure there is ...Separating Transmitter Halves With the transmitter buttons facing down, use a thin coin to pry the two halves of light only operation the system will not start. Remove and replace the batteries. Make sure not to disarm it with your fingers. When the alarm is an even "gap" between the...
Owner's Manual
Page 28
To open the door. If you remain in the vehicle or not. If this occurs, disarm the system. The exterior lights will flash, the horn will sound, and the ignition will sound. Pull out on the grab handle and open the sliding door from the outside . ... whether you are in the vehicle and open the sliding door from the inside or the outside . The alarm system will be activated when the battery is designed to protect your vehicle, however, you can not be unlocked from the inside , press the button on the outside handle to open a door...
To open the door. If you remain in the vehicle or not. If this occurs, disarm the system. The exterior lights will flash, the horn will sound, and the ignition will sound. Pull out on the grab handle and open the sliding door from the outside . ... whether you are in the vehicle and open the sliding door from the inside or the outside . The alarm system will be activated when the battery is designed to protect your vehicle, however, you can not be unlocked from the inside , press the button on the outside handle to open a door...
Owner's Manual
Page 87
UNDERSTANDING THE FEATURES OF YOUR VEHICLE 87 ▫ Automatic Headlights - If Equipped ...145 ▫ Daytime Running Lights (Canada/Fleet Vehicles Only) ...145 ▫ Lights-On Reminder ...145 ▫ Battery Protection ...145 ▫ Headlamp Delay - If Equipped ...146 ▫ Front Fog Lights - If Equipped ...146 Multifunction Lever ...147 ▫ Turn Signals ...147 ▫ Headlight Low/High...
UNDERSTANDING THE FEATURES OF YOUR VEHICLE 87 ▫ Automatic Headlights - If Equipped ...145 ▫ Daytime Running Lights (Canada/Fleet Vehicles Only) ...145 ▫ Lights-On Reminder ...145 ▫ Battery Protection ...145 ▫ Headlamp Delay - If Equipped ...146 ▫ Front Fog Lights - If Equipped ...146 Multifunction Lever ...147 ▫ Turn Signals ...147 ▫ Headlight Low/High...
Owner's Manual
Page 145
...counterclockwise position. After 3 minutes of time when the ignition switch is in the Automatic mode. Daytime Running Lights (Canada/Fleet Vehicles Only) The Daytime Running Lights will come ON in the LOCK position. UNDERSTANDING THE FEATURES OF YOUR VEHICLE 145 Automatic Headlights - If ...is in any position other than 3 Battery Protection This feature provides battery protection to the OFF position. To turn the system ON, turn the headlight switch clockwise to avoid wearing down the battery if the headlights, park lights, or front fog lights are off, and the parking brake...
...counterclockwise position. After 3 minutes of time when the ignition switch is in the Automatic mode. Daytime Running Lights (Canada/Fleet Vehicles Only) The Daytime Running Lights will come ON in the LOCK position. UNDERSTANDING THE FEATURES OF YOUR VEHICLE 145 Automatic Headlights - If ...is in any position other than 3 Battery Protection This feature provides battery protection to the OFF position. To turn the system ON, turn the headlight switch clockwise to avoid wearing down the battery if the headlights, park lights, or front fog lights are off, and the parking brake...
Owner's Manual
Page 146
... Vehicle Information Center (EVIC) "Customer Programmable Features" for 30, 60, or 90 seconds, or not remain on . Then turn on the park lights or the low beam headlights and pull out on the headlight switch control knob. Pressing the headlight switch control knob in will be cancelled. The... battery protection feature will be turned off within 45 seconds. NOTE: The headlights must be disabled if the ignition switch is turned off . To ...
... Vehicle Information Center (EVIC) "Customer Programmable Features" for 30, 60, or 90 seconds, or not remain on . Then turn on the park lights or the low beam headlights and pull out on the headlight switch control knob. Pressing the headlight switch control knob in will be cancelled. The... battery protection feature will be turned off within 45 seconds. NOTE: The headlights must be disabled if the ignition switch is turned off . To ...
Owner's Manual
Page 167
..., radio, power vent windows, power outlets, and removable center console, when the ignition switch is turned off your vehicle's battery and charging system; For additional information on HomeLink , call 1-800- 355-3515, or on for 10 seconds, the headlights... will remain on . It triggers these devices at www.homelink.com. 3 The display will turn ON. no batteries are turned on the internet at the push of viewing. Pressing the "STEP" button when in this display will select "...) that operate devices such as garage door openers, motorized gates, or home lighting.
..., radio, power vent windows, power outlets, and removable center console, when the ignition switch is turned off your vehicle's battery and charging system; For additional information on HomeLink , call 1-800- 355-3515, or on for 10 seconds, the headlights... will remain on . It triggers these devices at www.homelink.com. 3 The display will turn ON. no batteries are turned on the internet at the push of viewing. Pressing the "STEP" button when in this display will select "...) that operate devices such as garage door openers, motorized gates, or home lighting.

Owner's Manual
Page 169
...HomeLink for programming and/or operation of HomeLink. Do not hold the two outer HomeLink buttons, and release only when the indicator light begins to flash (after 20 seconds). HomeLink Buttons 3 2. UNDERSTANDING THE FEATURES OF YOUR VEHICLE 169 Programming HomeLink NOTE: When ...programming a garage door opener, it is also recommended that a new battery be turned to the second (or accessories ) position for quicker training and accurate transmission of the radio-frequency signal. 1. Some vehicles ...
...HomeLink for programming and/or operation of HomeLink. Do not hold the two outer HomeLink buttons, and release only when the indicator light begins to flash (after 20 seconds). HomeLink Buttons 3 2. UNDERSTANDING THE FEATURES OF YOUR VEHICLE 169 Programming HomeLink NOTE: When ...programming a garage door opener, it is also recommended that a new battery be turned to the second (or accessories ) position for quicker training and accurate transmission of the radio-frequency signal. 1. Some vehicles ...
Owner's Manual
Page 177
Do not hang any type of time to allow the alternator to degrade battery life and/or prevent engine starting. • Accessories that can cause damage. 3 Front Cupholders Only use these intermittently and with greater caution. &#...panel cupholders are designed for accessory plugs only. CAUTION! • Many accessories that draw higher power (i.e. coolers, vacuum cleaners, lights, etc.), will discharge sufficiently to recharge the vehicle's battery. • Power outlets are located in use of the power outlet can be driven a sufficient length of accessory or accessory ...
Do not hang any type of time to allow the alternator to degrade battery life and/or prevent engine starting. • Accessories that can cause damage. 3 Front Cupholders Only use these intermittently and with greater caution. &#...panel cupholders are designed for accessory plugs only. CAUTION! • Many accessories that draw higher power (i.e. coolers, vacuum cleaners, lights, etc.), will discharge sufficiently to recharge the vehicle's battery. • Power outlets are located in use of the power outlet can be driven a sufficient length of accessory or accessory ...

Owner's Manual
Page 188
...vacuum cleaners, lights, etc.), will discharge sufficiently to recharge the vehicle's battery. Eventually, if plugged in long enough, the vehicle's battery will degrade the battery even more quickly. CAUTION! • Many accessories that can be driven a sufficient length of time to allow the generator to degrade battery life and...vehicle not being started (with accessories still plugged in), the vehicle must be plugged in draw power from the vehicle's battery, even when not in the power cord for the cellular phone into the holder. 188 UNDERSTANDING THE FEATURES OF YOUR VEHICLE ...
...vacuum cleaners, lights, etc.), will discharge sufficiently to recharge the vehicle's battery. Eventually, if plugged in long enough, the vehicle's battery will degrade the battery even more quickly. CAUTION! • Many accessories that can be driven a sufficient length of time to allow the generator to degrade battery life and...vehicle not being started (with accessories still plugged in), the vehicle must be plugged in draw power from the vehicle's battery, even when not in the power cord for the cellular phone into the holder. 188 UNDERSTANDING THE FEATURES OF YOUR VEHICLE ...
Owner's Manual
Page 198
... ▫ Menu Button (14) ...261 ▫ Next/Prev Buttons (2, 15) ...261 ▫ FF/RW Buttons (3, 16) ...261 ▫ Enter Button (17) ...261 ▫ Light Button (18) ...262 ▫ Remote Control Battery Service ...262 ▫ Operating Instructions - Video Screen ...262 ▫ Operating Instructions - Headphones ...264 ▫ Operating Instructions - MP3 Player, Portable Walkman ...266
... ▫ Menu Button (14) ...261 ▫ Next/Prev Buttons (2, 15) ...261 ▫ FF/RW Buttons (3, 16) ...261 ▫ Enter Button (17) ...261 ▫ Light Button (18) ...262 ▫ Remote Control Battery Service ...262 ▫ Operating Instructions - Video Screen ...262 ▫ Operating Instructions - Headphones ...264 ▫ Operating Instructions - MP3 Player, Portable Walkman ...266

Owner's Manual
Page 262
The replacement batteries for the remote control slide the cover rearward. Operating Instructions - Video Screen Push up on the remote control. Screen Width Button Changes the width of the screen picture. 262 UNDERSTANDING YOUR INSTRUMENT PANEL Light Button (18) Pressing this button illuminates the buttons on the release button to lower the video screen. Lowering Video Screen 1. Remote Control Battery Service • To replace the batteries for the remote control are two AAA batteries.
The replacement batteries for the remote control slide the cover rearward. Operating Instructions - Video Screen Push up on the remote control. Screen Width Button Changes the width of the screen picture. 262 UNDERSTANDING YOUR INSTRUMENT PANEL Light Button (18) Pressing this button illuminates the buttons on the release button to lower the video screen. Lowering Video Screen 1. Remote Control Battery Service • To replace the batteries for the remote control are two AAA batteries.

Owner's Manual
Page 265
An indicator light will illuminate on the video screen and the headphones. • Replace the battery in the headphones. 3. General Information This device complies with part 15 of the FCC rules and RSS 210 of sight between the headphone transmitter on ... is subject to indicate the headphones are on the headphones. Direct sunlight or objects blocking the line of Industry Canada. The headphones require two AAA batteries. Press the headphone transmitter button (1) on the remote control and the power button on . UNDERSTANDING YOUR INSTRUMENT PANEL 265 Headphone...
An indicator light will illuminate on the video screen and the headphones. • Replace the battery in the headphones. 3. General Information This device complies with part 15 of the FCC rules and RSS 210 of sight between the headphone transmitter on ... is subject to indicate the headphones are on the headphones. Direct sunlight or objects blocking the line of Industry Canada. The headphones require two AAA batteries. Press the headphone transmitter button (1) on the remote control and the power button on . UNDERSTANDING YOUR INSTRUMENT PANEL 265 Headphone...

Owner's Manual
Page 434
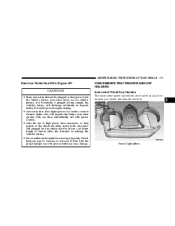
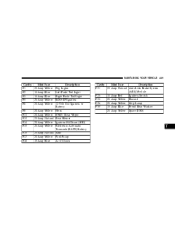
A label that identifies each component is located in the engine compartment near the battery. 434 MAINTAINING YOUR VEHICLE INTEGRATED POWER MODULE (IPM) Integrated Power module (IPM) An Integrated Power Module is printed on the inside of the cover. Cavity ... Pink Front Wipers F9 40 Amp Green Anti-Lock Brake System (ABS) Pump F10 40 Amp Green Front Blower F13 40 Amp Green Electronic Back Light (EBL) F19 40 Amp Green Body Control Module (BCM) Feed 1 F20 30 Amp Pink Central Amplifier F22 30 Amp Pink Seats F27 40 Amp Green...
A label that identifies each component is located in the engine compartment near the battery. 434 MAINTAINING YOUR VEHICLE INTEGRATED POWER MODULE (IPM) Integrated Power module (IPM) An Integrated Power Module is printed on the inside of the cover. Cavity ... Pink Front Wipers F9 40 Amp Green Anti-Lock Brake System (ABS) Pump F10 40 Amp Green Front Blower F13 40 Amp Green Electronic Back Light (EBL) F19 40 Amp Green Body Control Module (BCM) Feed 1 F20 30 Amp Pink Central Amplifier F22 30 Amp Pink Seats F27 40 Amp Green...
Owner's Manual
Page 435
... Fuse 20 Amp Yellow 15 Amp Blue 15 Amp Blue 20 Amp Yellow 20 Amp Yellow Description Fog Lights Left Park/Tail Light Right Park/Tail Light RDO/IP Ignition 12 Volt Out Ignition or Battery 20 Amp Yellow Horn 20 Amp Yellow EWD/ Rear Wiper 25 Amp Natural Rear Blower 20 Amp Yellow... Ignition Off Draw (IOD) 20 Amp Yellow Electronic Automatic Transaxle (EATX) Battery 25 Amp Natural ASD 20 Amp Yellow Fuel...
... Fuse 20 Amp Yellow 15 Amp Blue 15 Amp Blue 20 Amp Yellow 20 Amp Yellow Description Fog Lights Left Park/Tail Light Right Park/Tail Light RDO/IP Ignition 12 Volt Out Ignition or Battery 20 Amp Yellow Horn 20 Amp Yellow EWD/ Rear Wiper 25 Amp Natural Rear Blower 20 Amp Yellow... Ignition Off Draw (IOD) 20 Amp Yellow Electronic Automatic Transaxle (EATX) Battery 25 Amp Natural ASD 20 Amp Yellow Fuel...
Owner's Manual
Page 483
...Automatic Transmission ...424 Adding Fluid ...426 Fluid and Filter Changes ...427 Fluid Change ...427 Fluid Level Check ...426 Fluid Type ...425,445 Ball Joints ...Battery ...Gas Caution ...Jump Starting ...Keyless Transmitter Replacement (RKE) Saving Feature (Protection) ...Bearings ...412 ...409 ...409 ...387 ...25 ...145 ...428 Belts... ...445 Brake, Parking ...313 Brake System ...314,421 Anti-Lock (ABS) ...315 Fluid Check ...423 Hoses ...422 Warning Light ...205 Brakes ...314,421 Brake/Transmission Interlock ...310 Break-In Recommendations, New Vehicle ...82 Bulb Replacement ...438 Bulbs...
...Automatic Transmission ...424 Adding Fluid ...426 Fluid and Filter Changes ...427 Fluid Change ...427 Fluid Level Check ...426 Fluid Type ...425,445 Ball Joints ...Battery ...Gas Caution ...Jump Starting ...Keyless Transmitter Replacement (RKE) Saving Feature (Protection) ...Bearings ...412 ...409 ...409 ...387 ...25 ...145 ...428 Belts... ...445 Brake, Parking ...313 Brake System ...314,421 Anti-Lock (ABS) ...315 Fluid Check ...423 Hoses ...422 Warning Light ...205 Brakes ...314,421 Brake/Transmission Interlock ...310 Break-In Recommendations, New Vehicle ...82 Bulb Replacement ...438 Bulbs...
Owner's Manual
Page 490
...) . 74 Latches Hood ...141 Lead Free Gasoline ...342 Life of Tires ...335 Liftgate ...34 Lights ...84,142 Airbag ...59,68,84,206 Alarm ...208 Anti-Lock ...207 Automatic Headlights ...145 Back-Up ...441 Battery Saver ...145 Brake Warning ...205 Bulb Replacement ...437,438 Center Mounted Stop ...442 Cruise ...211 ... ...145 High Beam Indicator ...209 High Beam/Low Beam Select ...148 Illuminated Entry ...16 Interior ...143,144 License ...442 Liftgate Ajar ...205 Lights On Reminder ...145 Low Fuel ...204 Malfunction Indicator (Check Engine) ...210 Oil Pressure ...209 Park ...143,439 Passing ...148
...) . 74 Latches Hood ...141 Lead Free Gasoline ...342 Life of Tires ...335 Liftgate ...34 Lights ...84,142 Airbag ...59,68,84,206 Alarm ...208 Anti-Lock ...207 Automatic Headlights ...145 Back-Up ...441 Battery Saver ...145 Brake Warning ...205 Bulb Replacement ...437,438 Center Mounted Stop ...442 Cruise ...211 ... ...145 High Beam Indicator ...209 High Beam/Low Beam Select ...148 Illuminated Entry ...16 Interior ...143,144 License ...442 Liftgate Ajar ...205 Lights On Reminder ...145 Low Fuel ...204 Malfunction Indicator (Check Engine) ...210 Oil Pressure ...209 Park ...143,439 Passing ...148
Owner's Manual
Page 491
... Rack) ...Lumbar Support ... . 74 . 413 . 190 . 122 Maintenance, Airbag ...68 Maintenance Free Battery ...409 Maintenance Procedures ...401 Maintenance Schedule ...448 Schedule "A" ...463 Schedule "B" ...451 Maintenance, Sunroof ...175 Malfunction Indicator Light (Check Engine) . . 210,399 Manual, Service ...478 Map/Reading Lights ...158 Mini-Trip Computer ...162 Mirrors ...90 Automatic Dimming ...90 Electric Remote ...92...
... Rack) ...Lumbar Support ... . 74 . 413 . 190 . 122 Maintenance, Airbag ...68 Maintenance Free Battery ...409 Maintenance Procedures ...401 Maintenance Schedule ...448 Schedule "A" ...463 Schedule "B" ...451 Maintenance, Sunroof ...175 Malfunction Indicator Light (Check Engine) . . 210,399 Manual, Service ...478 Map/Reading Lights ...158 Mini-Trip Computer ...162 Mirrors ...90 Automatic Dimming ...90 Electric Remote ...92...

Owner Manual
Page 89
... ...138 Ⅵ Multifunction Lever ...138 ▫ Turn Signals ...138 ▫ Headlight Low/High Beam Selector Switch ...139 ▫ Passing Light ...139 ▫ Windshield Wipers And Washers ...140 Ⅵ Tilt Steering Column - If Equipped ...146 Ⅵ Electronic Speed Control - If...THE FEATURES OF YOUR VEHICLE 89 ▫ Automatic Headlights - If Equipped ...136 ▫ Daytime Running Lights (Canada/Fleet Vehicles Only) ...137 ▫ Lights-On Reminder ...137 ▫ Battery Protection ...137 ▫ Headlamp Delay - If Equipped ...144 Ⅵ Adjustable Pedals - If Equipped ......
... ...138 Ⅵ Multifunction Lever ...138 ▫ Turn Signals ...138 ▫ Headlight Low/High Beam Selector Switch ...139 ▫ Passing Light ...139 ▫ Windshield Wipers And Washers ...140 Ⅵ Tilt Steering Column - If Equipped ...146 Ⅵ Electronic Speed Control - If...THE FEATURES OF YOUR VEHICLE 89 ▫ Automatic Headlights - If Equipped ...136 ▫ Daytime Running Lights (Canada/Fleet Vehicles Only) ...137 ▫ Lights-On Reminder ...137 ▫ Battery Protection ...137 ▫ Headlamp Delay - If Equipped ...144 Ⅵ Adjustable Pedals - If Equipped ......
Owner Manual
Page 137
... If the headlights or the park lights are left on for normal night time driving. Battery Protection This feature provides battery protection to any position other than OFF or AUTO, the lights will turn off automatically until the next cycle of the ignition switch or headlight switch. After 3 minutes of time...whenever the vehicle is running, the headlights are off, and the parking brake is turned to avoid wearing down the battery if the headlights, park lights, or front fog lights are left on, or if the dimmer control is in the extreme top position after the ignition switch is turned ...
... If the headlights or the park lights are left on for normal night time driving. Battery Protection This feature provides battery protection to any position other than OFF or AUTO, the lights will turn off automatically until the next cycle of the ignition switch or headlight switch. After 3 minutes of time...whenever the vehicle is running, the headlights are off, and the parking brake is turned to avoid wearing down the battery if the headlights, park lights, or front fog lights are left on, or if the dimmer control is in the extreme top position after the ignition switch is turned ...
Owner Manual
Page 159
...The Universal Transceiver operates off or until the key is removed and either front door is running and, the front wipers are needed. no batteries are turned on Parade Mode (Daytime Brightness) for the power windows, radio, power vent windows, power outlets, and removable center console, when... switch has been moved to three remote controls (hand held transmitters) that operate devices such as garage door openers, motorized gates, or home lighting. Headlamp On With Wipers (Available with Auto Headlights Only) When this feature is selected, accessory power will select 30, 60, 90, or...
...The Universal Transceiver operates off or until the key is removed and either front door is running and, the front wipers are needed. no batteries are turned on Parade Mode (Daytime Brightness) for the power windows, radio, power vent windows, power outlets, and removable center console, when... switch has been moved to three remote controls (hand held transmitters) that operate devices such as garage door openers, motorized gates, or home lighting. Headlamp On With Wipers (Available with Auto Headlights Only) When this feature is selected, accessory power will select 30, 60, 90, or...


