
Owner Manual
Page 269
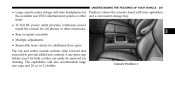
The cupholders will store headphones for Position 1 shows the console closed with four cupholders the available rear DVD entertainment system or other electronics. • Rear occupant accessible • Multiple adjustments &#...
The cupholders will store headphones for Position 1 shows the console closed with four cupholders the available rear DVD entertainment system or other electronics. • Rear occupant accessible • Multiple adjustments &#...
Owner Manual
Page 288
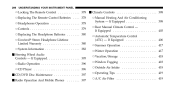
... - 286 UNDERSTANDING YOUR INSTRUMENT PANEL ▫ Locking The Remote Control ...378 Ⅵ Climate Controls ...398 ▫ Replacing The Remote Control Batteries ...378 ▫ Headphones Operation ...378 ▫ Controls ...379 ▫ Replacing The Headphone Batteries ...380 ▫ Unwired Stereo Headphone Lifetime Limited Warranty ...380 ▫ System Information ...382 Ⅵ Steering Wheel Audio Controls -
... - 286 UNDERSTANDING YOUR INSTRUMENT PANEL ▫ Locking The Remote Control ...378 Ⅵ Climate Controls ...398 ▫ Replacing The Remote Control Batteries ...378 ▫ Headphones Operation ...378 ▫ Controls ...379 ▫ Replacing The Headphone Batteries ...380 ▫ Unwired Stereo Headphone Lifetime Limited Warranty ...380 ▫ System Information ...382 Ⅵ Steering Wheel Audio Controls -
Owner Manual
Page 362
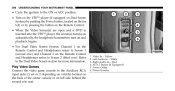
... the Remote Control. • When the Video Screen(s) are open and a DVD is inserted into the VES™ player, the screen(s) turn(s) on automatically, the headphone transmitters turn on and playback begins. • For Dual Video Screen System, Channel 1 on the Remote Control and... Headphones refers to Screen 1 (second row) and Channel 2 on the Remote Control and Headphones refers to the Auxiliary RCA input jacks (1 set or 2 depending on vehicle) located on the back of the center console or...
... the Remote Control. • When the Video Screen(s) are open and a DVD is inserted into the VES™ player, the screen(s) turn(s) on automatically, the headphone transmitters turn on and playback begins. • For Dual Video Screen System, Channel 1 on the Remote Control and... Headphones refers to Screen 1 (second row) and Channel 2 on the Remote Control and Headphones refers to the Auxiliary RCA input jacks (1 set or 2 depending on vehicle) located on the back of the center console or...
Owner Manual
Page 363
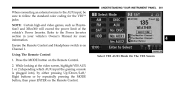
...: Certain high-end video games, such as Playstation3 and XBox360 will exceed the power limit of the vehicle's Power Inverter. Ensure the Remote Control and Headphone switch is plugged into), by either pressing Up/Down/Left/ Right buttons or by repeatedly pressing the MODE button, then press ENTER on Channel 1. While...
...: Certain high-end video games, such as Playstation3 and XBox360 will exceed the power limit of the vehicle's Power Inverter. Ensure the Remote Control and Headphone switch is plugged into), by either pressing Up/Down/Left/ Right buttons or by repeatedly pressing the MODE button, then press ENTER on Channel 1. While...
Owner Manual
Page 365
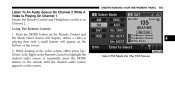
... Remote Control 1. UNDERSTANDING YOUR INSTRUMENT PANEL 363 Listen To An Audio Source On Channel 2 While A Video Is Playing On Channel 1 Ensure the Remote Control and Headphone switch is playing then only a small banner will display, unless a video is on Channel 2. While looking at the video screen, either press Up/ Down/Left...
... Remote Control 1. UNDERSTANDING YOUR INSTRUMENT PANEL 363 Listen To An Audio Source On Channel 2 While A Video Is Playing On Channel 1 Ensure the Remote Control and Headphone switch is playing then only a small banner will display, unless a video is on Channel 2. While looking at the video screen, either press Up/ Down/Left...
Owner Manual
Page 367
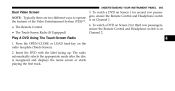
...Press the OPEN/CLOSE or LOAD hard-key on Screen 1 for third row passengers, • The Remote Control ensure the Remote Control and Headphone switch is recognized and displays the menu screen or starts playing the first track. 4 the features of the Video Entertainment System (VES)™.... 4. To watch a DVD on Screen 2 for second row passengers, ensure the Remote Control and Headphone switch NOTE: Typically there are two different ways to operate is on Channel 2. • The Touch-Screen Radio (If Equipped) Dual Video Screen Play...
...Press the OPEN/CLOSE or LOAD hard-key on Screen 1 for third row passengers, • The Remote Control ensure the Remote Control and Headphone switch is recognized and displays the menu screen or starts playing the first track. 4 the features of the Video Entertainment System (VES)™.... 4. To watch a DVD on Screen 2 for second row passengers, ensure the Remote Control and Headphone switch NOTE: Typically there are two different ways to operate is on Channel 2. • The Touch-Screen Radio (If Equipped) Dual Video Screen Play...
Owner Manual
Page 370
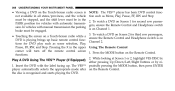
...control screen functions. Insert the DVD with the label facing up basic remote control functions for second row passengers, ensure the Remote Control and Headphone switch is recognized and starts playing the DVD. While looking at Screen 1 or 2, highlight VES DISC by either pressing Up/Down/Left/... buttons or by re1. the disc is on Channel 1. 3. Pressing the X in the PARK position for third row passengers, ensure the Remote Control and Headphone switch is on Channel 2. To watch a DVD on a Touch-Screen radio while a DVD is playing brings up . Using The Remote Control 1. Press...
...control screen functions. Insert the DVD with the label facing up basic remote control functions for second row passengers, ensure the Remote Control and Headphone switch is recognized and starts playing the DVD. While looking at Screen 1 or 2, highlight VES DISC by either pressing Up/Down/Left/... buttons or by re1. the disc is on Channel 1. 3. Pressing the X in the PARK position for third row passengers, ensure the Remote Control and Headphone switch is on Channel 2. To watch a DVD on a Touch-Screen radio while a DVD is playing brings up . Using The Remote Control 1. Press...
Owner Manual
Page 372
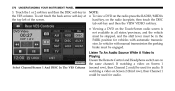
Listen To An Audio Source While A Video Is Playing Ensure the Remote Control and Headphone switch are on the radio faceplate, then touch the DISC the top left of the screen. If watching a video on Screen 1 (second row), then Channel 2 ...
Listen To An Audio Source While A Video Is Playing Ensure the Remote Control and Headphone switch are on the radio faceplate, then touch the DISC the top left of the screen. If watching a video on Screen 1 (second row), then Channel 2 ...
Owner Manual
Page 376
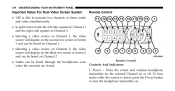
Turns the screen and wireless headphone transmitter for the selected Channel on . To hear audio while the screen is able to transmit two channels of stereo audio and video simultaneously. • ... 2 and can be heard on Channel 2 Remote Control Remote Control • Audio can be heard through the headphones even Controls And Indicators when the screen(s) are closed , press the Power button to turn the headphone transmitter on or off. Power - 374 UNDERSTANDING YOUR INSTRUMENT PANEL Important Notes For Dual Video Screen System...
Turns the screen and wireless headphone transmitter for the selected Channel on . To hear audio while the screen is able to transmit two channels of stereo audio and video simultaneously. • ... 2 and can be heard on Channel 2 Remote Control Remote Control • Audio can be heard through the headphones even Controls And Indicators when the screen(s) are closed , press the Power button to turn the headphone transmitter on or off. Power - 374 UNDERSTANDING YOUR INSTRUMENT PANEL Important Notes For Dual Video Screen System...
Owner Manual
Page 377
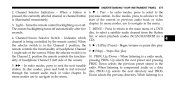
...Down - In menu modes, use to select a satellite audio channel from the Station seconds. Begin/resume or pause disc play 1 (right side of headphone Channel 9. Ⅲ (Stop) - pressing PROG Up selects the next preset and pressing PROG Down selects the previous preset stored in the Channel 1.../Pause) - MENU - When the selector switch is 6. ᭢ / Prev - In disc modes, press and hold to a radio mode, ality of headphone Channel 2 (left side of the screen). Channel Selector Indicators - Turns the remote control backlighting on a data station. Press to return to compressed audio on or...
...Down - In menu modes, use to select a satellite audio channel from the Station seconds. Begin/resume or pause disc play 1 (right side of headphone Channel 9. Ⅲ (Stop) - pressing PROG Up selects the next preset and pressing PROG Down selects the previous preset stored in the Channel 1.../Pause) - MENU - When the selector switch is 6. ᭢ / Prev - In disc modes, press and hold to a radio mode, ality of headphone Channel 2 (left side of the screen). Channel Selector Indicators - Turns the remote control backlighting on a data station. Press to return to compressed audio on or...
Owner Manual
Page 378
Press to slow playback of this manual 18. Press to mute the headphone audio output 16. Press 17. ᭣᭣ - STATUS - rewind through the current audio track or video chapter. 14. MODE - channel. menu. 15. SETUP - MUTE - Press ...
Press to slow playback of this manual 18. Press to mute the headphone audio output 16. Press 17. ᭣᭣ - STATUS - rewind through the current audio track or video chapter. 14. MODE - channel. menu. 15. SETUP - MUTE - Press ...
Owner Manual
Page 380
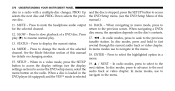
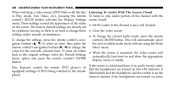
... control functionality can be able to the polarity diagram shown. • Replace the battery compartment cover. Front seat occupants receive some headphone audio coverage to allow them according to • Pressing the Video Lock again or turning the ignition do so for the young ... the vehicle is active. • Replace the batteries, making any changes, follow the radio's instructions to adjust the headphone volume for themselves. Headphones Operation The headphones receive two separate channels of the VES™. The radio and the video screen(s) indicate when Video Lock is not...
... control functionality can be able to the polarity diagram shown. • Replace the battery compartment cover. Front seat occupants receive some headphone audio coverage to allow them according to • Pressing the Video Lock again or turning the ignition do so for the young ... the vehicle is active. • Replace the batteries, making any changes, follow the radio's instructions to adjust the headphone volume for themselves. Headphones Operation The headphones receive two separate channels of the VES™. The radio and the video screen(s) indicate when Video Lock is not...

Owner Manual
Page 381
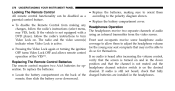
...Remote Control channel/screen selector switch is turned off. UNDERSTANDING YOUR INSTRUMENT PANEL 379 Controls The headphone power indicator and controls are located on Channel 1, the Remote is controlling Channel 1 and the headphones are on the right ear cup. Volume Control Power Button Channel Selection Switch Power Indicator ...: • When both switches are tuned to the audio of the VES™ Channel 1. 4 1. 2. 3. 4. To conserve battery life, the headphones will automatically turn off approximately three minutes after the rear video system is in the same position as the...
...Remote Control channel/screen selector switch is turned off. UNDERSTANDING YOUR INSTRUMENT PANEL 379 Controls The headphone power indicator and controls are located on Channel 1, the Remote is controlling Channel 1 and the headphones are on the right ear cup. Volume Control Power Button Channel Selection Switch Power Indicator ...: • When both switches are tuned to the audio of the VES™ Channel 1. 4 1. 2. 3. 4. To conserve battery life, the headphones will automatically turn off approximately three minutes after the rear video system is in the same position as the...
Owner Manual
Page 382
...Љ) wire5. 380 UNDERSTANDING YOUR INSTRUMENT PANEL • When both switches are tuned Each set of the Mode Selection menu, press the less headphone (ЉProductЉ). To replace the batteries: to the initial user or purchaser (ЉyouЉ or ЉyourЉ) of the ...• Replace the battery compartment cover. Selection menu appears on a popup banner at the bottom of the headphones, and then slide the battery cover 3. To cancel out of headphones requires two AAA batteries for operation. Press the MODE button on the left ear cup of the screen. ...
...Љ) wire5. 380 UNDERSTANDING YOUR INSTRUMENT PANEL • When both switches are tuned Each set of the Mode Selection menu, press the less headphone (ЉProductЉ). To replace the batteries: to the initial user or purchaser (ЉyouЉ or ЉyourЉ) of the ...• Replace the battery compartment cover. Selection menu appears on a popup banner at the bottom of the headphones, and then slide the battery cover 3. To cancel out of headphones requires two AAA batteries for operation. Press the MODE button on the left ear cup of the screen. ...
Owner Manual
Page 384
... (FM, AM, or SAT) are in radio): Ability to the When in Up/Down. This allows the VES™ to output radio sources to the headphones and the radio to output VES™ sources to Disk Up/Down and program all radio modes (FM, AM, and SAT). In this case, VES... from the VES™ online at www.unwiredtechnology.com or by phone at selected radio mode. The VES™ has the 2 are in the shared headphone channel 1 or channel 2. 2. CD Changer (in the same (shared) mode, a VES™ icon will be ability to control the 3332 or email [email protected]...
... (FM, AM, or SAT) are in radio): Ability to the When in Up/Down. This allows the VES™ to output radio sources to the headphones and the radio to output VES™ sources to Disk Up/Down and program all radio modes (FM, AM, and SAT). In this case, VES... from the VES™ online at www.unwiredtechnology.com or by phone at selected radio mode. The VES™ has the 2 are in the shared headphone channel 1 or channel 2. 2. CD Changer (in the same (shared) mode, a VES™ icon will be ability to control the 3332 or email [email protected]...
Owner Manual
Page 388
... select To change the value for optimum viewing, so there is no audio heard, verify Disc Features control the remote DVD player's (if that the headphones are turned on (the ON indicator is equipped) settings of DVD being watched in Play mode, Aux Video, etc.), pressing the remote control's SETUP ... are turned on the screen. desired channel. These settings control the appearance of the channel with the disc in the remote illuminated) and the headphone selector switch is on and show the appropriate menu option and press the remote control's ENTER display menu or media. If the...
... select To change the value for optimum viewing, so there is no audio heard, verify Disc Features control the remote DVD player's (if that the headphones are turned on (the ON indicator is equipped) settings of DVD being watched in Play mode, Aux Video, etc.), pressing the remote control's SETUP ... are turned on the screen. desired channel. These settings control the appearance of the channel with the disc in the remote illuminated) and the headphone selector switch is on and show the appropriate menu option and press the remote control's ENTER display menu or media. If the...

Owner Manual
Page 389
... title is still not heard, check that fully charged batteries The VES™ DVD player and many DVD discs are coded are installed in the headphones. UNDERSTANDING YOUR INSTRUMENT PANEL 387 the remote control's power button to two channels, which may result in a lowered apparent volume level. If DVD Region Codes...
... title is still not heard, check that fully charged batteries The VES™ DVD player and many DVD discs are coded are installed in the headphones. UNDERSTANDING YOUR INSTRUMENT PANEL 387 the remote control's power button to two channels, which may result in a lowered apparent volume level. If DVD Region Codes...
User Guide
Page 78
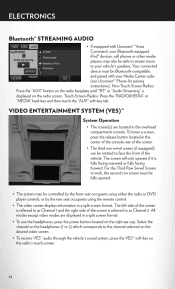
...To receive VES™ audio through the vehicle's sound system, press the VES™ soft-key on the radio screen. Select the channel on the headphones (1 or 2) which corresponds to as Channel 2. ELECTRONICS Bluetooth® STREAMING AUDIO • If equipped with your vehicle's speakers. VIDEO ENTERTAINMENT SYSTEM (...then touch the "AUX" soft-key tab. All modes except video modes are located in a split screen format. • To use the headphones, press the power button located on the right ear cup. Your connected device must be fully opened. • The system may also be ...
...To receive VES™ audio through the vehicle's sound system, press the VES™ soft-key on the radio screen. Select the channel on the headphones (1 or 2) which corresponds to as Channel 2. ELECTRONICS Bluetooth® STREAMING AUDIO • If equipped with your vehicle's speakers. VIDEO ENTERTAINMENT SYSTEM (...then touch the "AUX" soft-key tab. All modes except video modes are located in a split screen format. • To use the headphones, press the power button located on the right ear cup. Your connected device must be fully opened. • The system may also be ...


