

Owner Manual
Page 59
... cut into you with no protection. WARNING! 58 THINGS TO KNOW BEFORE STARTING YOUR VEHICLE WARNING! • A lap belt worn too high can 't do its stowed position. The belt forces won't be replaced immediately.
... cut into you with no protection. WARNING! 58 THINGS TO KNOW BEFORE STARTING YOUR VEHICLE WARNING! • A lap belt worn too high can 't do its stowed position. The belt forces won't be replaced immediately.
Owner Manual
Page 67
...chime will sound to the ON/RUN position, unbuckle and then re-buckle the driver's seat belt at least three times within the first 4. Chrysler Group LLC does not recomfully completed the programming. A 60 seconds of turning the ignition switch to signify that are secured by seat belts and...belt buckled. It is recommended that pets be enabled or disabled by your authorized on the front passenger seat or when the seat is properly stowed. 2. BeltAlert Programming NOTE: Watch for the Seat Belt Reminder Light to turn BeltAlert can be triggered when an animal or heavy...
...chime will sound to the ON/RUN position, unbuckle and then re-buckle the driver's seat belt at least three times within the first 4. Chrysler Group LLC does not recomfully completed the programming. A 60 seconds of turning the ignition switch to signify that are secured by seat belts and...belt buckled. It is recommended that pets be enabled or disabled by your authorized on the front passenger seat or when the seat is properly stowed. 2. BeltAlert Programming NOTE: Watch for the Seat Belt Reminder Light to turn BeltAlert can be triggered when an animal or heavy...

Owner Manual
Page 94
... it. Remind all third row fold-in -floor seats. In addition, all children in the vehicle that the seat belts are not toys and should stow the seat belt out of the reach of children. The child could be played with the child restraint anchorage system called LATCH, which stands for... infant or child restraint. THINGS TO KNOW BEFORE STARTING YOUR VEHICLE 93 WARNING! It is recommended that all third row fold-in -floor seats are stowed and out of reach of an inquisitive child. Two LATCH child restraint anchorage systems are installed on all second-row seats and in the center...
... it. Remind all third row fold-in -floor seats. In addition, all children in the vehicle that the seat belts are not toys and should stow the seat belt out of the reach of children. The child could be played with the child restraint anchorage system called LATCH, which stands for... infant or child restraint. THINGS TO KNOW BEFORE STARTING YOUR VEHICLE 93 WARNING! It is recommended that all third row fold-in -floor seats are stowed and out of reach of an inquisitive child. Two LATCH child restraint anchorage systems are installed on all second-row seats and in the center...
Owner Manual
Page 109
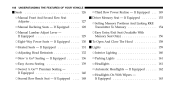
... Ⅵ Seats ...126 ▫ Manual Front And Second Row Seat Adjuster ...127 ▫ Manual Reclining Seats - If Equipped ...131 ▫ Adjusting Head Restraints ...132 ▫ Stow 'n Go Seating - If Equipped ...140 ▫ Second Row Bench Seat - If Equipped ...128 ▫ Manual Lumbar Adjust Lever - If Equipped ...136 ▫ Easy Access...
... Ⅵ Seats ...126 ▫ Manual Front And Second Row Seat Adjuster ...127 ▫ Manual Reclining Seats - If Equipped ...131 ▫ Adjusting Head Restraints ...132 ▫ Stow 'n Go Seating - If Equipped ...140 ▫ Second Row Bench Seat - If Equipped ...128 ▫ Manual Lumbar Adjust Lever - If Equipped ...136 ▫ Easy Access...
Owner Manual
Page 137
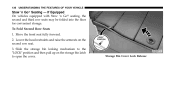
To Fold Second Row Seats 1. Slide the storage bin locking mechanism to open the cover. 136 UNDERSTANDING THE FEATURES OF YOUR VEHICLE Stow 'n Goா Seating - Move the front seat fully forward. 2. Storage Bin Cover Lock Release Lower the head restraints and raise the armrests on the storage bin latch to the ЉLOCKЉ position and then pull up on the second row seat. 3. If Equipped On vehicles equipped with Stow 'n Go seating, the second and third row seats may be folded into the floor for convenient storage.
To Fold Second Row Seats 1. Slide the storage bin locking mechanism to open the cover. 136 UNDERSTANDING THE FEATURES OF YOUR VEHICLE Stow 'n Goா Seating - Move the front seat fully forward. 2. Storage Bin Cover Lock Release Lower the head restraints and raise the armrests on the storage bin latch to the ЉLOCKЉ position and then pull up on the second row seat. 3. If Equipped On vehicles equipped with Stow 'n Go seating, the second and third row seats may be folded into the floor for convenient storage.

Owner Manual
Page 140
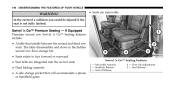
... storage bin cover and slide the storage bin locking mechanism to the third row seat or rear cargo area. Easy Access Seating The second row Stow 'n Go seats can be tilted forward for easy access to the ЉUnlockedЉ position. Always ensure that it latches. UNDERSTANDING THE FEATURES OF... upright position, push rearward on the front of the seat between the seatback and seat cushion and tilt the seat fully forward. Tilting Second Row Stow 'n Go Seat
... storage bin cover and slide the storage bin locking mechanism to the third row seat or rear cargo area. Easy Access Seating The second row Stow 'n Go seats can be tilted forward for easy access to the ЉUnlockedЉ position. Always ensure that it latches. UNDERSTANDING THE FEATURES OF... upright position, push rearward on the front of the seat between the seatback and seat cushion and tilt the seat fully forward. Tilting Second Row Stow 'n Go Seat
Owner Manual
Page 141
The table disassembles and stows in the hidden second row floor storage bin • Seats rotate to face forward or rearward • Seat belts are removable Swivel 'n Go™ Seating ...
The table disassembles and stows in the hidden second row floor storage bin • Seats rotate to face forward or rearward • Seat belts are removable Swivel 'n Go™ Seating ...

Owner Manual
Page 143
... rearward facing position. • The swivel seat should be locked in the forward position when using any obstructions from the floor behind the seat, and stow the third row seat. 2. Failure to see that it is in a locked position with the release handle fully engaged. 142 UNDERSTANDING THE FEATURES OF YOUR...
... rearward facing position. • The swivel seat should be locked in the forward position when using any obstructions from the floor behind the seat, and stow the third row seat. 2. Failure to see that it is in a locked position with the release handle fully engaged. 142 UNDERSTANDING THE FEATURES OF YOUR...

Owner Manual
Page 149
... the floor. To remove the seat, squeeze each release handle and rotate downwards to deploy the wheels. If Equipped While the bench seat does not stow in the floor, it is unlocked. The seat assembly can now be removed from the vehicle and moved on its Easy Out Rollers.
... the floor. To remove the seat, squeeze each release handle and rotate downwards to deploy the wheels. If Equipped While the bench seat does not stow in the floor, it is unlocked. The seat assembly can now be removed from the vehicle and moved on its Easy Out Rollers.

Owner Manual
Page 151
... seats can be folded individually and the vehicle is in PARK. The third row power folding seat adjusts to Normal 2 - Rear Panel Power Switch Bank 1 - Stow 3 - Right/Left Seats 5 - Fold Flat 5 - or together.
... seats can be folded individually and the vehicle is in PARK. The third row power folding seat adjusts to Normal 2 - Rear Panel Power Switch Bank 1 - Stow 3 - Right/Left Seats 5 - Fold Flat 5 - or together.
Owner Manual
Page 152
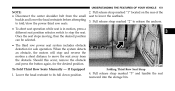
Pull release strap marked "2" to lower the seatback. To Fold Third Row Seats Manually - to fold/stow the power third row seats. • To abort seat operation while seat is in motion, press a different seat position selector switch to stop and reverse ...
Pull release strap marked "2" to lower the seatback. To Fold Third Row Seats Manually - to fold/stow the power third row seats. • To abort seat operation while seat is in motion, press a different seat position selector switch to stop and reverse ...

Owner Manual
Page 216
... consoles available: Basic and Premium. 2. Cupholders are dishwasher safe for additional floor space by removing the cap and clip at NOTE: With all rear seats stowed or removed, 4 x 8 foot the console base. Remove the front anchor cup plug and clip. Slide the console base forward while lifting slightly to extra large...
... consoles available: Basic and Premium. 2. Cupholders are dishwasher safe for additional floor space by removing the cap and clip at NOTE: With all rear seats stowed or removed, 4 x 8 foot the console base. Remove the front anchor cup plug and clip. Slide the console base forward while lifting slightly to extra large...
Owner Manual
Page 393
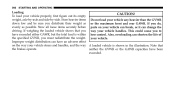
... maximum front and rear GAWR. If you to have been exceeded. Also, overloading can change the driving. Store heavier items Do not load your vehicle. Stow all loose items securely before parts on the way your vehicle can break, or it can shorten the life of the specified GVWR, you distribute...
... maximum front and rear GAWR. If you to have been exceeded. Also, overloading can change the driving. Store heavier items Do not load your vehicle. Stow all loose items securely before parts on the way your vehicle can break, or it can shorten the life of the specified GVWR, you distribute...
Owner Manual
Page 415
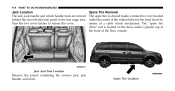
Turn the two cover latches to release the cover. The "spare tire drive" nut is stowed inside a protective cover located under a plastic cap at the front of a cable winch mechanism. Jack And Tool Location Remove the pouch containing the scissors jack, ...jack handle, and tools. 414 WHAT TO DO IN EMERGENCIES Jack Location The jack, jack handle and winch handle tools are stowed behind the rear left side trim panel in the rear cargo area. Spare Tire Removal The spare tire is located on the floor, under the...
Turn the two cover latches to release the cover. The "spare tire drive" nut is stowed inside a protective cover located under a plastic cap at the front of a cable winch mechanism. Jack And Tool Location Remove the pouch containing the scissors jack, ...jack handle, and tools. 414 WHAT TO DO IN EMERGENCIES Jack Location The jack, jack handle and winch handle tools are stowed behind the rear left side trim panel in the rear cargo area. Spare Tire Removal The spare tire is located on the floor, under the...

Owner Manual
Page 417
...; Always park on a firm, level surface as far from the edge of motor traffic. • To assure that spare tires, flat or inflated, are securely stowed, spares must be raised. • Set the parking brake firmly and set an automatic transmission in PARK; 416 WHAT TO DO IN EMERGENCIES NOTE: Passengers... or near a roadway, be extremely careful of the roadway as possible before raising the vehicle. • Block the wheel diagonally opposite the wheel to be stowed with the vehicle on a jack. • Do not let anyone sit in the vehicle when it is on a jack. • Do not get under the...
...; Always park on a firm, level surface as far from the edge of motor traffic. • To assure that spare tires, flat or inflated, are securely stowed, spares must be raised. • Set the parking brake firmly and set an automatic transmission in PARK; 416 WHAT TO DO IN EMERGENCIES NOTE: Passengers... or near a roadway, be extremely careful of the roadway as possible before raising the vehicle. • Block the wheel diagonally opposite the wheel to be stowed with the vehicle on a jack. • Do not let anyone sit in the vehicle when it is on a jack. • Do not get under the...

Owner Manual
Page 424
... the vehicle by your authorized dealer or at least three times. 12. Place the deflated (flat) tire and compact spare tire left. Do not stow the deflated tire in vehicle. wrench while tightening for increased leverage. Reassemble the winch handle extensions to the 13. Lower the jack to eliminate the... the jack screw to form doubt about the correct tightness, have them checked a "T" and fit the winch "T" handle over the drive nut. Always stow the jack parts and the spare tire in the wheels becoming elongated. Finish tightening the lug nuts. clicks at a Rotate the nut to the right...
... the vehicle by your authorized dealer or at least three times. 12. Place the deflated (flat) tire and compact spare tire left. Do not stow the deflated tire in vehicle. wrench while tightening for increased leverage. Reassemble the winch handle extensions to the 13. Lower the jack to eliminate the... the jack screw to form doubt about the correct tightness, have them checked a "T" and fit the winch "T" handle over the drive nut. Always stow the jack parts and the spare tire in the wheels becoming elongated. Finish tightening the lug nuts. clicks at a Rotate the nut to the right...

Owner Manual
Page 425
... TO DO IN EMERGENCIES of an air wrench or other power tools is not recommended and can damage the winch. Secure The Spare Tire 1. Always stow the compact spare tire with the winch "T" handle only. Progress around the bolt circle, tightening the nut opposite to become properly set. This will allow...
... TO DO IN EMERGENCIES of an air wrench or other power tools is not recommended and can damage the winch. Secure The Spare Tire 1. Always stow the compact spare tire with the winch "T" handle only. Progress around the bolt circle, tightening the nut opposite to become properly set. This will allow...

Owner Manual
Page 427
WARNING! 426 WHAT TO DO IN EMERGENCIES CAUTION! Vehicle damage may occur. Jump-starting if the battery is designed specifically to stow a compact spare tire only. CAUTION! NOTE: When using a portable battery booster pack. Do not attempt jump-starting can be dangerous if done ...Do not attempt to use a portable battery booster pack or any other booster source with a system voltage greater than 12 Volts or damage to stow the full size flat tire, or any other full-size tire. JUMP-STARTING PROCEDURE If your vehicle has a discharged battery it can be jumpstarted ...
WARNING! 426 WHAT TO DO IN EMERGENCIES CAUTION! Vehicle damage may occur. Jump-starting if the battery is designed specifically to stow a compact spare tire only. CAUTION! NOTE: When using a portable battery booster pack. Do not attempt jump-starting can be dangerous if done ...Do not attempt to use a portable battery booster pack or any other booster source with a system voltage greater than 12 Volts or damage to stow the full size flat tire, or any other full-size tire. JUMP-STARTING PROCEDURE If your vehicle has a discharged battery it can be jumpstarted ...

Owner Manual
Page 525
... Brake ...459 Power Steering ...342 Fluids ...486 Fluids, Lubricants and Genuine Parts ...486 Fog Light Service ...482 Fog Lights ...164,240,482 Fold in Floor (Stow Јn Go) Seating ...136 Freeing A Stuck Vehicle ...430 Fuel ...378 Adding ...387 Additives ...381 Clean Air ...379 Filler Cap (Gas Cap) ...246,387 Filler Door...
... Brake ...459 Power Steering ...342 Fluids ...486 Fluids, Lubricants and Genuine Parts ...486 Fog Light Service ...482 Fog Lights ...164,240,482 Fold in Floor (Stow Јn Go) Seating ...136 Freeing A Stuck Vehicle ...430 Fuel ...378 Adding ...387 Additives ...381 Clean Air ...379 Filler Cap (Gas Cap) ...246,387 Filler Door...
Owner Manual
Page 532
... Restraint ...87,89 Extender ...67 Front Seat ...53 Inspection ...102 Pretensioners ...61 Rear Seat ...53 Seats ...126 Adjustment ...127 Easy Entry ...139 Fold in Floor (Stow Јn Go) ...136 Heated ...131 Lumbar Support ...129 10
... Restraint ...87,89 Extender ...67 Front Seat ...53 Inspection ...102 Pretensioners ...61 Rear Seat ...53 Seats ...126 Adjustment ...127 Easy Entry ...139 Fold in Floor (Stow Јn Go) ...136 Heated ...131 Lumbar Support ...129 10


