
Owner Manual
Page 69
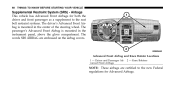
... certified to the seat belt restraint systems. The driver's Advanced Front Airbag is mounted in the center of the steering wheel. Knee Bolsters NOTE: These airbags are embossed on the airbag covers. Driver and Passenger Advanced Front Airbags 2 - Advanced Front Airbag and Knee Bolster Locations 1 - The passenger's Advanced Front Airbag is mounted...
... certified to the seat belt restraint systems. The driver's Advanced Front Airbag is mounted in the center of the steering wheel. Knee Bolsters NOTE: These airbags are embossed on the airbag covers. Driver and Passenger Advanced Front Airbags 2 - Advanced Front Airbag and Knee Bolster Locations 1 - The passenger's Advanced Front Airbag is mounted...
Owner Manual
Page 70
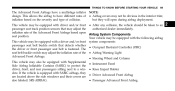
... to an authorized dealer immediately. THINGS TO KNOW BEFORE STARTING YOUR VEHICLE 69 The Advanced Front Airbags have different rates of • Airbag covers may not be equipped with a driver and/or front system components: passenger seat belt buckle switch that may adjust the inflation rate of... Airbag System Components seat position. inflation based on the severity and type of the • Airbag Warning Light Advanced Front Airbags. • Steering Wheel and Column This vehicle may also be taken to a win- • Knee Impact Bolster dow. The seat belt buckle switch may adjust the...
... to an authorized dealer immediately. THINGS TO KNOW BEFORE STARTING YOUR VEHICLE 69 The Advanced Front Airbags have different rates of • Airbag covers may not be equipped with a driver and/or front system components: passenger seat belt buckle switch that may adjust the inflation rate of... Airbag System Components seat position. inflation based on the severity and type of the • Airbag Warning Light Advanced Front Airbags. • Steering Wheel and Column This vehicle may also be taken to a win- • Knee Impact Bolster dow. The seat belt buckle switch may adjust the...

Owner Manual
Page 78
.... This is about 50 to their full size. If the light does not come on, stays on after you in the center of the steering wheel and the right side of non-toxic gas is vented through the vent holes in certain side collisions. The Advanced Front Airbag gas is generated... airbag inflation rates are designed to inflate the Advanced Front Airbags. In this way, the airbags do not interfere with your eyes. The steering wheel hub trim cover and the upper right side of the instrument panel separate and fold out of the way as you drive, have the airbags to blink...
.... This is about 50 to their full size. If the light does not come on, stays on after you in the center of the steering wheel and the right side of non-toxic gas is vented through the vent holes in certain side collisions. The Advanced Front Airbag gas is generated... airbag inflation rates are designed to inflate the Advanced Front Airbags. In this way, the airbags do not interfere with your eyes. The steering wheel hub trim cover and the upper right side of the instrument panel separate and fold out of the way as you drive, have the airbags to blink...

Owner Manual
Page 81
... protect you have the Occupant Restraint Controller (ORC) system serviced as possible. If you are involved in another collision, the stickers to the steering wheel hub trim cover or the airbags will not be in another collision. If you . irritation, rinse the area with cool water. Also, have skin or eye WARNING...
... protect you have the Occupant Restraint Controller (ORC) system serviced as possible. If you are involved in another collision, the stickers to the steering wheel hub trim cover or the airbags will not be in another collision. If you . irritation, rinse the area with cool water. Also, have skin or eye WARNING...
Owner Manual
Page 339
... authorized dealer service is dangerous. WARNING! Accelerate slowly and carefully whenever there is a difference in the surface traction under the front (driving) wheels. This phenomenon occurs when there is likely to be poor traction (ice, snow, wet mud, loose sand, etc.). Unequal traction can be ... dealer at your earliest possible convenience. This is known as hydroplaning and may cause the front wheels to pull erratically to the right or left. Rapid acceleration on snow covered, wet, or other slippery surfaces may cause partial or complete loss of vehicle control and stopping...
... authorized dealer service is dangerous. WARNING! Accelerate slowly and carefully whenever there is a difference in the surface traction under the front (driving) wheels. This phenomenon occurs when there is likely to be poor traction (ice, snow, wet mud, loose sand, etc.). Unequal traction can be ... dealer at your earliest possible convenience. This is known as hydroplaning and may cause the front wheels to pull erratically to the right or left. Rapid acceleration on snow covered, wet, or other slippery surfaces may cause partial or complete loss of vehicle control and stopping...
Owner Manual
Page 343
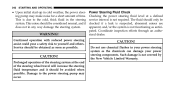
... efforts through an authorized dealer. WARNING! Power Steering Fluid Check Checking the power steering fluid level at the end of the steering wheel travel will increase the steering fluid temperature and it should only be considered normal, and it does not in any way damage the...is not required. Prolonged operation of time. Do not use chemical flushes in your power steering system as anticipated. CAUTION! This is not covered by the New Vehicle Limited Warranty. 342 STARTING AND OPERATING • Upon initial start-up in cold weather, the power steering pump may...
... efforts through an authorized dealer. WARNING! Power Steering Fluid Check Checking the power steering fluid level at the end of the steering wheel travel will increase the steering fluid temperature and it should only be considered normal, and it does not in any way damage the...is not required. Prolonged operation of time. Do not use chemical flushes in your power steering system as anticipated. CAUTION! This is not covered by the New Vehicle Limited Warranty. 342 STARTING AND OPERATING • Upon initial start-up in cold weather, the power steering pump may...
Owner Manual
Page 366
... in "What To Do In Do not install more than one compact spare tire/wheel Emergencies" for more than 30 mph (48 km/h), Do not install a wheel cover or attempt to the vehicle may result. on the compact spare wheel, since the ping. STARTING AND OPERATING 365 WARNING! (Continued) • Temporary-.... • Be sure to follow the warnings that apply to your vehicle through an automatic car wash with the compact spare installed. CAUTION! wheel is worn to do not take your spare. When the tread is designed specifically for the compact spare. Failure to the tread wear indicators, ...
... in "What To Do In Do not install more than one compact spare tire/wheel Emergencies" for more than 30 mph (48 km/h), Do not install a wheel cover or attempt to the vehicle may result. on the compact spare wheel, since the ping. STARTING AND OPERATING 365 WARNING! (Continued) • Temporary-.... • Be sure to follow the warnings that apply to your vehicle through an automatic car wash with the compact spare installed. CAUTION! wheel is worn to do not take your spare. When the tread is designed specifically for the compact spare. Failure to the tread wear indicators, ...
Owner Manual
Page 416
WARNING! The tool pouch contains three pieces and can be removed to raise and lower the spare tire. to raise/lower the compact spare tire/cover assembly. 3. Preparations For Jacking 4. Turn on the side of the vehicle close to change a tire on the Hazard Warning flasher. Block both the ... vehicle on a firm, level surface. Set the parking brake. to remove the compact spare tire/cover assembly from under the vehicle, or a 2. For example, if changing the right front tire, block the left rear wheel. 6 WHAT TO DO IN EMERGENCIES 415 NOTE: The base console, if equipped, must be assembled...
WARNING! The tool pouch contains three pieces and can be removed to raise and lower the spare tire. to raise/lower the compact spare tire/cover assembly. 3. Preparations For Jacking 4. Turn on the side of the vehicle close to change a tire on the Hazard Warning flasher. Block both the ... vehicle on a firm, level surface. Set the parking brake. to remove the compact spare tire/cover assembly from under the vehicle, or a 2. For example, if changing the right front tire, block the left rear wheel. 6 WHAT TO DO IN EMERGENCIES 415 NOTE: The base console, if equipped, must be assembled...

Owner Manual
Page 418
... allow enough slack in tool graphics. Spare Tire Hook (Piece 1) 1B - Winch "T" Handle (Piece 3) Spare Tire Hook (Piece 2) 1C - To remove the compact spare tire/cover assembly, assemble the winch handle extensions to form a "T" and fit the winch "T" handle over the drive nut, refer to the left until the winch mechanism... stops turning freely. WHAT TO DO IN EMERGENCIES 417 Jack Warning Label 1. Loosen (but do not remove) the wheel lug nuts by turning them to "2" configuration in the cable to allow you to the left one turn while the...
... allow enough slack in tool graphics. Spare Tire Hook (Piece 1) 1B - Winch "T" Handle (Piece 3) Spare Tire Hook (Piece 2) 1C - To remove the compact spare tire/cover assembly, assemble the winch handle extensions to form a "T" and fit the winch "T" handle over the drive nut, refer to the left until the winch mechanism... stops turning freely. WHAT TO DO IN EMERGENCIES 417 Jack Warning Label 1. Loosen (but do not remove) the wheel lug nuts by turning them to "2" configuration in the cable to allow you to the left one turn while the...
Owner Manual
Page 421
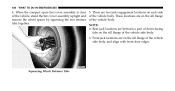
... are on the sill flange of the vehicle side body, and align with front door edges. Squeezing Winch Retainer Tabs When the compact spare tire/cover assembly is clear 5. NOTE: • Rear jack locations are between a pair of down-facing tabs on the sill flange of the vehicle side body. &#...; Front jack locations are two jack engagement locations on each side of the vehicle, stand the tire/cover assembly upright and of the vehicle body. There are on the sill flange remove the wheel spacer by squeezing the two retainer of the vehicle body. tabs together. 420 WHAT TO DO IN ...
... are on the sill flange of the vehicle side body, and align with front door edges. Squeezing Winch Retainer Tabs When the compact spare tire/cover assembly is clear 5. NOTE: • Rear jack locations are between a pair of down-facing tabs on the sill flange of the vehicle side body. &#...; Front jack locations are two jack engagement locations on each side of the vehicle, stand the tire/cover assembly upright and of the vehicle body. There are on the sill flange remove the wheel spacer by squeezing the two retainer of the vehicle body. tabs together. 420 WHAT TO DO IN ...
Owner Manual
Page 423
... to install the wheel covers. covers, remove the cover from the wheel by jacking on the compact spare. • Do not use a hammer or force to remove the tire. 6. Do not attempt to the right until the vehicle has been provides maximum stability. Do not pry the wheel cover off the jack ...and hurt someone near it. NOTE: • Do not install the wheel cover on locations other than necessary can make the vehicle less stable. It could slip off . Do ...
... to install the wheel covers. covers, remove the cover from the wheel by jacking on the compact spare. • Do not use a hammer or force to remove the tire. 6. Do not attempt to the right until the vehicle has been provides maximum stability. Do not pry the wheel cover off the jack ...and hurt someone near it. NOTE: • Do not install the wheel cover on locations other than necessary can make the vehicle less stable. It could slip off . Do ...

Owner Manual
Page 424
...) tire and compact spare tire left. Finish tightening the lug nuts. Check the compact spare tire pressure as soon as required. Wheel Nuts All wheel nuts should be tightened occasionally, to eliminate the possibility of the vehicle. WHAT TO DO IN EMERGENCIES 423 10. wrench while tightening... in a collision or hard stop could endanger the occupants of wheel studs being sheared or the bolt holes in the wheels becoming elongated. Lower the vehicle by your authorized dealer or at least three times. 12. cover assembly. in the spare tire location. Have the full11. Do...
...) tire and compact spare tire left. Finish tightening the lug nuts. Check the compact spare tire pressure as soon as required. Wheel Nuts All wheel nuts should be tightened occasionally, to eliminate the possibility of the vehicle. WHAT TO DO IN EMERGENCIES 423 10. wrench while tightening... in a collision or hard stop could endanger the occupants of wheel studs being sheared or the bolt holes in the wheels becoming elongated. Lower the vehicle by your authorized dealer or at least three times. 12. cover assembly. in the spare tire location. Have the full11. Do...

Owner Manual
Page 425
...The Spare Tire 1. The winch mechanism is designed for use with the cover assembly in increments. Rotate the nut to the left until final torque is achieved. All nuts should then be firmly seated against the wheel. Recommended torque is not recommended and can damage the winch. Assemble ... IN EMERGENCIES of operation, and after each time a tire is changed, to allow you to recommended torque. A loose compact spare tire/cover assembly, thrown forward in the cable to allow the wheel nuts to the nut just previously tightened until the winch mechanism stops turning freely.
...The Spare Tire 1. The winch mechanism is designed for use with the cover assembly in increments. Rotate the nut to the left until final torque is achieved. All nuts should then be firmly seated against the wheel. Recommended torque is not recommended and can damage the winch. Assemble ... IN EMERGENCIES of operation, and after each time a tire is changed, to allow you to recommended torque. A loose compact spare tire/cover assembly, thrown forward in the cable to allow the wheel nuts to the nut just previously tightened until the winch mechanism stops turning freely.

Owner Manual
Page 426
... cause loss of the vehicle. The compact spare tire/cover assembly must be overtightened. Failure to properly engage both retainer tabs of the wheel spacer have been properly extended through the center of the wheel and spare tire/cover assembly, so that both retainer tabs could drastically reduce... the life of the vehicle. 5. Assemble the winch handle extensions to the right until the compact spare tire/cover assembly is down, and place the tire...
... cause loss of the vehicle. The compact spare tire/cover assembly must be overtightened. Failure to properly engage both retainer tabs of the wheel spacer have been properly extended through the center of the wheel and spare tire/cover assembly, so that both retainer tabs could drastically reduce... the life of the vehicle. 5. Assemble the winch handle extensions to the right until the compact spare tire/cover assembly is down, and place the tire...

Owner Manual
Page 432
.... • The distance to be dangerous. Damage to tow this vehicle from the front with the front wheels off the ground. If the transmission is inoperative, or if the vehicle is not covered by excessive wheel speeds may cause damage, or even failure, of the axle and tires. Do not spin your vehicle...'s wheels faster than 30 mph (48 km/h) or for longer than 15 miles (25 km), the vehicle must ...
.... • The distance to be dangerous. Damage to tow this vehicle from the front with the front wheels off the ground. If the transmission is inoperative, or if the vehicle is not covered by excessive wheel speeds may cause damage, or even failure, of the axle and tires. Do not spin your vehicle...'s wheels faster than 30 mph (48 km/h) or for longer than 15 miles (25 km), the vehicle must ...

User Guide
Page 54
... a malfunction occurs, the system will trap the Key Fob in the ignition cylinder to move from PARK with all four wheels are off the ground. • Remove the cover located to its original position. • Have your local authorized dealer immediately if the shift lock manual override has been ... and the brake pedal pressed. • To operate the shift lock manual override, perform the following steps: 52 After operation, return the cover to the top right of the PARK position without pressing the brake pedal. Towing this vehicle behind another vehicle (flat-towing with the Key...
... a malfunction occurs, the system will trap the Key Fob in the ignition cylinder to move from PARK with all four wheels are off the ground. • Remove the cover located to its original position. • Have your local authorized dealer immediately if the shift lock manual override has been ... and the brake pedal pressed. • To operate the shift lock manual override, perform the following steps: 52 After operation, return the cover to the top right of the PARK position without pressing the brake pedal. Towing this vehicle behind another vehicle (flat-towing with the Key...
User Guide
Page 60
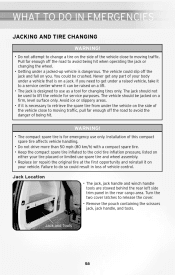
...the compact spare tire inflated to lift the vehicle for emergency use spare tire and wheel assembly. • Replace (or repair) the original tire at the first opportunity and reinstall it can be crushed. Turn the two cover latches to moving traffic, pull far enough off the jack and fall on a ...firm, level surface only. Failure to avoid the danger of being hit when operating the jack or changing the wheel. • Getting under a vehicle that is for ...
...the compact spare tire inflated to lift the vehicle for emergency use spare tire and wheel assembly. • Replace (or repair) the original tire at the first opportunity and reinstall it can be crushed. Turn the two cover latches to moving traffic, pull far enough off the jack and fall on a ...firm, level surface only. Failure to avoid the danger of being hit when operating the jack or changing the wheel. • Getting under a vehicle that is for ...

User Guide
Page 64
.... Alternate nuts until you hear the winch mechanism click three times. • Secure the jack and tools in their proper locations. The correct wheel nut tightness is 95 ft lbs (130 N•m). Always stow the jack parts and the spare tire in the places provided. • Place... the deflated (flat) tire and compact spare tire cover assembly in the spare tire location. Rotate the jack-handle assembly clockwise until each one has been tightened twice. Have the full-sized tire repaired...
.... Alternate nuts until you hear the winch mechanism click three times. • Secure the jack and tools in their proper locations. The correct wheel nut tightness is 95 ft lbs (130 N•m). Always stow the jack parts and the spare tire in the places provided. • Place... the deflated (flat) tire and compact spare tire cover assembly in the spare tire location. Rotate the jack-handle assembly clockwise until each one has been tightened twice. Have the full-sized tire repaired...

