Owner's Manual
Page 18
... the Keyless Entry transmitter to indicate that condition and monitor the remaining doors and ignition. For an additional 15 minutes only the headlights and security telltale will flash rapidly for unauthorized operation. The security light in the instrument cluster will rearm itself after the 15 ...additional minutes of Industry Canada. For the first 3 minutes the horn will sound and the headlights and security telltale will set , the security light will ignore that the system is subject to indicate that may be received, including...
... the Keyless Entry transmitter to indicate that condition and monitor the remaining doors and ignition. For an additional 15 minutes only the headlights and security telltale will flash rapidly for unauthorized operation. The security light in the instrument cluster will rearm itself after the 15 ...additional minutes of Industry Canada. For the first 3 minutes the horn will sound and the headlights and security telltale will set , the security light will ignore that the system is subject to indicate that may be received, including...

Owner's Manual
Page 85
... ▫ Daytime Running Lights (Canada Only) ...136 ▫ Lights-On Reminder ...136 ▫ Headlight Time Delay ...136 ▫ Fog Lights - If Equipped ...137 ▫ Turn Signals ...137 ▫ Highbeam/Lowbeam Select Switch ...138 ▫ Passing Light ...138 Windshield Wipers ...
... ▫ Daytime Running Lights (Canada Only) ...136 ▫ Lights-On Reminder ...136 ▫ Headlight Time Delay ...136 ▫ Fog Lights - If Equipped ...137 ▫ Turn Signals ...137 ▫ Highbeam/Lowbeam Select Switch ...138 ▫ Passing Light ...138 Windshield Wipers ...

Owner's Manual
Page 88
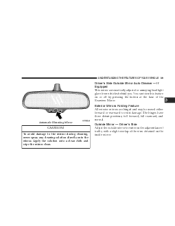
... pressing the button at the base of the mirror. A two point pivot system allows for annoying headlight glare from vehicles behind you. Automatic Dimming Mirror - If Equipped When using this feature is on. Annoying headlight glare can turn the feature on the view through the rear window. 88 UNDERSTANDING THE FEATURES OF...
... pressing the button at the base of the mirror. A two point pivot system allows for annoying headlight glare from vehicles behind you. Automatic Dimming Mirror - If Equipped When using this feature is on. Annoying headlight glare can turn the feature on the view through the rear window. 88 UNDERSTANDING THE FEATURES OF...
Owner's Manual
Page 89
... of the Rearview Mirror. UNDERSTANDING THE FEATURES OF YOUR VEHICLE 89 Driver's Side Outside Mirror Auto Dimmer - If Equipped This mirror automatically adjusts for annoying headlight glare from vehicles behind you.
... of the Rearview Mirror. UNDERSTANDING THE FEATURES OF YOUR VEHICLE 89 Driver's Side Outside Mirror Auto Dimmer - If Equipped This mirror automatically adjusts for annoying headlight glare from vehicles behind you.

Owner's Manual
Page 134
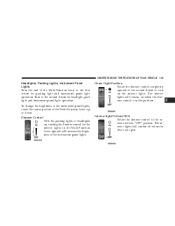
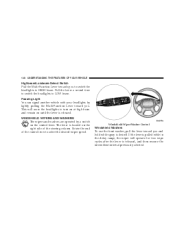
Multi-Function Control Lever The lever is located on when a door is left side of the headlights, parking lights, turn off in the Dome light position. Turn the ignition switch ON to restore the interior light operation. 134 UNDERSTANDING THE FEATURES OF ... dimmer control is opened. Multi-Function Lever The Multi-Function Lever controls the operation of the steering column. The interior lights will automatically turn signals, headlight beam selection, instrument panel light dimming, interior lights, the passing lights, and fog lights.
Multi-Function Control Lever The lever is located on when a door is left side of the headlights, parking lights, turn off in the Dome light position. Turn the ignition switch ON to restore the interior light operation. 134 UNDERSTANDING THE FEATURES OF ... dimmer control is opened. Multi-Function Lever The Multi-Function Lever controls the operation of the steering column. The interior lights will automatically turn signals, headlight beam selection, instrument panel light dimming, interior lights, the passing lights, and fog lights.
Owner's Manual
Page 135
...this position. 3 Interior light Defeat (OFF) Rotate the dimmer control to the second detent for headlight, park light and instrument panel light operation. UNDERSTANDING THE FEATURES OF YOUR VEHICLE 135 Headlights, Parking Lights, Instrument Panel Lights Turn the end of the Multi-Function Lever to the first...Multi-Function Lever upward will increase the brightness of the Multi-Function Lever up or down. Dimmer Control With the parking lights or headlights on the interior lights. The interior lights will remain off when the doors are open. To change the brightness of the instrument ...
...this position. 3 Interior light Defeat (OFF) Rotate the dimmer control to the second detent for headlight, park light and instrument panel light operation. UNDERSTANDING THE FEATURES OF YOUR VEHICLE 135 Headlights, Parking Lights, Instrument Panel Lights Turn the end of the Multi-Function Lever to the first...Multi-Function Lever upward will increase the brightness of the Multi-Function Lever up or down. Dimmer Control With the parking lights or headlights on the interior lights. The interior lights will remain off when the doors are open. To change the brightness of the instrument ...
Owner's Manual
Page 136
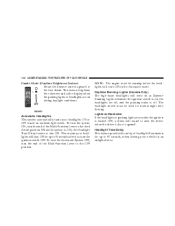
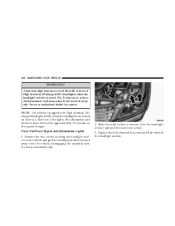
... (Daytime Brightness Feature) Rotate the dimmer control upward to 90 seconds, when leaving your headlights will stay ON for normal night time driving. NOTE: The engine must be running before the headlights will come on as Daytime Running Lights whenever the ignition switch is also ON. This ... the first detent. This feature brightens the odometer and radio display when the parking lights or headlights are on during daylight conditions. To turn the system ON, turn the end of headlight illumination for up to 90 seconds after the ignition is turned OFF, a chime will come ...
... (Daytime Brightness Feature) Rotate the dimmer control upward to 90 seconds, when leaving your headlights will stay ON for normal night time driving. NOTE: The engine must be running before the headlights will come on as Daytime Running Lights whenever the ignition switch is also ON. This ... the first detent. This feature brightens the odometer and radio display when the parking lights or headlights are on during daylight conditions. To turn the system ON, turn the end of headlight illumination for up to 90 seconds after the ignition is turned OFF, a chime will come ...

Owner's Manual
Page 137
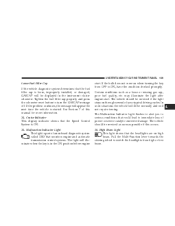
... proper operation of the front and rear turn signal lights. NOTE: The fog lights will only operate with the headlights on , the delay will be turned off within 45 seconds. Selecting high beam headlights will turn off in the normal manner. If either light has a very fast flash rate, check for a defective... Lights - If Equipped The front fog light switch is turned on low beam. To activate the front fog lights, turn on . Then turn off the headlights within 45 seconds of turning the ignition off to light when the lever is moved, it would suggest that the fuse or indicator bulb is...
... proper operation of the front and rear turn signal lights. NOTE: The fog lights will only operate with the headlights on , the delay will be turned off within 45 seconds. Selecting high beam headlights will turn off in the normal manner. If either light has a very fast flash rate, check for a defective... Lights - If Equipped The front fog light switch is turned on low beam. To activate the front fog lights, turn on . Then turn off the headlights within 45 seconds of turning the ignition off to light when the lever is moved, it would suggest that the fuse or indicator bulb is...
Owner's Manual
Page 138
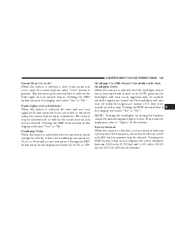
... Windshield Washers To use the front washer, pull the lever toward you to switch the headlights to turn on at high beam and remain on until the lever is released, and ... is desired. If the lever is pulled while in the delay range, the wiper will cause the headlights to HIGH beam. This will operate for two wipe cycles after the lever is released. Passing Light You ... side of the control lever to LOW beam. Pull the Lever a second time to switch the headlights to select the desired wiper speed. 138 UNDERSTANDING THE FEATURES OF YOUR VEHICLE Highbeam/Lowbeam Select Switch ...
... Windshield Washers To use the front washer, pull the lever toward you to switch the headlights to turn on at high beam and remain on until the lever is released, and ... is desired. If the lever is pulled while in the delay range, the wiper will cause the headlights to HIGH beam. This will operate for two wipe cycles after the lever is released. Passing Light You ... side of the control lever to LOW beam. Pull the Lever a second time to switch the headlights to select the desired wiper speed. 138 UNDERSTANDING THE FEATURES OF YOUR VEHICLE Highbeam/Lowbeam Select Switch ...
Owner's Manual
Page 185
...vehicle should be displayed in the ON position before engine start . Pull the Multi-Function lever towards the steering wheel to switch the headlights from OFF to serious conditions that monitors engine and automatic transmission control systems. The light will appear the next time the vehicle is part... be serviced as soon as a loose or missing gas cap, poor fuel quality, etc. Cruise Indicator This display indicator shows that the headlights are on when turning the key from high or low beam. 4 Tighten the fuel filler cap properly and press the odometer reset button to...
...vehicle should be displayed in the ON position before engine start . Pull the Multi-Function lever towards the steering wheel to switch the headlights from OFF to serious conditions that monitors engine and automatic transmission control systems. The light will appear the next time the vehicle is part... be serviced as soon as a loose or missing gas cap, poor fuel quality, etc. Cruise Indicator This display indicator shows that the headlights are on when turning the key from high or low beam. 4 Tighten the fuel filler cap properly and press the odometer reset button to...
Owner's Manual
Page 195
...Interval When this display will turn off when the wipers are turned on in this feature is pressed. This feature may be selected with Auto Headlights Only) When this section. Pressing the STEP button when in this feature is selected the driver can choose, when exiting the vehicle, to have...When this display will select "Yes" or "No." Flash Lights On Lock/Unlock? When this display will select "Yes" or "No." NOTE: Turning the headlights on . Pressing the STEP button when in approximately 10 seconds when the wipers are turned off if they were turned on in 500 mile (800...
...Interval When this display will turn off when the wipers are turned on in this feature is pressed. This feature may be selected with Auto Headlights Only) When this section. Pressing the STEP button when in this feature is selected the driver can choose, when exiting the vehicle, to have...When this display will select "Yes" or "No." Flash Lights On Lock/Unlock? When this display will select "Yes" or "No." NOTE: Turning the headlights on . Pressing the STEP button when in approximately 10 seconds when the wipers are turned off if they were turned on in 500 mile (800...

Owner's Manual
Page 362
...; Cleaning The Center Console Cup Holders ...401 Fuses (Integrated Power Module) ...402 Vehicle Storage ...405 Replacement Light Bulbs ...406 Bulb Replacement ...406 ▫ Standard Quad Headlights ...406 ▫ High Intensity Discharge Headlights (HID) - If Equipped ...407
...; Cleaning The Center Console Cup Holders ...401 Fuses (Integrated Power Module) ...402 Vehicle Storage ...405 Replacement Light Bulbs ...406 Bulb Replacement ...406 ▫ Standard Quad Headlights ...406 ▫ High Intensity Discharge Headlights (HID) - If Equipped ...407
Owner's Manual
Page 403
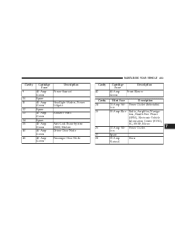
... 40 Amp Green 40 Amp Green 40 Amp Green Description Power Sunroof Cavity 42 Cavity 24 25 Cartridge Fuse 40 Amp Green Description Front Blower Headlight Washer, Power Liftgate Radiator Fan 1 Anti-Lock Brake System (ABS) Module Driver Door Node Passenger Door Node 26 27 28 Mini Fuse Description 20 Amp...
... 40 Amp Green 40 Amp Green 40 Amp Green Description Power Sunroof Cavity 42 Cavity 24 25 Cartridge Fuse 40 Amp Green Description Front Blower Headlight Washer, Power Liftgate Radiator Fan 1 Anti-Lock Brake System (ABS) Module Driver Door Node Passenger Door Node 26 27 28 Mini Fuse Description 20 Amp...

Owner's Manual
Page 406
...Vanity Lights...V26377 NOTE: For lighted switches, see your dealer for replacement. Remove the two screws securing the headlight module to the vehicle and pull the headlight module forward away from the vehicle, disengaging the assembly from the lower attachment clip. LIGHT BULBS - Exterior ... Turn Signal ...3157 Rear Sidemarker ...168 Fog Light ...9145 Front Turn Signal...3157A Front Sidemarker...194 Standard Headlight ...H13 License ...168 BULB REPLACEMENT Standard Quad Headlights 1. Aluminum base bulbs are glass wedge base or glass cartridge types. All of the interior bulbs are not...
...Vanity Lights...V26377 NOTE: For lighted switches, see your dealer for replacement. Remove the two screws securing the headlight module to the vehicle and pull the headlight module forward away from the vehicle, disengaging the assembly from the lower attachment clip. LIGHT BULBS - Exterior ... Turn Signal ...3157 Rear Sidemarker ...168 Fog Light ...9145 Front Turn Signal...3157A Front Sidemarker...194 Standard Headlight ...H13 License ...168 BULB REPLACEMENT Standard Quad Headlights 1. Aluminum base bulbs are glass wedge base or glass cartridge types. All of the interior bulbs are not...

Owner's Manual
Page 407
... authorized dealer for service. 2. Disconnect the electrical connector. 3. Reinstall the rubber boot seals and then the headlight module. 7 High Intensity Discharge Headlights (HID) - If Equipped The headlights are a type of this, you should not attempt to service a headlight bulb yourself. Because of high voltage discharge tube. If the bulb comes in the circuit even...
... authorized dealer for service. 2. Disconnect the electrical connector. 3. Reinstall the rubber boot seals and then the headlight module. 7 High Intensity Discharge Headlights (HID) - If Equipped The headlights are a type of this, you should not attempt to service a headlight bulb yourself. Because of high voltage discharge tube. If the bulb comes in the circuit even...
Owner's Manual
Page 408
... and becomes more white after approximately 10 seconds, as the system charges. Replace the bulb, reinstall the socket and then reinstall the headlight module. 408 MAINTAINING YOUR VEHICLE WARNING! A transient high tension occurs at the bulb sockets of High Intensity Discharge (HID...) headlights when the headlight switch is a blue hue to the vehicle and pull the headlight module forward away from the vehicle, disengaging the assembly from socket. 3. Remove the two screws securing the headlight module to the lights. It may cause serious ...
... and becomes more white after approximately 10 seconds, as the system charges. Replace the bulb, reinstall the socket and then reinstall the headlight module. 408 MAINTAINING YOUR VEHICLE WARNING! A transient high tension occurs at the bulb sockets of High Intensity Discharge (HID...) headlights when the headlight switch is a blue hue to the vehicle and pull the headlight module forward away from the vehicle, disengaging the assembly from socket. 3. Remove the two screws securing the headlight module to the lights. It may cause serious ...

Owner's Manual
Page 449
... Defroster, Rear Window ...259 Defroster, Windshield ...80,246,255 Delay (Intermittent) Wipers ...139 Diagnostic System, Onboard ...366 Digital Video Disc (DVD) Player ...221 Dimmer Switch, Headlight ...138 Dipsticks Automatic Transmission ...393 Oil (Engine) ...369 Disabled Vehicle Towing ...357 Disposal Antifreeze (Engine Coolant) ...386 Engine Oil ...373 Door Ajar Light ...189 Door...
... Defroster, Rear Window ...259 Defroster, Windshield ...80,246,255 Delay (Intermittent) Wipers ...139 Diagnostic System, Onboard ...366 Digital Video Disc (DVD) Player ...221 Dimmer Switch, Headlight ...138 Dipsticks Automatic Transmission ...393 Oil (Engine) ...369 Disabled Vehicle Towing ...357 Disposal Antifreeze (Engine Coolant) ...386 Engine Oil ...373 Door Ajar Light ...189 Door...
Owner's Manual
Page 452
... Rating ...327,330 Gross Vehicle Weight Rating ...327,330 Hands-Free Phone (UConnect™) ...91 Hazard Warning Flasher ...344 Head Phones ...230 Head Restraints ...115 Headlights ...407 Bulb Replacement ...406 High Beam ...138 High Beam/Low Beam Select Switch ...138 Passing ...138
... Rating ...327,330 Gross Vehicle Weight Rating ...327,330 Hands-Free Phone (UConnect™) ...91 Hazard Warning Flasher ...344 Head Phones ...230 Head Restraints ...115 Headlights ...407 Bulb Replacement ...406 High Beam ...138 High Beam/Low Beam Select Switch ...138 Passing ...138
Owner's Manual
Page 454
... Life of Tires ...304 Liftgate ...35 Lights ...81,133 Airbag ...55,65,80,188 Anti-Lock ...181 Automatic Headlights ...136 Back-Up ...409 Brake Warning ...182 Bulb Replacement ...406 Courtesy/Reading ...133 Cruise ...185 Daytime Running ...136 Dimmer Switch..., Headlight ...134 Door Ajar ...189 Engine Temperature Warning ...188 Fog ...137,186,409 Hazard Warning Flasher ...344 Headlight Switch ...135 Headlights ...135,406,407 High Beam Indicator ...185 Illuminated Entry ...20 Instrument Cluster ...135...
... Life of Tires ...304 Liftgate ...35 Lights ...81,133 Airbag ...55,65,80,188 Anti-Lock ...181 Automatic Headlights ...136 Back-Up ...409 Brake Warning ...182 Bulb Replacement ...406 Courtesy/Reading ...133 Cruise ...185 Daytime Running ...136 Dimmer Switch..., Headlight ...134 Door Ajar ...189 Engine Temperature Warning ...188 Fog ...137,186,409 Hazard Warning Flasher ...344 Headlight Switch ...135 Headlights ...135,406,407 High Beam Indicator ...185 Illuminated Entry ...20 Instrument Cluster ...135...


