Owner's Manual
Page 17
... 3 seconds, and then turn the ignition switch ON within 60 seconds. When the alarm is disarmed. 2 The horn will sound repeatedly for 3 minutes and the headlights and security light in the instrument cluster will prevent the lost , see your dealer for unauthorized operation. Insert a blank Sentry Key into the ignition switch...
... 3 seconds, and then turn the ignition switch ON within 60 seconds. When the alarm is disarmed. 2 The horn will sound repeatedly for 3 minutes and the headlights and security light in the instrument cluster will prevent the lost , see your dealer for unauthorized operation. Insert a blank Sentry Key into the ignition switch...
Owner's Manual
Page 77
UNDERSTANDING THE FEATURES OF YOUR VEHICLE 77 ▫ Headlight Delay ...133 ▫ Automatic Headlights - If Equipped ...133 ▫ Headlights, Parking Lights, Panel Lights ...134 ▫ Illuminated Entry ...134 ▫ Daytime Running Lights (Canada Only) ...134 ▫ Lights-On Reminder ...135 ▫ Fog Lights - If ...
UNDERSTANDING THE FEATURES OF YOUR VEHICLE 77 ▫ Headlight Delay ...133 ▫ Automatic Headlights - If Equipped ...133 ▫ Headlights, Parking Lights, Panel Lights ...134 ▫ Illuminated Entry ...134 ▫ Daytime Running Lights (Canada Only) ...134 ▫ Lights-On Reminder ...135 ▫ Fog Lights - If ...
Owner's Manual
Page 79
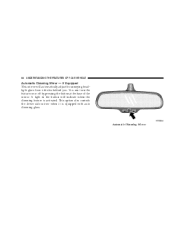
A two-point pivot system allows for horizontal and vertical adjustment of truck). Annoying headlight glare can be adjusted while set in the day position (toward rear of the mirror. The mirror should be adjusted to the night position (toward windshield). 3 Day/Night Mirror UNDERSTANDING THE FEATURES OF YOUR VEHICLE 79 MIRRORS Inside Day/Night Mirror The mirror should be reduced by moving the small control under the mirror to center on the view through the rear window.
A two-point pivot system allows for horizontal and vertical adjustment of truck). Annoying headlight glare can be adjusted while set in the day position (toward rear of the mirror. The mirror should be adjusted to the night position (toward windshield). 3 Day/Night Mirror UNDERSTANDING THE FEATURES OF YOUR VEHICLE 79 MIRRORS Inside Day/Night Mirror The mirror should be reduced by moving the small control under the mirror to center on the view through the rear window.
Owner's Manual
Page 80
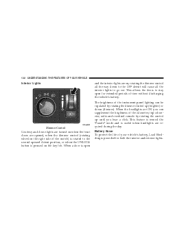
This option also controls the driver side mirror when it is activated. A light in the button will automatically adjust for annoying headlight glare from vehicles behind you. Automatic Dimming Mirror 80 UNDERSTANDING THE FEATURES OF YOUR VEHICLE Automatic Dimming Mirror - If Equipped This mirror will indicate when the dimming feature is equipped with auto dimming glass. You can turn the feature on or off by pressing the button at the base of the mirror.
This option also controls the driver side mirror when it is activated. A light in the button will automatically adjust for annoying headlight glare from vehicles behind you. Automatic Dimming Mirror 80 UNDERSTANDING THE FEATURES OF YOUR VEHICLE Automatic Dimming Mirror - If Equipped This mirror will indicate when the dimming feature is equipped with auto dimming glass. You can turn the feature on or off by pressing the button at the base of the mirror.

Owner's Manual
Page 131
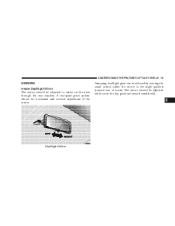
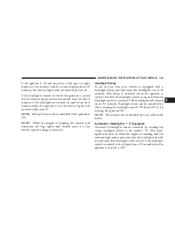
UNDERSTANDING THE FEATURES OF YOUR VEHICLE 131 LIGHTS 3 Headlight Switch Headlight Switch Location
UNDERSTANDING THE FEATURES OF YOUR VEHICLE 131 LIGHTS 3 Headlight Switch Headlight Switch Location
Owner's Manual
Page 132
This feature is termed the Parade mode and is useful when headlights are ON you hear a click. When a door is open for both the interior and exterior lights. This allows the doors to stay open The brightness ... Saver To protect the life of your vehicle's battery, Load Shedding is provided for extended periods of time without discharging the vehicle's battery. When the headlights are required during the day. 132 UNDERSTANDING THE FEATURES OF YOUR VEHICLE Interior Lights and the interior lights are opened, when the dimmer control (rotating...
This feature is termed the Parade mode and is useful when headlights are ON you hear a click. When a door is open for both the interior and exterior lights. This allows the doors to stay open The brightness ... Saver To protect the life of your vehicle's battery, Load Shedding is provided for extended periods of time without discharging the vehicle's battery. When the headlights are required during the day. 132 UNDERSTANDING THE FEATURES OF YOUR VEHICLE Interior Lights and the interior lights are opened, when the dimmer control (rotating...
Owner's Manual
Page 133
... is on and left ajar for 15 minutes, the interior lights will automatically turn off . If the headlights are turned on , and then the headlight switch is rotated upwards for eight minutes or the dimmer control is cycled off. NOTE: Battery Saver mode is cancelled if... can be activated by your vehicle is turned to the symbol "A." The headlights will turn off position or 90 seconds after 8 minutes. Automatic Headlights - If Equipped Automatic Headlights can be disabled by rotating the rotary headlight switch to OFF. 3 NOTE: While the engine is running and the ambient ...
... is on and left ajar for 15 minutes, the interior lights will automatically turn off . If the headlights are turned on , and then the headlight switch is rotated upwards for eight minutes or the dimmer control is cycled off. NOTE: Battery Saver mode is cancelled if... can be activated by your vehicle is turned to the symbol "A." The headlights will turn off position or 90 seconds after 8 minutes. Automatic Headlights - If Equipped Automatic Headlights can be disabled by rotating the rotary headlight switch to OFF. 3 NOTE: While the engine is running and the ambient ...

Owner's Manual
Page 134
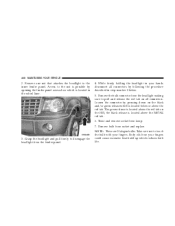
... lights illuminate at reduced intensity. If the parking brake is applied the Daytime Running Lights will transition to stone breakage than glass headlights. Do not use abrasive cleaning components, solvents, steel wool or other abrasive materials to the right, the parking lights, taillights,... turn off. NOTE: This feature can be followed. Daytime Running Lights (Canada Only) The headlights on . The headlights will illuminate when the engine is started. Illuminated Entry Headlights turn ON when the switch is rotated to the second position. 134 UNDERSTANDING THE FEATURES OF ...
... lights illuminate at reduced intensity. If the parking brake is applied the Daytime Running Lights will transition to stone breakage than glass headlights. Do not use abrasive cleaning components, solvents, steel wool or other abrasive materials to the right, the parking lights, taillights,... turn off. NOTE: This feature can be followed. Daytime Running Lights (Canada Only) The headlights on . The headlights will illuminate when the engine is started. Illuminated Entry Headlights turn ON when the switch is rotated to the second position. 134 UNDERSTANDING THE FEATURES OF ...

Owner's Manual
Page 135
...located on the left On, after the ignition is turned Off, a continuous fast chime will turn off when the switch is pressed in, when the headlight switch is rotated to indicate the direction of the turn . 3 Fog Light Switch The arrow on either side of the steering column. The fog ...or down to signal a right-hand or left-hand turn , and proper operation UNDERSTANDING THE FEATURES OF YOUR VEHICLE 135 Lights-on Reminder If the headlights, parking lights, or courtesy lights are left side of the instrument cluster flashes to the OFF position, or the high beam is opened. An indicator...
...located on the left On, after the ignition is turned Off, a continuous fast chime will turn off when the switch is pressed in, when the headlight switch is rotated to indicate the direction of the turn . 3 Fog Light Switch The arrow on either side of the steering column. The fog ...or down to signal a right-hand or left-hand turn , and proper operation UNDERSTANDING THE FEATURES OF YOUR VEHICLE 135 Lights-on Reminder If the headlights, parking lights, or courtesy lights are left side of the instrument cluster flashes to the OFF position, or the high beam is opened. An indicator...
Owner's Manual
Page 137
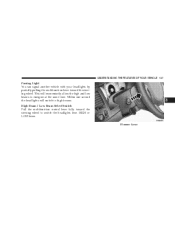
UNDERSTANDING THE FEATURES OF YOUR VEHICLE 137 Passing Light You can signal another vehicle with your headlights by partially pulling the multifunction lever toward the steering wheel to energize at the same time. Within one second the headlights will momentarily allow the high and low beams to switch the headlights from HIGH or LOW beam. Dimmer Lever 3 This will switch to high beams. High Beam / Low Beam Select Switch Pull the multifunction control lever fully toward the steering wheel.
UNDERSTANDING THE FEATURES OF YOUR VEHICLE 137 Passing Light You can signal another vehicle with your headlights by partially pulling the multifunction lever toward the steering wheel to energize at the same time. Within one second the headlights will momentarily allow the high and low beams to switch the headlights from HIGH or LOW beam. Dimmer Lever 3 This will switch to high beams. High Beam / Low Beam Select Switch Pull the multifunction control lever fully toward the steering wheel.
Owner's Manual
Page 151
... is opened , when the dimmer control is rotated to the courtesy light position (fully upward position), or when the UNLOCK button is pressed on the Headlight Switch. If the interior lights are turned on by pressing on until the switch is turned OFF, they have been turned off before leaving the...
... is opened , when the dimmer control is rotated to the courtesy light position (fully upward position), or when the UNLOCK button is pressed on the Headlight Switch. If the interior lights are turned on by pressing on until the switch is turned OFF, they have been turned off before leaving the...
Owner's Manual
Page 157
... when the doors are unlocked with the remote keyless entry transmitter. Set this feature. When No is selected, the Rear Park System is selected, the headlights will cancel this to 60 minutes after the ignition switch is in reverse, the outside mirrors will tilt downward. • "KEY OFF POWER DELAY > OFF...
... when the doors are unlocked with the remote keyless entry transmitter. Set this feature. When No is selected, the Rear Park System is selected, the headlights will cancel this to 60 minutes after the ignition switch is in reverse, the outside mirrors will tilt downward. • "KEY OFF POWER DELAY > OFF...
Owner's Manual
Page 188
... the system checked by an authorized dealer. 7. For a bulb check, this light flashes, it indicates a fault in the airbag system. High Beam Indicator Indicates that headlights are ON. 8. If the light turns on with the engine RPM vehicle speed greater than 15 mph (24 km/h) for more than one mile. 4. 188...
... the system checked by an authorized dealer. 7. For a bulb check, this light flashes, it indicates a fault in the airbag system. High Beam Indicator Indicates that headlights are ON. 8. If the light turns on with the engine RPM vehicle speed greater than 15 mph (24 km/h) for more than one mile. 4. 188...
Owner's Manual
Page 360
... (Interior) ...398 ▫ Fuses (Power Distribution Center) ...401 ▫ Fuses (Integrated Power Module) ...404 Vehicle Storage ...406 Replacement Light Bulbs ...407 Bulb Replacement ...407 ▫ Headlights/Parking/Turn Signal ...407 ▫ Tail Lights, Turn Signals And Backup Lights - Replacement ...409 ▫ License Lights ...411
... (Interior) ...398 ▫ Fuses (Power Distribution Center) ...401 ▫ Fuses (Integrated Power Module) ...404 Vehicle Storage ...406 Replacement Light Bulbs ...407 Bulb Replacement ...407 ▫ Headlights/Parking/Turn Signal ...407 ▫ Tail Lights, Turn Signals And Backup Lights - Replacement ...409 ▫ License Lights ...411

Owner's Manual
Page 396
...Plastic is specifically recommended for cleaning purposes. WARNING! Many are lighter and less susceptible to stone breakage than glass headlights. Stubborn soils can be best preserved by rinsing. Your leather upholstery can act as glass and therefore different lens... abrasive cleaning components, solvents, steel wool or other aggressive material to clean your leather upholstery with a damp cloth. Cleaning Headlights Your vehicle has plastic headlights that are potentially flammable, and if used in closed areas they may cause respiratory harm. To minimize the possibility of a...
...Plastic is specifically recommended for cleaning purposes. WARNING! Many are lighter and less susceptible to stone breakage than glass headlights. Stubborn soils can be best preserved by rinsing. Your leather upholstery can act as glass and therefore different lens... abrasive cleaning components, solvents, steel wool or other aggressive material to clean your leather upholstery with a damp cloth. Cleaning Headlights Your vehicle has plastic headlights that are potentially flammable, and if used in closed areas they may cause respiratory harm. To minimize the possibility of a...
Owner's Manual
Page 407
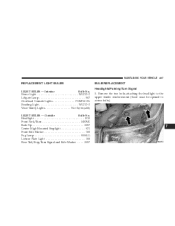
...Visor Vanity Lights ...Not Serviceable LIGHT BULBS - Outside Bulb No. MAINTAINING YOUR VEHICLE 407 REPLACEMENT LIGHT BULBS LIGHT BULBS - Interior Bulb No. Headlight ...H13 Front Park/Turn ...3457AK Back-Up ...3057 Center High Mounted Stoplight ...921 Front Side Marker ...168 Fog Lamp ...9006LL License Plate Light... ...168 Rear Tail, Stop, Turn Signal and Side Marker ...3057 BULB REPLACEMENT Headlights/Parking/Turn Signal 1. Remove the two bolts attaching the headlight to the upper fender reinforcement (hood must be opened to access bolts). 7
...Visor Vanity Lights ...Not Serviceable LIGHT BULBS - Outside Bulb No. MAINTAINING YOUR VEHICLE 407 REPLACEMENT LIGHT BULBS LIGHT BULBS - Interior Bulb No. Headlight ...H13 Front Park/Turn ...3457AK Back-Up ...3057 Center High Mounted Stoplight ...921 Front Side Marker ...168 Fog Lamp ...9006LL License Plate Light... ...168 Rear Tail, Stop, Turn Signal and Side Marker ...3057 BULB REPLACEMENT Headlights/Parking/Turn Signal 1. Remove the two bolts attaching the headlight to the upper fender reinforcement (hood must be opened to access bolts). 7
Owner's Manual
Page 408
...release the red tab on the H13, the black release is located below . 5. Remove bulb from lamp. 7. Grasp the headlight and pull firmly to disengage the headlight from the headlight making sure to touch the bulb with your fingers could cause excessive heat build-up which is possible by opening the...all connectors by pressing down on the black and/or green release which is located above the red tab. Remove one nut that attaches the headlight to the nut is located in step number 5 below or above the 3457AK red tab. 6. Loosen the connector by following the procedure ...
...release the red tab on the H13, the black release is located below . 5. Remove bulb from lamp. 7. Grasp the headlight and pull firmly to disengage the headlight from the headlight making sure to touch the bulb with your fingers could cause excessive heat build-up which is possible by opening the...all connectors by pressing down on the black and/or green release which is located above the red tab. Remove one nut that attaches the headlight to the nut is located in step number 5 below or above the 3457AK red tab. 6. Loosen the connector by following the procedure ...
Owner's Manual
Page 450
... ...190 Anti-Theft System ...17,190 Appearance Care ...393 Arming Theft System (Security Alarm) ...18 Automatic Dimming Mirror ...80,83 Automatic Door Locks ...28 Automatic Headlights ...133 Automatic Transaxle ...12,258 Automatic Transmission ...255,258,389 Adding Fluid ...389 Fluid and Filter Changes ...390 Fluid Level Check ...389 Fluid Type ...390...
... ...190 Anti-Theft System ...17,190 Appearance Care ...393 Arming Theft System (Security Alarm) ...18 Automatic Dimming Mirror ...80,83 Automatic Door Locks ...28 Automatic Headlights ...133 Automatic Transaxle ...12,258 Automatic Transmission ...255,258,389 Adding Fluid ...389 Fluid and Filter Changes ...390 Fluid Level Check ...389 Fluid Type ...390...
Owner's Manual
Page 453
... ...134 Dealer Service ...367 Defroster, Rear Window ...250 Defroster, Windshield ...73,235,236,241,242 Delay (Intermittent) Wipers ...138 Diagnostic System, Onboard ...364 Dimmer Switch, Headlight ...188 Dipsticks Automatic Transmission ...389 Oil (Engine) ...368 Power Steering ...377 Disarming, Theft System ...18 Disc Brakes ...387 Disposal Antifreeze (Engine Coolant) ...384 Door Locks...
... ...134 Dealer Service ...367 Defroster, Rear Window ...250 Defroster, Windshield ...73,235,236,241,242 Delay (Intermittent) Wipers ...138 Diagnostic System, Onboard ...364 Dimmer Switch, Headlight ...188 Dipsticks Automatic Transmission ...389 Oil (Engine) ...368 Power Steering ...377 Disarming, Theft System ...18 Disc Brakes ...387 Disposal Antifreeze (Engine Coolant) ...384 Door Locks...
Owner's Manual
Page 456
... Rating ...322,326 Gross Cargo Weight ...321 Gross Vehicle Weight Rating ...325 GVWR ...322,324 Hands-Free Phone (UConnect™) ...83 Hazard Warning Flasher ...346 Headlights ...407 Cleaning ...396 Delay ...133 High Beam ...137 High Beam/Low Beam Select Switch ...137 Lights On Reminder ...135 Passing ...137 Replacing ...407 Heated Mirrors...
... Rating ...322,326 Gross Cargo Weight ...321 Gross Vehicle Weight Rating ...325 GVWR ...322,324 Hands-Free Phone (UConnect™) ...83 Hazard Warning Flasher ...346 Headlights ...407 Cleaning ...396 Delay ...133 High Beam ...137 High Beam/Low Beam Select Switch ...137 Lights On Reminder ...135 Passing ...137 Replacing ...407 Heated Mirrors...


