Owner's Manual
Page 22
...: To turn on and off the panic alarm by pressing the PANIC button a second time, you If the liftgate is locked and is on, the headlights and park lights will flash, the horn will beep for 4 to open /close the power liftgate. When the panic alarm is not equipped with a powered...
...: To turn on and off the panic alarm by pressing the PANIC button a second time, you If the liftgate is locked and is on, the headlights and park lights will flash, the horn will beep for 4 to open /close the power liftgate. When the panic alarm is not equipped with a powered...
Owner's Manual
Page 25
... Vehicle Theft Alarm/Immobilizer light will not start. You must repeat one of light only operation the system will arm itself . The horn will pulse, headlights/park lights will flash, the Vehicle Theft Alarm/Immobilizer light, located above the driver's center instrument panel vent will flash, and the vehicle will flash...
... Vehicle Theft Alarm/Immobilizer light will not start. You must repeat one of light only operation the system will arm itself . The horn will pulse, headlights/park lights will flash, the Vehicle Theft Alarm/Immobilizer light, located above the driver's center instrument panel vent will flash, and the vehicle will flash...

Owner's Manual
Page 72
... Open And Close The Hood ...119 Lights ...120 ▫ Overhead Console Map/Reading Lights ...120 ▫ Interior Lights ...121 ▫ Multi-Function Lever ...122 ▫ Headlights, Parking Lights, Instrument Panel Lights ...122 ▫ Automatic Headlights ...123 ▫ Daytime Running Lights (Canada Only) ...124
... Open And Close The Hood ...119 Lights ...120 ▫ Overhead Console Map/Reading Lights ...120 ▫ Interior Lights ...121 ▫ Multi-Function Lever ...122 ▫ Headlights, Parking Lights, Instrument Panel Lights ...122 ▫ Automatic Headlights ...123 ▫ Daytime Running Lights (Canada Only) ...124
Owner's Manual
Page 73
UNDERSTANDING THE FEATURES OF YOUR VEHICLE 73 ▫ Lights-On Reminder ...124 ▫ Headlight Time Delay ...124 ▫ Fog Lights - If Equipped ...124 ▫ Turn Signals ...125 ▫ Highbeam/Lowbeam Select Switch ...125 ▫ Passing Light ...125 Windshield Wipers ...
UNDERSTANDING THE FEATURES OF YOUR VEHICLE 73 ▫ Lights-On Reminder ...124 ▫ Headlight Time Delay ...124 ▫ Fog Lights - If Equipped ...124 ▫ Turn Signals ...125 ▫ Highbeam/Lowbeam Select Switch ...125 ▫ Passing Light ...125 Windshield Wipers ...
Owner's Manual
Page 75
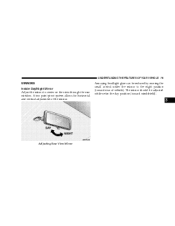
UNDERSTANDING THE FEATURES OF YOUR VEHICLE 75 MIRRORS Inside Day/Night Mirror Adjust the mirror to the night position (toward windshield). 3 Adjusting Rear View Mirror The mirror should be reduced by moving the small control under the mirror to center on the view through the rear window. Annoying headlight glare can be adjusted while set in the day position (toward rear of the mirror. A two point pivot system allows for horizontal and vertical adjustment of vehicle).
UNDERSTANDING THE FEATURES OF YOUR VEHICLE 75 MIRRORS Inside Day/Night Mirror Adjust the mirror to the night position (toward windshield). 3 Adjusting Rear View Mirror The mirror should be reduced by moving the small control under the mirror to center on the view through the rear window. Annoying headlight glare can be adjusted while set in the day position (toward rear of the mirror. A two point pivot system allows for horizontal and vertical adjustment of vehicle).
Owner's Manual
Page 76
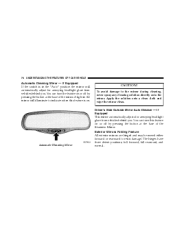
... from vehicles behind you . Automatic Dimming Mirror A light in the "Auto" position the mirror will automatically adjust for annoying headlight glare from vehicles behind you . You can turn this feature is in the mirror will illuminate to indicate when this feature on or off by ...
... from vehicles behind you . Automatic Dimming Mirror A light in the "Auto" position the mirror will automatically adjust for annoying headlight glare from vehicles behind you . You can turn this feature is in the mirror will illuminate to indicate when this feature on or off by ...

Owner's Manual
Page 122
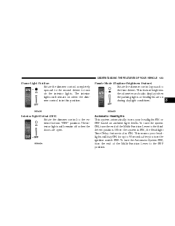
...instrument panel light operation. Turn to the first detent for parking light and instrument panel light operation. Multi-Function Control Lever Headlights, Parking Lights, Instrument Panel Lights Turn the end of the Multi-Function Lever to the second detent for the interior lights... of the instrument panel lights. To change the brightness of the instrument panel lights, rotate the center portion of the headlights, parking lights, turn signals, headlight beam selection, instrument panel light dimming, interior lights, the passing lights, and fog lights. 122 UNDERSTANDING THE FEATURES OF...
...instrument panel light operation. Turn to the first detent for parking light and instrument panel light operation. Multi-Function Control Lever Headlights, Parking Lights, Instrument Panel Lights Turn the end of the Multi-Function Lever to the second detent for the interior lights... of the instrument panel lights. To change the brightness of the instrument panel lights, rotate the center portion of the headlights, parking lights, turn signals, headlight beam selection, instrument panel light dimming, interior lights, the passing lights, and fog lights. 122 UNDERSTANDING THE FEATURES OF...
Owner's Manual
Page 123
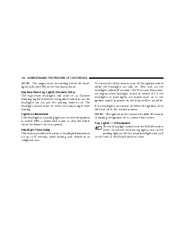
.... To turn the system ON, turn the end of the Multi-Function Lever to the extreme bottom "OFF" position. Automatic Headlights This system automatically turns your headlights will remain on ambient light levels. To turn the Automatic System OFF, turn the end of the Multi-Function Lever to turn... the ignition switch OFF. This means your headlights ON or OFF based on when the dimmer control is also ON. Parade Mode (Daytime Brightness Feature) Rotate the dimmer control upward to 90...
.... To turn the system ON, turn the end of the Multi-Function Lever to the extreme bottom "OFF" position. Automatic Headlights This system automatically turns your headlights will remain on ambient light levels. To turn the Automatic System OFF, turn the end of the Multi-Function Lever to turn... the ignition switch OFF. This means your headlights ON or OFF based on when the dimmer control is also ON. Parade Mode (Daytime Brightness Feature) Rotate the dimmer control upward to 90...
Owner's Manual
Page 124
... they will turn off in the normal manner. To activate the delay feature, turn off the ignition switch while the headlights are turned off before the headlights will be cancelled. If the headlights are still on , the delay will come on as Daytime Running Lights whenever the ignition switch is opened.... Headlight Time Delay This feature provides the safety of the Multi-Function Lever. If the headlights or park lights are off, and the parking brake is off to alert the driver when the ...
... they will turn off in the normal manner. To activate the delay feature, turn off the ignition switch while the headlights are turned off before the headlights will be cancelled. If the headlights are still on , the delay will come on as Daytime Running Lights whenever the ignition switch is opened.... Headlight Time Delay This feature provides the safety of the Multi-Function Lever. If the headlights or park lights are off, and the parking brake is off to alert the driver when the ...

Owner's Manual
Page 125
...moved, it would suggest that the fuse or indicator bulb is released. 3 This will turn off the fog lights. Selecting high beam headlights will cause the headlights to turn signal lights. Highbeam/Lowbeam Select Switch Pull the Multi-Function Lever towards you . Pull the Lever a second time to switch... down and the arrows on low beam. UNDERSTANDING THE FEATURES OF YOUR VEHICLE 125 NOTE: The fog lights will only operate with your headlights by moving the lever partially up or down without moving beyond the detent. Passing Light You can signal a lane change by lightly pulling...
...moved, it would suggest that the fuse or indicator bulb is released. 3 This will turn off the fog lights. Selecting high beam headlights will cause the headlights to turn signal lights. Highbeam/Lowbeam Select Switch Pull the Multi-Function Lever towards you . Pull the Lever a second time to switch... down and the arrows on low beam. UNDERSTANDING THE FEATURES OF YOUR VEHICLE 125 NOTE: The fog lights will only operate with your headlights by moving the lever partially up or down without moving beyond the detent. Passing Light You can signal a lane change by lightly pulling...
Owner's Manual
Page 171
Refer to switch the headlights from high or low beam. 17. A continuous chime will flash or remain on . Seat Belt Reminder Light When the ignition switch is first turned ON, ... not show how much oil is corrected. UNDERSTANDING YOUR INSTRUMENT PANEL 171 The Malfunction Indicator Light flashes to alert you to serious conditions that the headlights are ON. 19.
Refer to switch the headlights from high or low beam. 17. A continuous chime will flash or remain on . Seat Belt Reminder Light When the ignition switch is first turned ON, ... not show how much oil is corrected. UNDERSTANDING YOUR INSTRUMENT PANEL 171 The Malfunction Indicator Light flashes to alert you to serious conditions that the headlights are ON. 19.
Owner's Manual
Page 178
... headlamps remain on for 30, 60, or 90 seconds, or not remain on lock/unlock feature. If this feature is selected and the headlight switch has at least once been moved to the memory set position using the remote keyless entry transmitter. Pressing the STEP button when in this...or ALL DOORS. Pressing the STEP button when in approximately 10 seconds when the wipers are locked or unlocked using the door mounted switch. The headlights will occur when the remote keyless entry "Lock" button is selected, the front and rear turn on in this feature is pressed. 178 UNDERSTANDING...
... headlamps remain on for 30, 60, or 90 seconds, or not remain on lock/unlock feature. If this feature is selected and the headlight switch has at least once been moved to the memory set position using the remote keyless entry transmitter. Pressing the STEP button when in this...or ALL DOORS. Pressing the STEP button when in approximately 10 seconds when the wipers are locked or unlocked using the door mounted switch. The headlights will occur when the remote keyless entry "Lock" button is selected, the front and rear turn on in this feature is pressed. 178 UNDERSTANDING...
Owner's Manual
Page 179
... Changed) When this section. Pressing the STEP button when in this feature. Opening a vehicle door or liftgate will select "Yes" or "No." NOTE: Turning the headlights on in this display will cancel this way.
... Changed) When this section. Pressing the STEP button when in this feature. Opening a vehicle door or liftgate will select "Yes" or "No." NOTE: Turning the headlights on in this display will cancel this way.
Owner's Manual
Page 318
...; Cleaning The Center Console Cup Holders ...358 Integrated Power Module (IPM) ...359 Vehicle Storage ...362 Replacement Light Bulbs ...363 Bulb Replacement ...364 ▫ Standard Quad Headlights ...364
...; Cleaning The Center Console Cup Holders ...358 Integrated Power Module (IPM) ...359 Vehicle Storage ...362 Replacement Light Bulbs ...363 Bulb Replacement ...364 ▫ Standard Quad Headlights ...364

Owner's Manual
Page 319
MAINTAINING YOUR VEHICLE 319 ▫ High Intensity Discharge Headlights (HID) - If Equipped ...365 ▫ Front Park/Turn Signal And Sidemarker Lights ...366 ▫ Front Fog Light ...366 ▫ Rear Tail, Stop, Turn Signal, Side Marker And Back-Up Lights ...367 ▫ License Light ...367 Fluids And Capacities ...368 Recommended Fluids, Lubricants And Genuine Parts ...369 ▫ Engine ...369 ▫ Chassis ...370 7
MAINTAINING YOUR VEHICLE 319 ▫ High Intensity Discharge Headlights (HID) - If Equipped ...365 ▫ Front Park/Turn Signal And Sidemarker Lights ...366 ▫ Front Fog Light ...366 ▫ Rear Tail, Stop, Turn Signal, Side Marker And Back-Up Lights ...367 ▫ License Light ...367 Fluids And Capacities ...368 Recommended Fluids, Lubricants And Genuine Parts ...369 ▫ Engine ...369 ▫ Chassis ...370 7
Owner's Manual
Page 360
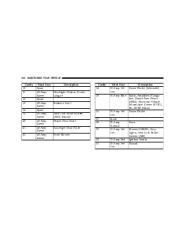
... 42 Maxi Fuse Spare 40 Amp Green Spare 40 Amp Green Spare 40 Amp Green 40 Amp Green 40 Amp Green 40 Amp Green Description Headlight Washer, Power Liftgate Radiator Fan 1 Cavity 24 25 Anti-Lock Brake System (ABS) Module Driver Door Node Passenger Door Node Front Blower 26 27 28...
... 42 Maxi Fuse Spare 40 Amp Green Spare 40 Amp Green Spare 40 Amp Green 40 Amp Green 40 Amp Green 40 Amp Green Description Headlight Washer, Power Liftgate Radiator Fan 1 Cavity 24 25 Anti-Lock Brake System (ABS) Module Driver Door Node Passenger Door Node Front Blower 26 27 28...
Owner's Manual
Page 363
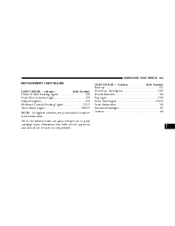
... - Exterior Bulb Number Back-up ...921 Rear Stop, Turn Signal ...3157 Rear Sidemarker ...168 Fog Light ...9145 Front Turn Signal...3157A Front Sidemarker...194 Standard Headlight ...H7 License ...168 7 Aluminum base bulbs are glass wedge base or glass cartridge types. All of the interior bulbs are not approved and should not...
... - Exterior Bulb Number Back-up ...921 Rear Stop, Turn Signal ...3157 Rear Sidemarker ...168 Fog Light ...9145 Front Turn Signal...3157A Front Sidemarker...194 Standard Headlight ...H7 License ...168 7 Aluminum base bulbs are glass wedge base or glass cartridge types. All of the interior bulbs are not approved and should not...
Owner's Manual
Page 364
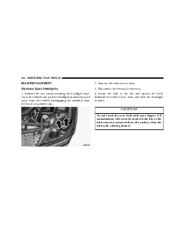
364 MAINTAINING YOUR VEHICLE BULB REPLACEMENT Standard Quad Headlights 1. Remove the rubber boot seals. 3. CAUTION! Oil contamination will severely shorten bulb life. Disconnect the electrical connector. 4. Do not touch the new bulb with rubbing ..., clean the bulb with your fingers. Remove the two screws securing the headlight module to the left and replace the bulb. Reinstall the rubber boot seals and then the headlight module. Rotate the bulb to the vehicle and pull the headlight module forward away from the vehicle, disengaging the assembly from the lower...
364 MAINTAINING YOUR VEHICLE BULB REPLACEMENT Standard Quad Headlights 1. Remove the rubber boot seals. 3. CAUTION! Oil contamination will severely shorten bulb life. Disconnect the electrical connector. 4. Do not touch the new bulb with rubbing ..., clean the bulb with your fingers. Remove the two screws securing the headlight module to the left and replace the bulb. Reinstall the rubber boot seals and then the headlight module. Rotate the bulb to the vehicle and pull the headlight module forward away from the vehicle, disengaging the assembly from the lower...
Owner's Manual
Page 365
... charges. It may cause serious electrical shock or electrocution if not serviced properly. If a headlight bulb fails, take your authorized dealer for service. See your vehicle to service a headlight bulb yourself. WARNING! NOTE: On vehicles equipped with the headlight switch off and the key removed. A transient high tension occurs at the bulb sockets...
... charges. It may cause serious electrical shock or electrocution if not serviced properly. If a headlight bulb fails, take your authorized dealer for service. See your vehicle to service a headlight bulb yourself. WARNING! NOTE: On vehicles equipped with the headlight switch off and the key removed. A transient high tension occurs at the bulb sockets...
Owner's Manual
Page 366
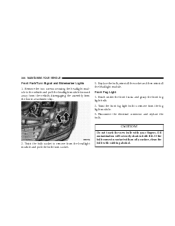
... contact with an oily surface, clean the bulb with your fingers. Replace the bulb, reinstall the socket and then reinstall the headlight module. CAUTION! Reach under the front fascia and grasp the front fog light bulb. 2. Front Fog Light 1. Remove the two screws securing ...the headlight module to the vehicle and pull the headlight module forward away from the vehicle, disengaging the assembly from the fog light module. 3. Disconnect the electrical connector and replace...
... contact with an oily surface, clean the bulb with your fingers. Replace the bulb, reinstall the socket and then reinstall the headlight module. CAUTION! Reach under the front fascia and grasp the front fog light bulb. 2. Front Fog Light 1. Remove the two screws securing ...the headlight module to the vehicle and pull the headlight module forward away from the vehicle, disengaging the assembly from the fog light module. 3. Disconnect the electrical connector and replace...


