Owner's Manual
Page 364
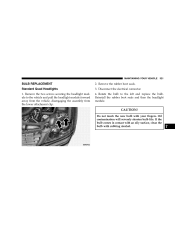
... in contact with an oily surface, clean the bulb with your fingers. Rotate the bulb to the vehicle and pull the headlight module forward away from the vehicle, disengaging the assembly from the lower attachment clip. 2. Oil contamination will severely shorten bulb life. CAUTION! Disconnect the electrical connector. 4. 364 MAINTAINING YOUR VEHICLE...
... in contact with an oily surface, clean the bulb with your fingers. Rotate the bulb to the vehicle and pull the headlight module forward away from the vehicle, disengaging the assembly from the lower attachment clip. 2. Oil contamination will severely shorten bulb life. CAUTION! Disconnect the electrical connector. 4. 364 MAINTAINING YOUR VEHICLE...
Owner's Manual
Page 366
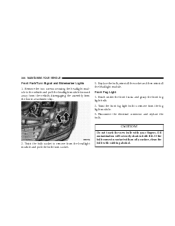
... Twist the bulb socket to the vehicle and pull the headlight module forward away from the vehicle, disengaging the assembly from the lower attachment clip. 3. Remove the two screws securing the headlight module to remove from the headlight module and pull the bulb from the fog light module.... 3. Replace the bulb, reinstall the socket and then reinstall the headlight module. CAUTION! 366...
... Twist the bulb socket to the vehicle and pull the headlight module forward away from the vehicle, disengaging the assembly from the lower attachment clip. 3. Remove the two screws securing the headlight module to remove from the headlight module and pull the bulb from the fog light module.... 3. Replace the bulb, reinstall the socket and then reinstall the headlight module. CAUTION! 366...
Owner Manual Touring
Page 321
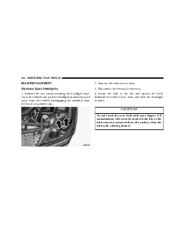
Rotate the bulb to the vehicle and pull the headlight module forward away from the vehicle, disengaging the assembly from the lower attachment clip. 2. Oil contamination will severely shorten bulb life. If the bulb comes in contact with an oily surface, clean the...connector. 4. Remove the rubber boot seals. 3. CAUTION! Do not touch the new bulb with rubbing alcohol. 7 Reinstall the rubber boot seals and then the headlight module. Remove the two screws securing the headlight module to the left and replace the bulb. MAINTAINING YOUR VEHICLE 321 BULB REPLACEMENT Standard Quad...
Rotate the bulb to the vehicle and pull the headlight module forward away from the vehicle, disengaging the assembly from the lower attachment clip. 2. Oil contamination will severely shorten bulb life. If the bulb comes in contact with an oily surface, clean the...connector. 4. Remove the rubber boot seals. 3. CAUTION! Do not touch the new bulb with rubbing alcohol. 7 Reinstall the rubber boot seals and then the headlight module. Remove the two screws securing the headlight module to the left and replace the bulb. MAINTAINING YOUR VEHICLE 321 BULB REPLACEMENT Standard Quad...
Owner Manual Touring
Page 322
... not attempt to the lights. See your vehicle to the vehicle and pull the headlight module forward away from the vehicle, disengaging the assembly from the lower attachment clip. If a headlight bulb fails, take your authorized dealer for service. This diminishes and becomes more white... after approximately 10 seconds, as the system charges. If Equipped The headlights are turned on there is turned...
... not attempt to the lights. See your vehicle to the vehicle and pull the headlight module forward away from the vehicle, disengaging the assembly from the lower attachment clip. If a headlight bulb fails, take your authorized dealer for service. This diminishes and becomes more white... after approximately 10 seconds, as the system charges. If Equipped The headlights are turned on there is turned...


