
Owner's Manual
Page 1
SECTION 1 2 3 4 5 6 7 8 9 10 TABLE OF CONTENTS PAGE INTRODUCTION ...3 THINGS TO KNOW BEFORE STARTING YOUR VEHICLE ...9 UNDERSTANDING THE FEATURES OF YOUR VEHICLE ...71 UNDERSTANDING YOUR INSTRUMENT PANEL ...159 STARTING AND OPERATING ...245 WHAT TO DO IN EMERGENCIES ...299 MAINTAINING YOUR VEHICLE ...317 MAINTENANCE SCHEDULES ...371 IF YOU NEED CONSUMER ASSISTANCE ...393 INDEX ...403 1 2 3 4 5 6 7 8 9 10
SECTION 1 2 3 4 5 6 7 8 9 10 TABLE OF CONTENTS PAGE INTRODUCTION ...3 THINGS TO KNOW BEFORE STARTING YOUR VEHICLE ...9 UNDERSTANDING THE FEATURES OF YOUR VEHICLE ...71 UNDERSTANDING YOUR INSTRUMENT PANEL ...159 STARTING AND OPERATING ...245 WHAT TO DO IN EMERGENCIES ...299 MAINTAINING YOUR VEHICLE ...317 MAINTENANCE SCHEDULES ...371 IF YOU NEED CONSUMER ASSISTANCE ...393 INDEX ...403 1 2 3 4 5 6 7 8 9 10
Owner's Manual
Page 12
... after the ignition switch has been turned off after 2 seconds of running if an invalid key is in the ignition. The system will cancel this feature. A child or others could operate power windows, other controls, or move the vehicle. Don't leave the keys in the ignition switch, a chime will remain active...
... after the ignition switch has been turned off after 2 seconds of running if an invalid key is in the ignition. The system will cancel this feature. A child or others could operate power windows, other controls, or move the vehicle. Don't leave the keys in the ignition switch, a chime will remain active...

Owner's Manual
Page 17
... or remote keyless entry transmitter. locks will sound if the key is enabled, 2. Use this switch to lock or unlock the doors. The Auto Lock feature is in gear, 3.
... or remote keyless entry transmitter. locks will sound if the key is enabled, 2. Use this switch to lock or unlock the doors. The Auto Lock feature is in gear, 3.
Owner's Manual
Page 18
.../OFF four times ending in the OFF position. (do not start the engine) 3. The Auto Unlock feature is 0 mph (0 km/h). The Automatic Door Locks can turn the feature back on by repeating the above mentioned procedure or by performing the following procedure: 1. Cycle the ignition ...switch ON/OFF four times ending in the Electronic Vehicle Information Center (EVIC), Customer Programmable Features section on vehicles with power door locks if: 1. 18 THINGS TO KNOW BEFORE STARTING YOUR VEHICLE 1. You can be enabled or ...
.../OFF four times ending in the OFF position. (do not start the engine) 3. The Auto Unlock feature is 0 mph (0 km/h). The Automatic Door Locks can turn the feature back on by repeating the above mentioned procedure or by performing the following procedure: 1. Cycle the ignition ...switch ON/OFF four times ending in the Electronic Vehicle Information Center (EVIC), Customer Programmable Features section on vehicles with power door locks if: 1. 18 THINGS TO KNOW BEFORE STARTING YOUR VEHICLE 1. You can be enabled or ...

Owner's Manual
Page 19
... environment for small children riding in a collision. NOTE: Use the Auto Door Locks and Auto Unlock features in the Electronic Vehicle Information Center (EVIC), Customer Programmable Features section or by performing the procedure in accordance with a child protection door lock system. 2 WARNING!... The Auto Unlock On Exit feature is enabled when your vehicle is shipped from the assembly plant...
... environment for small children riding in a collision. NOTE: Use the Auto Door Locks and Auto Unlock features in the Electronic Vehicle Information Center (EVIC), Customer Programmable Features section or by performing the procedure in accordance with a child protection door lock system. 2 WARNING!... The Auto Unlock On Exit feature is enabled when your vehicle is shipped from the assembly plant...
Owner's Manual
Page 21
... be reactivated by referring to the If desired, the "Sound Horn On Lock" feature can be turned on and off by repeating this procedure. Press the UNLOCK button for 4 to acknowledge the signal. To lock the doors and liftgate: ... 10 seconds. 2. THINGS TO KNOW BEFORE STARTING YOUR VEHICLE 21 NOTE: If desired, the "Remote Unlock Driver's Door 1st" feature can be turned on and off by referring to the Customer Programmable Features of the "Electronic Vehicle Information Center (EVIC)" section or by following these steps. 1. While the UNLOCK button is pressed...
... be reactivated by referring to the If desired, the "Sound Horn On Lock" feature can be turned on and off by repeating this procedure. Press the UNLOCK button for 4 to acknowledge the signal. To lock the doors and liftgate: ... 10 seconds. 2. THINGS TO KNOW BEFORE STARTING YOUR VEHICLE 21 NOTE: If desired, the "Remote Unlock Driver's Door 1st" feature can be turned on and off by referring to the Customer Programmable Features of the "Electronic Vehicle Information Center (EVIC)" section or by following these steps. 1. While the UNLOCK button is pressed...
Owner's Manual
Page 22
... locked and is being power closed, the liftgate will result in the liftgate becoming unlocked for 4 to the ON position. The "Sound Horn On Lock" feature can be closer to the vehicle due to the radio frequency noises of the "Electronic Vehicle Information Center (EVIC)" section or by repeating this procedure... full open /close the power liftgate. When the panic alarm is pressed (after 4 seconds), press the PANIC button. The liftgate will turn the panic alarm feature ON or OFF, press and hold the PANIC button on . 22 THINGS TO KNOW BEFORE STARTING YOUR VEHICLE Customer Programmable...
... locked and is being power closed, the liftgate will result in the liftgate becoming unlocked for 4 to the ON position. The "Sound Horn On Lock" feature can be closer to the vehicle due to the radio frequency noises of the "Electronic Vehicle Information Center (EVIC)" section or by repeating this procedure... full open /close the power liftgate. When the panic alarm is pressed (after 4 seconds), press the PANIC button. The liftgate will turn the panic alarm feature ON or OFF, press and hold the PANIC button on . 22 THINGS TO KNOW BEFORE STARTING YOUR VEHICLE Customer Programmable...

Owner's Manual
Page 23
... liftgate area. While the LOCK button is closed. The table below explains the Lamp Flash options. The "Flash Lights On Lock/Unlock" feature can be reactivated by referring to 10 seconds. 2. THINGS TO KNOW BEFORE STARTING YOUR VEHICLE 23 to the following these steps. 1. Press... the LOCK button for 4 to the Customer Programmable Features of Industry Canada. The liftgate will re-lock automatically within 10 seconds once the liftgate is pressed, (after 4 seconds) press the UNLOCK button...
... liftgate area. While the LOCK button is closed. The table below explains the Lamp Flash options. The "Flash Lights On Lock/Unlock" feature can be reactivated by referring to 10 seconds. 2. THINGS TO KNOW BEFORE STARTING YOUR VEHICLE 23 to the following these steps. 1. Press... the LOCK button for 4 to the Customer Programmable Features of Industry Canada. The liftgate will re-lock automatically within 10 seconds once the liftgate is pressed, (after 4 seconds) press the UNLOCK button...

Owner's Manual
Page 31
... operate only when the ignition switch is pressed the window controls on the passenger doors will not illuminate and the passenger windows will cancel this feature. Power Window Switches 2 There are single window controls on the passenger doors. The power window switches remain active for up to disable the window .... The window lock switch on the driver's door allows you want the window to the second detent, release, and the window will go down feature. To open the window part way, press the window switch to the first detent and release it when you to 45 seconds after the ignition...
... operate only when the ignition switch is pressed the window controls on the passenger doors will not illuminate and the passenger windows will cancel this feature. Power Window Switches 2 There are single window controls on the passenger doors. The power window switches remain active for up to disable the window .... The window lock switch on the driver's door allows you want the window to the second detent, release, and the window will go down feature. To open the window part way, press the window switch to the first detent and release it when you to 45 seconds after the ignition...

Owner's Manual
Page 32
...windows open, open positions. If you will be a Passenger Airbag Disabled (PAD) Indicator Light located on the center of the most important safety features in certain open or partially open the front and rear windows together to a window and a driver inflatable knee blocker. Passenger Airbag Disabled Light ... the Occupant Classification System (OCS) there will be carrying children too small for adult-size seat belts, your seat belts or the LATCH feature (refer to the Child Restraint section in this manual), can be used to hold infant and child restraint systems. If your vehicle are...
...windows open, open positions. If you will be a Passenger Airbag Disabled (PAD) Indicator Light located on the center of the most important safety features in certain open or partially open the front and rear windows together to a window and a driver inflatable knee blocker. Passenger Airbag Disabled Light ... the Occupant Classification System (OCS) there will be carrying children too small for adult-size seat belts, your seat belts or the LATCH feature (refer to the Child Restraint section in this manual), can be used to hold infant and child restraint systems. If your vehicle are...

Owner's Manual
Page 33
... happen far away from the vehicle. In a collision, you and your own street. Please pay close attention to move freely with Lap/ Shoulder Belts. This feature allows the shoulder part of the vehicle. Buckle up . This can reduce the seriousness of injuries in your vehicle or other passengers, or you under...
... happen far away from the vehicle. In a collision, you and your own street. Please pay close attention to move freely with Lap/ Shoulder Belts. This feature allows the shoulder part of the vehicle. Buckle up . This can reduce the seriousness of injuries in your vehicle or other passengers, or you under...
Owner's Manual
Page 65
... with the seat belt or remove it in the vehicle. Child restraints having attachments for those anchorages will continue to the seatback tether anchorage have features for adjusting the tension in the strap. In general, you push the child restraint rearward and downward into the seat according to the lower anchorages...
... with the seat belt or remove it in the vehicle. Child restraints having attachments for those anchorages will continue to the seatback tether anchorage have features for adjusting the tension in the strap. In general, you push the child restraint rearward and downward into the seat according to the lower anchorages...
Owner's Manual
Page 71
...▫ Automatic Dimming Mirror - If Equipped ...76 ▫ Driver's Side Outside Mirror Auto Dimmer - If Equipped ...76 ▫ Exterior Mirrors Folding Feature ...76 ▫ Outside Mirror - Driver's Side ...77 ▫ Outside Mirror - Passenger's Side ...77 ▫ Power Remote-Control Mirrors ...78 ... ...78 Hands-Free Communication (UConnect™) - If Equipped ...79 ▫ Operation ...81 ▫ Phone Call Features ...87 ▫ UConnect™ System Features ...90 ▫ Advanced Phone Connectivity ...94 ▫ Things You Should Know About Your UConnect™ System ...96 3
...▫ Automatic Dimming Mirror - If Equipped ...76 ▫ Driver's Side Outside Mirror Auto Dimmer - If Equipped ...76 ▫ Exterior Mirrors Folding Feature ...76 ▫ Outside Mirror - Driver's Side ...77 ▫ Outside Mirror - Passenger's Side ...77 ▫ Power Remote-Control Mirrors ...78 ... ...78 Hands-Free Communication (UConnect™) - If Equipped ...79 ▫ Operation ...81 ▫ Phone Call Features ...87 ▫ UConnect™ System Features ...90 ▫ Advanced Phone Connectivity ...94 ▫ Things You Should Know About Your UConnect™ System ...96 3

Owner's Manual
Page 72
72 UNDERSTANDING THE FEATURES OF YOUR VEHICLE Seats ...102 ▫ 10-Way Driver's Power Seat - If Equipped . . 102 ▫ 8-Way Driver's Power Seat - If Equipped ...103 ▫ 4-Way Passenger's ...
72 UNDERSTANDING THE FEATURES OF YOUR VEHICLE Seats ...102 ▫ 10-Way Driver's Power Seat - If Equipped . . 102 ▫ 8-Way Driver's Power Seat - If Equipped ...103 ▫ 4-Way Passenger's ...
Owner's Manual
Page 73
... ▫ Turn Signals ...125 ▫ Highbeam/Lowbeam Select Switch ...125 ▫ Passing Light ...125 Windshield Wipers And Washers ...126 ▫ Windshield Washers ...126 ▫ Mist Feature ...126 ▫ Windshield Wiper Operation ...127 ▫ Intermittent Wiper System ...127 ▫ Rear Window Wiper/Washer ...127 Tilt Steering Column ...129 Traction Control Switch - If...
... ▫ Turn Signals ...125 ▫ Highbeam/Lowbeam Select Switch ...125 ▫ Passing Light ...125 Windshield Wipers And Washers ...126 ▫ Windshield Washers ...126 ▫ Mist Feature ...126 ▫ Windshield Wiper Operation ...127 ▫ Intermittent Wiper System ...127 ▫ Rear Window Wiper/Washer ...127 Tilt Steering Column ...129 Traction Control Switch - If...
Owner's Manual
Page 74
... Buttons ...144 ▫ Reprogramming a Single Homelink Button ...144 ▫ Security ...145 Power Sunroof - If Equipped ...145 ▫ Express Open Feature ...146 ▫ Wind Buffeting ...148 ▫ Sunroof Maintenance ...148 Electrical Power Outlets ...148 ▫ Electrical Outlet Use With Engine Off ...150...Cupholders ...150 ▫ Second Row Seat Cupholders ...151 ▫ Third Row Seat Cupholders - If Equipped ...151 Storage ...151 ▫ Console Features ...151 ▫ Rear Cargo Storage Bin - If Equipped ...152 ▫ Retractable Cargo Area Cover - If Equipped . 152 ▫ Cargo...
... Buttons ...144 ▫ Reprogramming a Single Homelink Button ...144 ▫ Security ...145 Power Sunroof - If Equipped ...145 ▫ Express Open Feature ...146 ▫ Wind Buffeting ...148 ▫ Sunroof Maintenance ...148 Electrical Power Outlets ...148 ▫ Electrical Outlet Use With Engine Off ...150...Cupholders ...150 ▫ Second Row Seat Cupholders ...151 ▫ Third Row Seat Cupholders - If Equipped ...151 Storage ...151 ▫ Console Features ...151 ▫ Rear Cargo Storage Bin - If Equipped ...152 ▫ Retractable Cargo Area Cover - If Equipped . 152 ▫ Cargo...
Owner's Manual
Page 75
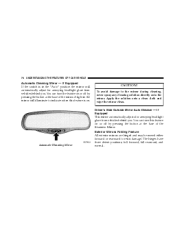
The mirror should be reduced by moving the small control under the mirror to center on the view through the rear window. A two point pivot system allows for horizontal and vertical adjustment of vehicle). Annoying headlight glare can be adjusted while set in the day position (toward rear of the mirror. UNDERSTANDING THE FEATURES OF YOUR VEHICLE 75 MIRRORS Inside Day/Night Mirror Adjust the mirror to the night position (toward windshield). 3 Adjusting Rear View Mirror
The mirror should be reduced by moving the small control under the mirror to center on the view through the rear window. A two point pivot system allows for horizontal and vertical adjustment of vehicle). Annoying headlight glare can be adjusted while set in the day position (toward rear of the mirror. UNDERSTANDING THE FEATURES OF YOUR VEHICLE 75 MIRRORS Inside Day/Night Mirror Adjust the mirror to the night position (toward windshield). 3 Adjusting Rear View Mirror
Owner's Manual
Page 76
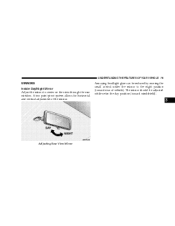
... Apply the solution onto a clean cloth and wipe the mirror clean. full forward, full rearward, and normal. Exterior Mirrors Folding Feature All exterior mirrors are hinged and may be moved either forward or rearward to the mirror during cleaning, never spray any cleaning solution... directly onto the mirror. The hinges have three detent positions; You can turn this feature is in the mirror will automatically adjust for annoying headlight glare from vehicles behind you . To avoid damage to resist damage. Automatic...
... Apply the solution onto a clean cloth and wipe the mirror clean. full forward, full rearward, and normal. Exterior Mirrors Folding Feature All exterior mirrors are hinged and may be moved either forward or rearward to the mirror during cleaning, never spray any cleaning solution... directly onto the mirror. The hinges have three detent positions; You can turn this feature is in the mirror will automatically adjust for annoying headlight glare from vehicles behind you . To avoid damage to resist damage. Automatic...
Owner's Manual
Page 77
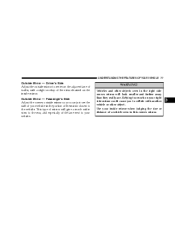
... side convex mirror will give a much on the inside mirror when judging the size or distance of the mirror closest to the vehicle. UNDERSTANDING THE FEATURES OF YOUR VEHICLE 77 Outside Mirror - Driver's Side Adjust the outside mirror so you to collide with another vehicle or other objects seen in this...
... side convex mirror will give a much on the inside mirror when judging the size or distance of the mirror closest to the vehicle. UNDERSTANDING THE FEATURES OF YOUR VEHICLE 77 Outside Mirror - Driver's Side Adjust the outside mirror so you to collide with another vehicle or other objects seen in this...

Owner's Manual
Page 78
...Right mirror selection. Illuminated Vanity Mirrors An illuminated vanity mirror is activated whenever you want the mirror to melt frost or ice. This feature is on the Rear Window Defrost. To use the mirror, rotate the sun visor down and swing the mirror cover upward. Power ...mirror preselected positions can be controlled by the optional Memory Seat Feature. Power Mirror Switches Use the center off the lights. Refer to guard against accidentally moving a mirror position. Heated Remote Control Mirrors These...
...Right mirror selection. Illuminated Vanity Mirrors An illuminated vanity mirror is activated whenever you want the mirror to melt frost or ice. This feature is on the Rear Window Defrost. To use the mirror, rotate the sun visor down and swing the mirror cover upward. Power ...mirror preselected positions can be controlled by the optional Memory Seat Feature. Power Mirror Switches Use the center off the lights. Refer to guard against accidentally moving a mirror position. Heated Remote Control Mirrors These...

